Section 1.3
Cylinder Block
The cylinder block has integrated oil and water channels.
Section 1.3.1
Cylinder Liner Removal
Remove the cylinder liner as follows:
- Remove the piston. Refer to "1.18.1 Piston Removal"
.

1. Cylinder Block
2. Cylinder Liner
Figure 1. Mark the Cylinder Liner
- Using a paint pen, mark the position of the liner in the cylinder block. Mark both the liner and the block. Then make another set of marks 90 degrees from the first set, in a clockwise direction. See Figure
"Mark the Cylinder Liner"
.
Note: If the same cylinder liner is used again, it must be installed at an offset of 90 degrees from its last position. This reference will not be needed if the cylinder liner is being replaced.
NOTICE:
To prevent damage, never use a hammer or other unsuitable device to remove the cylinder liner.
- Remove the cylinder liner using the cylinder liner removal tool, (J–45876).
See Figure
"Cylinder Liner Removal Tool J-45876"
.
- Clean and wipe out the inside of the cylinder liner of any oil or coolant .
- Install the cylinder liner removal tool in the cylinder liner to be removed with bridge resting on deck of cylinder block and lip of tool resting on the top of the cylinder liner. See Figure "Cylinder Liner Removal Tool J-45876" .
- Tighten the lower nut to expand the tool in the cylinder liner.See Figure "Cylinder Liner Removal Tool J-45876" .
- Tighten the upper nut on the tool until the cylinder liner is pulled from the cylinder block. Remove the cylinder liner and tool. See Figure "Cylinder Liner Removal Tool J-45876" .
- Remove the tool from the liner.

1. Lower Nut
2. Resting Bridge
3. Upper Nut
Figure 2. Cylinder Liner Removal Tool J-45876
- Remove the shim from the block counterbore.See Figure
"Cylinder Liner Collar Seat"
.

1. Collar Seat Insert (shim)
4. Liner Seat D-Ring
2. Cylinder Block
A. Specified in Measuring Cylinder Liner Protrusion Table
3. Cylinder Liner
Figure 3. Cylinder Liner Collar Seat
- Remove and discard the two O-rings from the block. See Figure
"Cylinder Liner O-rings"
.

1. Collar Seat Insert (shim)
5. Upper O-ring
2. Block
6. Lower O-ring
3. Cylinder Liner
A. Specified in Measuring Cylinder Liner Protrusion Table
4. Liner D-Ring
Figure 4. Cylinder Liner O-rings
- Clean the cylinder block sealing areas and inspect for corrosion.
- Check the condition of the cylinder liner collar seat. Ensure that the depth of the collar seat is within the specifications listed in Table
"Cylinder Liner Installation Tolerances"
.
Description
Dimensions: mm (in.)
Cylinder Liner Protrusion, From Block, see Figure "Cylinder Liner Collar Seat" , Ref. A.
0.230–0.330 (0.0090–0.0130)
Height of the Cylinder Liner Collar, see Figure "Cylinder Liner Collar Seat"
10.10–10.12 (0.3976–0.3984)
Depth of the Collar Seat, see Figure "Cylinder Liner Collar Seat"
9.950–10.010 (0.3917–0.3941)
Thickness of the Seat Insert
0.14–0.16 (0.0055–0.0063)
Table 6. Cylinder Liner Installation Tolerances - Check the condition of the liner collar seat. Make sure that the depth of the collar seat is within the specifications given, listed in Table
"Cylinder Liner Inspection Tolerances"
.
Description
Dimensions: mm (in.)
Admissible Out-of-Round of the Cylinder Liner, where it contacts the O-rings
Max.: 0.02 (0.0008)
Admissible Deformation of the Cylinder Liner Collar, at the Contact Surface with the Seat Insert
Max.: 0.02 (0.0008)
Admissible Deformation of the Cylinder Liner Collar Seat, at the Contact Surface with the Seat Insert
Max.: 0.03 (0.0012)
Table 7. Cylinder Liner Inspection Tolerances
Section 1.3.1.1
Cylinder Liner Bore Inspection and Measurement
Inspection
Inspect the cylinder liner bore as follows:
- Check the wall of the cylinder liner for signs of excessive wear or deformation.
- ·heck the honing pattern on the cylinder liner for damage caused by penetration of dirt into the cylinder. If the honing pattern is faded or no longer visible, discard the cylinder liner. See Figure
"Intact Honing Pattern"
for an intact honing pattern and see Figure
"Faded Honing Pattern"
for a faded honing pattern.
Note: Minor fading of the honing pattern at the top ring inversion area is not sufficient cause to reject the liner.
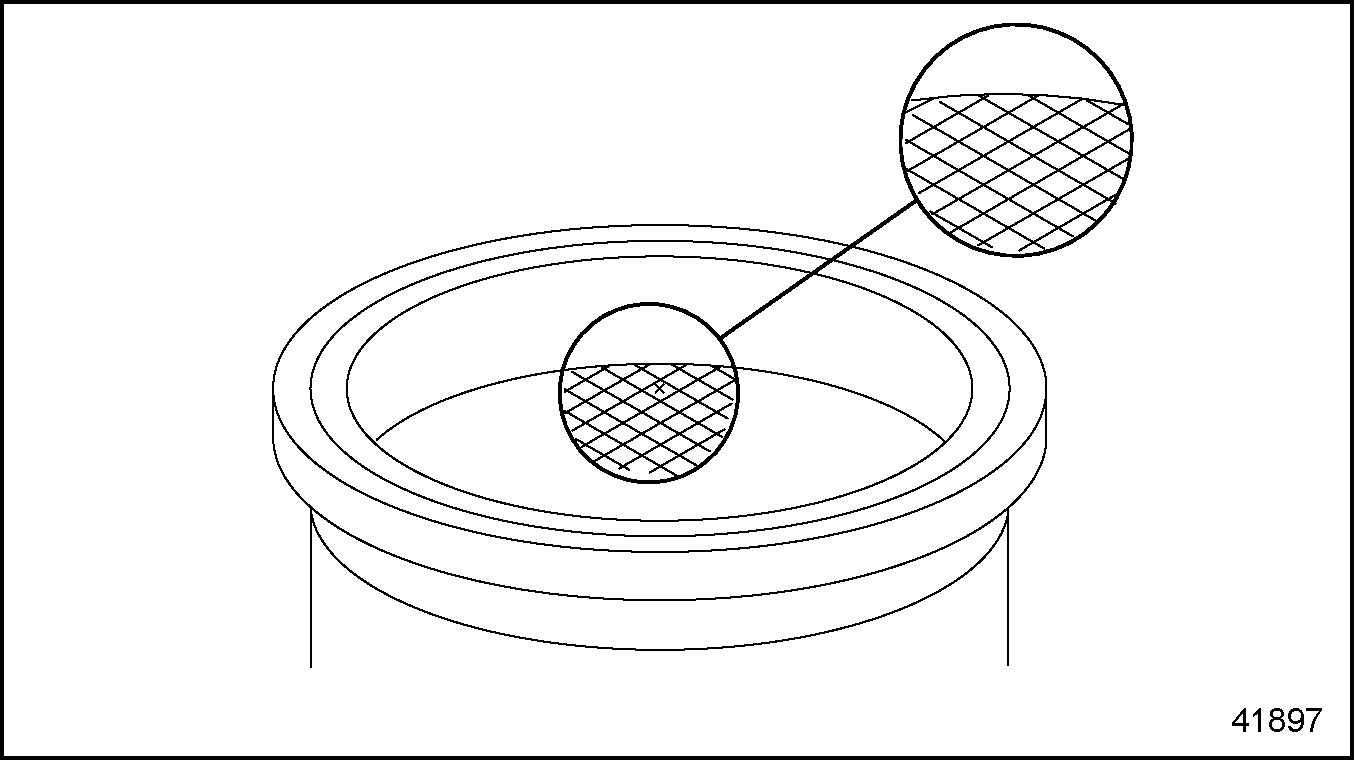
Figure 5. Intact Honing Pattern

Figure 6. Faded Honing Pattern
- Do an external visual check of the cylinder liner for signs of cavitation and corrosion. Discard the liner if any damage is noted.
Measurement
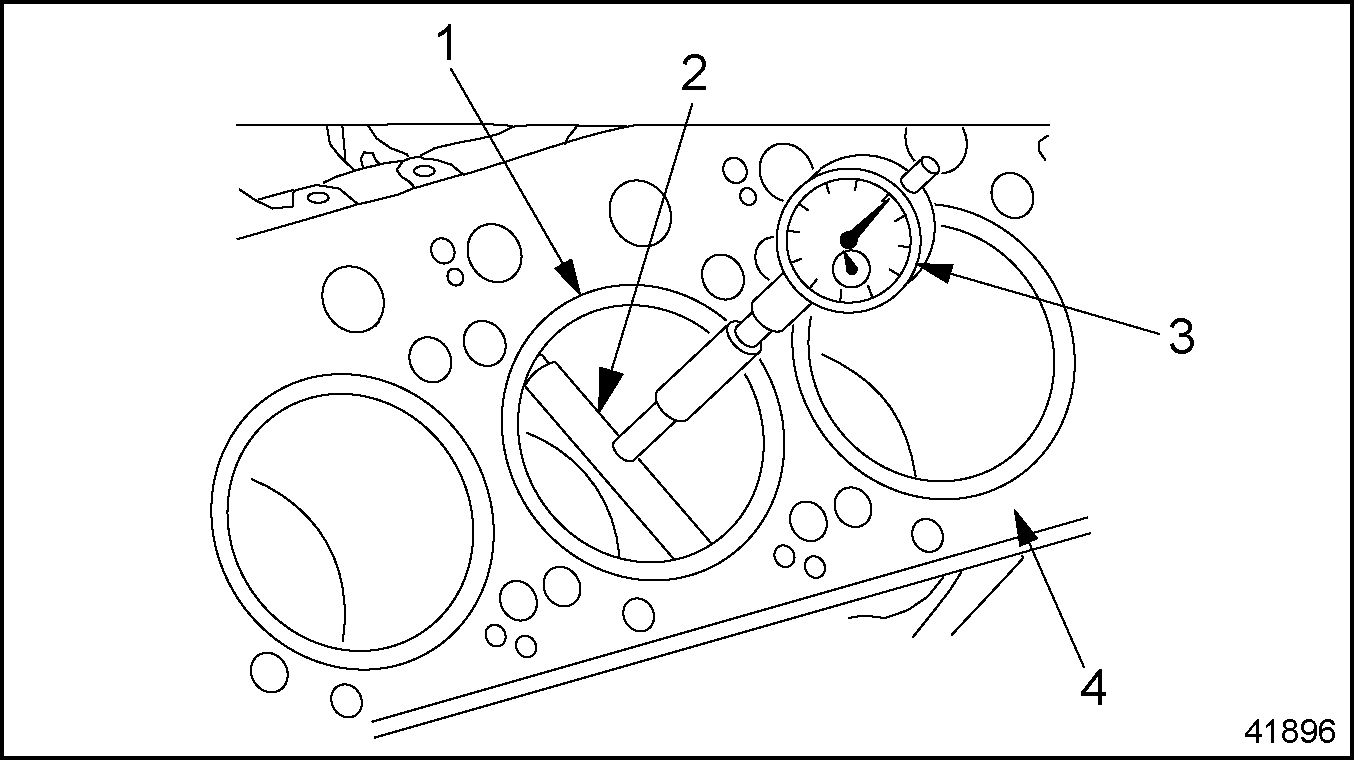
- Set the dial gauge and quick calipers with a dial caliper to the inside diameter of the cylinder liner. Preload the dial gauge to 5 mm (0.20 in.). See Figure
"Setting the Dial Gauge"
for set-up and listed in Table
"Cylinder Liner Measurements"
are specifications.
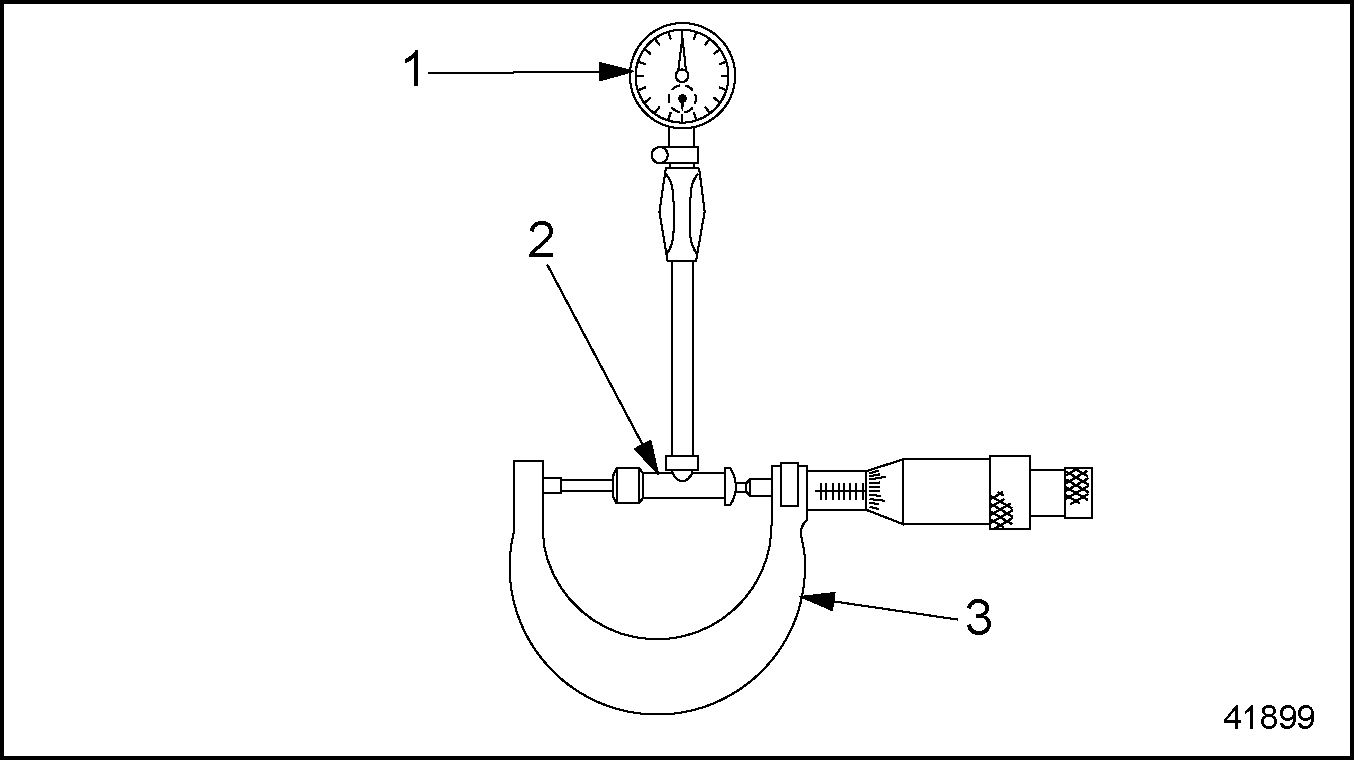
1. Dial Gauge
2. Quick Calipers (for internal measurements)
3. Dial Caliper
Figure 7. Setting the Dial Gauge
Where To Measure
What To Measure
Value: mm (in.)
Measuring Point 1: At the area of the O-rings
Inside Diameter of the Cylinder Liner, A Class
127.990–127.995 (5.0390–5.0392)
Measuring Point 1: At the area of the O-rings
Inside Diameter of the Cylinder Liner, B Class
127.995–128.005 (5.0392–5.0396)
Measuring Point 1: At the area of the O-rings
Inside Diameter of the Cylinder Liner, C Class
128.005–128.010 (5.0396–5.0398)
Measuring Point 2: Upper Reversal Point of the First Piston Ring
Max. Wear to Cylinder Liner, Measured Along Axis A and Axis B
0.08 (0.003)
At Measuring Point 2, Compare Axis A to Axis B
Admissible Wear Out
Max.: 0.08 (0.003)
Table 9. Cylinder Liner MeasurementsNote: This measurement serves as a baseline against which to measure the actual wear.
- Measure the inside diameter of the cylinder liner at measuring point 1: near the O-ring area. See Figure
"Measuring the Inside Diameter"
.

Figure 8. Measuring the Inside Diameter
- Make the first measurement along the fore-to-aft axis.
- Make the second measurement 90 degrees away, along the side-to-side axis.
- When finished, set the dial gauge to zero.
- Measure the wear on the inside diameter of the liner at measuring point 2: the upper reversal point of the first piston ring. Measure the cylinder liner in both directions: fore-to-aft and side-to-side. See Figure
"Measuring Points"
. The specifications are listed in Table
"Cylinder Liner Measurements"
.

1. Cylinder Liner
2. Measuring Point 2 (upper reversal point of the first piston ring)
Figure 9. Measuring Points
- Make the first measurement along the fore-to-aft axis (axis A).
- Make the second measurement 90 degrees away, along the side-to-side axis (axis B).
- If there is more than 0.08 mm (0.003 in.) of wear, replace the cylinder liner.
- Check the cylinder liner for out-of-round. If the two measurements vary by more than 0.010 mm (0.0004 in.), replace the cylinder liner.
- Replace the cylinder liner, if required. Refer to "1.3.1 Cylinder Liner Removal" .
Section 1.3.1.2
Measurement of Cylinder Liner Protrusion
Measurement steps are as follows:
- Clean the contact surfaces of the cylinder block, the cylinder liner, and the measuring plate.
Note: Correct cylinder liner protrusion is necessary to obtain a perfect seal when the head gasket is compressed by the cylinder head.
- Install the liner and shim into the block without the seals.
- Install the measuring plate (J–46180)
on the cylinder block and cylinder liner. Fasten the measuring plate to the block by inserting the cylinder head bolts into the spacers and then threading them into the holes in the cylinder block. See Figure
"Measuring Plate Installation"
.
1. Cylinder Head Bolts
Figure 10. Measuring Plate Installation
- Tighten the cylinder head bolts 50 N·m (37 lb·ft).
- Install the dial gauge so that the feeler on the dial gauge extends into the slot in the measuring plate. The feeler must touch the contact surface of the cylinder block with some preload. Support the dial gauge. See Figure
"Dial Gauge Installation"
.

1. Dial Gauge
3. Feeler
2. Slot (4 qty.)
Figure 11. Dial Gauge Installation
- Measure the cylinder liner protrusion from the block in four places, once at each slot in the measuring plate. See Figure
"Measuring Protrusion"
. The acceptance/rejection criteria is listed in Table
"Specifications for Measuring Cylinder Liner Protrusion"
.
1. Collar Seat Insert (shim)
4. Liner Seat D-Ring
2. Cylinder Block
A. Specified in Measuring Cylinder Liner Protrusion Table
3. Cylinder Liner
Figure 12. Measuring Protrusion
Description
Value: mm (in.)
Cylinder Liner Protrusion From Block
0.230–0.330 (0.0090–0.0130)
Difference Between the Four Measuring Points
Max.: 0.02 (0.0007)
Table 14. Specifications for Measuring Cylinder Liner Protrusion- Set the scale on the dial gauge to zero.
- Move the dial gauge until the feeler touches the cylinder liner collar. Record the reading on the dial gauge.
- Move the dial gauge and support to the next slot, and repeat the measurement process, until four measurements have been made, one at each slot. Record each measurement.
- Check each measurement. If any one measurement records protrusion of less than 0.230 mm (0.0090 in.), or more than 0.330 mm (0.0130 in.), remove the cylinder liner and check it according to the procedures that refer to "1.3.3 Installation of Cylinder Liner"
.
Note: There are three different cylinder liner shim thicknesses that are available, 0.15mm, 0.30mm and 0.50mm.
- Compare the four measurements. If any measurement differs from any one of the others by more than 0.02 mm (0.0008 in.), replace the cylinder liner and repeat steps “a” through “e”. If the cylinder liner measurements are within specification continue to step 7 .
- Remove the bolts, spacers and measuring plate as installed.
Section 1.3.1.3
Fuel System Leak Test
Perform the following procedure to ensure that the fuel gallery is properly sealed and does not leak.
Note: This procedure can be performed with the engine installed or removed from the vehicle.
|
FIRE |
|
To avoid injury from fire, keep all potential ignition sources away from diesel fuel, including open flames, sparks, and electrical resistance heating elements. Do not smoke when refueling. |
- Drain all fuel from engine.
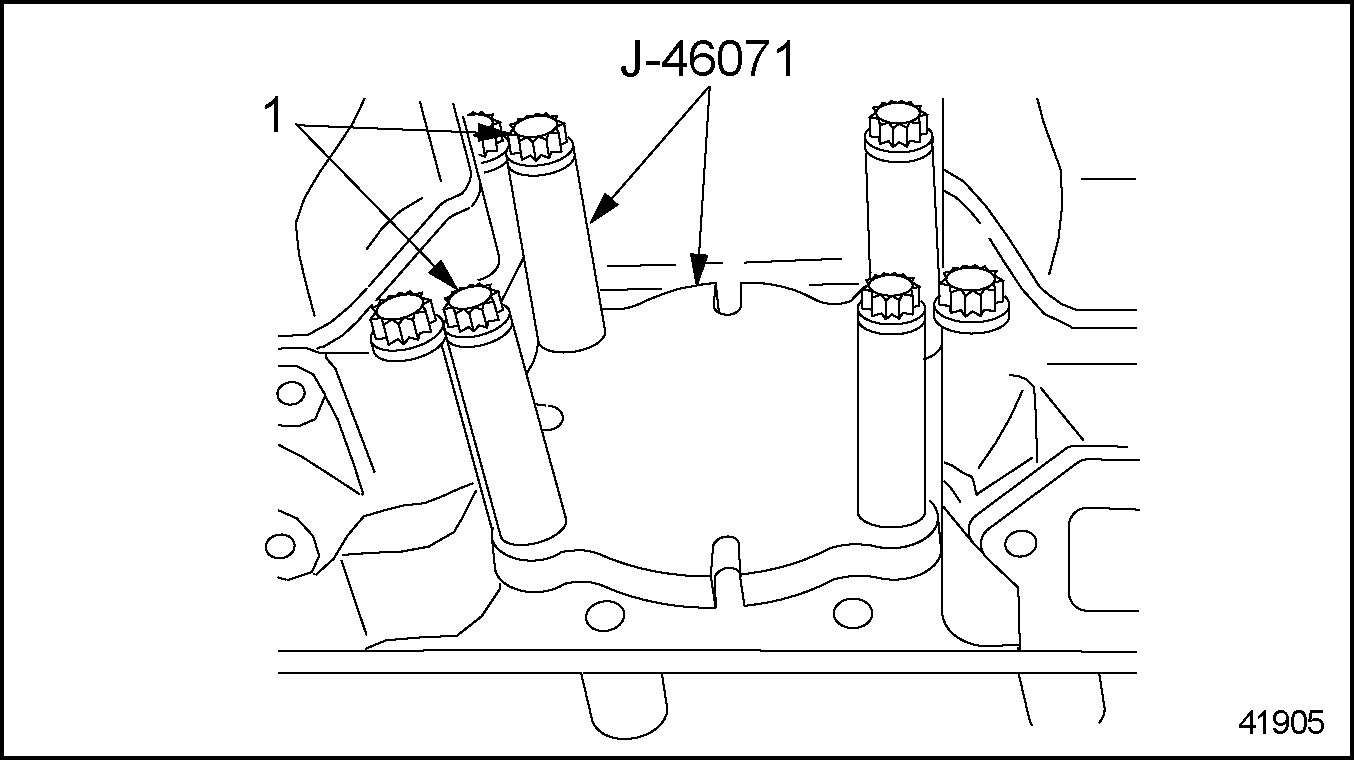
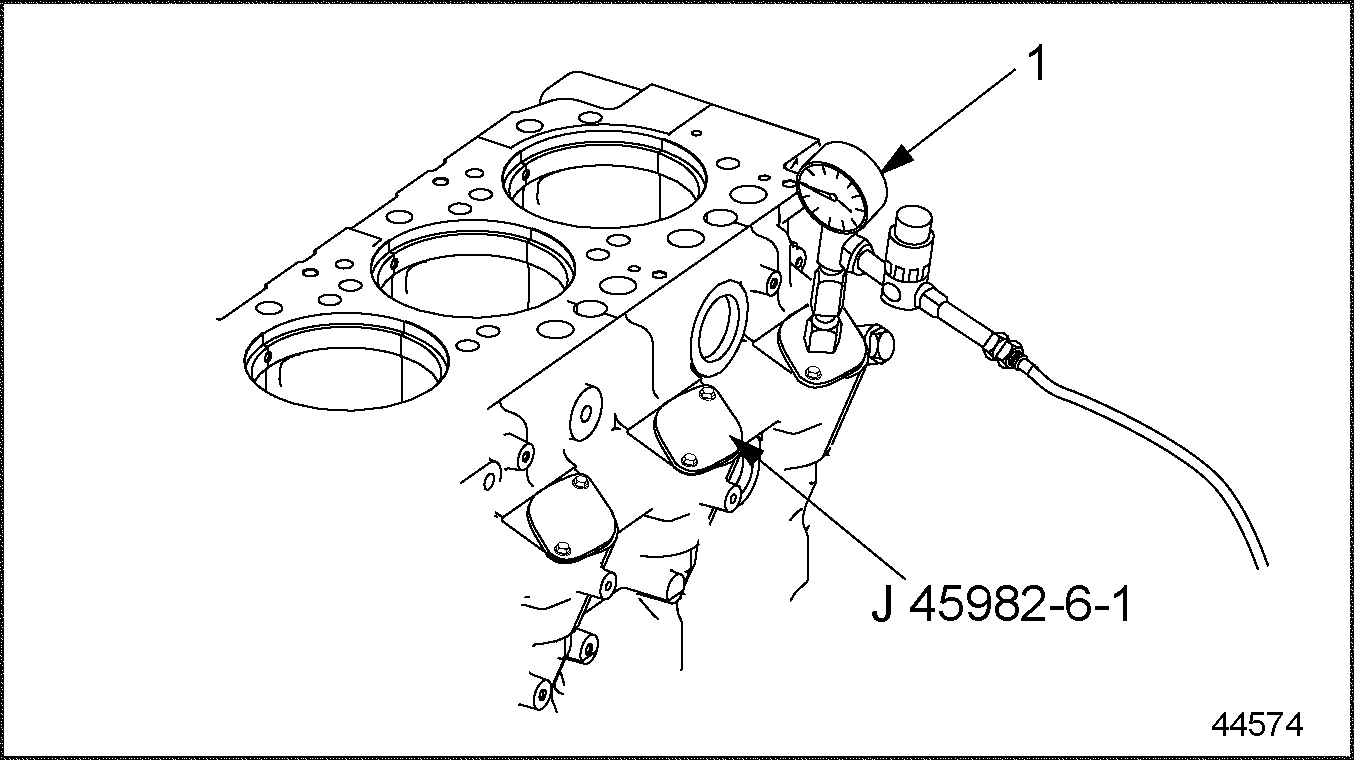
- Remove all six electronic unit pumps from the engine block.
- Install all six dummy unit pumps (J–45982-6-1)
, from the Head and Block Leak Tester Tool Kit (J–45982)
. See Figure
"Installing Dummy Injector Unit Pumps"
.
1. Fuel Gallery Inlet Plug
2. Pressure Gauge Fitting
3. Fuel Gallery Outlet Plug
Figure 13. Installing Dummy Injector Unit Pumps
Note: One of the dummy unit pumps has a fitting for pressure gauge installation and it must be installed at the easiest position for gauge installation.
- Block the fuel gallery inlet and outlet with special plugs from kit (J–45982) . See Figure "Installing Dummy Injector Unit Pumps" .
- Install the pressure gauge assembly J-45982–7 (pressure gauge, pressure regulator, and shut off valve) from kit (J–45982) . See Figure "Installing Pressure Gauge Assembly to Dummy Unit Pump" .
- Connect a compressed air supply to the pressure gauge assembly.
1. Pressure Gauge J-45982–7 on Dummy Unit Pump
Figure 14. Installing Pressure Gauge Assembly to Dummy Unit Pump

EYE INJURY
To avoid injury from flying debris when using compressed air, wear adequate eye protection (face shield or safety goggles) and do not exceed 276 kPa (40 psi) air pressure.
- Pressurize the system with 200 kPa (29 psi). Use the pressure regulator to set the pressure.
- Check for leaks around the dummy unit pumps and inlet/outlet plugs using a soap solution. Repair any leaks.
- Close the shut off valve.
- Watch the pressure for 30 seconds. If the pressure holds at 200 kPa (29 psi), the fuel gallery is properly sealing. In case of a pressure drop, the engine block should not be reused.
|
EYE INJURY |
|
To avoid injury from flying debris when using compressed air, wear adequate eye protection (face shield or safety goggles) and do not exceed 276 kPa (40 psi) air pressure. |
Section 1.3.1.4
Cylinder Block Leak Test
Perform the following steps to conduct a cylinder block leak test to see if the engine block is leaking coolant.
Note: This procedure can only be performed with the engine removed from the vehicle and using only the engine block with the liners installed.
- Place the engine block with installed liners on the engine stand.
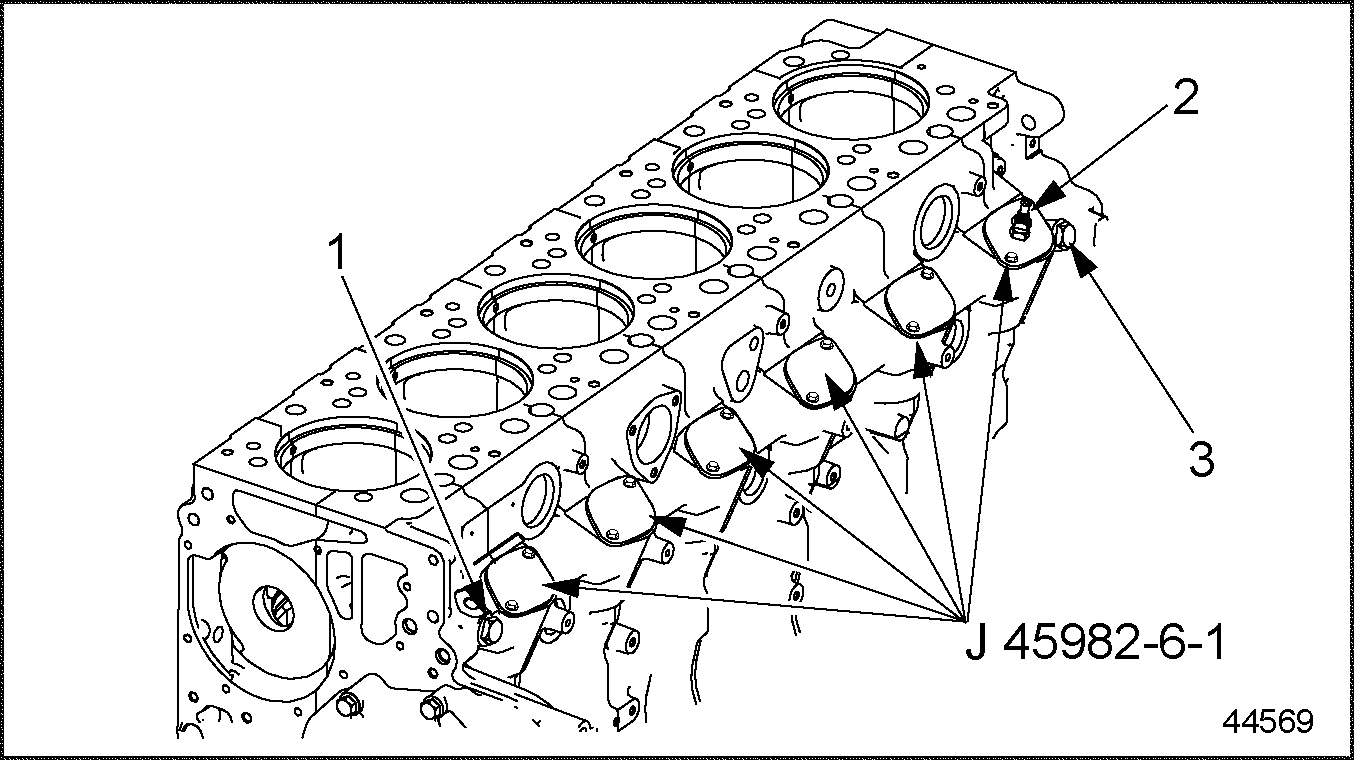
- Install all six top block cover plates (J–45982-1)
from the Head and Block Leak Test kit (J–45982)
using the special bolts supplied. See Figure
"Installing Block Cover Plates"
.
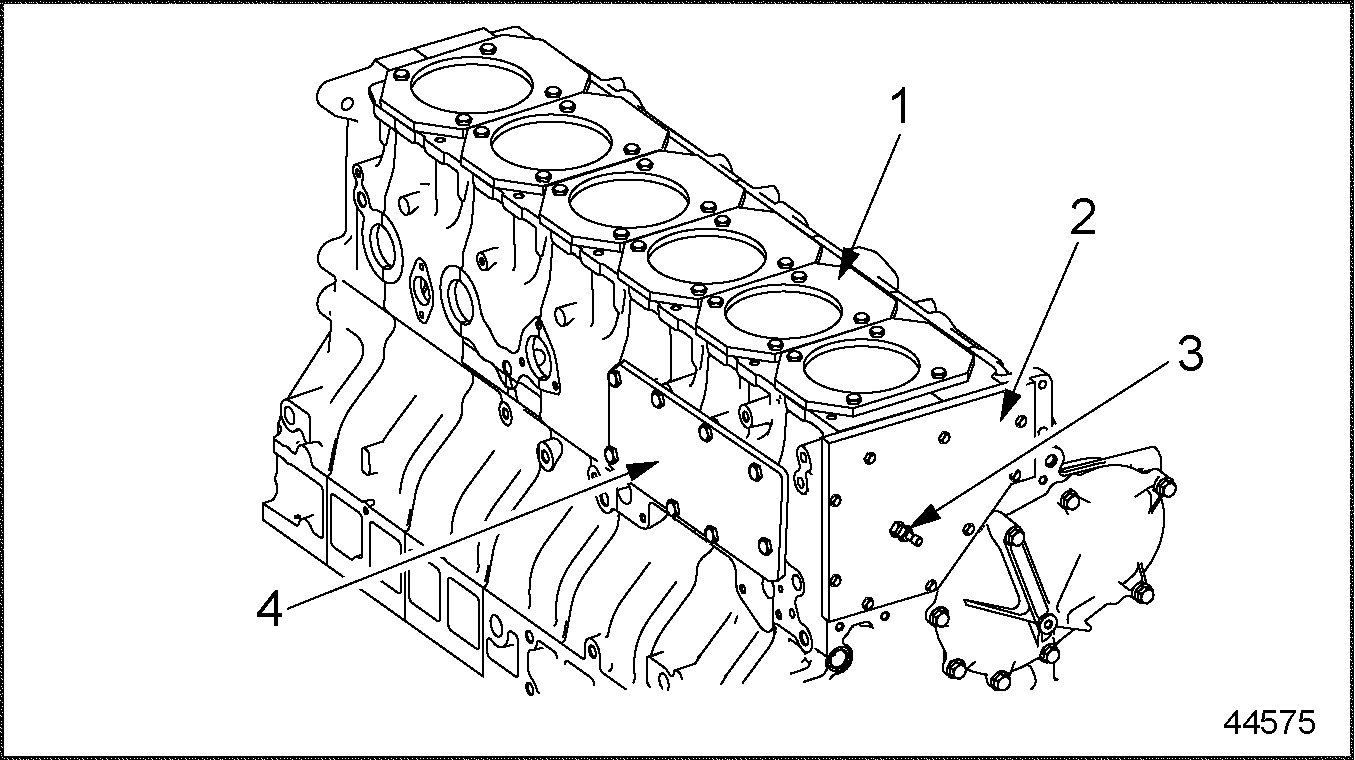
1. Block Cover Plates (6) - part of kit J–45982
3. Pressure Gauge Fitting
2. Water Pump Cover Plate - part of kit J–45982
4. Oil Cooler/Filter Housing Cover Plate - part of kit J–45982
Figure 15. Installing Block Cover Plates
- Install the oil cooler/filter housing cover plate, from the kit, on the right hand side of the engine block using supplied hardware. See Figure "Installing Block Cover Plates" .
- Install the water pump cover plate, from the kit, on the front of the engine using supplied hardware. See Figure
"Installing Block Cover Plates"
.
Note: The water pump cover plate has a fitting for installing the supplied pressure gauge.
- Block the air compressor coolant inlet and outlet from the engine block with the special plugs and copper washers as supplied in the leak test kit (J–45982).
See Figure
"Blocking Air Compressor Inlet/Outlet from Engine Block"
.

1. Coolant Line to Air Compressor
2. Air Compressor Outlet location from Engine Block
Figure 16. Blocking Air Compressor Inlet/Outlet from Engine Block
- Install the pressure gauge assembly J-45982–7 (pressure gauge, pressure regulator, and shut off valve) from kit (J–45982).
See Figure
"Installing Pressure Gauge Assembly"
.
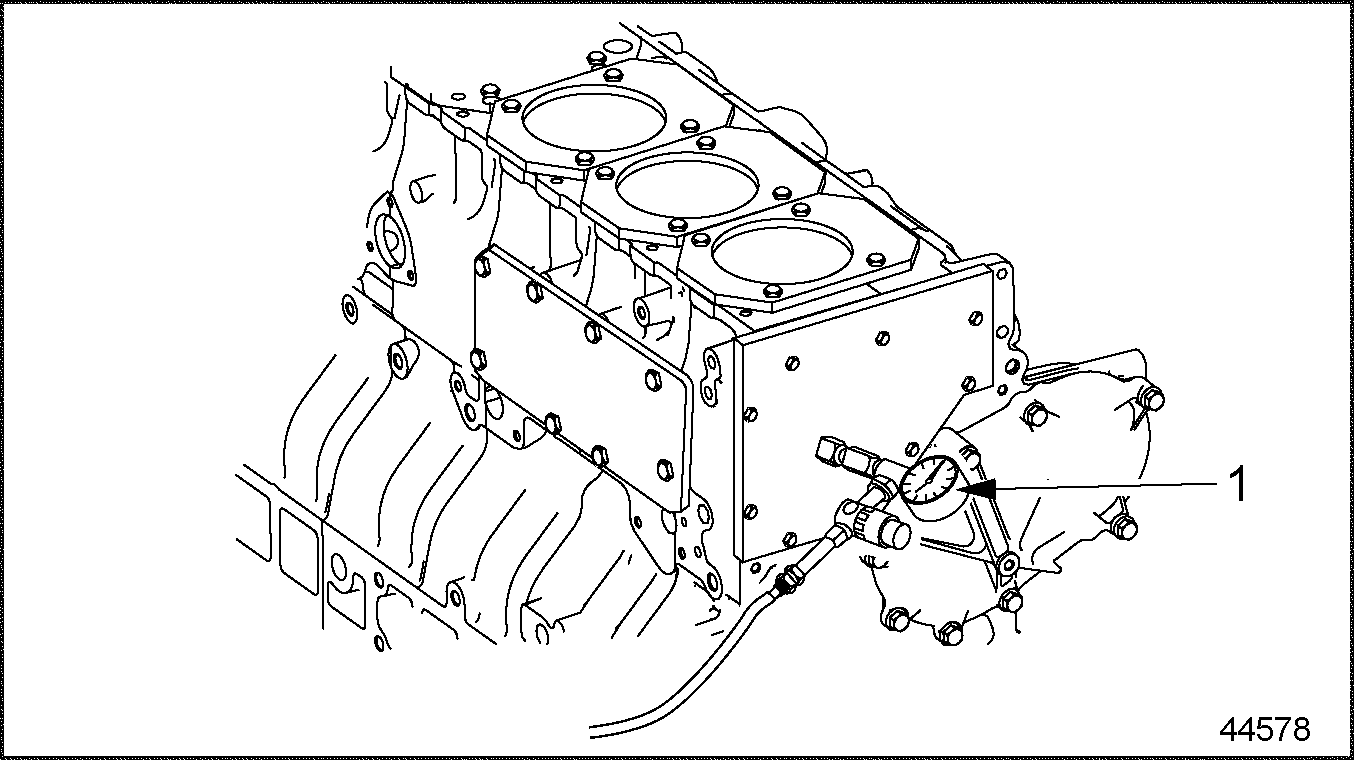
1. Pressure Gauge Assembly J-45987–2
Figure 17. Installing Pressure Gauge Assembly
- Connect a compressed air supply to the pressure gauge assembly. See Figure
"Installing Pressure Gauge Assembly"
.
EYE INJURY
To avoid injury from flying debris when using compressed air, wear adequate eye protection (face shield or safety goggles) and do not exceed 276 kPa (40 psi) air pressure.
- Pressurize the system with 200 kPa (29 psi). Use the pressure regulator to set the pressure.
- Check for leaks around the all cover plates and plugs using a soap solution. Eliminate leaks.
- Close the shut off valve.
- Watch the pressure for 30 seconds. If the pressure holds at the 200 kPa (29 psi), the cylinder block coolant system is properly sealed. In case of a pressure drop, the engine block should not be reused.
- Remove the test equipment from the cylinder block.
Section 1.3.2
Cylinder Block Preparation
This procedure is used with the PT-2250-B counterbore tool and J-41065 .
|
1. Collar Seat Insert (shim) |
4. Liner Seat D-Ring |
|
2. Cylinder Block |
A. Specified in Measuring Cylinder Liner Protrusion Table |
|
3. Cylinder Liner |
|
Figure 18. Cylinder Liner Collar Seat
- Remove the cylinder heads, pistons, liners, and other hardware.
- Protect the crankshaft, oil, and coolant passages from machining debris by covering with a shop towel or a suitable clean cover. Clean the top surface of the block to remove any debris from the machining area.
- Remove the cylinder block dowel pins using (Snap-On CG503 or equivalent).
- Remove the coolant pump.Refer to "4.2.1 Coolant Pump Removal"
- Remove the rear lifting bracket.
- Protect internal engine parts from cutting debris using an oiled sponge filler in the cylinder block.
- The cutting edge of the cutting bit should be retracted to protect the cutting tool PT-2250-B
. Cap screws of the cutter should be loose at this time.

1. Cylinder Block
2. Cutter Plate
Figure 19. Cross Section
- Center the tool on the top of the block using the Counter Bore Cutter tool (J-41065) .
- Raise the depth stop adjustment collars and lower the tapered cutter plate into the bore. Rotate the tool and allow it to center itself in the bore. See Figure "Cross Section" .
- Install two opposing cylinder head bolts with the washers and spacers through the base plate of the tool. See Figure
"Cutting Tool"
. Tighten securely to 41 N·m (30 lbs. ft.).

1. Cylinder Head Bolt
2. Cylinder Block
Figure 20. Cutting Tool
- Raise the tapered cutter head from the block and install the depth set spacer provided. While there is no load, extend the cutting tool outward (using a clockwise rotation of the cutting screw) until it just touches a 0.15mm feeler gauge or shim placed next to the vertical wall of the counterbore. Tighten the Allen head hold-down screws. See Figure
"Cutting Tool"
.
NOTICE:
Do not turn past this position or the cutter plate will fit and prevent an accurate reading.
- Lower the cutting plate and cutter tool into the counterbore until it just touches the lower surface of the counterbore. Rotate the lock collars downward until they touch the bronze bushing of the tool.
- Set the depth of cut by adjusting the top collar upwards to allow the liner shim to be inserted between the two collars. Tighten the thumb screw of the top collar. Remove the shim.
- Lubricate the tool bushing. Back off the lower collar by two graduations 0.0254 mm (0.001 in. each). Rotate the T-handle clockwise with a moderate, constant pressure. Stop at random positions to prevent creating a ridge in the counterbore. Continue backing off the adjustment in 0.0508 mm (0.002 in.) increments for the balance of the cutting operation until the collars come together.
- Raise the handle and insert the spacer block under the lower collar. Remove the hold-down bolts and spacers to remove the tool from the block.
- Retract the cutter bit into the cutter plate to protect during storage.
NOTICE:
After machining the cylinder block, inspect for the presence of a chamfer on the edge of the balcony. Use a hand stone to break the sharp edge if needed.
Section 1.3.3
Installation of Cylinder Liner
Installation steps are as follows:
- Perform the Measurement of Cylinder Liner Protrusion procedure. Refer to "1.3.1.2 Measurement of Cylinder Liner Protrusion" .
- Install new O-rings, clean and dry, in the cylinder block.
- Install Liner Seat D-Ring to Cylinder Liner. Be sure the D-ring is installed with the flat surface of the of the ring against the liner. Be careful not to over-stretch the ring as it is installed over the liner flange. See Figure
"Cylinder Liner Seat"
.
1. Collar Seat Insert (shim)
4. Liner Seat D-Ring
2. Cylinder Block
A. Specified in Measuring Cylinder Liner Protrusion Table
3. Cylinder Liner
Figure 21. Cylinder Liner Seat
Note: The cylinder liner collar and collar seat must remain completely free of oil.
- Install a new seat insert, clean and dry, into the block counterbore. See Figure "Cylinder Liner Seat" .
- Apply a light coating of engine oil to the lower part of the cylinder liner, from where it contacts the O-rings up to the bevelled area.
- When installing a new cylinder liner, make sure that the diameter tolerance code corresponds to the one marked on the piston.See Figure
"Tolerance Codes"
for the location of tolerance codes.

1. Piston
2. Cylinder Liner
Figure 22. Tolerance Codes
- Cylinder liners with tolerance code A require a piston of code BA.
- Cylinder liners with tolerance code B require a piston of either code BA or BC.
- Cylinder liners with tolerance code C require a piston of code BC.
- Install the cylinder liner, using the cylinder liner installation tool (J–46168)
. See Figure
"Cylinder Liner"
.
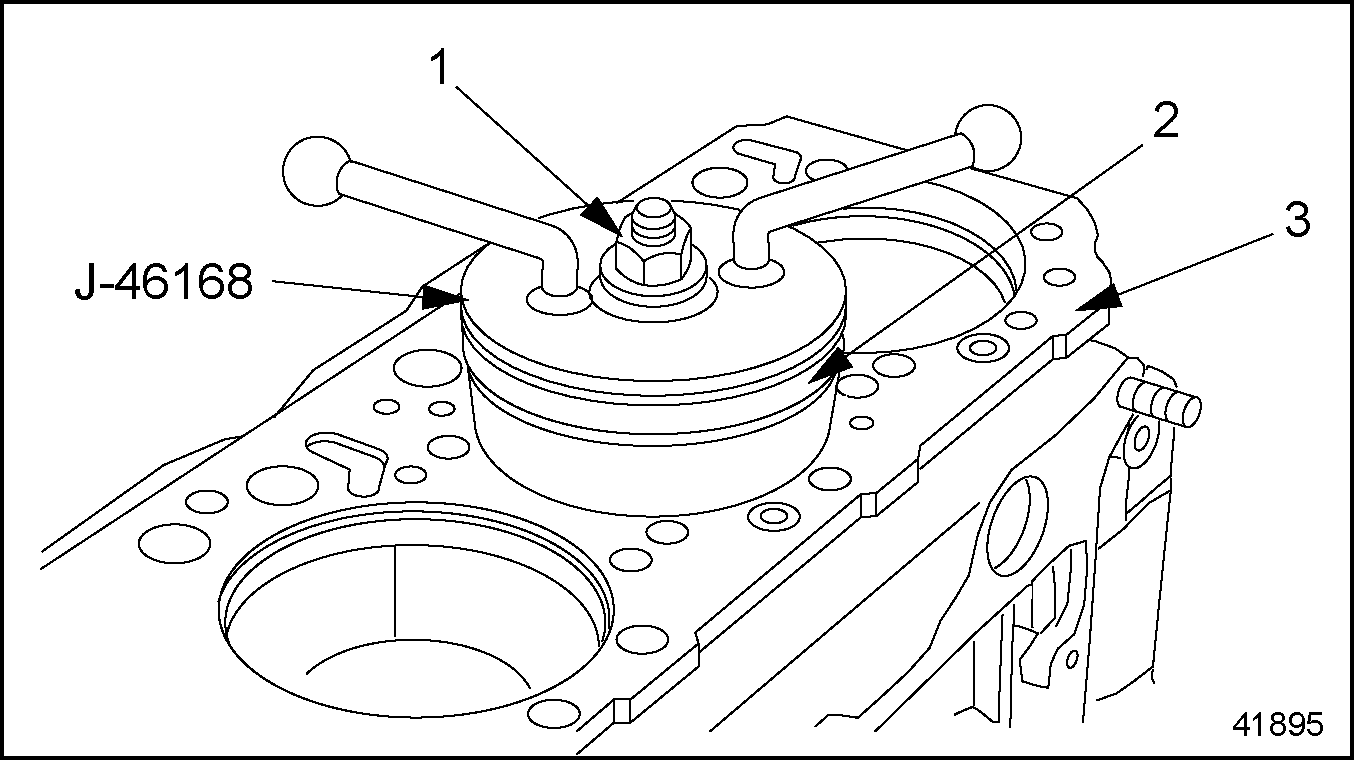
1. Installation Nut
3. Cylinder Block
2. Cylinder Liner
Figure 23. Cylinder Liner
NOTICE:
Do not overtighten the installation tool. This may deform the cylinder liner and make the installation tool more difficult to remove.
- Tighten the installation tool just enough to hold the installation tool inside the cylinder liner without turning.
- Insert the cylinder liner into the cylinder block until it contacts the O-rings. Continue to insert the cylinder liner past the O-rings, being careful to keep turning the installation tool until the cylinder liner is properly seated.
- Remove the installation tool from the cylinder liner.
NOTICE:
To prevent damage to the O-rings, the cylinder liner must be rotated during installation.
Note: If installing the old cylinder liner, offset the reference marks 90 degrees from the previous ones.
- Measure the cylinder liner protrusion from the block. The specifications are listed in Table
"Cylinder Liner Installation Tolerances"
.
Description
Dimensions: mm (in.)
Cylinder Liner Protrusion, From Block, see Figure "Cylinder Liner Collar Seat" , Ref. A.
0.230–0.330 (0.0090–0.0130)
Height of the Cylinder Liner Collar, see Figure "Cylinder Liner Collar Seat"
10.10–10.12 (0.3976–0.3984)
Depth of the Collar Seat, see Figure "Cylinder Liner Collar Seat"
9.950–10.010 (0.3917–0.3941)
Thickness of the Seat Insert
0.14–0.16 (0.0055–0.0063)
Table 34. Cylinder Liner Installation Tolerances - Measure the inside diameter of the cylinder liner and check for out-of-round. See Figure
"Measuring the Cylinder Liner Inside Diameter"
.
1. Cylinder Liner
3. Dial Gauge
2. Quick Calipers
4. Cylinder Block
Figure 24. Measuring the Cylinder Liner Inside Diameter
- Measure at three different locations 60 degrees apart in the area of the two O-rings.
- Compare the three measurements. If they differ by more than the maximum admissible out-of-round listed in Table "Cylinder Liner Installation Tolerances" , remove the cylinder liner and inspect the two O-rings and their seating area in the cylinder block.
- If the O-rings are damaged, replace them.
- Check the out-of-round again until it meets specifications.
- Install the piston. Refer to "1.18.1 Piston Removal" .
| MBE 4000 Service Manual - 6SE412 |
| Generated on 10-13-2008 |