Section 4.5
Engine Cooling Fan
The engine cooling fan can be mounted at the front of the engine and is belt driven from the crankshaft pulley. See Figure "Engine Cooling Fan Location" .

Figure 1. Engine Cooling Fan Location
On most applications, the fan is thermostatically controlled. This fan assembly is designed to regulate the fan speed and maintain an efficient engine coolant temperature regardless of the variations in the engine load or outside air temperature. No adjustment of the thermostatic control is necessary.
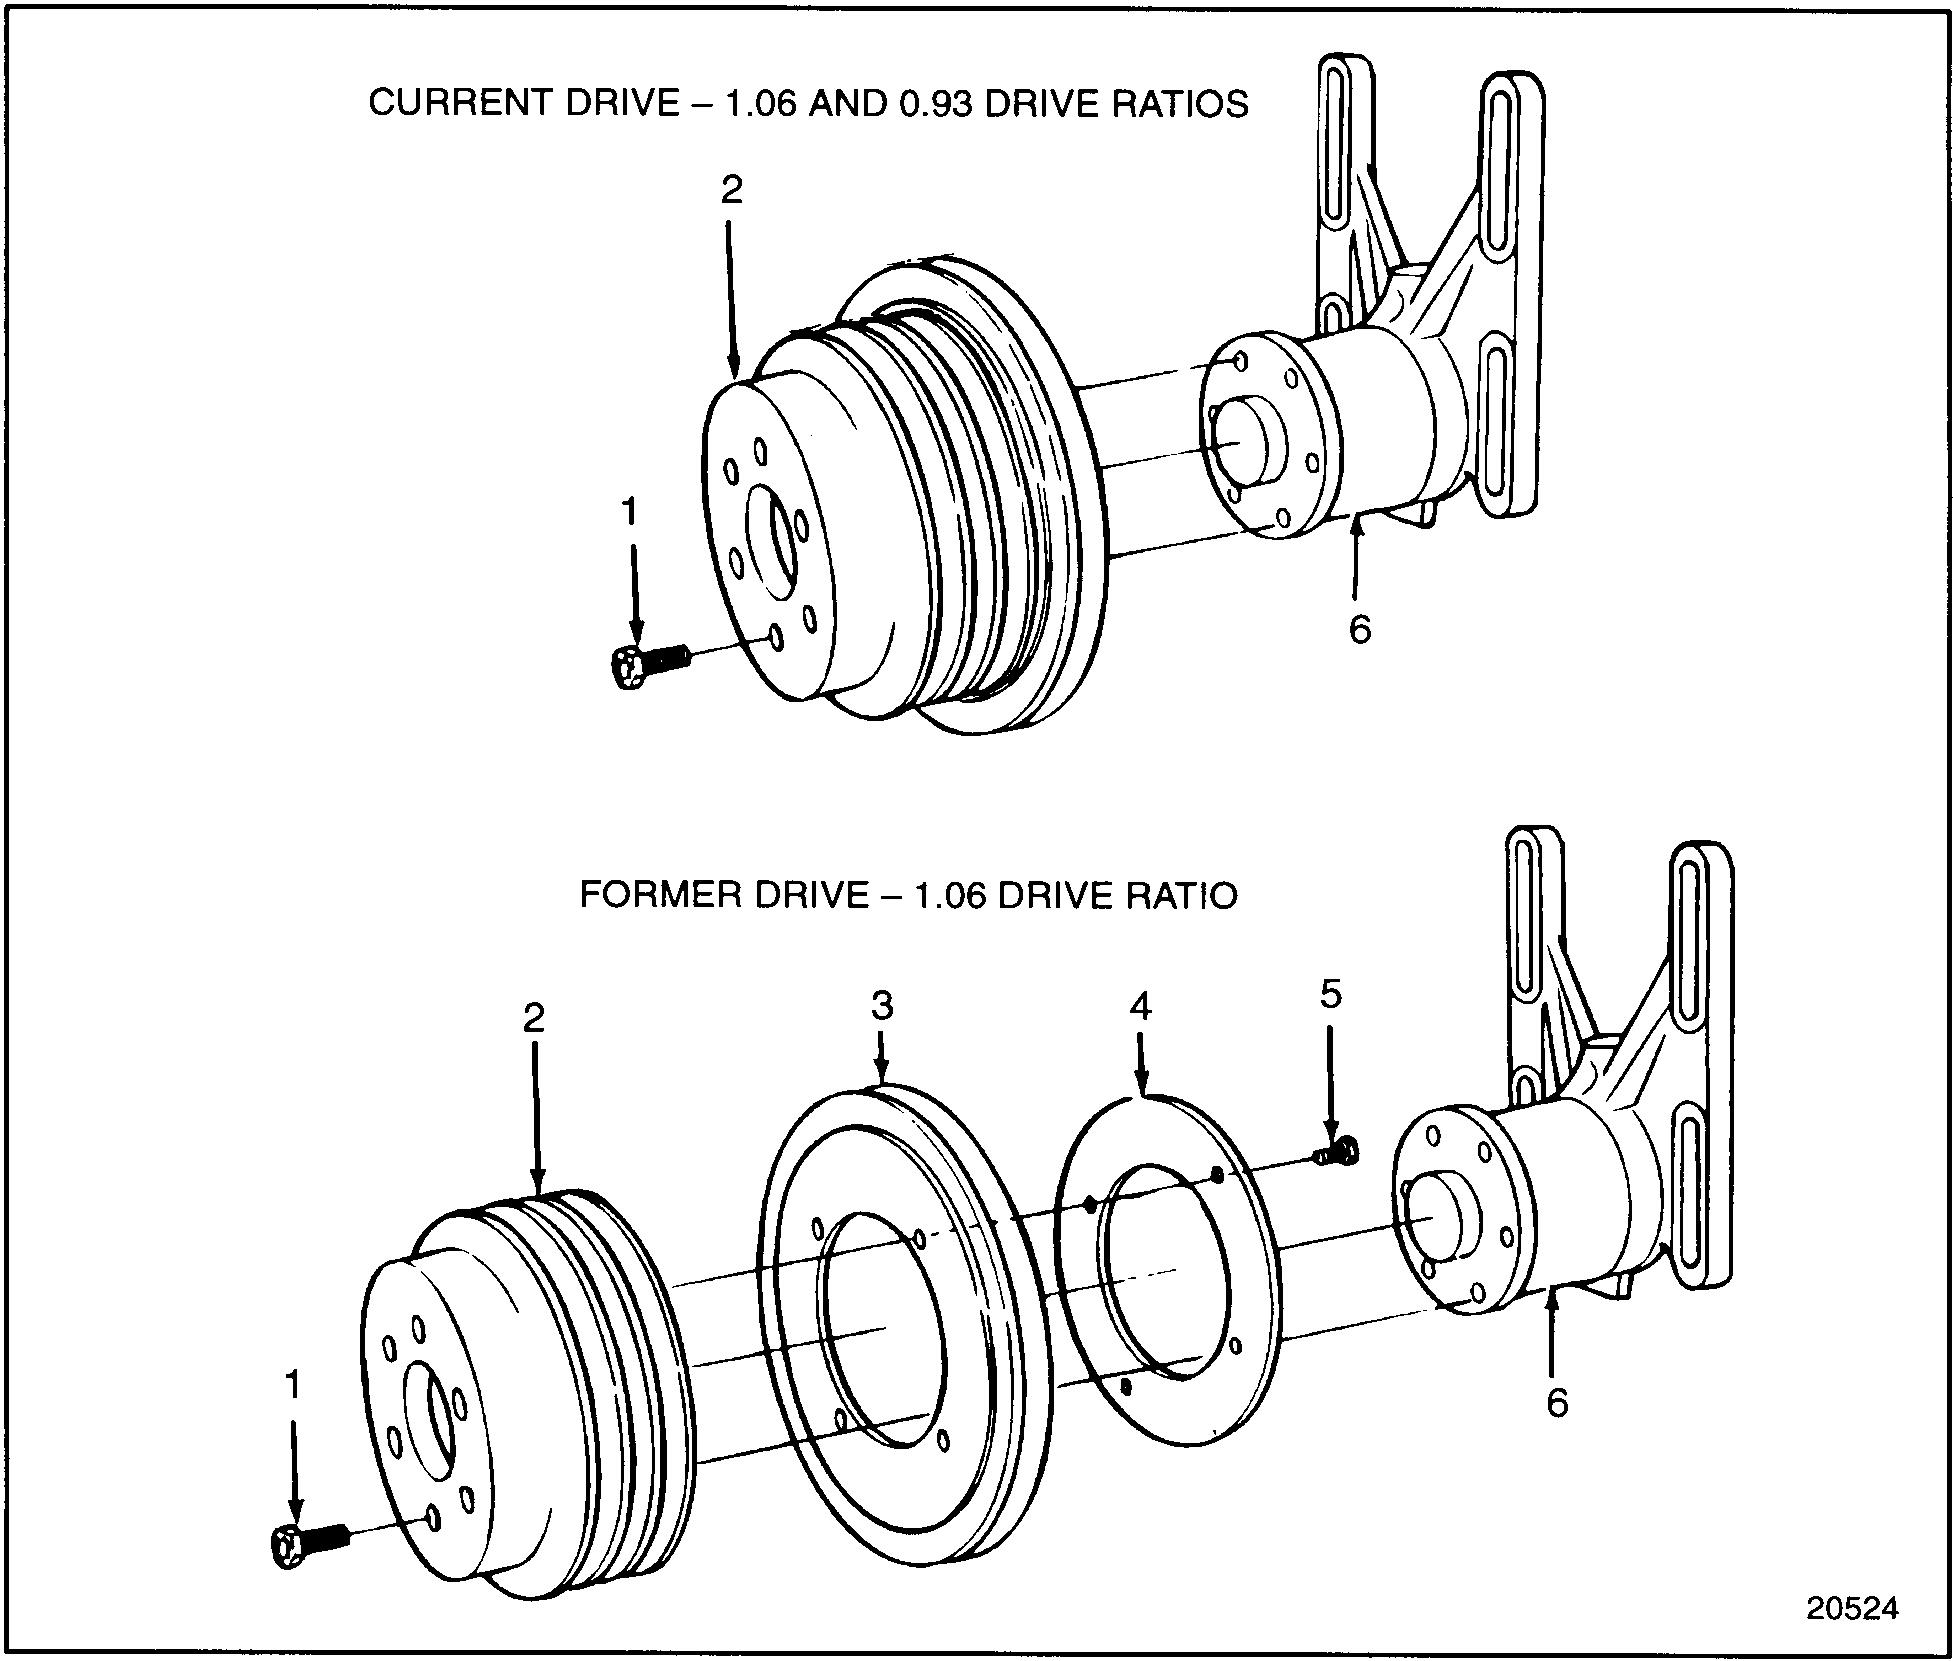
The three-groove pulley hub uses a matched set of three drive belts. On some units equipped with an air conditioning compressor, an additional pulley and retaining plate are attached to the three-groove pulley. See Figure "Air Conditioning Compressor Drive Pulley and Related Parts" .
|
1. Bolt, Fan Retaining (6) |
4. Retaining Plate |
|
2. Fan Pulley |
5. Bolt, Air Conditioning Retaining |
|
3. Drive Pulley, Air Conditioning Compressor |
6. Fan Hub Assembly |
Figure 2. Air Conditioning Compressor Drive Pulley and Related Parts
Whenever it is necessary to replace one of the crankshaft pulley-to-fan hub drive belts, all three belts must be replaced as a matched set. Refer to "13.5.7 Drive Belts" for belt adjustment or replacement information.
The fan hub is supported by a front roller bearing and a rear ball bearing. Internal snap rings are used to retain the bearings in the housing and on the shaft. A single lip grease seal is mounted in the fan hub housing. A hub cap seals the bearing cavity at the rear of the housing. See Figure "Fan Hub and Related Parts" .

|
1. Drive Shaft, Fan |
9. Ball Bearing, Rear |
|
2. Race, Front Bearing Inner |
10. Snap Ring, Rear Bearing Retaining |
|
3. Snap Ring, Inner Race Retaining |
11. Spacer |
|
4. Grease Seal |
12. Pin |
|
5. Snap Ring, Front Bearing Retaining |
13. Bolt, Spacer-to-drive |
|
6. Bearing, Front Roller |
14. Hub Cap |
|
7. Housing, Fan Hub |
15. Bolt, Fan Hub Mounting (4) |
|
8. Pipe Plug |
16. Hardened Washer (4) |
Figure 3. Fan Hub and Related Parts
The fan hub utilizes four elongated mounting holes and a single threaded rod for adjustment. The fan hub is mounted to the fan support bracket with four bolts. See Figure "Fan Hub Mounting" .

Figure 4. Fan Hub Mounting
The bearings and the cavity between the bearings are packed with grease at the time the fan hub is assembled. Refer to "13.5.23 Fan Hub" for the maintenance schedule.
Section 4.5.1
Repair and Replacement of Engine Cooling Fan
To determine if repair is possible or replacement of the engine cooling fan is necessary preform the following procedure. See Figure "Flowchart for Repair or Replacement of Engine Cooling Fan" .

Figure 5. Flowchart for Repair or Replacement of Engine Cooling Fan
Section 4.5.2
Cleaning and Removal of Engine Cooling Fan
Remove the engine cooling fan as follows:
NOTICE: |
|
Before removing the fan, check the blades for alignment or damage. Do not rotate the fan by pulling on the fan blades. Engine damage and radiator damage could result. |
The fan blades must rotate in a vertical plane parallel with and a sufficient distance from the radiator core. Cracked, deformed or otherwise damaged fan blades may reduce the efficiency of the cooling system, throw the fan out of balance, or damage the radiator cores.
- If equipped with air conditioning, loosen the air conditioning compressor mounting bolts. Remove the compressor drive belt.
- Loosen the four fan hub-mounting bolts. See Figure "Fan Hub Mounting" .
- Turn the adjusting rod counterclockwise enough to allow slack in the drive belts.
- Remove the fan attaching bolts and remove the fan, fan drive belts and fan pulley.
- Remove the adjusting rod from the housing by unscrewing it.
- Remove the four fan hub-mounting bolts. Remove the fan hub assembly.
Section 4.5.3
Disassembly of Engine Cooling Fan
Disassemble the engine cooling fan as follows:
- Remove the hub cap at the rear of the housing by piercing the cap with a punch and prying the cap out of the housing.
NOTICE:
If a vise is used to secure the fan hub, use wood or leather between hub and vise. Exercise extreme caution to prevent damage to the fan hub.
- Secure the fan hub in a vise. Loosen and remove the bolt, securing the spacer to the shaft.
- Remove the spacer.
- Place the housing, fan mounting surface down, on a press bed on wood blocks high enough to allow the shaft to be removed. Press the shaft to remove it from the housing.

EYE INJURY
To avoid injury from flying debris, wear a face shield or goggles.
- Remove the roller bearing inner race snap ring from the shaft using snap ring pliers.
- Remove the roller bearing inner race using a two-jaw puller.
Note: Any time the shaft is removed from the housing, the ball bearing assembly (rear bearing) must be replaced. Any time the roller bearing inner race is removed from the shaft or the roller bearing assembly is removed from the housing, the roller bearing assembly must be replaced.
- Remove the grease seal from the housing and discard the seal.
- Remove the bearings from the housing as follows:
- Remove the rear ball bearing snap ring using snap ring pliers.
- Support the housing, fan side up, on two wood blocks spaced far enough apart to permit removal of the rear bearing from the housing.
- Remove the bearing from the housing by tapping alternately around the rear face of the bearing outer race with a small brass rod and hammer.
- Reverse the housing on the wood blocks. Remove the front bearing snap ring using snap ring pliers.
- Remove the front bearing from the hub in the same manner as the rear bearing. Refer to step 8a through step 8d .
Section 4.5.3.1
Inspection of Engine Cooling Fan
Inspect the engine cooling fan as follows:
- Clean the fan, fan hub and related parts with clean fuel oil.

EYE INJURY
To avoid injury from flying debris when using compressed air, wear adequate eye protection (face shield or safety goggles) and do not exceed 276 kPa (40 psi) air pressure.
- Dry the fan, fan hub and related parts with compressed air.
- Check the fan blades for cracks or other damage.
- Replace the fan if the blades are cracked or deformed.
- Inspect fan pulley for wear or damage to grooves.
- If fan pulley grooves are damaged or severely worn, replace the pulley.
- Inspect fan pulley for rust or rough spots.
- Remove any rust or rough spots in the grooves of the fan pulley.
- Inspect the fan drive shaft for galling, pitting, scoring or cracks.
- Replace as necessary. Small imperfections in the bearing contact surfaces may be removed using crocus cloth wet with fuel oil.
Section 4.5.4
Assembly of Engine Cooling Fan
Assemble the engine cooling fan as follows:
- Install the roller bearing inner race to the fan hub shaft. Support the shaft (fan side down) on a press bed. Use tool, J 36310-4 part of J 36310–A
to press the race on the shaft firmly against the shoulder. See Figure
"Fan Hub and Related Parts"
.
Note: The identification number side of the race should be against the tool.
EYE INJURY
To avoid injury from flying debris, wear a face shield or goggles.
- Using snap ring pliers, install the inner race retaining snap ring on the shaft.
Note: Be sure the snap ring is fully seated in the groove.
- Using Mobilgrease® HP or equivalent lithium base multipurpose grease, pack the roller bearing.
Mobilgrease® is a registered trademark of Mobil Oil Corporation.
- With the fan drive housing on a press bed (fan side up) install the roller bearing into the housing. Using the stepped side of tool, J 36310-2 part if J 36310–A , press the bearing firmly against the shoulder in the housing.
- Install the roller bearing retaining snap ring.
Note: Be sure the snap ring is fully seated in the groove in the housing.
NOTICE:
Care must be taken to only apply enough pressure to seat the seal against the snap ring. Excess pressure will deform the seal case.
- Using the opposite (smooth side) of tool J 36310-2, part of tool set J 36310-A , press the oil seal into the housing against the snap ring.
- Using Mobilgrease® HP or equivalent lithium base multipurpose grease, pack the ball bearing.
- Using the wider end of tool J 36310-1, part of tool set J 36310-A , to press on the outer race of the bearing, turn the fan hub housing over (fan side down) on the press bed and install the ball bearing assembly into the housing.
- Press the bearing firmly against the shoulder in the housing.
- Install the ball bearing retaining snap ring in the housing.
Note: Be sure the snap ring is fully seated in the groove.
- Pack the housing with Mobilgrease® HP or equivalent lithium base multipurpose grease. Do not overfill the housing.
Note: The housing should be between 1/2 to 2/3 full.
- Coat the lip of the new oil seal with clean engine oil.
- With the fan hub shaft (fan side down) supported on a press bed, carefully install the housing over the shaft.
- Using the narrow end of tool J 36310-1, part of tool set J 36310-A , press the inner race of the ball bearing onto the shaft until it is firmly seated against the shoulder on the shaft.
- Secure the fan hub shaft in a vice with soft (brass) jaws.
- Index the locating pin in the shaft with its mating hole in the spacer and install the spacer.
- Install the spacer retaining bolt and torque to 58-73 N·m (43-54 lb·ft).
- Coat the edge of the hub cap with a sealant such as Loctite 620 or equivalent.
- Install the cap into the end of the housing.
- Using the flat side of tool J 36310-2, part of tool set J 36310–A
, press the cap into the housing.
Note: The raised center section of the cap should be flush with the surface of the housing.
Section 4.5.5
Installation of the Engine Cooling Fan
Install the engine cooling fan as follows:
- Install the fan hub assembly to the support bracket using the four bolts and hardened washers. Do not tighten the bolts.
- Install the adjusting rod in the housing.
- If removed, install the air conditioning compressor drive pulley and retaining plate to the fan drive pulley. Torque the retaining bolts to 30-38 N·m (22-28 lb·ft).
- Install the fan drive pulley on the fan hub assembly.
- Install the fan to the fan drive pulley. Align the holes in the fan, drive pulley and drive shaft.
- Install the attaching bolts through the fan and pulley and thread them into the tapped holes in the fan hub. Torque the bolts in a crisscross pattern to 47-53 N·m (35-39 lb·ft).
- Install the drive belts to the fan pulley and crankshaft pulley.
- Adjust the drive belts to provide the proper tension. Refer to "13.5.7 Drive Belts" .
- Torque the fan hub-mounting bolts to 102-126 N·m (75-93 lb·ft).
| Series 50 Service Manual - 6SE50 |
| Generated on 10-13-2008 |