Section 13.4
Maintenance Operations
Service intervals are based upon average operating conditions. Where dusty, frequent start and stop or heavily laden operations are encountered, more frequent servicing will be required.
Section 13.4.1
Oil Level
Check oil level daily.
Check the oil level by removing the oil level gage from the oil fill tube and observe. Ensure the oil level is at the FULL mark on the oil level gage. See Figure "Checking Oil Level" . If the oil level is below FULL, fill with the proper grade of oil for the temperature. Do not overfill past the FULL mark.

Figure 1. Checking Oil Level
Section 13.4.2
Coolant Level
Check coolant level daily.
- Observe the level of coolant in the deaeration tank. If the coolant level is not visible in the sight gage, refer to "5.3 Coolant" for proper requirements and specifications.
- Refer to "13.4.13 Change Coolant Filter" for the filling procedure.
Section 13.4.3
Water Separator (Fuel System)
Check water separator, (fuel system) daily. Drain water from the fuel system as follows:
- Loosen valve on bottom of water separator and allow water to drain out.
- Tighten drain valve.
Section 13.4.4
Air-to-Air Intercooler
Inspect Air-to-Air Intercooler daily.
- With the engine off, visually inspect the air-to-air intercooler core assembly for debris and clogging of external fins. See Figure "Chassis Mounted Air-to-Air Intercooler" .
- Prior to engine operation, remove any debris blocking the core.

Figure 2. Chassis Mounted Air-to-Air Intercooler
Section 13.4.5
External Leakage
Inspect for external leakage daily. Visually inspect for leakage as follows:
- Hoses (for cracking and loose clamps)
- Water stains
- Oil stains
- Wetness at water pump
Section 13.4.6
Air Restriction Indicator
Inspect Air Cleaner Restriction Indicator daily. Refer to "13.4.11 Air Intake Restriction" for inspection procedure.
Service the air cleaner as follows:
- Remove dirty air cleaner element and discard.
- Clean any accumulation of dirt from the air cleaner housing. Do not use shop air for this cleaning.
- Visually inspect air cleaner housing for damage or distortion that could allow unfiltered air to enter the engine. Correct as required.
- Install a new air cleaner element.
- Reset the indicator by pushing the reset button and releasing it. The yellow indicator will drop below the window so the gage can be reused.
Section 13.4.7
Belt
Inspect belt daily. Check belt for worn, grease coated, oil soaked and missing material. Replace as necessary. Install new belt as follows:
Note: When installing belt, place it around the inside edge of the belt tensioner.
- Place belt around pulleys.
- Attach breaker bar to square hole of belt tensioner. See Figure "Setting Belt Tensioner" .
- Pull breaker bar counterclockwise. Install belt over tensioner pulley. Then, release pulley in a clockwise direction. Belt tensioner is automatically adjusted. Remove breaker bar.
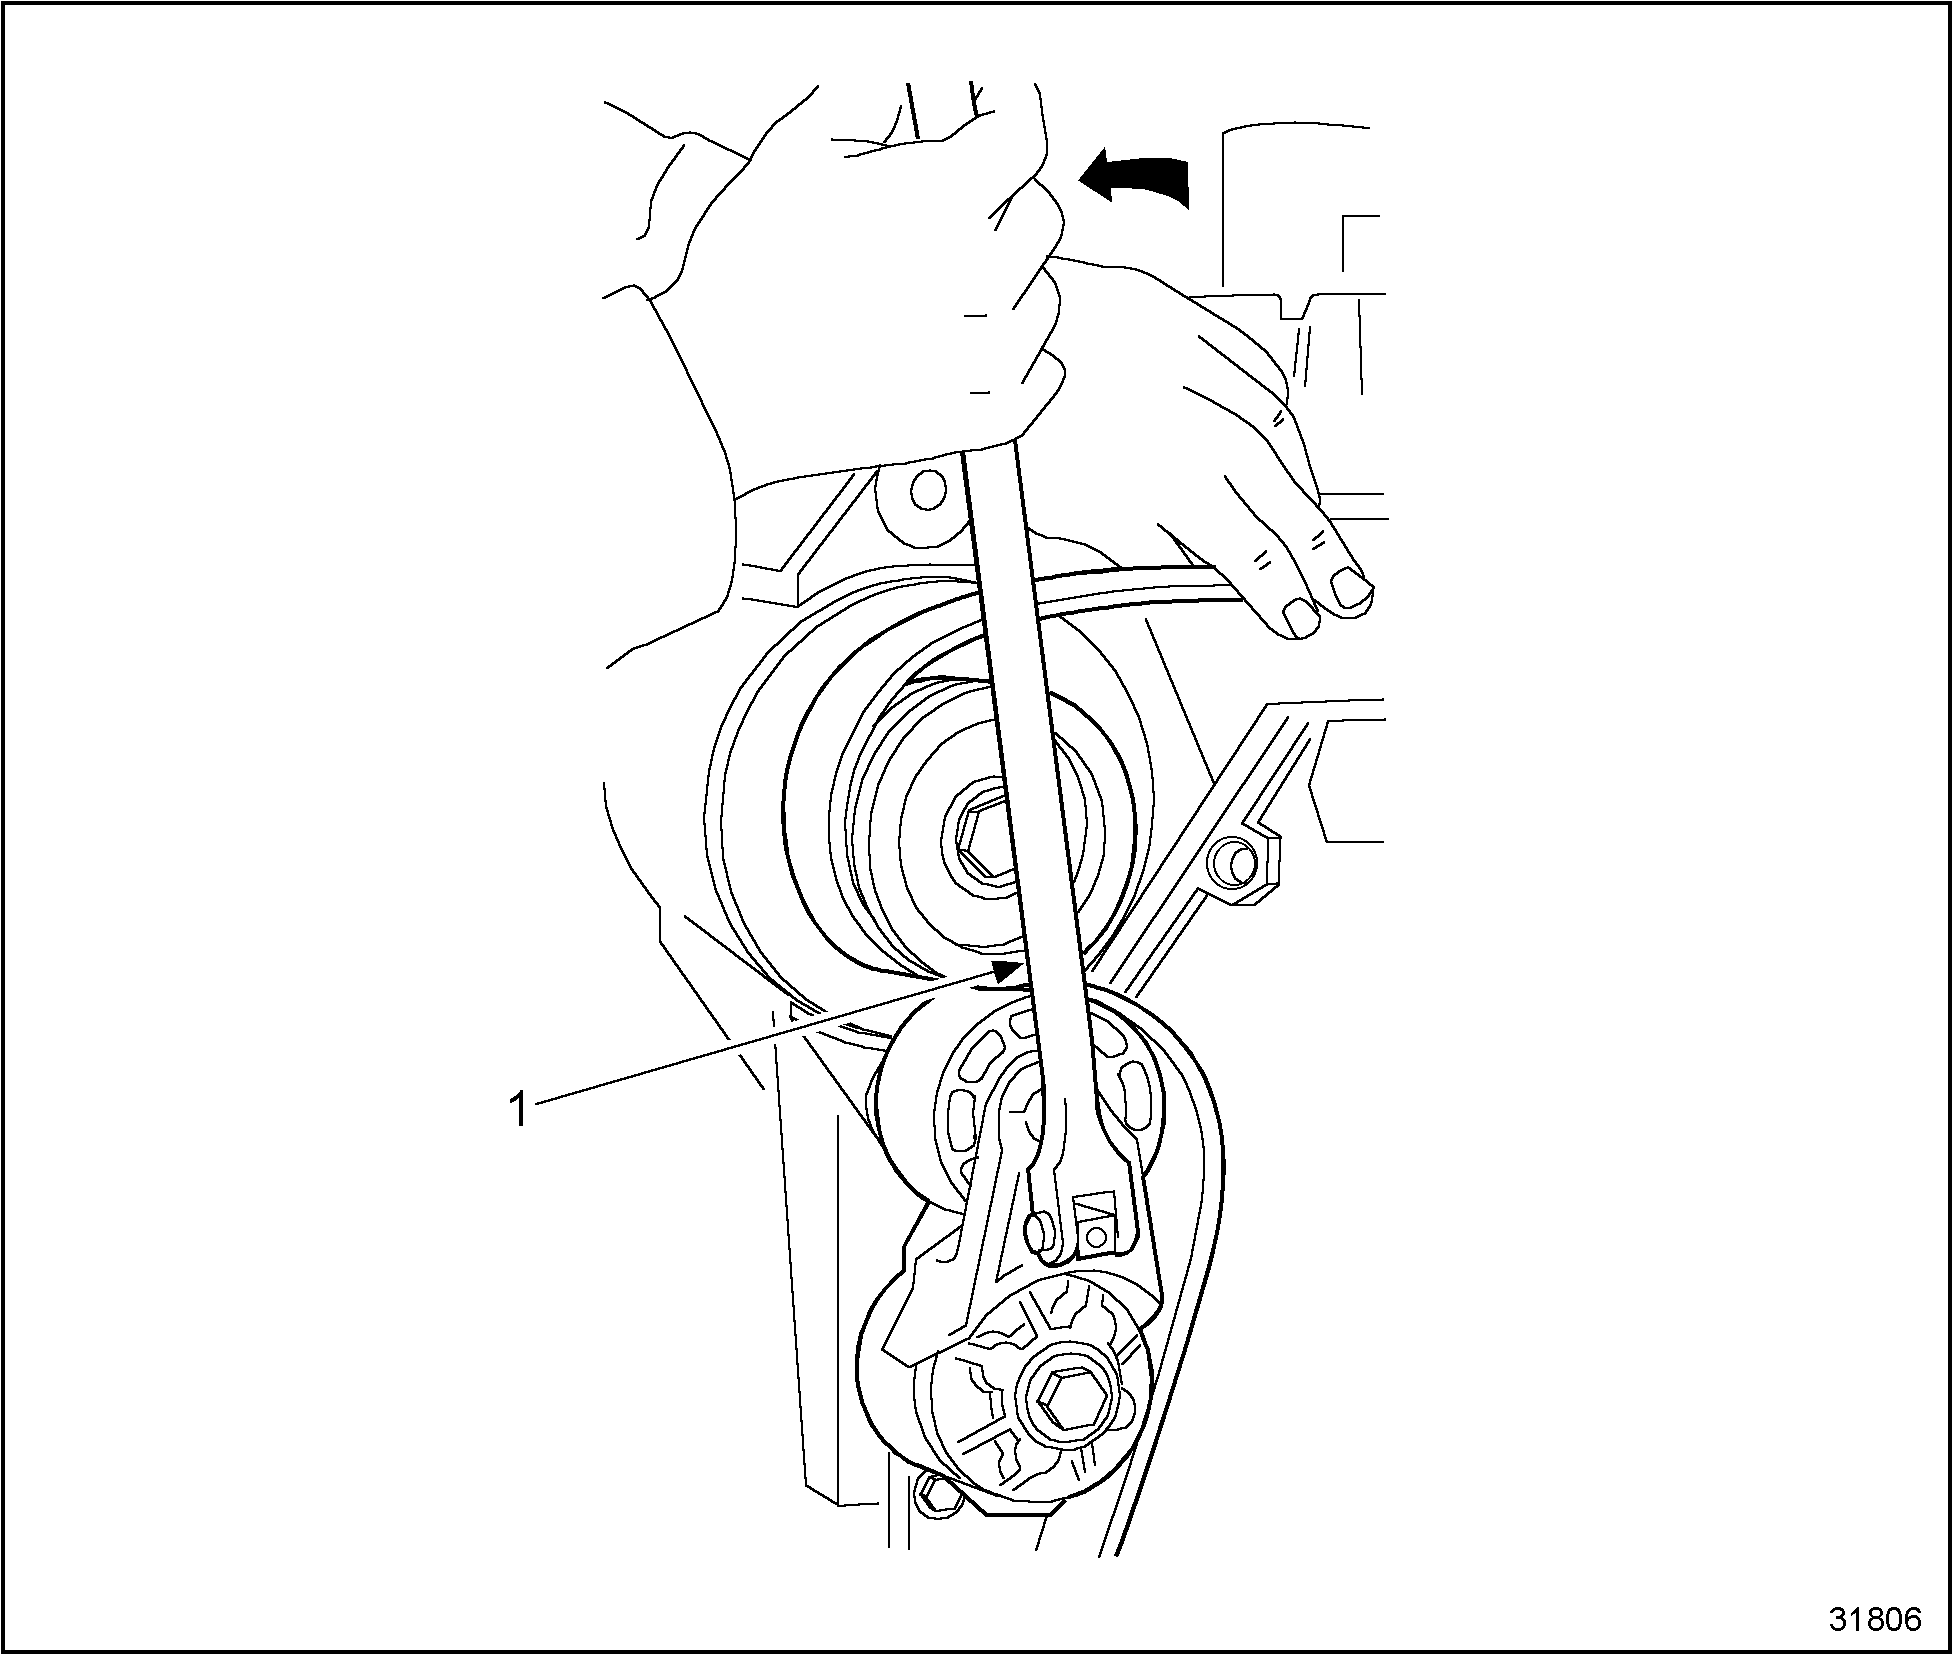
1. Breaker Bar
Figure 3. Setting Belt Tensioner
Section 13.4.8
Engine Oil and Oil Filter
Change engine oil and oil filter as follows. If fuel contains more than 0.05% sulfur, reduce the oil change intervals listed in Table "Fuel Sulfur Content" .
|
Sulfur Content, Percent |
Oil Change Interval |
|
Below 0.5 |
Normal |
|
0.5 to 1.0 |
3/4 Normal |
|
Above 1.0 |
1/2 Normal |
- Run engine until operating temperature is reached; then shut down.
- Drain oil pan and reinstall drain plug, using a new gasket if required.
NOTICE:
Do not overtighten filter. A damaged filter may fracture or leak.
- Install new oil filter, P/N: 1 819 452 C1, as follows:
- Remove old oil filter and discard. See Figure "Oil Filter" .
- Lubricate new oil filter gasket with clean engine oil.
- Install new oil filter and hand-tighten one full turn after the gasket first contacts the filter header.

1. Oil Filter
2. Oil Filter Header
Figure 4. Oil Filter
- Fill engine to specified capacity with the appropriate oil type. Refer to "3.3.6 Prime Lubricating System" .
- Start engine and run at low idle r/min. Check lube oil pressure gage reading. If there is no gage reading, shut engine off immediately. Check for oil filter leaks. Lube oil pressure gage reference is a minimum of 137 kPa (20 psi) @ 700 r/min. Let engine run until operating temperature is reached. Check for leaks.
- Shut engine down. Wait 15 minutes.
- Recheck oil level and add oil if needed, bringing oil level to FULL mark on the gage.
- Do not overfill past FULL mark.
Section 13.4.9
Coolant
Check coolant SCA concentration.
Every six months, check the coolant concentration level in the coolant. Refer to "13.4.13 Change Coolant Filter" for further information.
Section 13.4.10
Air Intake Piping
Inspect air intake piping every six months. See Figure "Air Intake Piping" .
- Check for loose hoses and clamps.
- Check for ruptured hoses.
- Check air cleaner housing for cracks.
- Check air-to-air intercooler for holes or damage.

Figure 5. Air Intake Piping
Section 13.4.11
Air Intake Restriction
Measure air intake restriction every 12 months or 900 hours.
Note: The air cleaner is to be serviced only when the restriction reaches the maximum allowable limit. The restriction can be measured by the service indicator.
Note: Often a low power and poor fuel economy complaint is simply due to a dirty air cleaner. As the air cleaner accumulates dirt, restrictions to airflow increases. If the service indicator is locked at maximum restriction, replace the air cleaner elements.
- Refer to section 4 for gage and indicator operation.
- Inspect the elements for damaged gaskets or dents in the elements. If they exhibit either, they should be repaired.
- If low power is still experienced after replacing the air cleaner, see your DDC dealer.
Section 13.4.11.1
Optional Dual Element Cleaner
The dual element air cleaner provides a large primary (outer) filter element and optional small secondary (inner) filter element. The secondary element should be used in dusty environments such as dump and mixer applications. See Figure "Top View of Dual Element Air Cleaner with Retaining Nut Indicator" .
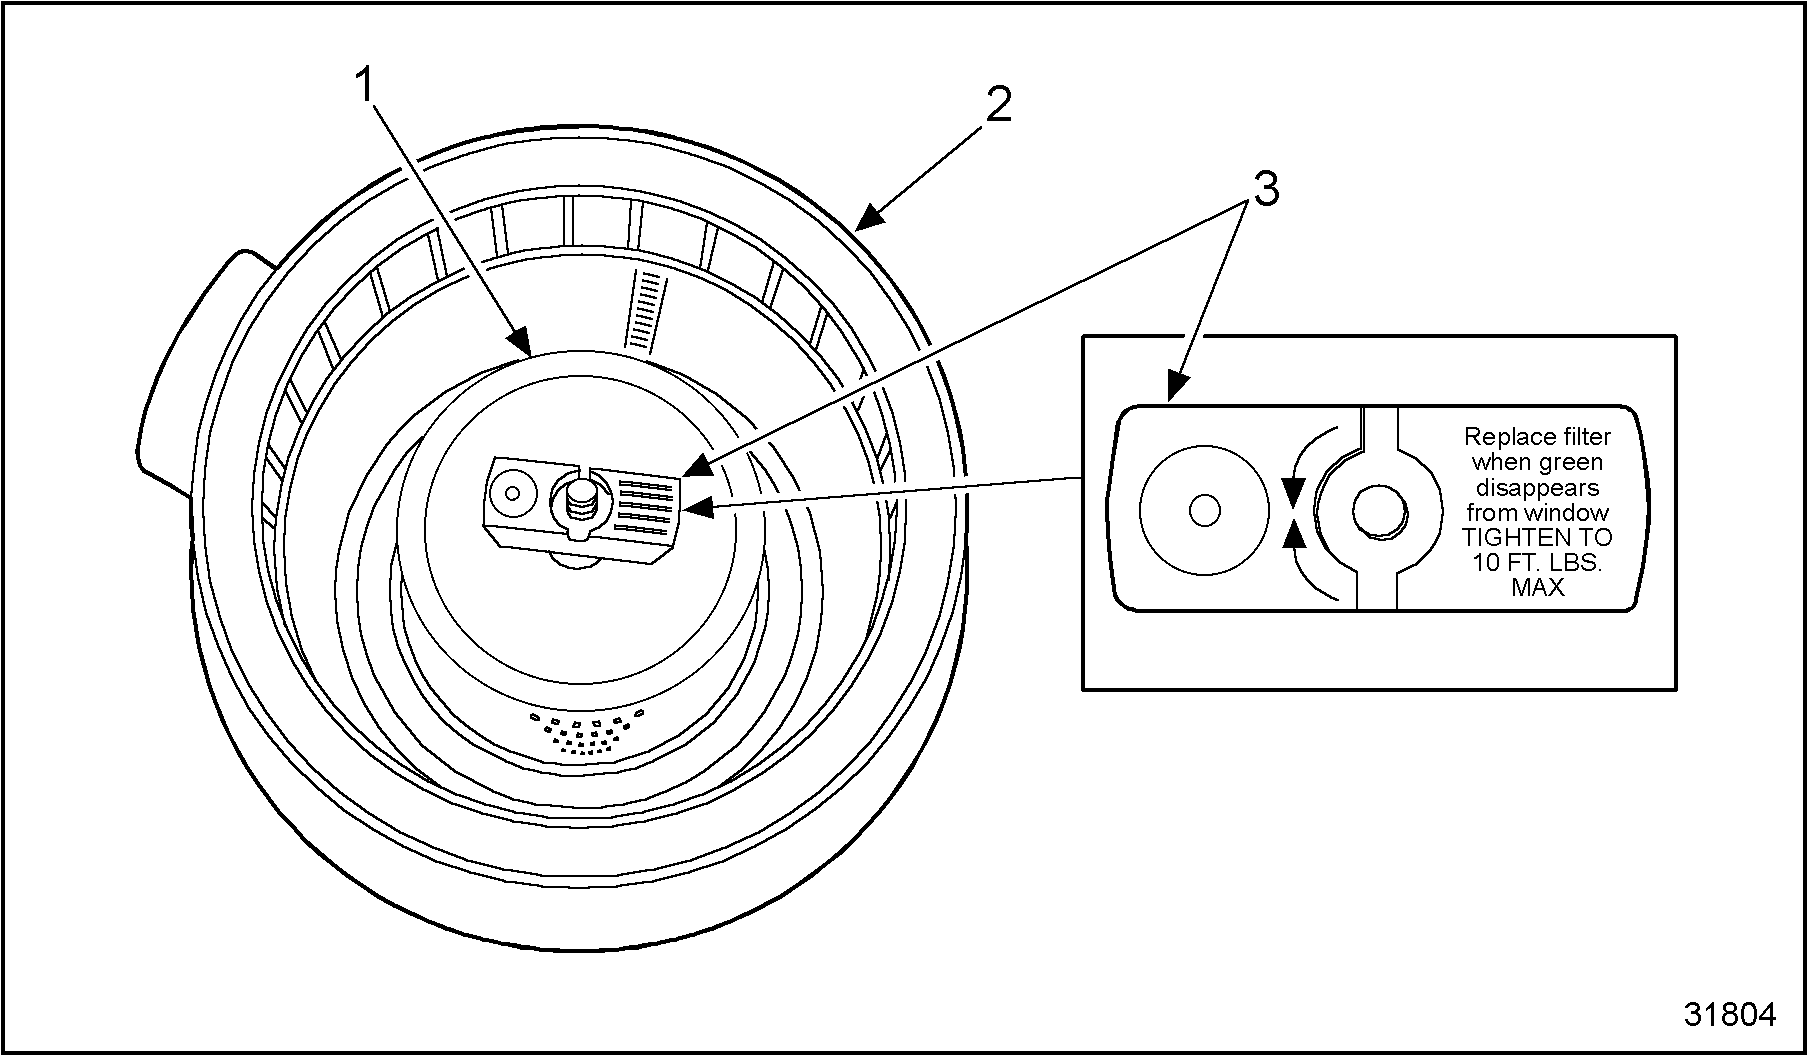
|
1. Secondary (Inner) Element |
3. Inner Element Retaining Nut with Restriction Indicator |
|
2. Air Cleaner Housing |
|
Figure 6. Top View of Dual Element Air Cleaner with Retaining Nut Indicator
The current dual element air cleaner restriction indicator assembly is located between the primary and the secondary element in the bottom of the air cleaner housing. This arrangement allows only the primary element to be sensed by the restriction indicator or dash mounted vacuum gage. The inner element is not recorded on the restriction indicator or dash mounted vacuum gage.
A separate inner element indicator senses restriction of that element. Dependent upon the manufacturer, either a rectangular wing nut with a built-in indicator is used or an element with an indicator located on the inner element end cap. See Figure "Top View of Dual Element Air Cleaner with Indicator in End Cap" . When all green disappears on the wing nut indicator, replace the inner element. When the green dot disappears from the indicator built into the inner element end cap, replace the inner element.

|
1. Secondary (Inner) Element |
3. End Cap with Restriction Indicator |
|
2. Air Cleaner Housing |
|
Figure 7. Top View of Dual Element Air Cleaner with Indicator in End Cap
Section 13.4.12
Fuel Filter and Strainer Assembly
Change fuel filter and strainer assembly every 12 months. Fuel with more than average impurities may require changing the filter and strainer assembly at shorter intervals. See Figure "Removing Fuel Filter" . Use the following procedure:
- Using an appropriate filter wrench/strap, loosen and remove the fuel filter from the header and discard.
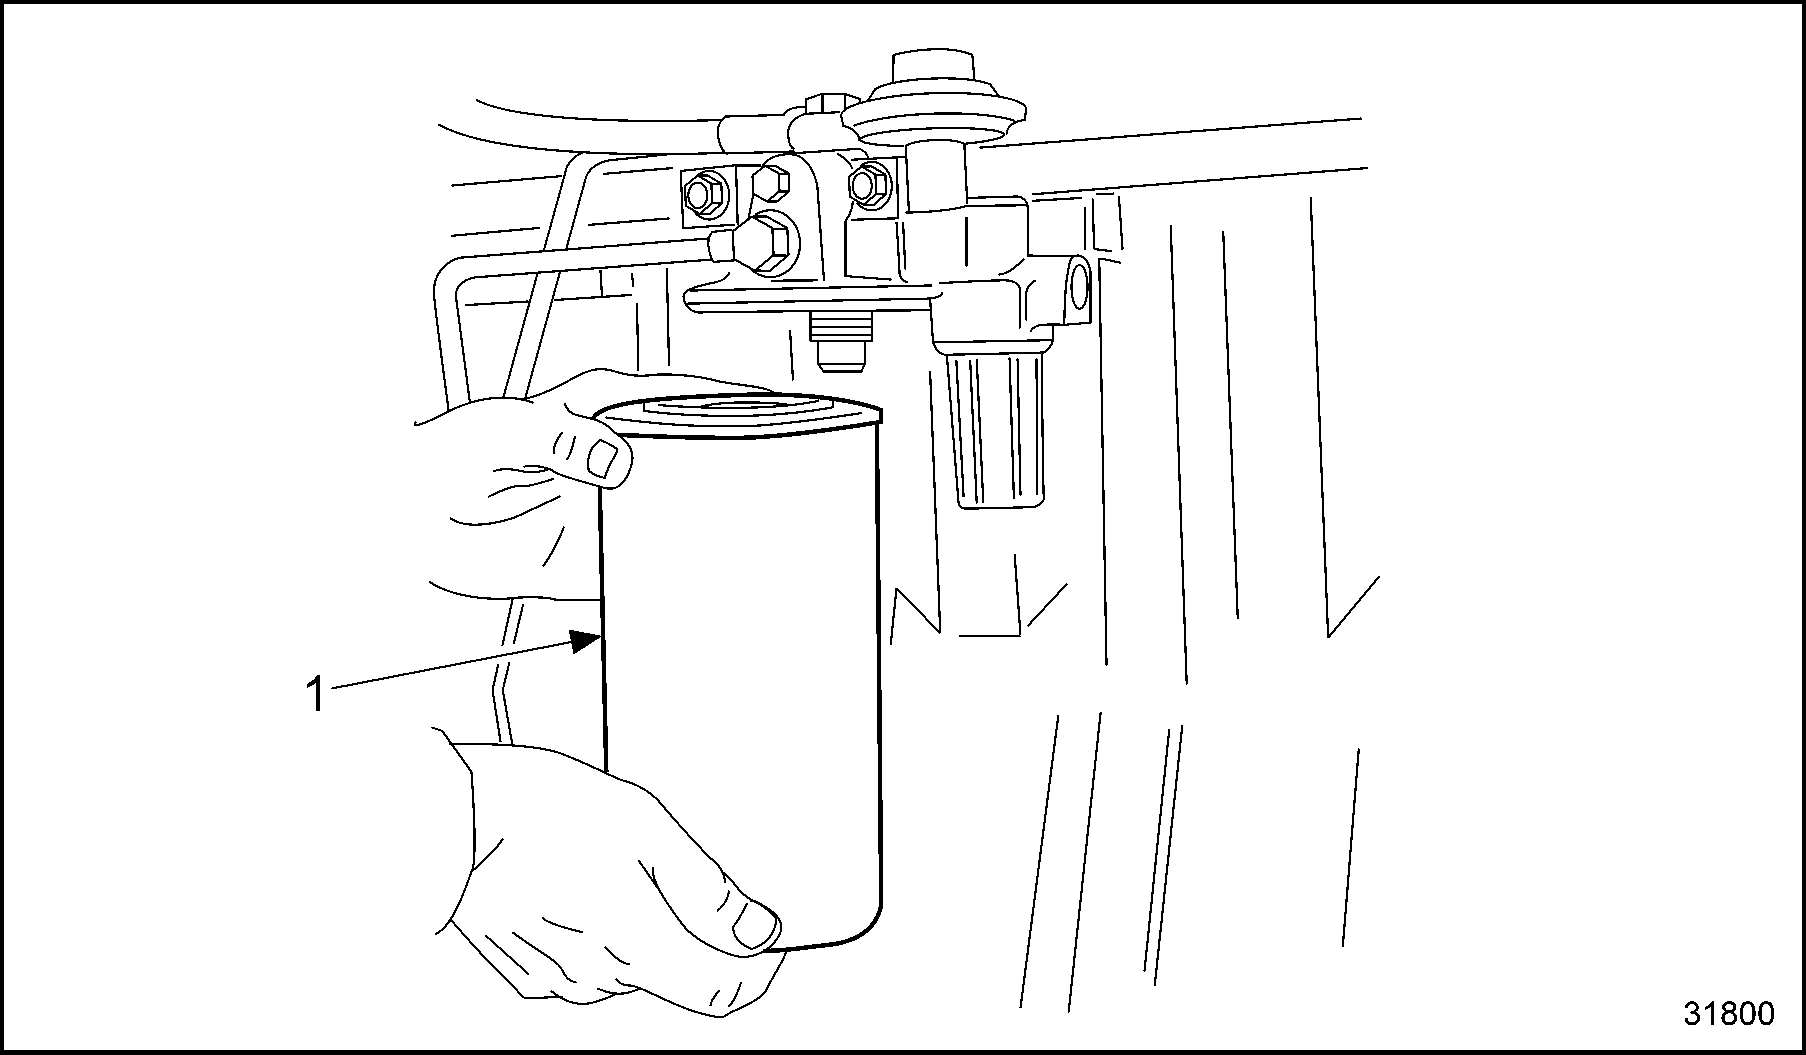
1. Fuel Filter
Figure 8. Removing Fuel Filter
- Remove the primary fuel filter/strainer assembly as follows:
- Remove plastic strainer cover from filter strainer assembly using a 1-1/8 in. or 29 mm (12 point) socket. See Figure "Removing Strainer Assembly" .
- Clean or replace strainer after inspection. Reinstall strainer and cover to header assembly.
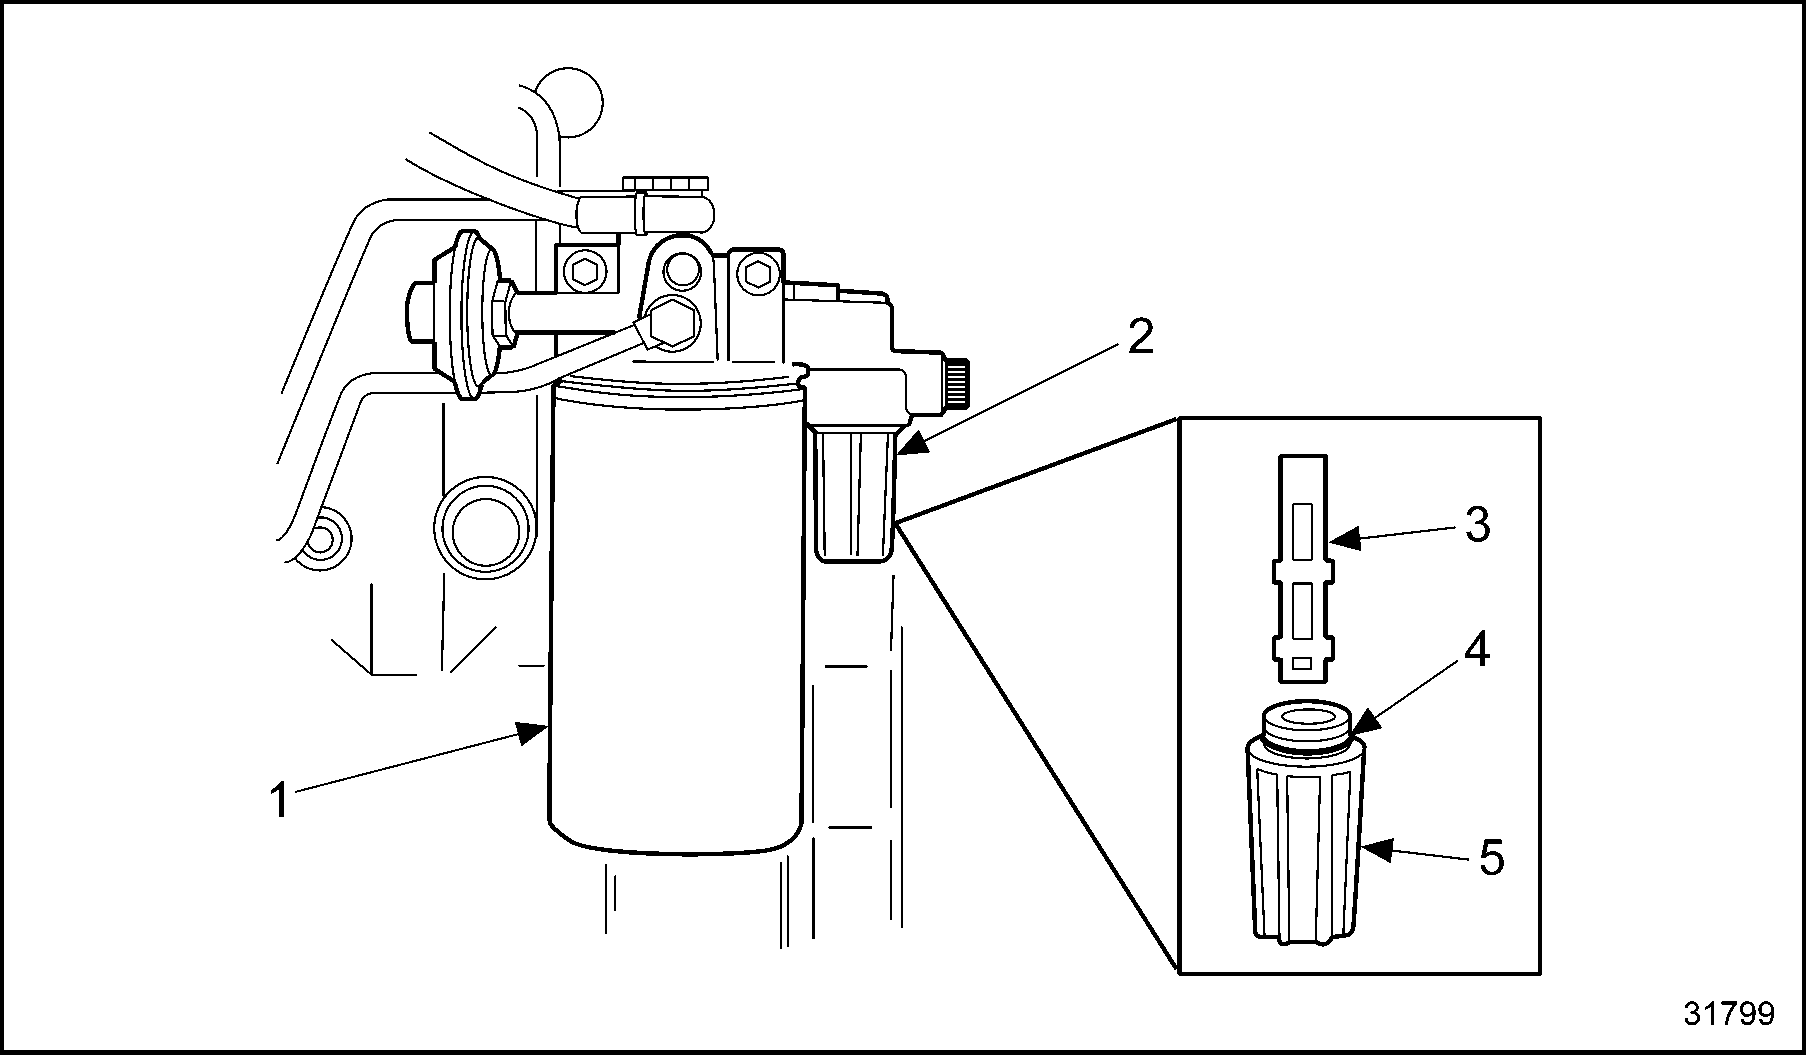
1. Fuel Filter
4. O-ring
2. Fuel Filter Header
5. Strainer Cover
3. Strainer
Figure 9. Removing Strainer Assembly
Note: Install strainer with open end toward filter header.
- Install a new fuel filter, P/N: 1 820 479 C1 (6 inch) or P/N: 1 809 789 C1 (8 inch), as follows:
- Lubricate fuel filter gasket with clean diesel fuel.
- Tighten until gasket touches fuel filter header.
- Tighten by hand an additional 1/2 turn.
Note: Do not add fuel to new fuel filter.
- Bleed air from the fuel system as follows. See Figure
"Bleeding Air from Fuel System"
.
1. Primary Pump
3. Fuel Filter Header
2. Bleed Screw
Figure 10. Bleeding Air from Fuel System
- Loosen bleed screw at fuel filter header.
- Operate priming pump until pump action provides solid fuel at bleed screw. Close bleed screw.
- Crank engine for 15 seconds.
- Start engine and operate until engine runs smoothly.
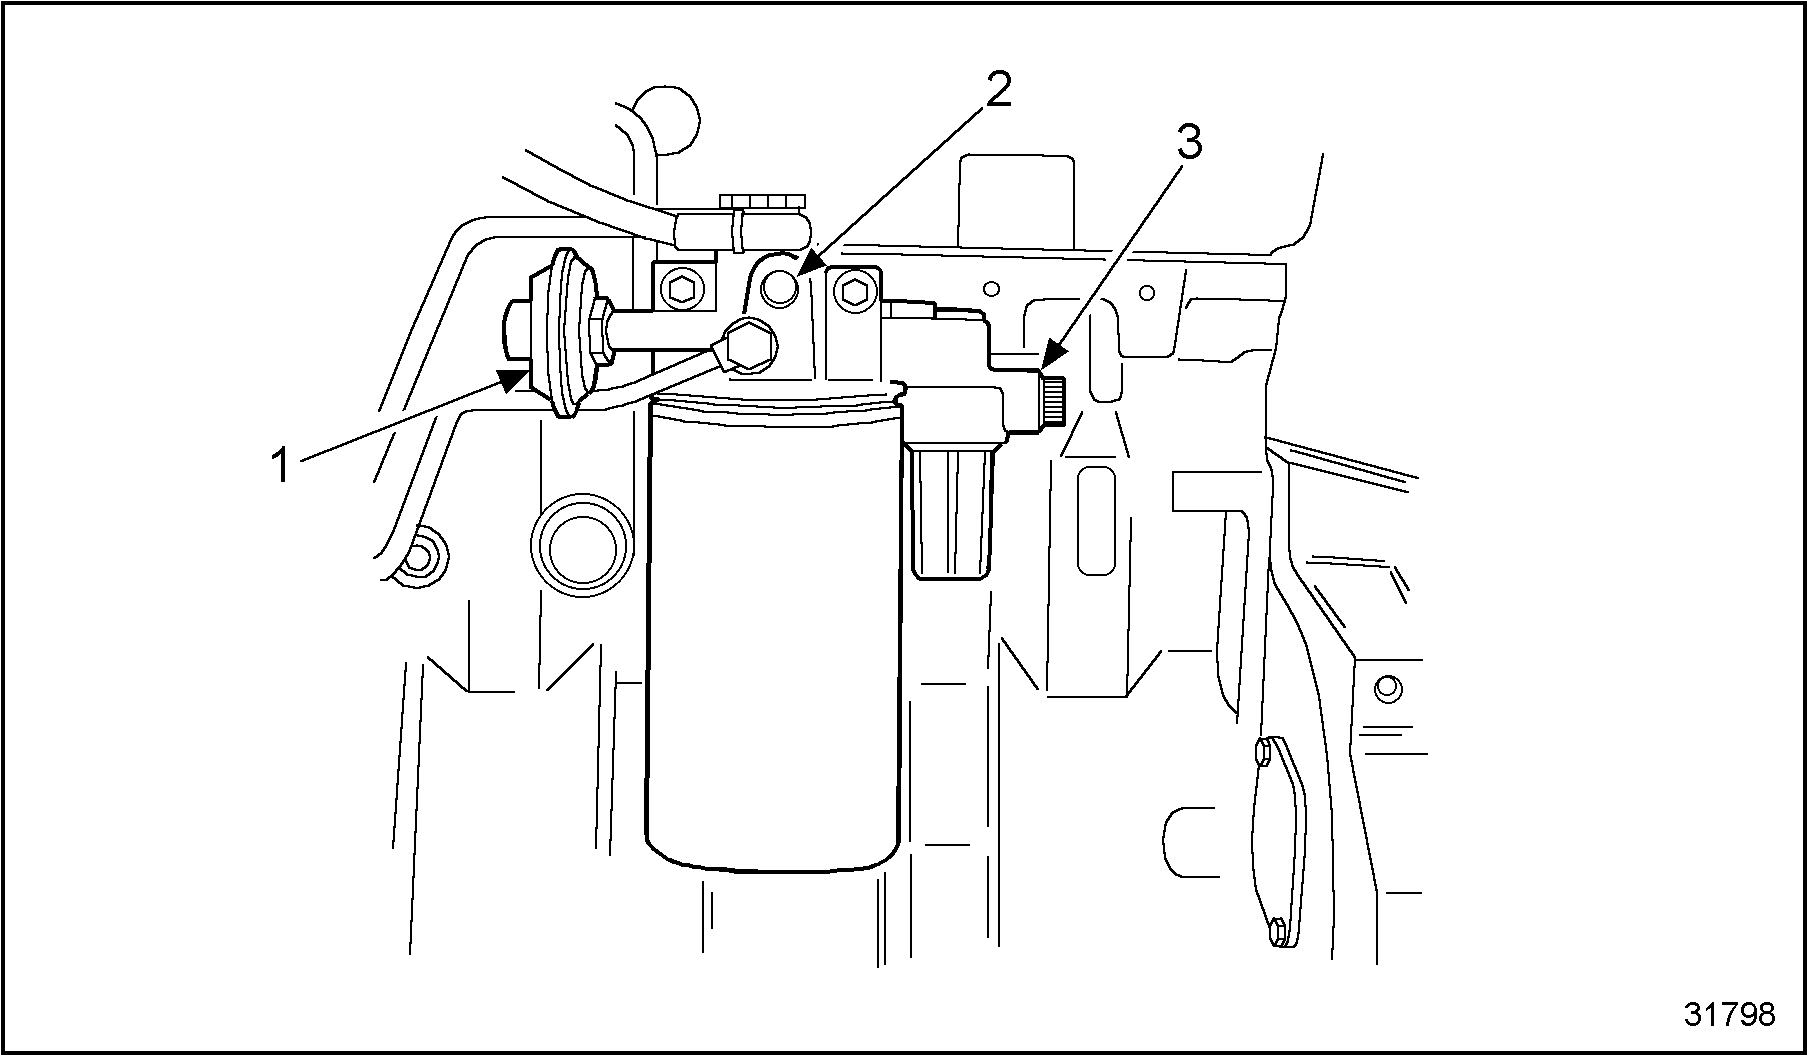
Section 13.4.13
Change Coolant Filter
Change coolant filter every 12 months using the following procedure.
- Remove deaeration tank pressure cap and remove coolant filter using a filter wrench/strap. The filter is located on the right hand side rear of the front cover. See Figure
"Removing Strainer Assembly"
.
1. Coolant Filter
2. Coolant Filter Header
Figure 11. Removing Strainer Assembly
Note: Coolant filter header is equipped with two check valves to stop flow of coolant when filter is removed.
- Apply a thin coat of coolant to filter gasket and install onto filter header.
- Tighten until gasket touches the coolant filter header. Tighten by hand an additional one full turn.
Section 13.4.14
Service Cooling System
Service cooling system every 100,000 miles (161,000 km) for the 7.6L engine, and every 180,000 miles (290,000 km) for the 8.7L engine.
|
|
|
To avoid injury from the expulsion of hot coolant, never remove the cooling system pressure cap while the engine is at operating temperature. Remove the cap slowly to relieve pressure. Wear adequate protective clothing (face shield or safety goggles, rubber gloves, apron, and boots). |
Drain and fill the cooling system as follows:
- The engine must be level. This will permit all water to drain from the cooling system.
- Allow the engine to cool. Remove deaeration tank pressure cap; open radiator drain. Wrap a heavy cloth around the cap and push down. Loosen cap slowly to the first notch position. Pause to allow steam and pressure to escape. Continue top turn the cap to the left and remove.
- Remove crankcase coolant drain plug and oil cooler drain plug from the rear of the cooler. After the system has been thoroughly drained, close all drains.
- Slowly fill the cooling system until the coolant reaches the bottom of the filler opening. Install deaeration tank cap.
- Set the parking brake and start the engine.
- Allow the engine to operate until the engine reaches its normal operating temperature. Watch for overheating.
- After the engine reaches its normal operating temperature, shut off engine. Carefully remove tank cap and add sufficient coolant to fill system. Reinstall tank cap.
Clean the cooling system as follows.
- Drain the system completely.
- Flush the cooling system with water. If the system is dirty or rusty, use the dealer recommended cooling system cleaner following the procedures in this guide. Refer to section 13.4.14.1.
- Refill the system with water, conditioner, antifreeze and coolant.
NOTICE:
If the coolant is extremely low and the engine is very hot, let the engine cool for approximately 15 minutes before adding coolant. Then, with the engine running, add coolant slowly. Adding cold water to a hot engine may crack the cylinder head or crankcase. Never use water alone!
Section 13.4.14.1
Cleaning the Cooling System
The cooling system should be drained and thoroughly flushed. Refer to section 13.4.14.
Unless the cooling system is treated with a corrosion preventative, rust and scale will eventually clog up passages in the radiator and water jackets. This condition is aggravated in some localities by formation of insoluble salts from the water used.
DDC cleaning solutions are available which have proven very successful in removing accumulation or rust, scale, sludge and grease. They should be used according to the recommendation on the container.
Note: Do not use chemical mixtures to stop radiator leaks except in an emergency. Never use such solutions instead of needed radiator repair.
Section 13.4.14.2
Radiator Fins
Check the radiator fins periodically to make sure they are free of bugs, leaves and other debris, and that they are not bent or damaged. Clogged or damaged fins prohibit the flow of outside air to the radiator and hamper efficient cooling system operation.
Section 13.4.14.3
Coolant Hoses
Only coolants with an ethylene glycol or a propylene glycol base are recommended for use in the Series 40E cooling systems. Other base coolants may damage rubber hoses, especially those made of silicone rubber. Type of rubber can usually be determined by color. Silicone hoses are made in COLOR while other rubber hoses are BLACK .
NOTICE: |
|
Coolant made with methoxy propanol is not recommended for use with Detroit Diesel Corporation engines. These types of coolant can damage engine internal seals and coolant hoses, and create a potential fire hazard due to lower flash points than ethylene glycol. |
Note: Avoid mixing propylene glycol antifreeze and ethylene glycol antifreeze in any diesel engine cooling system. This mixing of antifreeze solutions does not allow an accurate coolant solution reading for freeze protection.
The cooling system will most likely be filled with ethylene glycol coolant. It is recommended that an ethylene glycol coolant be added to the system when required.
Section 13.4.14.4
Thermostat
Your new engine is equipped at the factory with a high temperature thermostat.
Note: Ethylene glycol antifreeze must be used with high temperature thermostats.
Section 13.4.15
Vibration Damper
Inspect vibration damper every 24 months.
- At the appropriate inspection interval, have the vibration damper inspected by your DDC dealer for deterioration of rubber.
- Refer to the appropriate service manuals for the inspection procedures.
Section 13.4.16
Induction System
Pressurize induction system every 24 months.
- At the appropriate inspection interval, your DDC dealer should pressure test the air induction system.
- Refer to the appropriate troubleshooting manuals for the inspection procedures.
Section 13.4.17
Valve Lash
Adjust valve lash every 120,000 miles (193,100 km).
- At the appropriate inspection interval, have the valve lash adjusted by your DDC dealer.
- Refer to the appropriate service manuals for the inspection procedures.
Section 13.4.18
Crankcase Pressure
Measure crankcase pressure every 200,000 miles (290,000 km).
- At the appropriate interval, have the crankcase pressure checked by your DDC dealer.
- Refer to the appropriate service manuals for the inspection procedures.
Section 13.4.19
Turbocharger
Inspect turbocharger every 180,000 miles (290,000 km).
- Clean, then remove the turbocharger compressor inlet connections.
- Visually inspect the compressor wheel for:
- Dirt.
- Wheel rub.
- Wheel blade damage (bent or broken tips).
- Check by hand for the following conditions:
- Excessive radial or end play.
- Free wheel spin.
- Consult your DDC dealer if there is any doubt as to the condition of the turbocharger.
Section 13.4.20
Electrical System
Inspect the electrical system annually.
- Check the wiring harness for cracks, rubbing and loose connections.
- Check sensors for loose connections, corrosion or cracks.
- Check battery cables for
- Broken insulation.
- Rubbing/chafing.
- Corroded or loose connections.
| Series 40E Service Manual - 6SE410 |
| Generated on 10-13-2008 |