Section 7.2
Exhaust Manifold
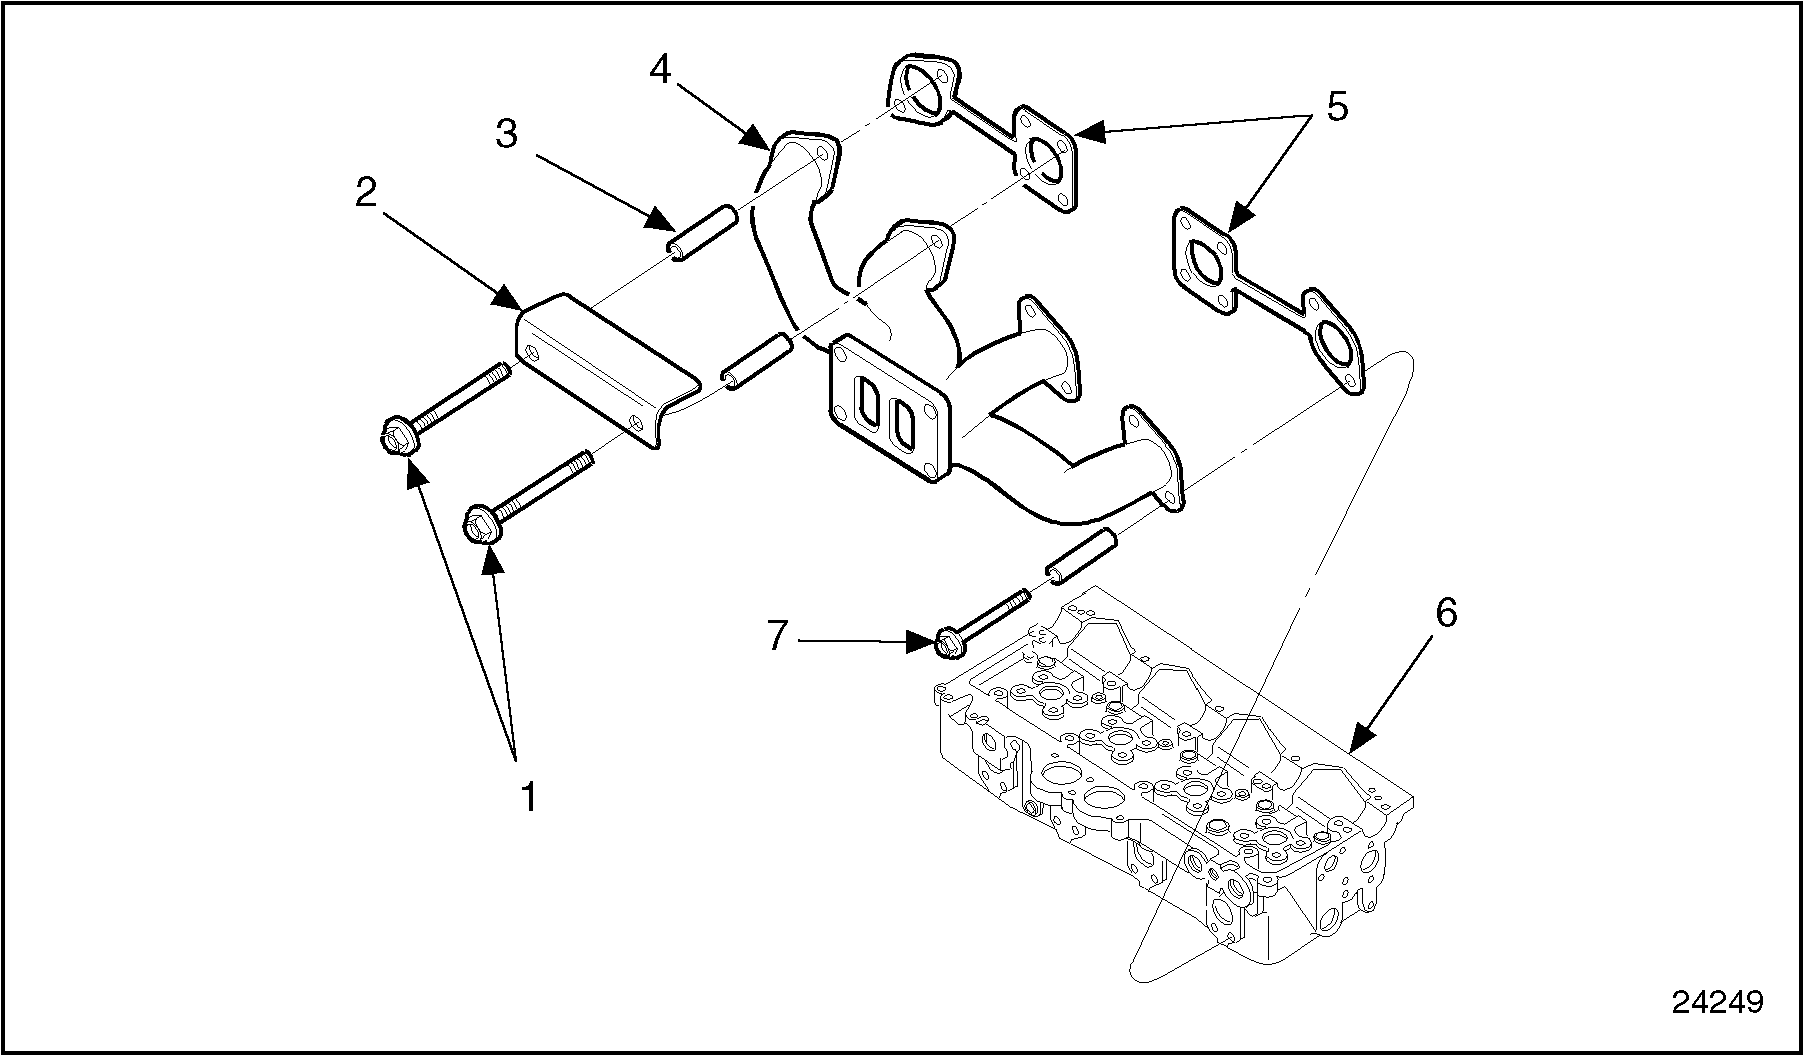
The cast-iron exhaust manifold is attached to the cylinder head with eight special alloy hardened bolts and eight bolt spacers. The manifold has a square outlet flange which is bolted directly to the turbocharger turbine housing. See Figure "Typical Exhaust Manifold Mounting" .

|
1. Stud |
5. Exhaust Manifold Gasket |
|
2. Heat Shield |
6. Cylinder Head |
|
3. Spacers |
7. Bolt |
|
4. Exhaust Manifold |
|
Figure 1. Typical Exhaust Manifold Mounting
Note: Exhaust manifolds on natural gas engines are thermal wrapped for efficiency, see Figure "Typical Exhaust Manifold Mounting (Series 50G)" .
Note: Exhaust manifolds on S50G automotive engines have an insulation wrap to contain heat.

|
1. Nut |
4. Gaskets |
|
2. Sleeves |
5. Cylinder Head |
|
3. Exhaust Manifold |
6. Bolt |
Figure 2. Typical Exhaust Manifold Mounting (Series 50G)
Two identical exhaust manifold gaskets are used between the manifold and the cylinder head. See Figure "Exhaust Manifold Gaskets and Related Parts" .
Section 7.2.1
Repair or Replacement of the Exhaust Manifold
To determine if repair is possible or replacement is necessary, perform the following procedure. See Figure "Flowchart for Repair or Replacement of Exhaust Manifold" .

Figure 3. Flowchart for Repair or Replacement of Exhaust Manifold
Section 7.2.2
Cleaning and Removal of the Exhaust System
Precleaning is not necessary.
Remove the exhaust manifold as follows:
- Remove the turbocharger assembly. Refer to "6.5.2 Cleaning and Removal of Turbocharger" .
- Remove the eight bolts and spacers that secure the exhaust manifold to the cylinder head.
- Remove the manifold. Discard the two gaskets.
Clean the exhaust manifold prior to inspection as follows:
- Remove any loose scale and carbon that may have accumulated on the internal walls of the manifold.
- Clean the manifold exterior with a wire brush.
Section 7.2.2.1
Inspection of the Exhaust Manifold
Inspect the exhaust manifold as follows:
- Inspect the exhaust manifold for damage.
- Check the exhaust manifold for cracks, especially in the bolt clamp areas.
- If manifold is cracked, replace with a new manifold.
- Inspect manifold mounting bolts for damage.
- Visually check for bolt stretching and thread damage.
- If bolts are excessively stretched, or if threads are excessively damaged, replace with new bolts.
Section 7.2.3
Installation of Exhaust Manifold
Install the exhaust manifold as follows:
- Install four exhaust manifold guide studs, J 36107 into the cylinder head to position and hold the two exhaust manifold gaskets correctly, and facilitate installation of the manifold.
- Install the exhaust gaskets (2) to the guide studs.
- Install the assembled manifold to the guide studs.
- Install four of the bolts and spacers to the vacant holes. Tighten the bolts finger-tight.
- Remove the four guide studs.
- Install the remaining four manifold bolts and spacers to the holes from which the studs were removed.
- Torque the bolts to 58-73 N·m (43-54 lb·ft) using the tightening sequence. See Figure
"Exhaust Manifold Bolt Tightening Sequence"
.

Figure 4. Exhaust Manifold Bolt Tightening Sequence
- Install the turbocharger assembly. Refer to "6.5.7 Installation of Turbocharger" .
- Install any other equipment that was removed for this procedure.

PERSONAL INJURY
To avoid injury before starting and running the engine, ensure the vehicle is parked on a level surface, parking brake is set, and the wheels are blocked.

PERSONAL INJURY
Diesel engine exhaust and some of its constituents are known to the State of California to cause cancer, birth defects, and other reproductive harm.
- Always start and operate an engine in a well ventilated area.
- If operating an engine in an enclosed area, vent the exhaust to the outside.
- Do not modify or tamper with the exhaust system or emission control system.
- Run the engine until normal operating temperature is reached.
- Torque the bolts to 73 N·m (54 lb·ft) again. See Figure "Exhaust Manifold Bolt Tightening Sequence" .
- Refer to "11.3.6 Turbocharger" for verification of proper exhaust manifold installation.
| Series 50 Service Manual - 6SE50 |
| Generated on 10-13-2008 |