Section 1.18
Flywheel Housing
The flywheel housing is a one-piece casting mounted against the rear of the cylinder block. It provides a cover for the flywheel and serves as a support for the cranking motor and the transmission. See Figure "Flywheel Housing and Related Parts" .

|
1. Crankshaft Rear Oil Seal |
3. Outer Bolt (4 long) |
|
2. Inner Bolt (8 short) |
4. Flywheel Housing |
Figure 1. Flywheel Housing and Related Parts
The crankshaft rear oil seal, which is pressed into the housing, may be removed or installed without removing the housing. Refer to "1.8.2 Removal of Front or Rear Crankshaft Oil Seal (Gear Case Cover or Flywheel Housing Removed)" .
Section 1.18.1
Repair or Replacement of Flywheel Housing
To determine if repair is possible or replacement is necessary, perform the following procedure. See Figure "Flowchart for Repair or Replacement of Flywheel Housing" .
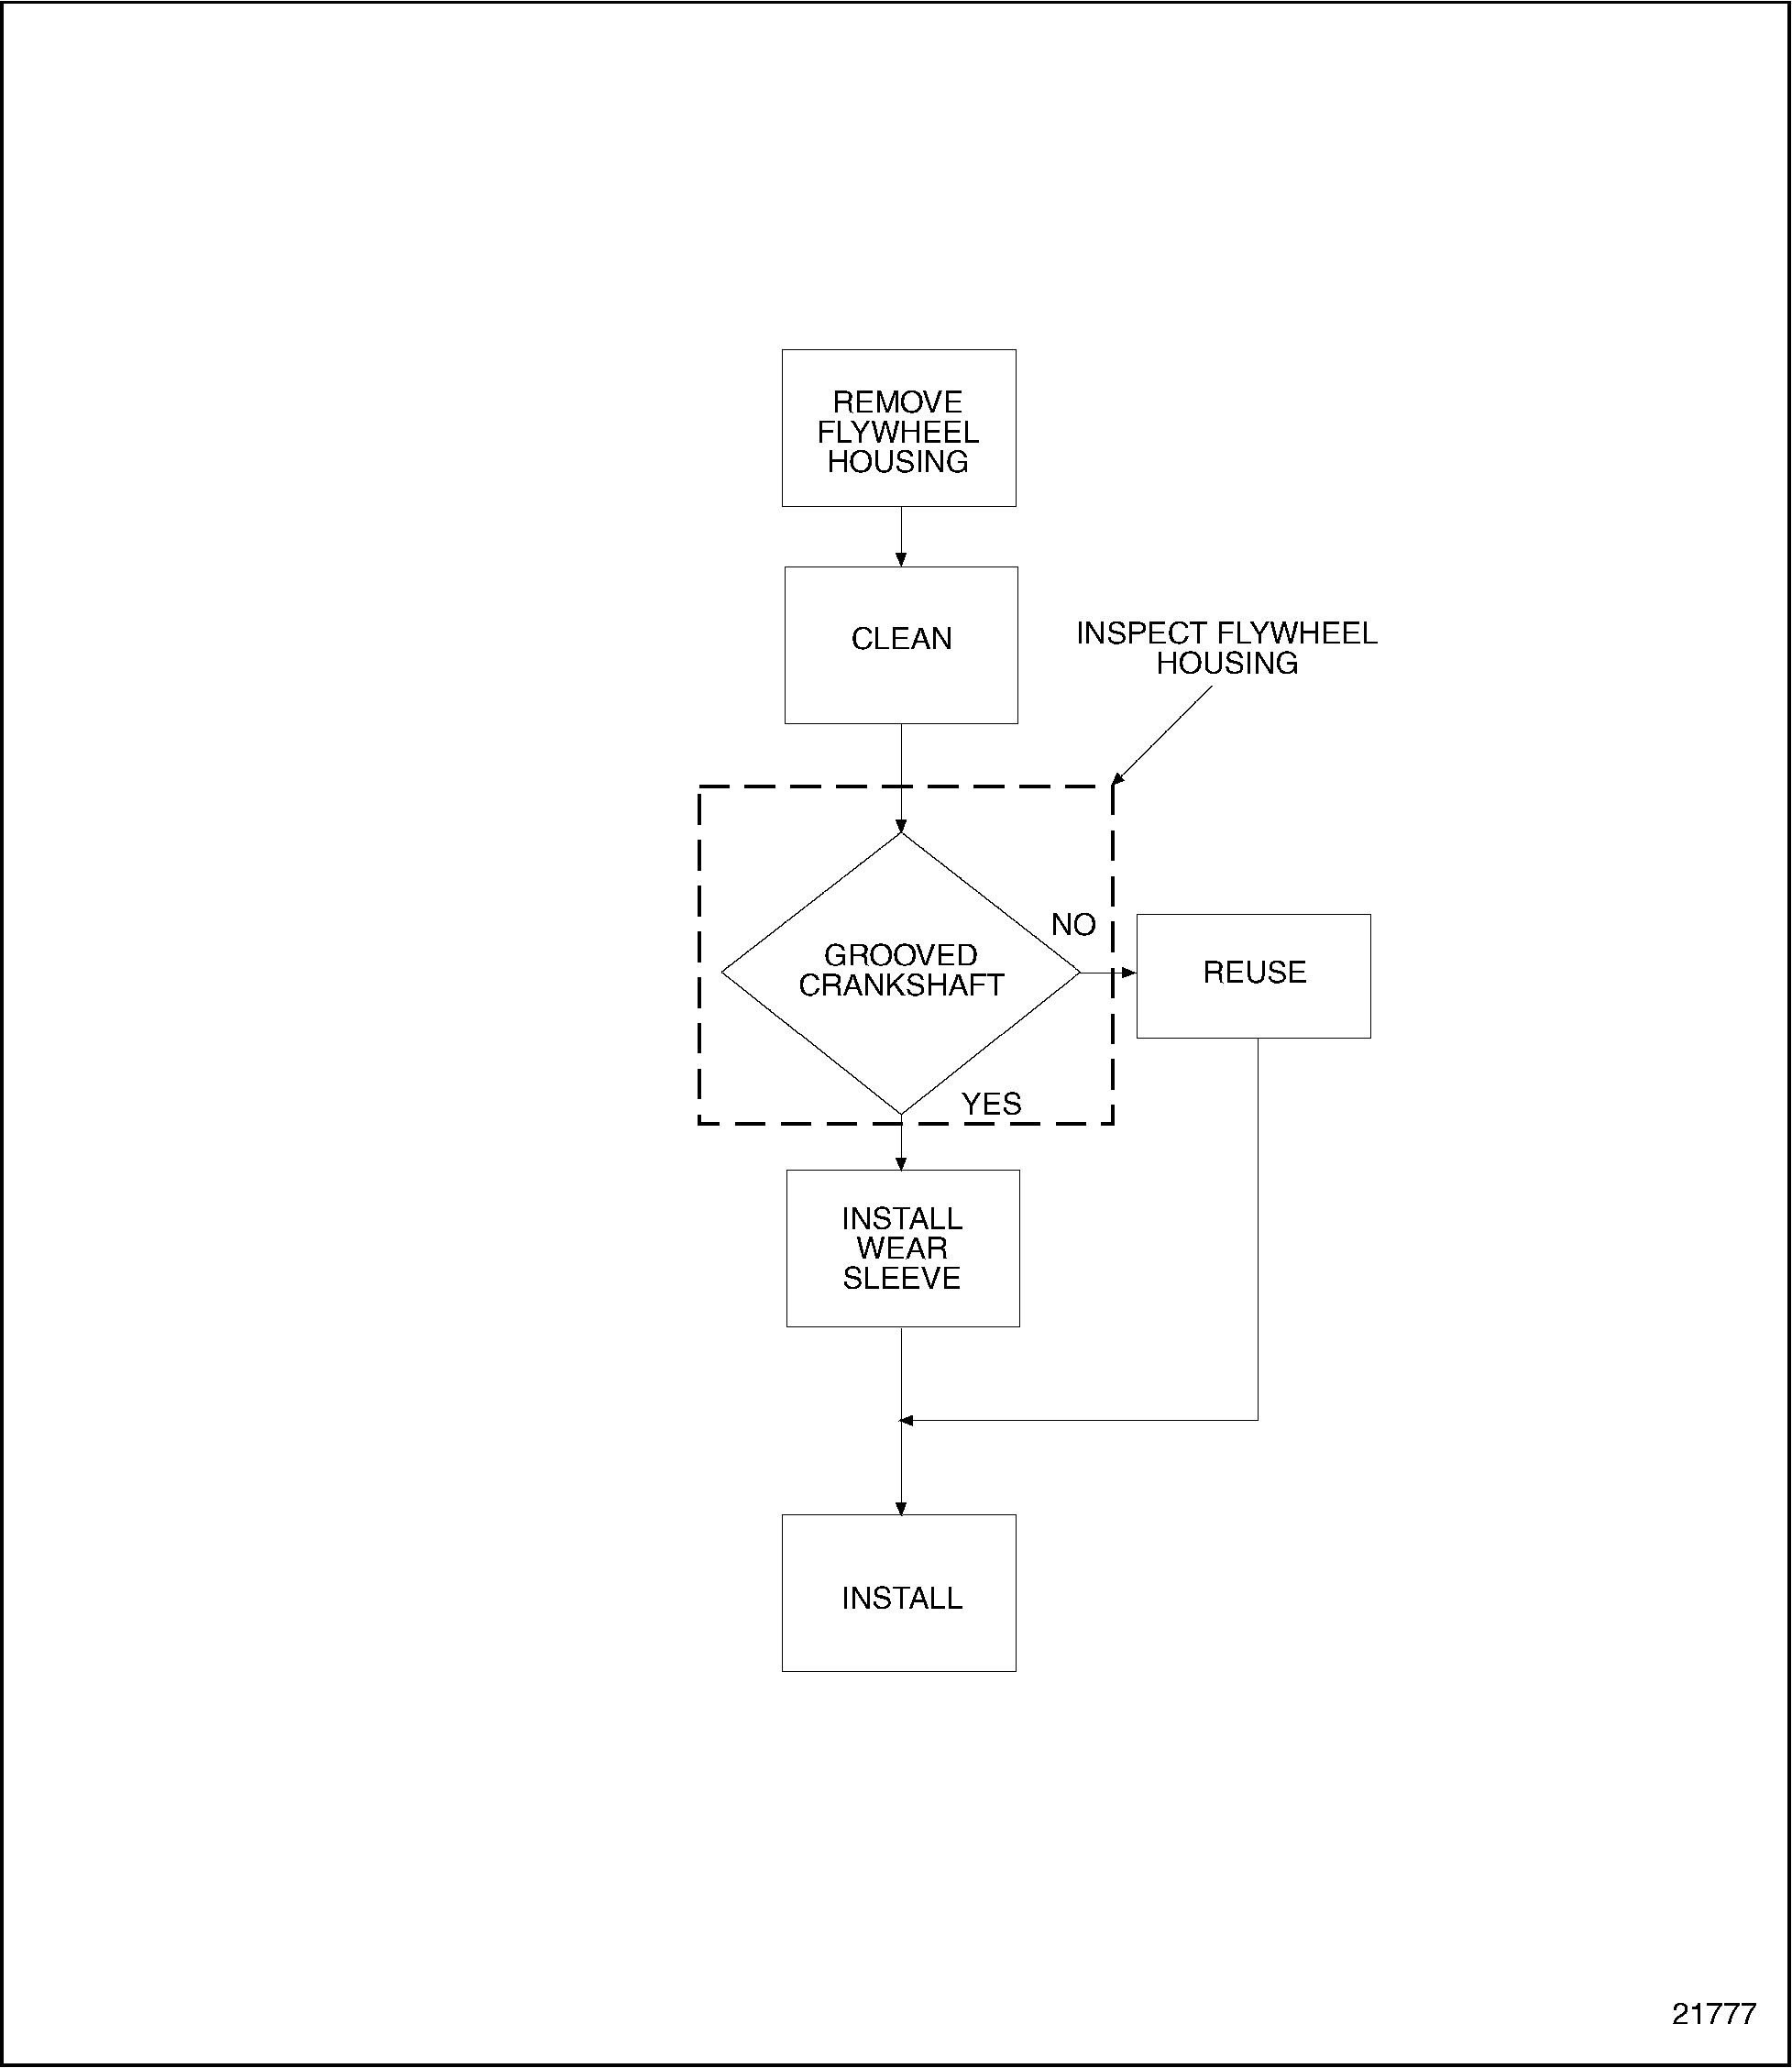
Figure 2. Flowchart for Repair or Replacement of Flywheel Housing
Section 1.18.2
Removal and Cleaning of Flywheel Housing
Precleaning is not necessary.
Remove the flywheel housing as follows:
- If the engine is removed from the vehicle, mount the engine on an overhaul stand. Refer to "1.1.2 Removal and Disassembly of Engine from the Vehicle" .
- Drain the engine oil; refer to "14.6.1 Lubricating Oil" , and remove the oil pan; refer to "3.11.2 Removal of Oil Pan" .
- Remove the flywheel and scuff plate. Refer to "1.16.2 Removal and Cleaning of Flywheel" .
- Remove the four long outer bolts and the eight short inner bolts that secure the flywheel housing to the engine. See Figure "Flywheel Housing and Related Parts" .
- To guide the flywheel housing until it clears the end of the crankshaft, thread two guide studs (J–35785)
for 12 mm bolts, or guide studs (J–43431)
for 14 mm bolts, into the cylinder block. See Figure
"Pilot Stud Installation"
.

Figure 3. Pilot Stud Installation
Note: The illustration is shown with the flywheel housing already removed for clarity.
- Thread eye bolts into the tapped holes in the side pads of the flywheel housing.
- Attach a suitable sling to the eye bolts and strike the front face of the housing alternately on each side with a soft hammer to loosen and work it off the dowel pins.
- Remove and discard the crankshaft rear oil seal.
- Remove all sealing material from the flywheel housing. Refer to section, "Cleaning" in the "General Information" section at the beginning of this manual.
Section 1.18.2.1
Inspection of Flywheel Housing and Rear Oil Seal Area of Crankshaft
Inspect the flywheel housing as follows:
- Inspect flywheel housing for cracks and any other damage.
- If sealing surface is damaged, repair with emery cloth.
- If cracked, repair is not possible.
- Inspect the crankshaft where the rear oil seal makes contact.
- Check for groove in crankshaft.
- If crankshaft is grooved, install a wear sleeve over the crankshaft end. An oversized I.D. rear oil seal must be used with the rear sleeve. Refer to "1.8.5 Installation of Front and Rear Crankshaft Oil Seal and Wear Sleeve" .
Section 1.18.3
Installation of Flywheel Housing
Install the flywheel housing as follows:
- Apply a continuous 1.6 mm (1/16 in.) bead of Loctite® 509 Gasket Eliminator®, or equivalent, to the cylinder block where it mates with the flywheel housing. See Figure
"Gasket Eliminator® Installation"
.

Figure 4. Gasket Eliminator® Installation
- Thread two aligning studs (J–35785) for 12 mm bolts or guide studs (J–43431) for 14 mm bolts, into the cylinder block to guide the housing in place. See Figure "Pilot Stud Installation" .
- Support the housing and position it over the crankshaft and against the cylinder block.
Note: Whenever crankshaft rear seal is put over the crankshaft, use crankshaft oil seal expander. Refer to "1.8.5 Installation of Front and Rear Crankshaft Oil Seal and Wear Sleeve" .
- Install all of the housing bolts in their proper location, finger-tighten them.
- Remove the pilot studs.
- Torque the eight short and four long flywheel housing bolts using the proper tightening sequence. See Figure
"Flywheel Housing Bolt Torque Sequence"
.
- If the bolts are 12 mm, torque to 112-126 N·m (83-93 lb·ft).
- If the bolts are 14 mm, torque to 160-200 N·m (118–148 lb·ft).
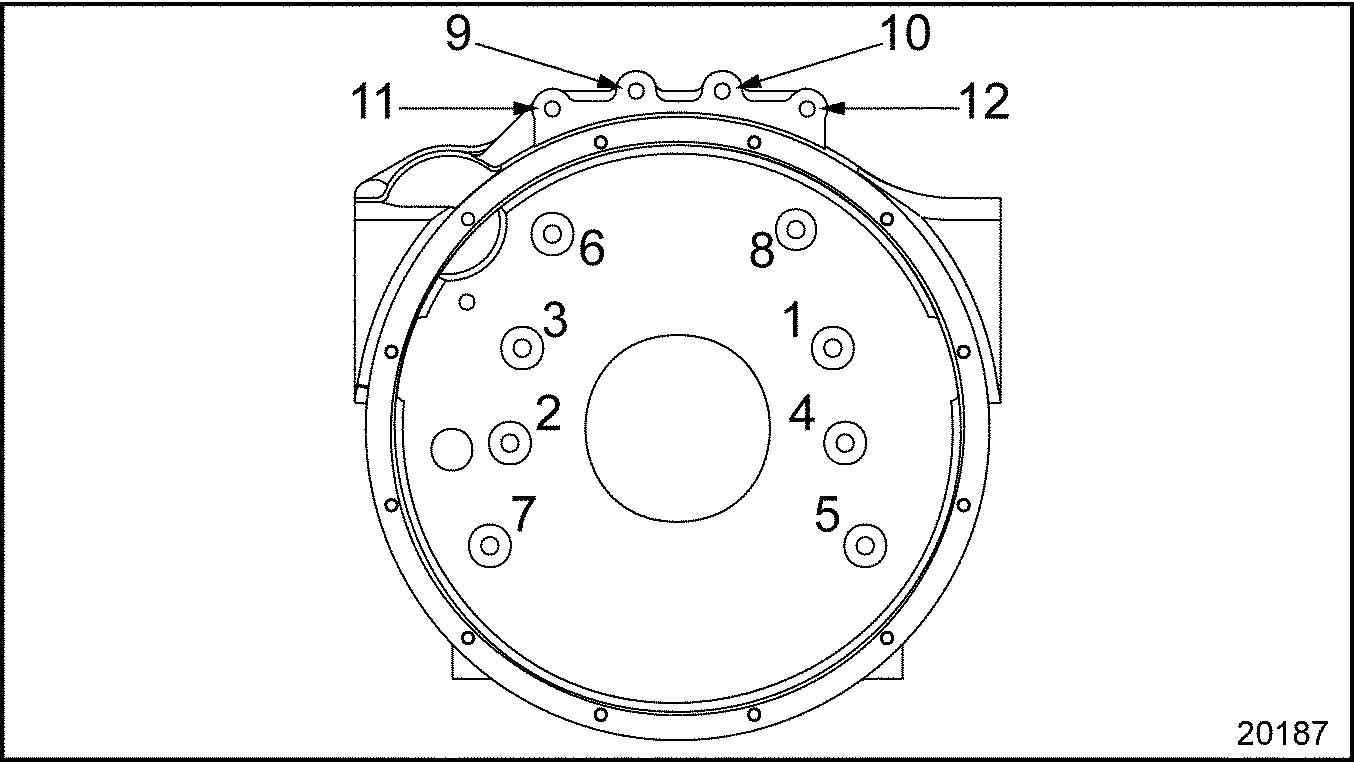
Figure 5. Flywheel Housing Bolt Torque Sequence
- Install the crankshaft rear main oil seal. Refer to "1.8.5 Installation of Front and Rear Crankshaft Oil Seal and Wear Sleeve" .
- Install the flywheel. Refer to "1.16.3 Installation of Flywheel" .
- Install oil pan; refer to "3.11.4 Installation of Oil Pan" , and refill the engine with new oil; refer to "14.6.1 Lubricating Oil" .
Section 1.18.3.1
Test for Flywheel Housing Bore Concentricity
Check the flywheel housing bore concentricity, and bolting flange run-out with tool set (J–9737–D) as follows:
- Thread the base post (J–9737–3, part of tool set J–9737–D) into one of the tapped holes on the outer edge of the flywheel.
- Assemble the dial indicators on the base post with the attaching parts provided in the tool set.
- Position the dial indicators straight and square with the flywheel housing bell face and inside bore of the bell. Make sure each indicator has adequate travel in each direction. See Figure
"Measuring Flywheel Housing Bore Concentricity and Bolting Flange Run-out"
.

Figure 6. Measuring Flywheel Housing Bore Concentricity and Bolting Flange Run-out
- Tap the end of the crankshaft (not the crankshaft pulley) with a soft hammer to force it toward one end of the block to ensure end play is in one direction only.
- Adjust each dial indicator to read zero at the twelve o'clock position.
- Bar the engine and rotate the crankshaft one complete revolution, taking readings at 90 degree intervals (four readings each for the bore and bolting flange face). See Figure
"Flywheel Housing"
.

Figure 7. Flywheel Housing
- Remove the wrench or cranking bar before recording each reading to ensure accuracy.
- The maximum total indicator reading must not exceed 0.33 mm (0.013 in.) for either the bore or the face.
- If the run-out exceeds the maximum limits, remove the flywheel and flywheel housing and check for dirt or foreign material between the flywheel housing and the cylinder block or oil pan.
- Clean the mating surfaces once again. Refer to section "General Information, Cleaning" in the beginning of this manual.
- Install flywheel housing. Torque the eight short and four long bolts to the cylinder block using the proper tightening sequence. See Figure
"Flywheel Housing Bolt Torque Sequence"
.
- If the bolts are 12 mm, torque to 112-126 N·m (83-93 lb·ft).
- If the bolts are 14 mm, torque to 160-200 N·m (118-148 lb·ft).
- Install the flywheel. Refer to "1.16.3 Installation of Flywheel" .
- Check the run-out again. If desired run-out cannot be accomplished, replace the flywheel housing.
| Series 60 Service Manual - 6SE483 |
| Generated on 10-13-2008 |