Section 6.5
Turbocharger
The 3K turbocharger is used on the Turbotronic 638. See Figure "Turbocharger Assembly Location" .

|
1.Exhaust Manifold |
5.Air Gas Recirculator |
|
2.Rocker Oil Feed Pipe |
6.Oil Filter |
|
3.Intake Manifold |
7.Turbocharger |
|
4.Water Manifold |
8.Starter |
Figure 1. Turbocharger Assembly Location
The turbocharger is designed to increase the overall efficiency of the engine. Power to drive the turbocharger is extracted from the energy in the engine exhaust gas.
The turbocharger consists of a turbine wheel and shaft, a compressor wheel, and a center housing that supports the rotating assembly, bearings, seals, turbine housing, and compressor housing. The center housing has connections for oil inlet and oil outlet fittings.
The turbine housing is a heat-resistant alloy casting that encloses the turbine wheel and provides a flanged engine exhaust gas inlet and an axially located turbocharger exhaust gas outlet. The turbine housing is secured to the turbine end of the center housing.
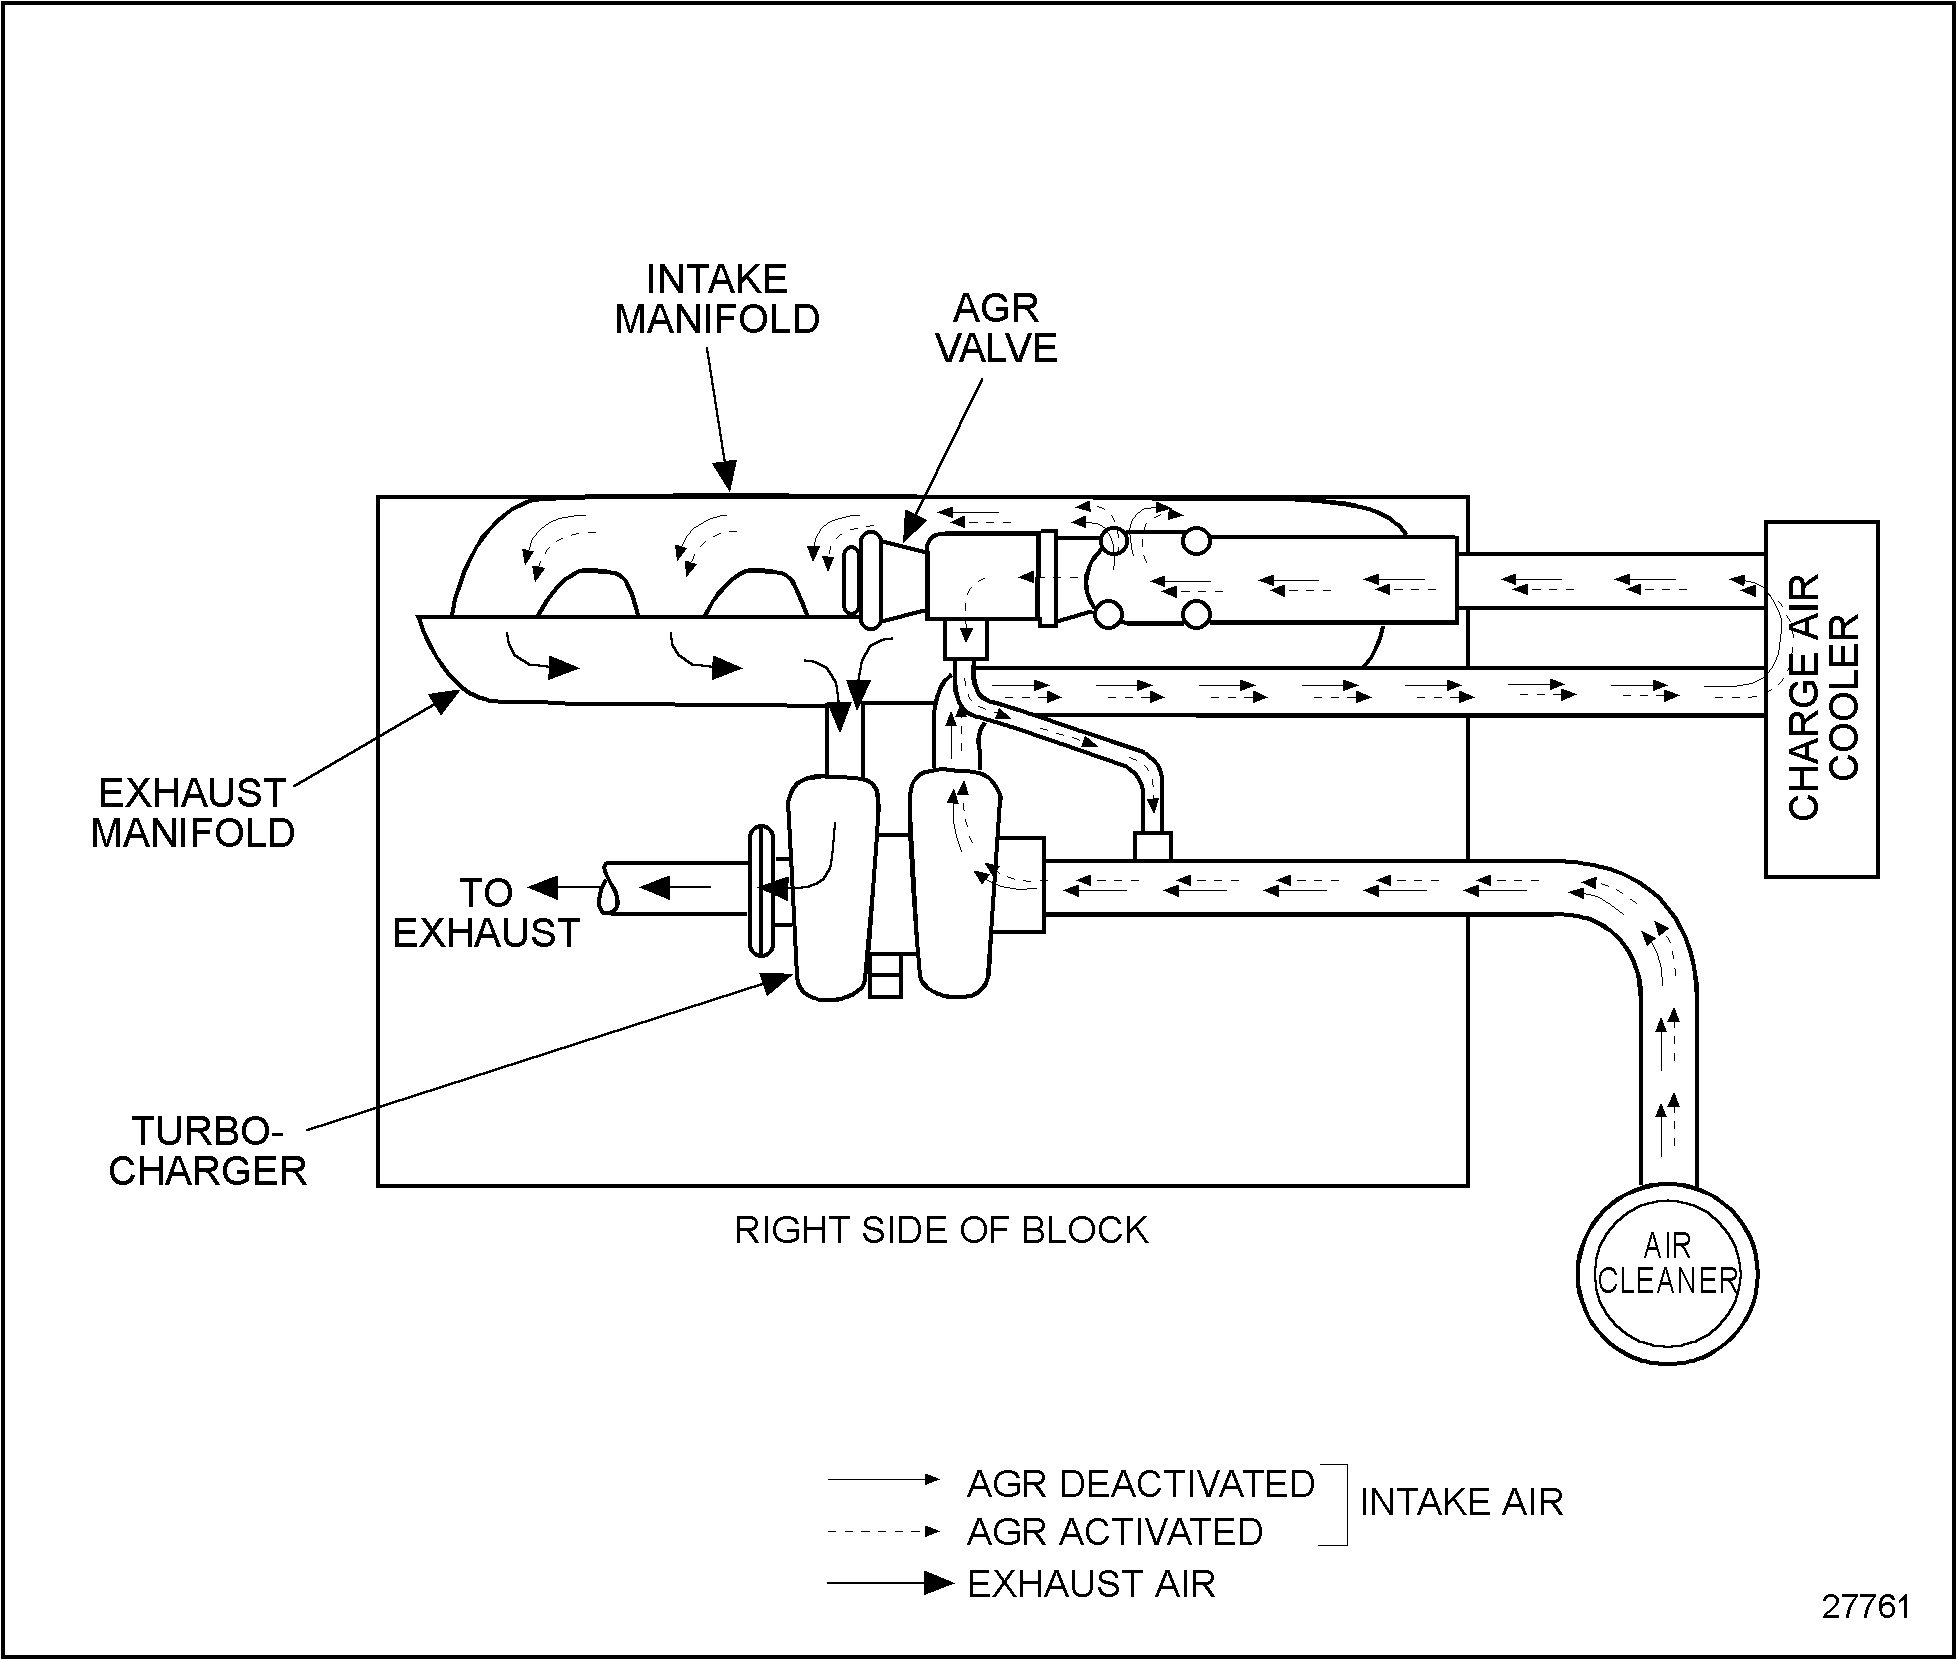
The turbocharger is mounted on the exhaust outlet flange of the engine exhaust manifold. After the engine is started, the exhaust gases flow from the engine and through the turbine housing causing the turbine wheel and shaft to rotate. See Figure "Schematic Air Flow Diagram" .

Figure 2. Schematic Air Flow Diagram
Section 6.5.1
Repair or Replacement of Turbocharger
To determine if repair is possible or replacement of the turbocharger is necessary, perform the following procedure. See Figure "Flowchart for Repair or Replacement of Turbocharger" .

Figure 3. Flowchart for Repair or Replacement of Turbocharger
Section 6.5.2
Removal of Turbocharger
Remove the turbocharger as follows:
NOTICE: |
|
Do not attempt to remove carbon or dirt buildup on the compressor or turbine wheels without removing the turbocharger from the engine. If chunks of carbon are left on the blades, an unbalanced condition will exist and subsequent failure of the bearings will result if the turbocharger is operated. |
- Disconnect oil feed line from turbocharger. See Figure
"Turbocharger Related Parts"
.

1.Allen Head Bolt
9.Oil Tube (Inlet)
2.Washer
10.Stud
3.Spring Washer
11.Gasket
4.Turbo Support Bracket
12.Turbocharger
5.Stud
13.Washer
6.Flange Nut
14.Adaptor
7.Turbocharger Exhaust Gasket
15.OIl Tube (Outlet)
8.Gasket
16.Adaptor
Figure 4. Turbocharger Related Parts
- Disconnect oil drain line. See Figure "Turbocharger Related Parts" .
- Disconnect the exhaust outlet pipe from the turbine housing of the turbocharger.
- Disconnect and remove air inlet hose attached to the compressor housing.
- Disconnect and remove CAC ducting at the compressor housing.
- Remove two turbocharger bracket nuts from the cylinder block. See Figure "Turbocharger Related Parts" .
- Remove turbocharger bracket to turbocharger housing Allen screws. See Figure "Turbocharger Related Parts" .
- Remove the turbocharger bracket.
- Remove four turbocharger mounting nuts from exhaust manifold.
- Remove turbocharger from engine.
Section 6.5.2.1
Inspection of Turbocharger
Similar damage can result from a contaminated exhaust system. Any debris left in the exhaust system after service work can fall back into the exhaust wheel. If large enough, these particles may cause turbine wheel damage at initial engine startup. The exhaust manifold and exhaust piping attached to the turbocharger should also be inspected for debris and cleaned, if necessary, before being installed.
Any time the CAC is removed, all CAC system components must be inspected to make sure they are clean and free of any casting slag, core sand, welding slag, or any other contaminants that could break free during engine operation and damage the turbine wheel.
Inspect the disassembled turbocharger, discarding any damaged parts, in the following manner:
- Visually check for nicked, crossed or stripped oil line threads.
- If damage is found, replace the turbocharger. Refer to "6.5.3 Installation of Turbocharger" .
- If no damage is found, proceed with step 2 of inspection.
- Visually check the turbine wheel shroud and turbine wheel for signs of rubbing.
- If damage is found, replace the turbocharger. Refer to "6.5.3 Installation of Turbocharger" .
- If no damage is found, proceed with step 3 of inspection.
- Visually check the compressor wheel for signs of rubbing or damage from foreign material. The wheel must be free of dirt and other foreign material.
- If damage is found, replace the turbocharger. Refer to "6.5.3 Installation of Turbocharger" .
- If no damage is found, proceed with step 4 of inspection.
- Rotate turbine shaft assembly to check for free rotation.
- If the turbine shaft assembly will not rotate freely, replace the turbocharger. Refer to "6.5.3 Installation of Turbocharger" .
- If the turbine shaft assembly rotates freely, reuse the turbocharger. Refer to "6.5.3 Installation of Turbocharger" .
Section 6.5.3
Installation of Turbocharger
Install turbocharger as follows:
- Install turbocharger to exhaust manifold with four nuts. Torque to 27-34 N · m (20-25 lb · ft).
- Install two turbocharger bracket bolts and secure turbocharger to bracket. Torque to 24-29 N · m (18-21 lb · ft).
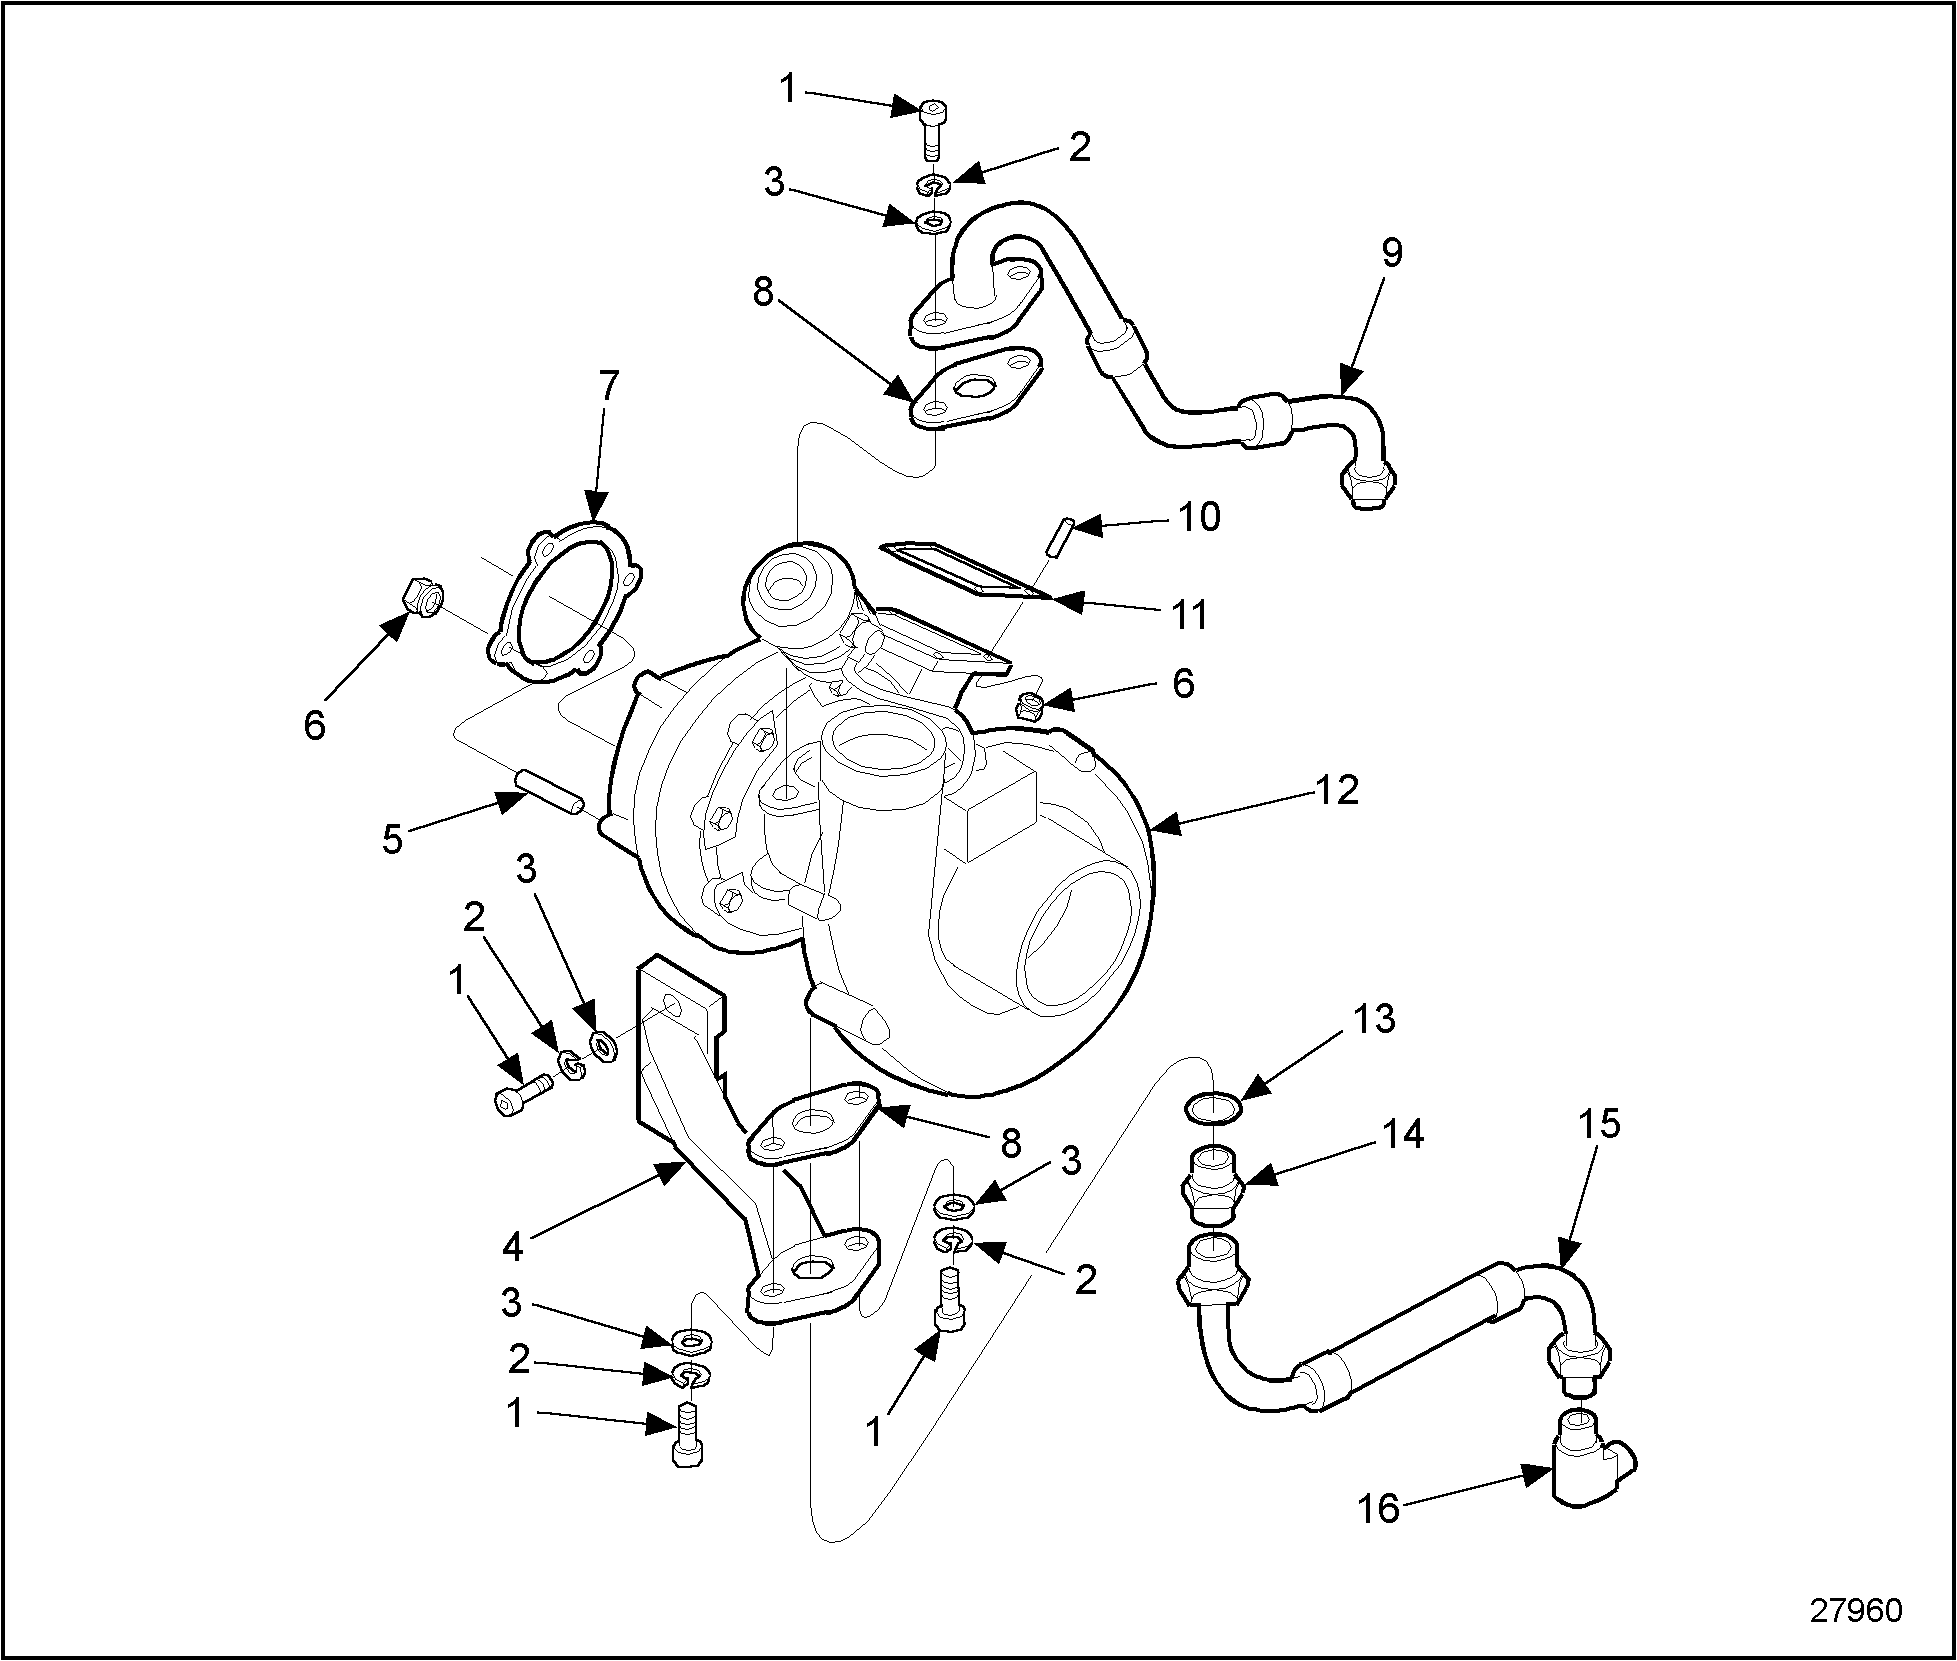
- Install two turbocharger support bolts and secure turbocharger bracket to cylinder block. Torque to 24-29 N · m (18-21 lb · ft). See Figure
"Turbocharger Part Location"
.

1.Allen Head Bolt
9.Oil Tube (Inlet)
2.Washer
10.Stud
3.Spring Washer
11.Gasket
4.Turbo Support Bracket
12.Turbocharger
5.Stud
13.Washer
6.Flange Nut
14.Adaptor
7.Turbocharger Exhaust Gasket
15.Oil Tube (Outlet)
8.Gasket
16.Adaptor
Figure 5. Turbocharger Part Location
- Connect CAC ducting at the compressor housing.
- Connect air inlet hose to the compressor housing.
- Connect exhaust outlet pipe to the turbine housing.
- Connect oil drain line.
- Connect oil feed line to turbocharger.
- Run the engine to verify repair.
| Series 638 Service Manual - 6SE648 |
| Generated on 10-13-2008 |
Hola tengo un problema con mi turbotronic 638 nadie en mi pais puede escanearme el camion yo soy de nicaragua lo e llevado a varios lugares y no pueden comunicarce si alguien me da informacion del programa que utilisa este motor porfavor les estaria muy agradecido y sobre la falla que tengo es la luz del chek engine se queda encendida en la pantalla del camion hyundai bering ld15 y solamente acelera a 2600rpm y no hace los cambios de marcha la caja entra como en modo seguro como podria solucionar ese problema si me pudieran brindar informacion estaria agradecido ..saludes.
Hola mi turbo tronic 638 tiene un problema solamente acelera a 2600 rpm y la luz chek engine no se apaga y bloquea la caja de cambios ya que es automatico y esta como en modo seguro si alguien me puede ayudar dandome algo de informacion selos agradeceria mi camion es un hyundai bering ld15 año 2000 y si pudieran rregalarme informacion de que tipo de programa necesita el escaner ya que lo e llevado a muchos lugares y nadie a podido escanearlo ya que no pueden comunicarse con la computadora del vehiculo ..