Additional Information
SHOP NOTES
Shop notes contains information on checking bearing clearances, the crankshaft remanufacturing procedures and a glossary.
Cylinder Block Liner Boring
Further information will be printed as it is developed.
Machining Cylinder Block Counterbores
Cutter plate assembly (J–41063) is used with Porta-Matic boring tool (PT–2050–D) to machine cylinder block counterbores for the installation of repair bushings. J–41063 features a special diameter and taper design which will permit the machining of the counterbore area in accordance with Detroit Diesel specifications.
Note: Use the appropriate Detroit Diesel part when installing the counterbore insert (repair bushing).
Machine the cylinder block counterbores as follows:
- Ensure block deck surface and boring tool base plate are clean and burr free.
- Plug push tube opening, oil galleys and lower liner packing areas to seal out any contaminating particles.
Note: Ensure cutter is marked Series 60.
Note: Maintain a sharp cutter bit to ensure the cylinder block counterbore is accurately machined.
- Using cutter (PT–2000–109) set to the dimensions listed in Table
"PT–2000–109 Cutter Dimensions"
and see Figure
"Bushing Repair Area"
.
Area to be Machined
Cutter Setting Dimensions
Depth of Cut
Upper counterbore
161.798 ± 0.0127 mm (6.370 ± .0005 in. Diameter)
15.29 mm (.602 in.)
Table 1. PT–2000–109 Cutter Dimensions
Figure 1. Bushing Repair Area
- Assemble Cutter Plate (PT–2090) to the Porta-Matic mainshaft. See Figure
"Cutter Plate(PT–2090) Location"
.

Figure 2. Cutter Plate(PT–2090) Location
- Mount Porta-Matic over cylinder to be bored. Open feed valve to lower cutter plate into cylinder bore. Push down firmly while rotating the mainshaft to insure proper alignment of Porta-Matic.
- With cutter plate centered in the cylinder bore, align base plate with the four cylinder head bolt holes in block deck while maintaining as much base plate to block deck contact as possible.
- Cross torque all four cylinder head bolts slowly to 67 N·m (50 ft·lbs). Rotate mainshaft to insure that the cutter plate is centered and moves freely.
Note: If binding occurs loosen the four cylinder head bolts and repeat steps 6 and .
- Pull up on the mainshaft to retract the cutter plate to the highest position and close the feed valve to lock in position.
NOTICE:
Ensure cutter bit is completely inserted into cutter slot.
- Insert cutter into slot of cutter plate. Hold cutter bit against the main shaft of the boring tool and tighten the cutter plate set screw to secure the cutter.
- Slowly lower the cutter and allow to rest onto engine block deck surface. Insert a 0.1016 mm (0.004 in.) shim between cutter and engine block. Set the depth of cut using bushing (PT–8065). Tighten socket set screw to hold depth collar in place. See Figure
"Upper Counterbore Cutting Area."
.

Figure 3. Upper Counterbore Cutting Area.
- Retract cutter plate to the up position and lock machine.
- Attach a right angle drill (PT–7145–A) and proceed to bore hole until Porta–Matic freewheels.
- Open feed valve and retract cutter plate upward. Remove cutter bit.
- Repeat steps 9 to for each of the next five bores.
- Cut the counterbore ledge depth to 8.966 ± 0.0254 mm (0.353 ± 0.001 in.) using counterbore tool (PT–2250–B) and the appropriate cutter plates. Follow normal ledge cutting procedures to achieve the finished counterbore depth.
Checking Bearing Clearance
A strip of soft plastic squeezed between the crankshaft journal and the connecting rod bearing or main bearing may be used to measure the bearing clearances.
The strip is a specially molded plastic wire manufactured commercially and is available in three sizes and colors. Type PG-1 (green) has a clearance range of 0.0254-0.0762 mm (0.001 -0.003 in.). Type PR-1 (red) has a range of 0.0508-0.1524 mm (0.002 -0.006 in.). Type PB-1 (blue) has a range of 0.1016-0.2286 mm (0.004 -0.009 in.).
The plastic strip may be used for checking the bearing clearances as follows:
- Remove the bearing cap and wipe the oil from the bearing shell and the crankshaft journal to be checked.
Note: Check the main bearing clearances with the weight of the crankshaft supported by a jack under the counterweight adjoining the bearing being checked. If the engine is positioned with the main bearing caps supporting the crankshaft and flywheel, an erroneous reading could result.
- Place a piece of plastic strip the full width of the bearing shell, about 1/4 inch off center. See Figure
"Using Plastic Strip to Measure Bearing-to-Crankshaft Clearance"
.
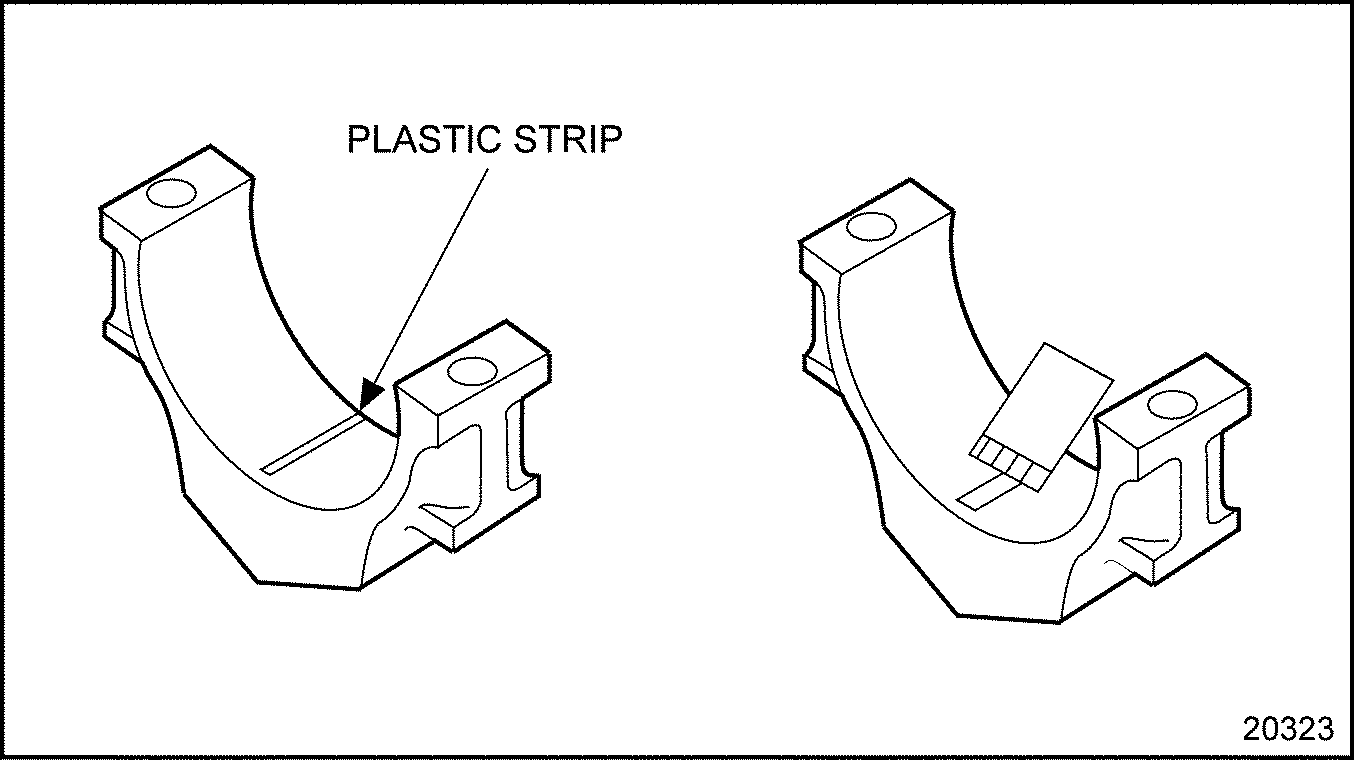
Figure 4. Using Plastic Strip to Measure Bearing-to-Crankshaft Clearance
- Install the bearing cap. Torque the bolts to 470-530 N·m (347-391 lb·ft).
- Remove the bearing cap. The flattened plastic strip will be found adhering to either the bearing shell or the crankshaft.
- Compare the width of the flattened plastic strip at its widest point with the graduations on the envelope. See Figure
"Using Plastic Strip to Measure Bearing-to-Crankshaft Clearance"
. The value within the graduation on the envelope indicates the bearing clearance in thousands of an inch. To obtain metric specifications:
- Multiply the reading obtained (in thousandths) by 25.4. Taper may be indicated when one end of the flattened plastic strip is wider than the other.
- Measure each end of the plastic strip. The difference between the two readings is the approximate amount of taper.
CRANKSHAFT REMANUFACTURING PROCEDURES
This section describes the procedures used to remanufacture crankshafts.
Crankshaft Grinding
In addition to the standard size main and connecting rod bearings, 0.254 mm, 0.508 mm and 0.762 mm (approximately 0.010 in., 0.020 in., and 0.030 in.), underseas bearings listed in Table "Crankshaft Journal Specifications" are available.
Crankshafts which exhibit surface irregularities may be reground to utilize these bearings. Listed in Table "Crankshaft Journal Specifications" , are guidelines to determine if the crankshaft is suitable for regrinding:
|
Bearing Size |
11 & 12L Connecting Rod Journal Diameter |
14L Connecting Rod Journal Diameter |
Main Bearing Journal Diameter |
|
Standard |
85.000 - 84.975 mm (3.346 in. - 3.345 in.) |
95.000 - 94.975 mm (3.740 in. - 3.739 in.) |
125.000 - 124.975 mm (4.921 in. - 4.920 in.) |
|
0.254 mm (0.010 in.) Undersize |
*84.750 - 84.775 mm (3.336 in. - 3.337 in.) |
94.750 - 94.775 mm (3.730 in. - 3.731 in.) |
*124.750 - 124.725 mm (4.911 in. - 4.910 in.) |
|
0.508 mm (0.020 in.) Undersize |
*84.500 - 84.475 mm (3.327 in. - 3.326 in.) |
94.500 - 94.475 mm (3.720 in. - 3.719 in.) |
*124.500 - 124.475 mm (4.902 in. - 4.901 in.) |
|
0.762 mm (0.030 in.) Undersize |
*84.250 - 84.225 mm (3.317 in. - 3.316 in.) |
94.250 - 94.225 mm (3.711 in. - 3.709 in.) |
*124.250 - 124.225 mm (4.892 in. - 4.891 in.) |
Note: * Dimension of reground crankshaft.
Inspection
Perform the following steps for part inspection:
- Determine if the crankshaft is from an 11.1 liter engine or a 12.7 liter engine. Listed in Table
"Crankshaft Part Number History"
are the forging number history for Series 60 crankshafts.
Model
Series 60 Crankshaft
Forging Part Number
Part Number History
Year Released
Fillet Finishing
11.1 Liter
8929238
1986
Induction Hardened
12.7 Liter
8929239
1986
Induction Hardened
14 Liter
23522887
1998
Induction Hardened
Table 4. Crankshaft Part Number History - Inspect connecting rod and main bearing journals for discoloration due to excessive overheating from bearing failure.
Note: Crankshafts with discoloration are not acceptable for rework.
- Inspect keyway conditions using width gages and micrometers. Compare with the specifications. See Figure
"Standard Crankshaft Keyway Dimensions"
.
Figure 5. Standard Crankshaft Keyway Dimensions
- Inspect flange bolt holes visually and determine if any necessary repairs can be made by chasing threads or installing heli-coil(s).
- Regardless of seal area wear condition, a new sleeve and seal must be installed.
- Read and record all "bearing" total indicator reading (TIR) measurements with the crankshaft mounted in vee blocks. Listed in Table
"Bearing Total Indicator Reading (TIR) Specifications"
are TIR limits.
Note: Run-out tolerance listed in Table "Bearing Total Indicator Reading (TIR) Specifications" are given for guidance when regrinding crankshaft. When the run-out on adjacent journals is in the opposite direction, the sum must not exceed 0.076 mm (0.003 in.) total indicator reading. When the run-out on adjacent journals is in the same direction, the difference must not exceed 0.076 mm (0.003 in.) total indicator reading.
Journals Supported On
Journals Measured
Maximum Run-Out (Total Indicator Reading)
No. 1 and No. 7
No. 2 and No. 6
0.076 mm (0.003 in.)
No. 1 and No. 7
No. 3 and No. 5
0.127 mm (0.005 in.)
No. 1 and No. 7
No. 4
0.152 mm (0.006 in.)
Table 5. Bearing Total Indicator Reading (TIR) Specifications - Whether run-out on adjacent journals is in the same or opposite directions, the sum shall not exceed 0.076 mm (0.003 in.) TIR.
- When high spots of run-out adjacent journals are at right angles to each other, the sum shall not exceed 0.10 mm (0.004 in.) TIR or 0.05 mm (0.002 in.) on each journal.
- In the event of bearing seizure, bearing overlay must be removed. Check the width of journals to determine whether the sidewalls can be reground. See Figure
"Standard Crankshaft Dimensions"
for location of crankshaft dimensions. Crankshaft specifications are listed in Table
"Crankshaft Specifications"
.
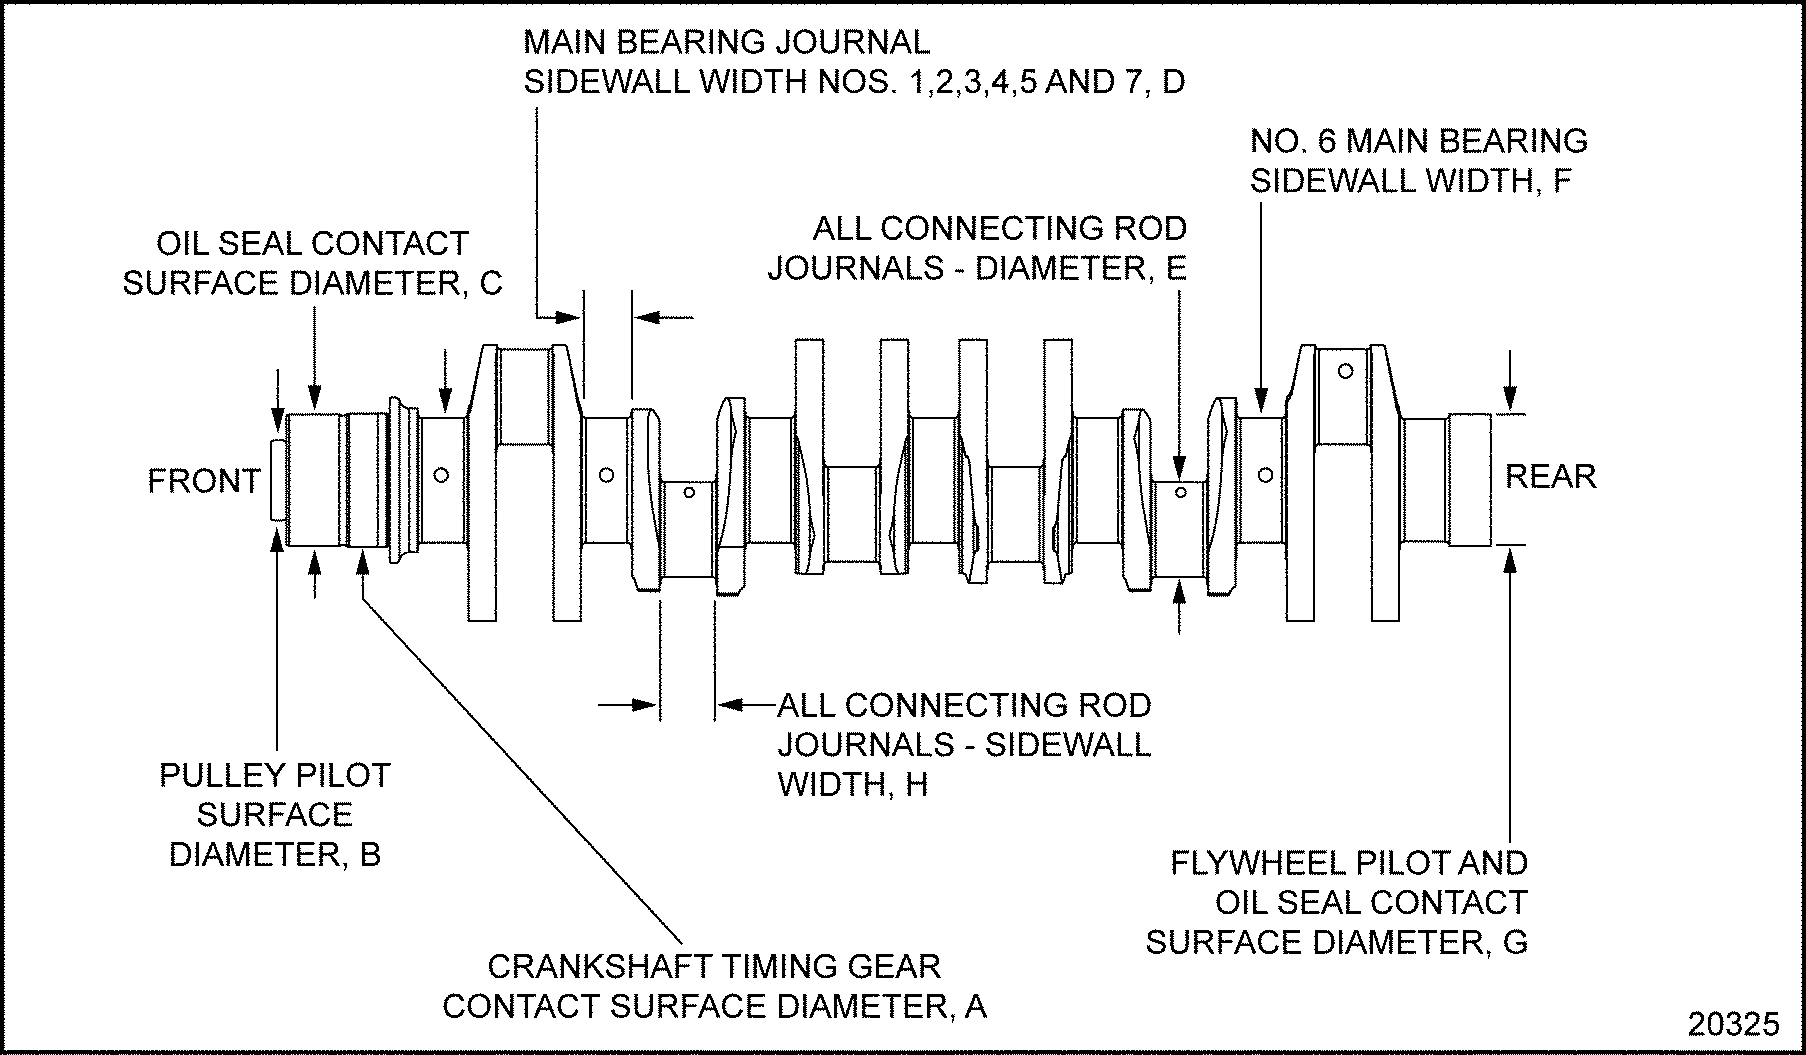
Figure 6. Standard Crankshaft Dimensions
Location
Diameter, mm (in.)
A
11.1 L 132.970-133.000 mm (5.235-5.236 in.)
12.7 L 133.670-133.770 mm (5.263-5.264 in.)
B
80.19-80.22 mm (3.157-3.158 in.)
C
131.72-131.78 mm (5.185-5.188 in.)
D
49.35-49.65 mm (1.943-1.955 in.)
E (11 & 12 L)
84.975-85.000 mm (3.345-3.346 in.)
E (14 L)
94.975-95.000 mm (3.742-3.743 in.)
F
49.45-49.55 mm (1.947-1.950 in.)
G
131.72-131.78 mm (5.186-5.188 in.)
H
55.77-56.07 mm (2.196-2.208 in.)
Table 6. Crankshaft Specifications - Visually inspect the entire crankshaft for any serious deviations from normal wear patterns, cracks, nicks or other damage.
- If the crankshaft has been ground undersize prior to present receiving inspection, check fillets, thrust, and all widths to determine whether or not enough stock remains to warrant regrinding. See Figure
"Standard Crankshaft Dimensions"
for location of crankshaft dimensions. Listed in Table
"Series 60 Crankshaft Remanufacturing Tolerances"
are crankshaft remanufacturing tolerances.
Crankshaft Specifications
Minimum
Maximum
Tolerance
Journal Diameter - Main Bearing
124.975 mm (4.920 in.)
125.000 mm (4.921 in.)
0.025 mm (0.001 in.)
Journal Diameter - Connecting Rod Bearing
84.975 mm (3.345 in.)
85.000 mm (3.346 in.)
0.025 mm (0.001 in.)
14L Journal Diameter - Connecting Rod Bearing
94.975 mm (3.742 in.)
95.000 mm (3.743 in.)
0.025 mm (0.001 in.)
Journal Out-of-Round - Main Bearing
–
0.015 mm (0.0006 in.)
0.015 mm (0.0006 in.)
Journal Out-of-Round - Connecting Rod Bearing
–
0.010 mm (0.0004 in.)
0.010 mm (0.0004 in.)
Journal Taper - Main Bearing - Full Length
–
0.013 mm (0.0005 in.)
0.013 mm (0.0005 in.)
Journal Taper - Connecting Rod - Full Length
–
0.010 mm (0.0004 in.)
0.010 mm (0.0004 in.)
Journal Taper Connecting Rod Half - Length
–
0.005 mm (0.0002 in.)
0.005 mm (0.0002 in.)
Gear Fit Run-out TIR (Total Indicated Reading)
–
0.030 mm (0.0012 in.)
0.030 mm (0.0012 in.)
Journal Alignment - Main and Connecting Rod - Per Length of Pin
–
0.012 mm (0.0005 in.)
0.012 mm (0.0005 in.)
Axial Profile Slope - Main - Full Length
–
0.008 mm (0.0003 in.)
0.008 mm (0.0003 in.)
Axial Profile Slope - Mains Per 5.0 mm (0.197 in.) of Length
–
0.006 mm (0.00024 in.)
0.006 mm (0.00024 in.)
Axial Profile Slope - Connecting Rod Journals - Full Length
–
0.006 mm (0.0002 in.)
–
Axial Profile Slope - Connecting Rod Journals - Per 5.0 mm (0.197 in.) of Length
–
0.003 mm (0.0001 in.)
–
Main and Connecting Rod Fillet Radius Main and Connecting Rod Fillet Radius
3.5 mm (0.1378 in.)
4.0 mm (0.1575 in.)
–
Surface Finish - Main and Connecting Rod Journals
–
0.3 μ m 12 AA
0.3 μ m 12 AA
Surface Finish - Thrust Wall
–
0.4 μ m 16 AA
0.4 μ m 16 AA
Surface Finish - Oil Seal Area
0
2.0 μ m 80 AA
2.0 μ m 80 AA
Journal Hardness (Rockwell C)
47 Rc
55 Rc
8 Rc
Crankshaft Dynamic Balance - (Ounce - Inch)
–
1.5
1.5
Main and Connecting Rod Journal Alignment Per Length of Pin
–
0.012 mm (0.0004 in.)
–
Crankshaft - Convex
–
0.013 mm (0.0005 in.)
0.043 mm (0.0017 in.)
Butt Face Concave
–
0.03 mm (0.0011 in.)
0.043 mm (0.0017 in.)
Pin Width
55.77 mm (2.196 in.)
56.07 mm (2.208 in.)
0.30 mm (0.012 in.)
Timing Gear Diameter (must maintain 0.003 -0.005 in. press fit)
133.67 (5.263 in.)
133.70 mm (5.264 in.)
0.030 mm (0.0012 in.)
Table 7. Series 60 Crankshaft Remanufacturing Tolerances - Journal O.D. score marks must be:
- Circumferential-not axial.
- Maximum of 0.254 mm (0.010 in.) wide.
- At least 3.175 mm (0.125 in.) from fillet tangent point.
- Smooth, no proud metal.
- Maximum of one mark per journal.
- No journal dimpling permitted for removal of defects.
- Nicks, dents or pits in journal O.D. must be 3.175 mm (0.125 in.) maximum diameter, no proud metal, maximum (3) per journal.
- Pins and bearing journals which exhibit discoloration due to excessive overheating from bearing failure are not acceptable for rework.
- If one or more main or connecting rod journals require grinding, then grind all of the main journals or all of the connecting rod journals to the same required size.
- Inspect the hardness of all journals. Crankshafts to be 47-55 Rc.
- Clean the crankshaft as follows:
- Clean all oil passages with a brush. Power probing is recommended.
- Remove all copper, brass and lead, etc., from journal surfaces. Scrub the crankshaft until clean in a detergent bath.
- Extremely rusted shafts can be soaked in hot rust stripper.
- Scrub all webs and counterweights with a wire brush to remove all blackened residue. Use industrial detergent at proper ratios or regular hot degreaser.
NOTICE:
A crack in any vital area of the crankshaft cannot be repaired or removed. That is why magnetic particle inspection of the entire crankshaft before regrinding is mandatory. Crankshafts that are cracked MUST BE SCRAPPED.
- After a visual inspection, the crankshaft should be magnetically inspected using one of the two following methods:
- Magnetic Particle Method: Refer to "1.7.2.6 Magnetic Particle Method" .
- Fluorescent Magnetic Particle Method: Refer to "1.7.2.8 Fluorescent Penetrant Method" .
MACHINING OPERATIONS
The following topics cover machining operations:
Main and Connecting Rod Journals
Main and Connecting Rod Journals:
- Connecting rod and main bearing journal grinding should be performed with crankshaft rotation opposite to actual engine rotation. See Figure
"Crankshaft Grinding Rotation"
.
Note: Crankshaft and main journal grinding should be performed with crankshaft rotation opposite to actual engine rotation. While polishing should be performed with the crankshaft rotation in the same direction as engine rotation.

Figure 7. Crankshaft Grinding Rotation
- Crankshaft polishing should be performed with the crankshaft rotation in the same direction as engine rotation.
- All connecting rod journal fillets must have a 5.75 mm (0.226 in.) radius between the crank cheek and the journal.
- All connecting rod journal fillets must have a 5.75 mm (0.226 in.) radius between the crank cheek and the journal. All main journal fillets must have a 3.75 mm (0.148 in.) radius between the crank cheek and the journal.
- No journal may have any sharp grind marks. The fillet must blend smoothly into the journal and the crank cheek and must be free of scratches.
- The radius may be checked with a fillet gage. See Figure
"Crankshaft Journal Fillets"
.

Figure 8. Crankshaft Journal Fillets
- Lobing and Chatter: The number of lobes around the journal circumference, times the average peak to valley lobe height in micrometers, shall not exceed 42 micrometers. Peak to valley excursions exceeding 1.0 micrometers shall be considered lobing or chatter.
- Excursions can be measured on a circular chart of the circumferential profile.
Grinding Connection Rod Journals (Pins)
Perform the following steps for grinding connection rod journals:
- Grind the pin O.D. surface to the specified undersize. The undersize conditions are 0.254 mm, 0.508 mm or 0.762 mm (approximately 0.010 in., 0.020 in. or 0.030 in.).
- ALL connecting rod journals must be ground to the same undersize condition.
- Journal taper on a radial basis shall not exceed 0.008 mm (0.0003 in.) overall, or exceed 0.004 mm (0.00016 in.) on half-length.
Note: Avoid localized heating, which often produces grinding cracks. Cool the crankshaft generously with coolant while grinding. Do not crowd the grinding wheel into the work.
- Grind sidewalls wide enough to clean up the basic face surface, not to exceed pin width allowable. See Figure "Standard Crankshaft Dimensions" .
- If there are deep interruptions, gouges or nicks that do not extend into fillets, smooth the edges with 120 grit emery cloth.
Grinding Main Bearing Journals
Perform the following steps for grinding main bearing journals:
- Grind the main bearing O.D. surface to the specified undersize. The undersize conditions are 0.254, 0.508 or 0.762 mm (approximately 0.010, 0.020, or 0.030 in.).
Note: Avoid localized heating, which often produces grinding cracks. Cool the crankshaft generously with coolant while grinding. Do not crowd the grinding wheel into the work.
- ALL main bearing journals must be ground to the same undersize conditions.
- Journal taper on a radial basis shall not exceed 0.012 (0.0005 in.) overall or exceed 0.006 mm (0.00024 in.) on half-length.
Other Machining Operations:
Perform the following steps for other machining operations:
- Examine the thrust wall (No. 4 main bearing):
- If the thrust wall surface is scored, scratched or groove worn, the thrust wall must be "bump ground."
- The maximum run-out of the thrust wall is 0.038 mm (0.0015 in.) TIR.
- If wear is 0.0508 mm (0.002 in.) or more, regrind to restore flatness to the thrust wall. See Figure "No. 6 Main Journal Thrust Wall Dimensions" .
- An oversize thrust wall is to be "bump ground" in multiples of 0.127 mm (0.005 in.), with a maximum of 0.250 mm (0.010 in.) to be removed from each side. Record oversize for installations.

Figure 9. No. 6 Main Journal Thrust Wall Dimensions
Note: Avoid localized heating, which often produces grinding cracks. Cool the crankshaft generously with coolant while grinding. Do not crowd the grinding wheel into the work.
- Chamfer all oil holes to remove grinding burrs to the limit shown on illustrations. See Figure
"Oil Hole Specifications - Connecting Rod Journals - 11.1 L Crankshaft (139 mm stroke) "
. See Figure
"Oil Hole Specifications - Connecting Rod Journals - 12.7 L Crankshaft (160 mm stroke) "
. See Figure
"Connecting Rod Journal Oil Hole Chamfer Limits"
. See Figure
"Main Journal Oil Hole Chamfer Limits"
.
Figure 10. Oil Hole Specifications - Connecting Rod Journals - 11.1 L Crankshaft (139 mm stroke)

Figure 11. Oil Hole Specifications - Connecting Rod Journals - 12.7 L Crankshaft (160 mm stroke)

Figure 12. Connecting Rod Journal Oil Hole Chamfer Limits
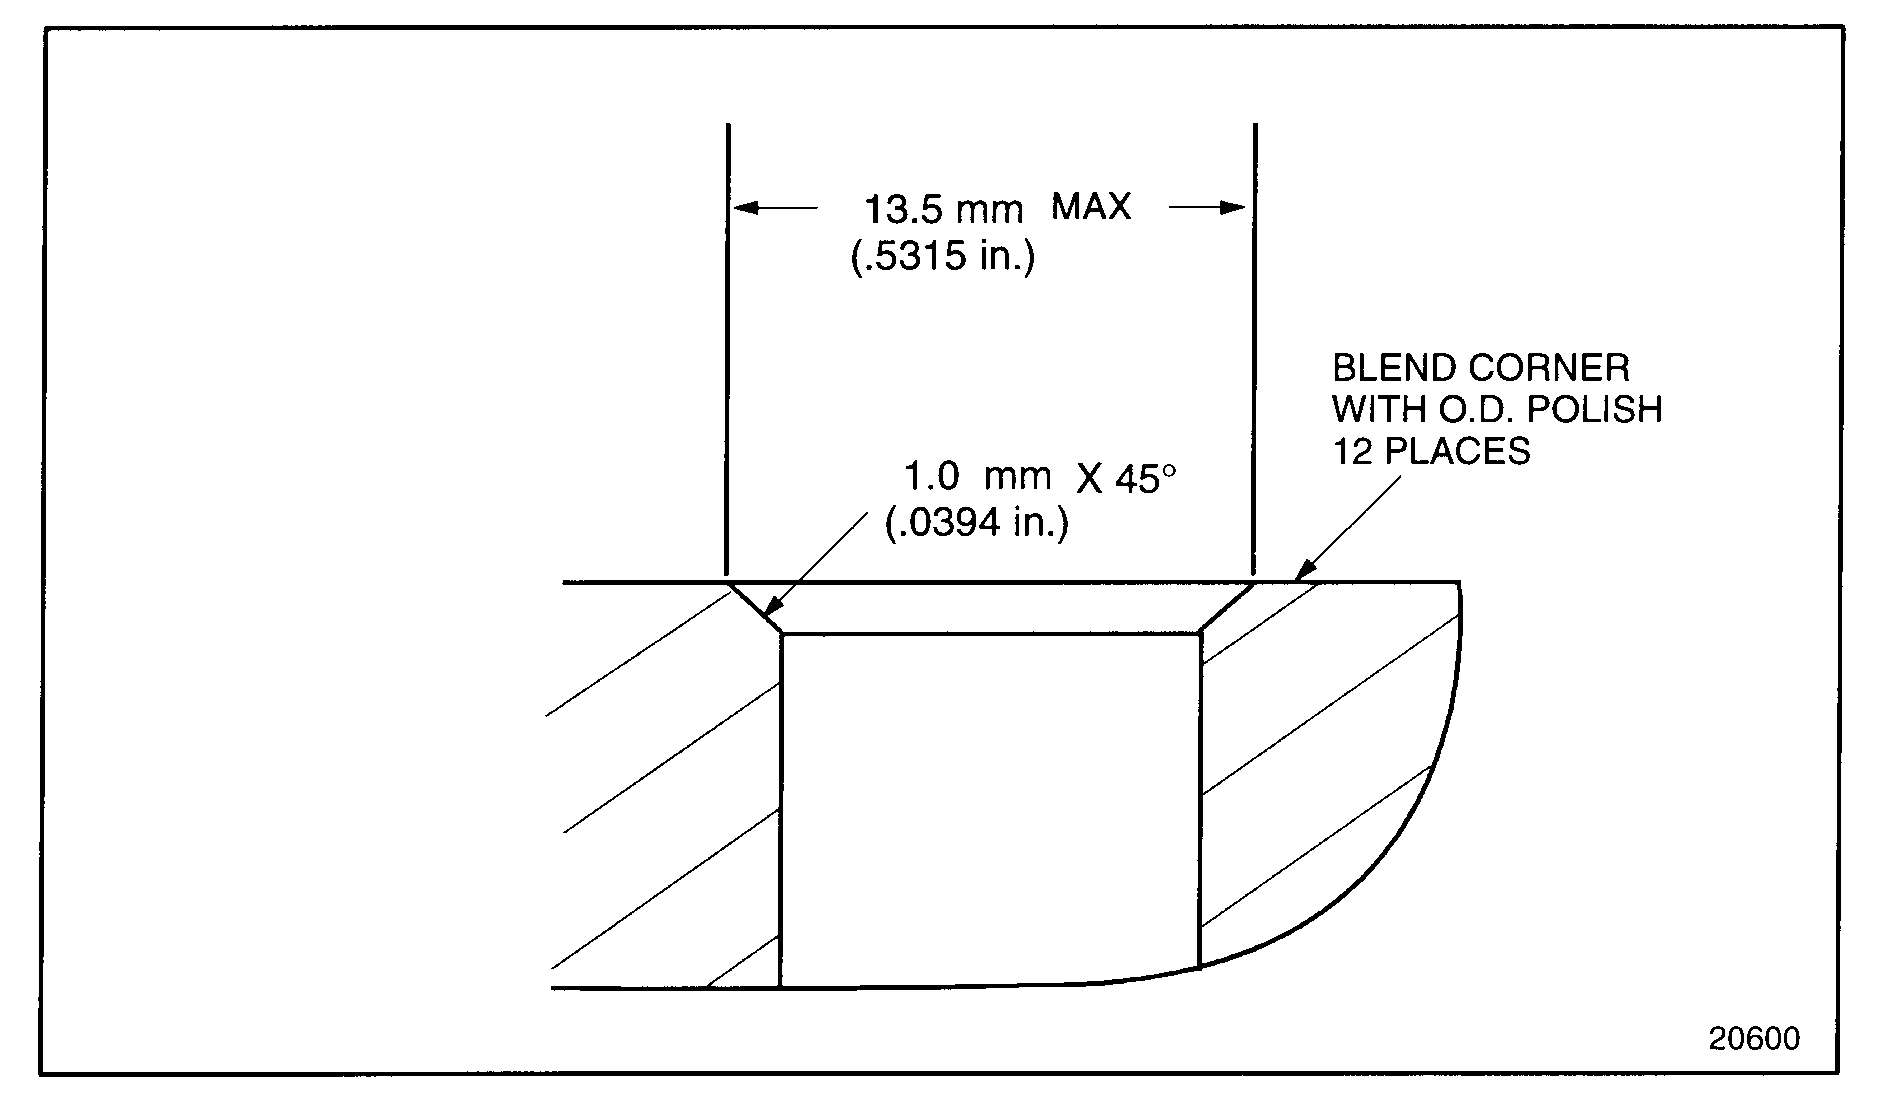
Figure 13. Main Journal Oil Hole Chamfer Limits
- Repair the flywheel and pulley contact faces of the crankshaft to clean up the surface of any nicks, gouges or raised metal. The crankshaft face must be 0.013 mm (0.0005 in.) convex to 0.025 mm (0.001 in.) concave.
After-Grinding Inspection
Perform the following steps for after grinding:
- Inspect the crankshaft by the magnetic particle method after grinding has been completed to determine whether the grinding operation has produced cracks.
- Re-tap and check all internal threads with plug gages to determine acceptability. If necessary, heli-coil pulley and flywheel flange bolt holes with the following restrictions: Heli-coil 2 holes maximum per crankshaft end (front or rear). Heli-coil of two adjacent holes at rear (forward end) is not permitted.
- Demagnetize the crankshaft.
- Clean the crankshaft and oil passages thoroughly with clean fuel oil.

EYE INJURY
To avoid injury from flying debris when using compressed air, wear adequate eye protection (face shield or safety goggles) and do not exceed 276 kPa (40 psi) air pressure.
- Dry the crankshaft with compressed air.
GLOSSARY
The following glossary terms support the Series 60 Engine.
Glossary Terms
AA - ARITHMETICAL AVERAGE: The average total sum of the heights and depths of the ridges and valleys above and below the mean reference line. Limits for journal surfaces are 0.3 μm (12 AA).
AXIAL PROFILE: The deviation of the journal surface from a reference line. Total peak to valley variation per full length of journal.
AXIAL PROFILE SLOPE: The amount of variation tolerable from the mean reference line of the journal in a particular distance (example: 0.0025 mm [0.0001 in.] deviation / 2.54 mm [0.100 in.] length maximum). This specification indicates that any deviation in excess of 0.0025 mm (0.0001 in.) inside a 2.54 mm (0.100 in.) length is not acceptable.
GOULD 1200: Surfanalyzer 1200 surface texture measuring system is used to determine surface parameters such as profile, roundness and waviness. A diamond stylus having a radius of 0.0025-0.013 mm (0.0001 -0.0005 in.) is moved at a constant speed over the surface. Vertical displacements of this stylus are converted into a voltage signal through a linear variable differential transformer.
OIL HOLE WASHOUT: The localized removal of material below the reference surface of an idealized round and straight journal at the trailing edge of the oil hole. This condition is the result of excessive polishing with a soft black apparatus (nut cracker, soft show, rawhide) with lapping paper or cloth in an attempt to improve the surface finish.
A depression (washout) extending beyond the oil hole blend out ellipse reduces the effective bearing area appreciably. This type of polishing is not recommended.
PIN and CRANKPIN: The cylindrical piece to which the connecting rod is attached.
RADIAL CHATTER: This term relates to surface irregularities which are of greater magnitude or spacing than those indicated by the term roughness. Chatter might be the result of vibration or deflection of a cutting tool, of some part of the machine, or the work itself.
ENGINE PLUG AND DOWEL CHARTS
Following figures support the Series 60 Engine plugs and dowels.
1991 Model Year and Later
See Figure "Right Side View" ; see Figure "Left Side View" ; see Figure "Cylinder Head Deck" ; see Figure "Front View " ; see Figure "No. 6 Main Bearing Cap" ; and see Figure "Rear View " for plug and dowel information supporting 1991 model year and later Series 60 Engines.

|
1. 8922327 1/4 in. Pipe Plug (4 places). Torque to 19-24 N·m (14 -18 lb·ft). |
6. 8929163 Dowel (Diamond) * † § |
|
2. 8929015 Dowel (Round) * ‡ |
7. 5139991 Cup Plug (5 places) | |
|
3. 8929594 3/8 in. Pipe Plug (2 places). Torque to 24-31 N·m (18-23 lb·ft). |
8. 8929152 Dowel (Round) * † |
|
4. 8924140 Draincock |
9. 8922327 1/4 in. Pipe Plug (1 place). Opposite Oil Level Dipstick Location. |
|
5. 8929022 Dowel (Diamond) (2 places)* ‡ § |
10. 8929594 3/8 in. Pipe Plug (2 places). Torque to 24-31 N·m (18-23 lb·ft). |
|
|
|
|
*Installed to a height of 12.0 mm ± 0.5 mm (0.472 in. ± 0.002 in.). |
|
|
† Use tool (J–36244–1) to install. |
|
|
‡ Use tool (J–36224–2) to install. |
|
|
§ Refer to illustration for orientation of dowels. |
|
|
| Cup plug 7 are installed 2.5-3.0 mm (0.098 in. -0.118 in.) below the machined surface. Use tool set (J–35653) to install the cup plugs. Coat the outside sealing edge of the cup plugs with a good grade of non-hardening sealant such as Loctite® 620 (or equivalent) before installing. |
|
Figure 14. Right Side View

|
1. 8929022 Dowel (Diamond) (2 places)* ‡ § |
5. 8923916 1/2 in. Pipe Plug (1 place). Torque to 31-39 N·m (23-29 lb·ft). |
|
2. 8924517 3/8 in. Pipe Plug (2 places). Torque to 24-31 N·m (18-23 lb·ft). |
6. 8929163 Dowel (Diamond) * † § |
|
3. 8922327 1/4 in. Pipe Plug (4 places). Torque to 19-24 N·m (14 -18 lb·ft). |
7. 8922327 1/4 in. Pipe Plug (2 places) ¶. |
|
4. 8929152 Dowel (Round) * † |
8. 8929015 Dowel (Round) * ‡ |
|
|
|
|
*Installed to a height of 12.0 mm ± 0.5 mm (0.472 in. ± 0.002 in.). |
|
|
† Use tool (J–36244) to install. |
|
|
‡ Use tool (J–36244–2) to install. |
|
|
§ Refer to illustration for orientation of dowels. ¶ Required only for pressure testing of cylinder block. In service, these plugs are replaced by the oil pressure sensor (OPS), refer to "2.25.1 Replacement of the Oil Pressure Sensor" , and the oil temperature sensor (OTS), refer to "2.26.1 Replacement of Oil Temperature Sensor" . |
|
Figure 15. Left Side View

Figure 16. Cylinder Head Deck
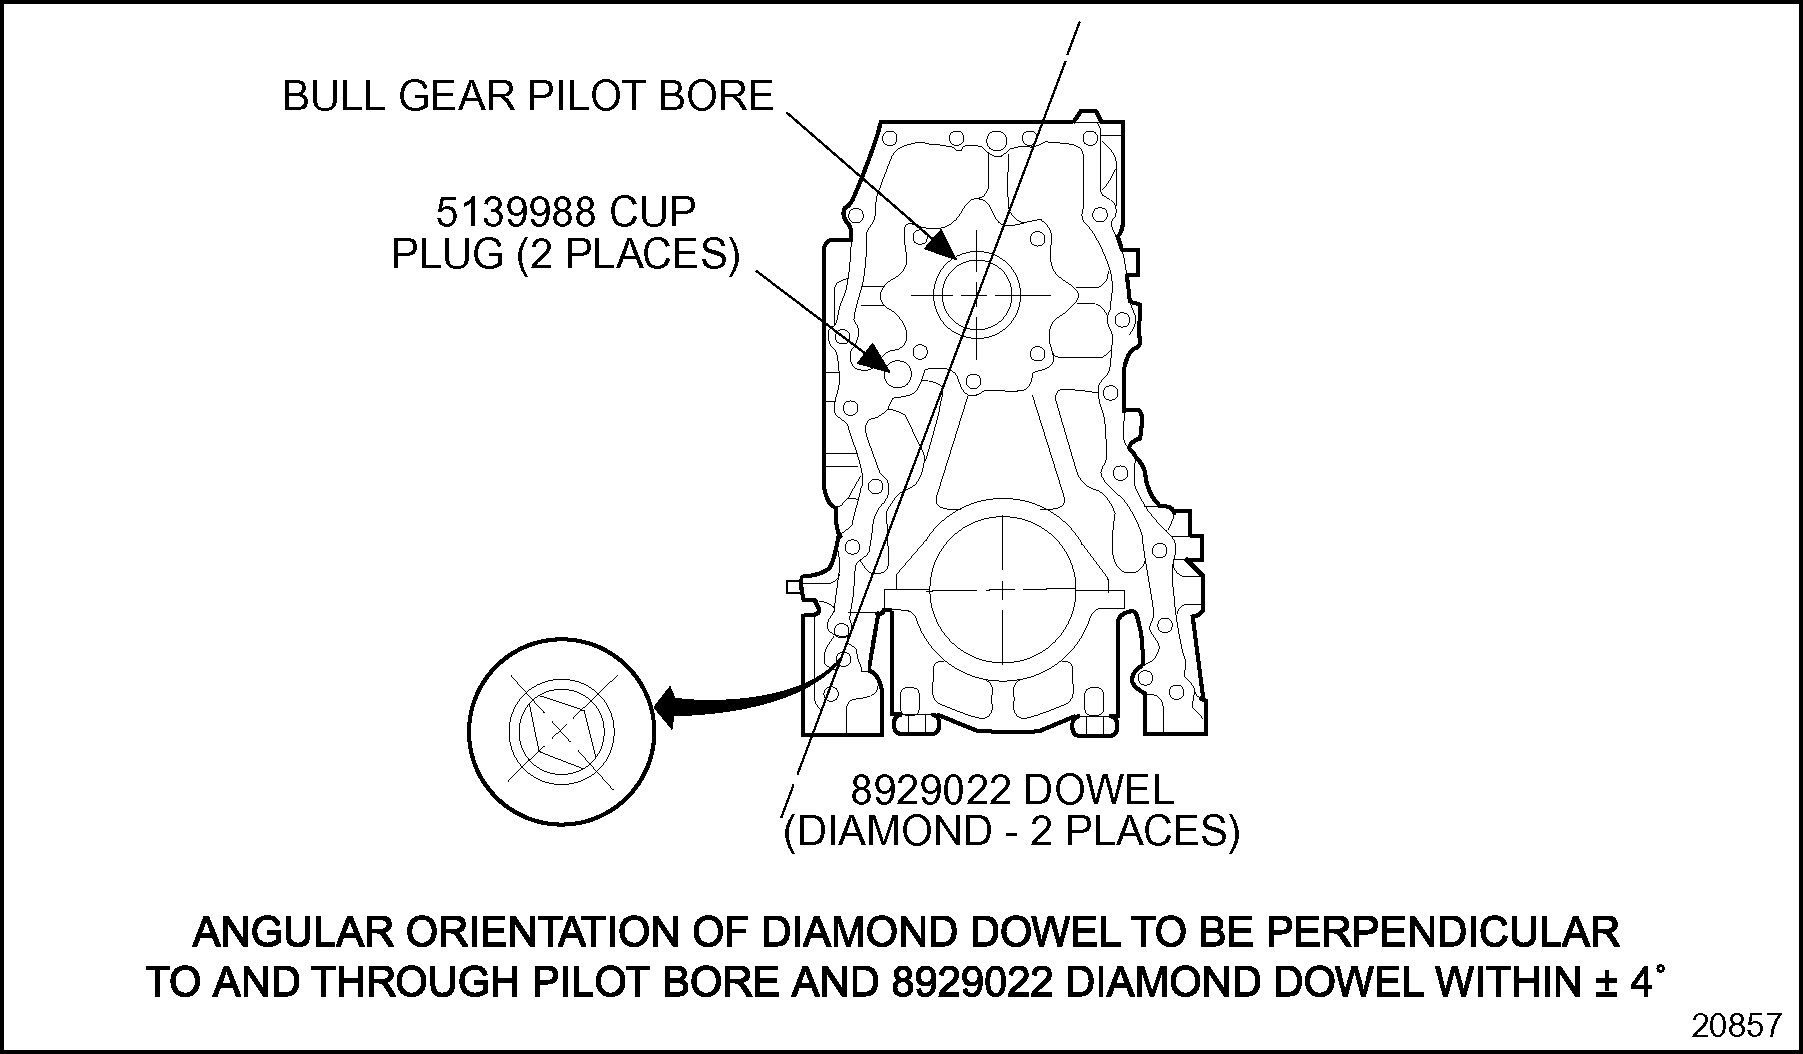
Figure 17. Front View

Figure 18. No. 6 Main Bearing Cap
|
1.8929022 Dowel (Diamond-2 Places) |
3.8929015 Dowel (Round) |
|
2.5139988 Cup Plug (2 Places) |
|
Figure 19. Rear View
Pre-1991 Engines
See Figure "Right Side View" ; see Figure "Left Side View" ; see Figure "Cylinder Head Deck" ; see Figure "Front View " ; see Figure "No. 6 Main Bearing Cap" ; see Figure "Rear View " ; see Figure "Cylinder Head Dowel Chart" ; see Figure "Cylinder Head Cup, Pipe Plug, and Dowel Chart" ; and see Figure "Gear Case Dowel Chart" for plug and dowel information supporting pre-1991 model year Series 60 Engines.
|
1. 5139991 Cup Plug (6 places) | |
6. 8922327 1/4 in. Pipe Plug (4 places). Torque to 19-24 N·m (14-18 lb·ft). |
|
2. 8929015 Dowel (Round) * ‡ |
7. 8923312 3/4 in. Pipe Plug (1 place). Torque to 45-56 N·m (31-39 lb·ft). |
|
3. 8929022 Dowel (Diamond) (2 places)* ‡ § |
8. 8929152 Dowel (Round) * † |
|
4. 8929153 Dowel (Diamond) |
9. 8922327 1/4 in. Pipe Plug (4 places). Torque to 19-24 N·m (14-18 lb·ft). |
|
5. 8924140 Draincock |
10. 8929594 3/8 in. Pipe Plug (2 places). Torque to 24-31 N·m (18-23 lb·ft). |
|
*Installed to a height of 12.0 mm ± 0.5 mm (0.472 in. ± 0.002 in.). |
|
|
† Use tool (J–36244–1) to install. |
|
|
‡ Use tool (J–36244–2) to install. |
|
|
§ Refer to illustration for orientation of dowels. |
|
|
¶ Cup plug 7 are installed 2.5-3.0 mm (0.098 -0.118 in.) below the machined surface. Use tool set (J–35653) to install the cup plugs. Coat the outside sealing edge of the cup plugs with a good grade of non-hardening sealant such as Loctite® 620 (or equivalent) before installing. |
|
Figure 20. Right Side View

|
1. 8929022 Dowel (Diamond) (2 places)* ‡ § |
5. 8923916 1/2 in. Pipe Plug (1 place). Torque to 31-39 N·m (23-29 lb·ft). |
|
2. 8929594 3/8 in. Pipe Plug (2 places) Torque to 24-31 N·m (18-23 lb·ft). |
6. 8929153 Dowel (Diamond) * † § |
|
3. 8922327 1/4 in. Pipe Plug (4 places). Torque to 19-24 N·m (14-18 lb·ft). |
7. 8922327 1/4 in. Pipe Plug (2 places). Required only for pressure testing of cylinder block. In service, these plugs are replaced by the oil pressure sensor (OPS). |
|
4. 8929152 Dowel (Round) * † |
8. 8929015 Dowel (Round) * ‡ |
|
|
|
|
*Installed to a height of 12.0 mm ± 0.5 mm (0.472 in. ± 0.002 in.) |
|
|
† Use tool(J–36224–1) to install. |
|
|
‡ Use tool (J–36224–2) to install. |
|
|
§ Refer to illustration for orientation of dowels. |
|
Figure 21. Left Side View

|
1. 8929163 Dowel (Diamond) |
3. 5151272 Plug (1.0 mm [0.040 in.] below surface) |
|
2. 8929152 Dowel |
|
Figure 22. Cylinder Head Deck

|
1. 8929022 Dowel (Diamond-2 Places) |
3. 5139988 Cup Plug (2 Places) |
|
2. 8920062 Dowel Pin |
4. Bull Gear Pilot Bore |
Figure 23. Front View
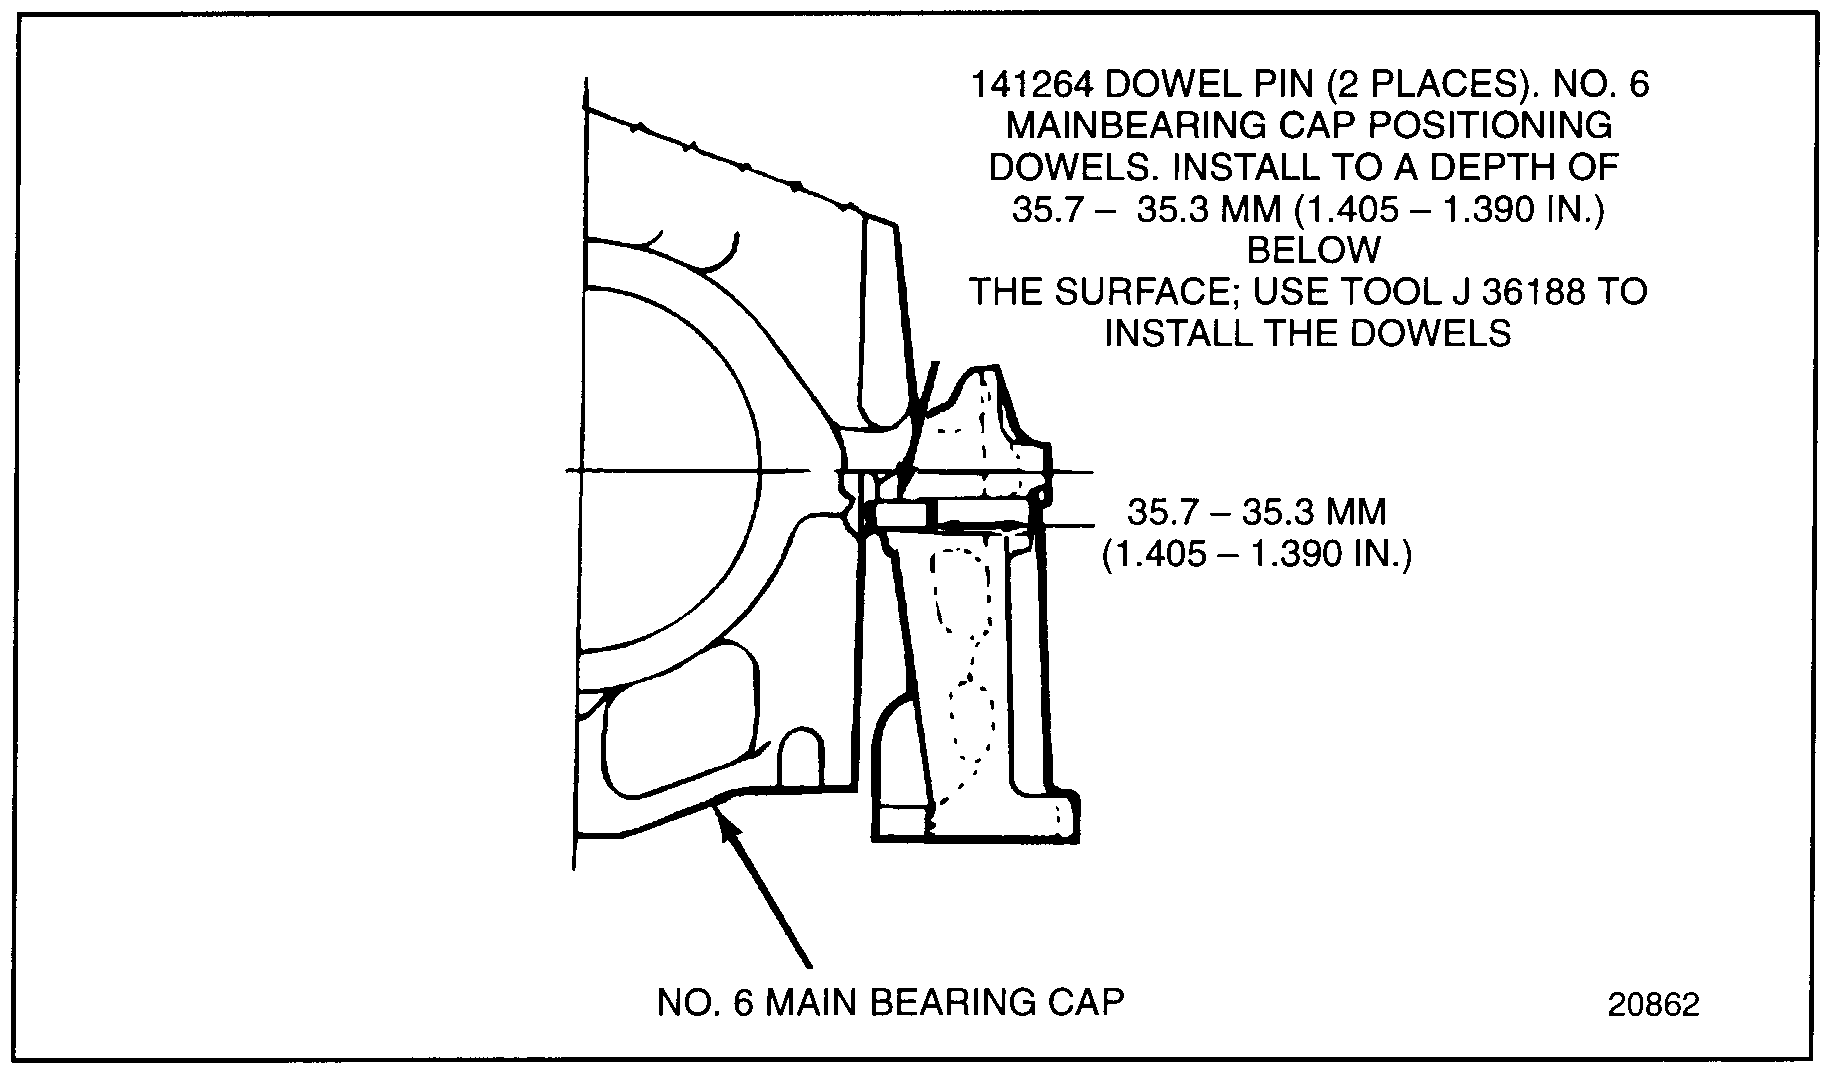
Figure 24. No. 6 Main Bearing Cap
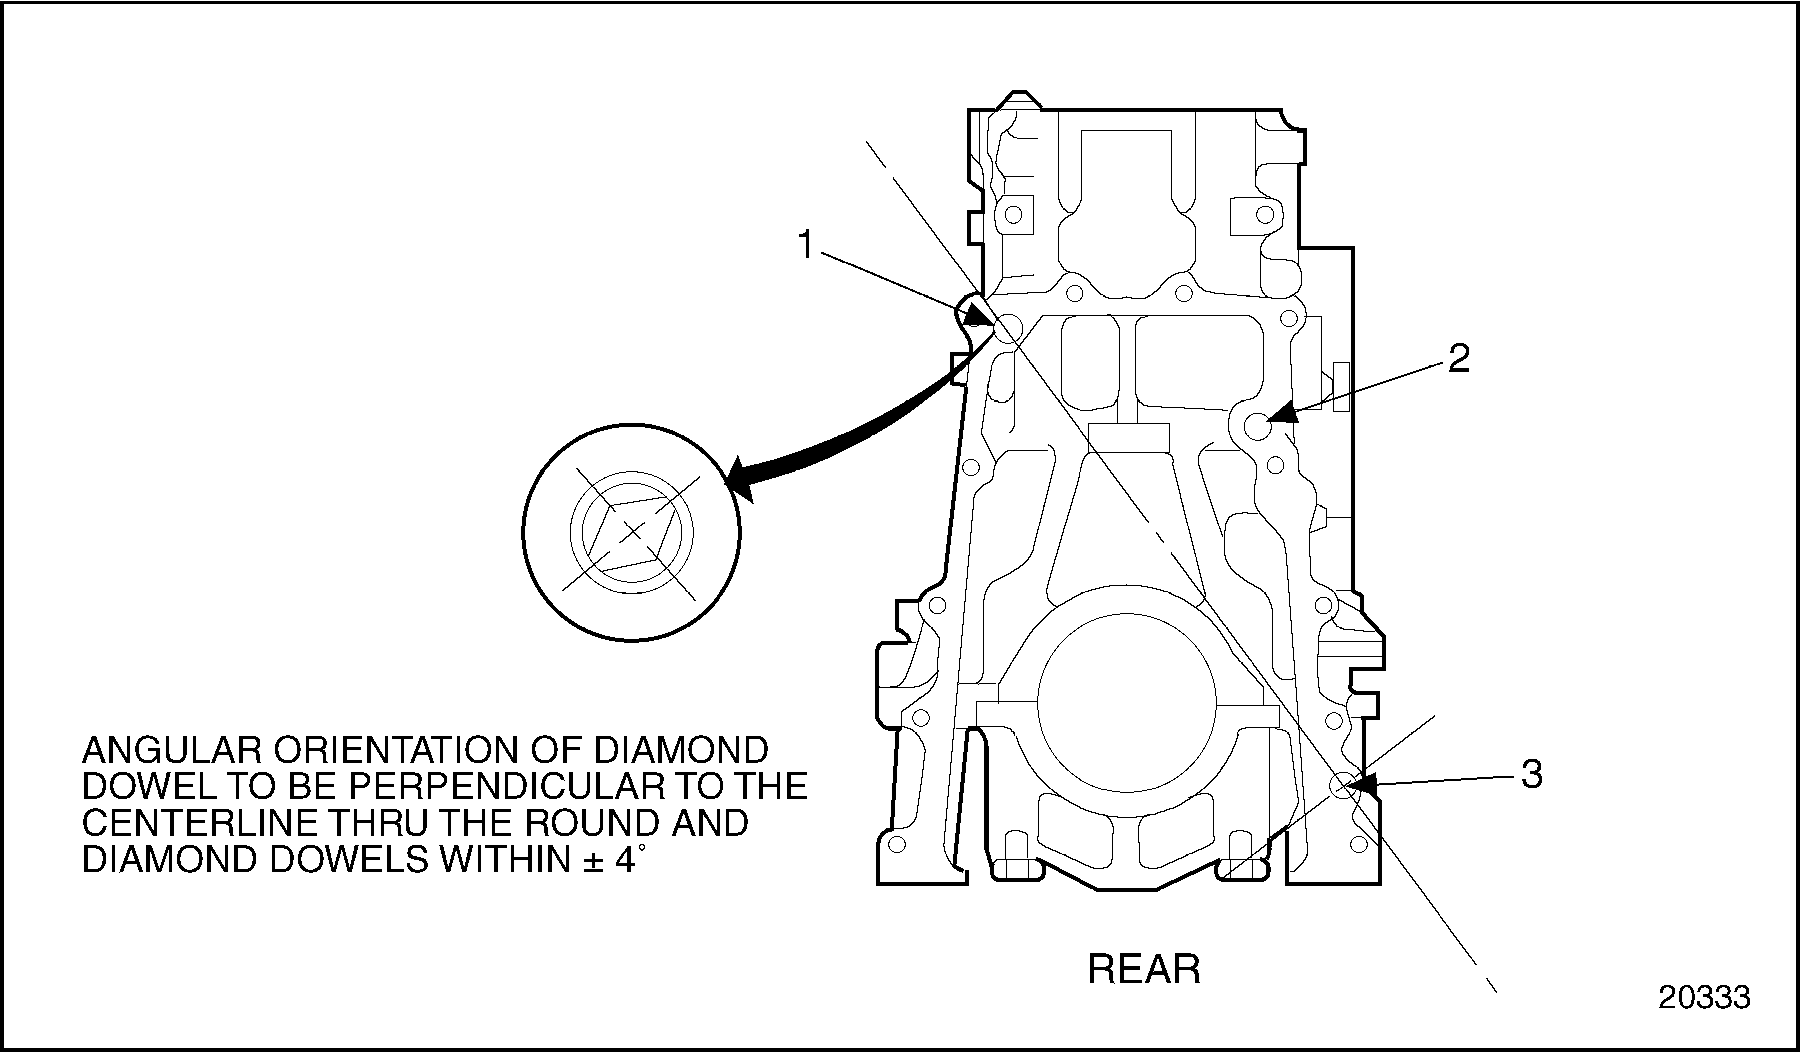
|
1. 8929022 Dowel (Diamond-2 Places) |
3. 8929015 Dowel (Round) |
|
2. 5139988 Cup Plug (2 Places) |
|
Figure 25. Rear View
|
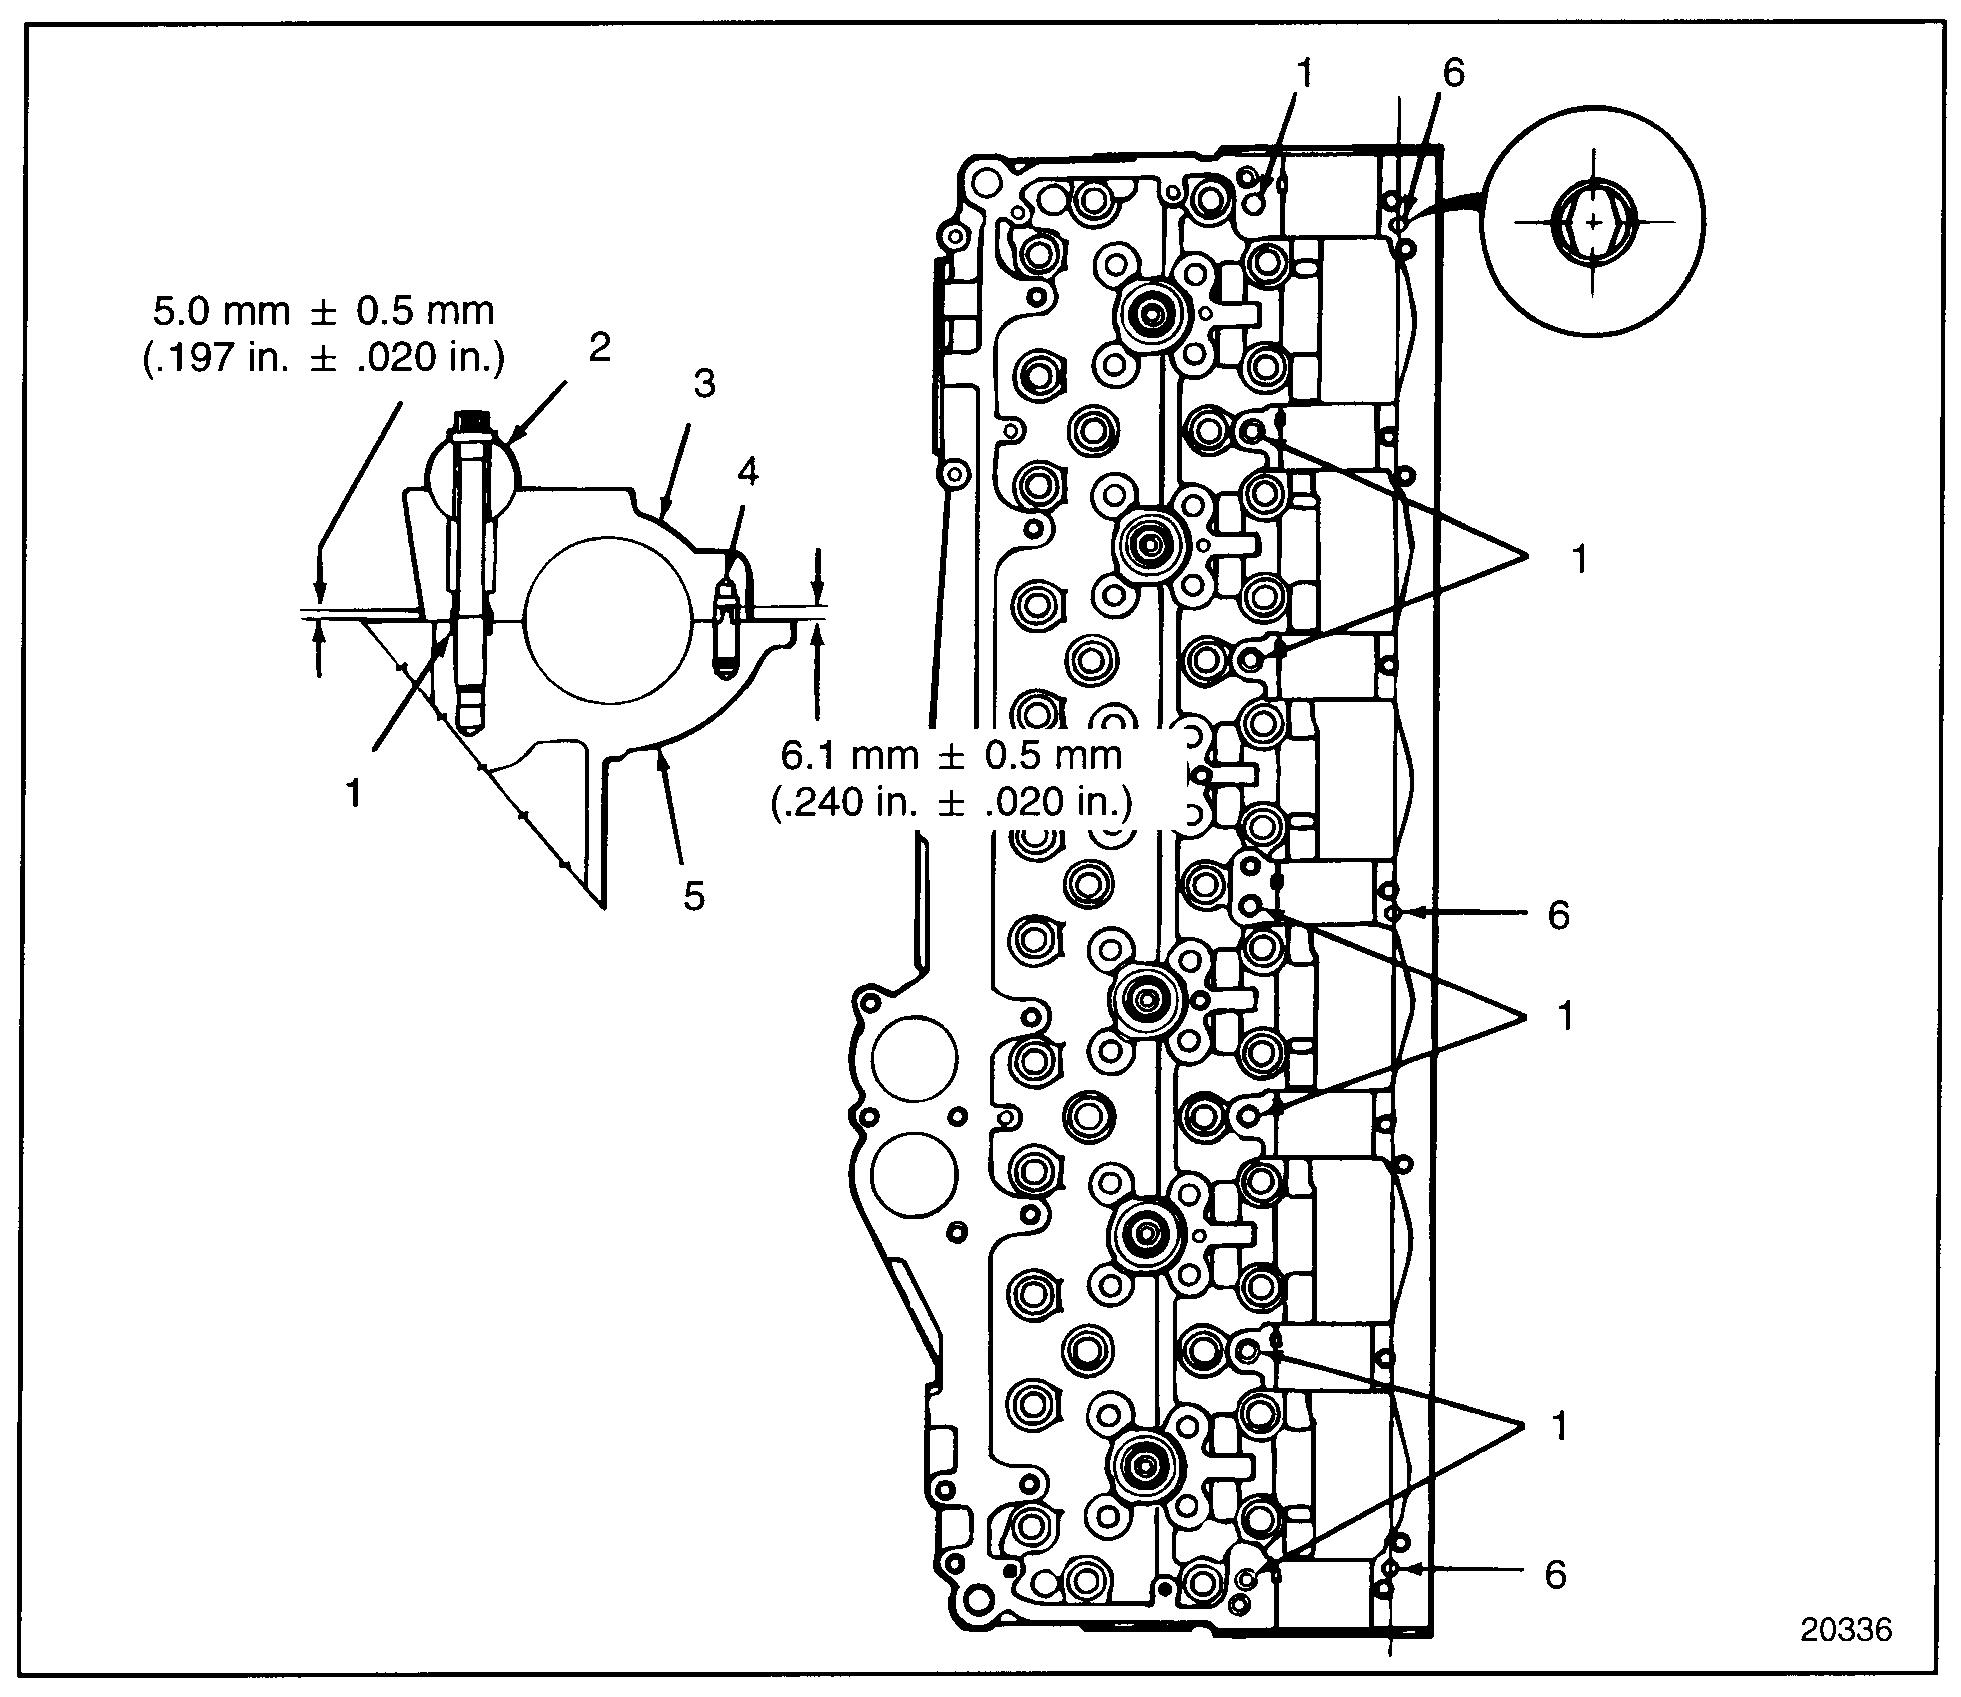
1. 5138638 Dowel (Hollow) (7 places). Install to a height of 5.000 mm ± 0.254 mm (0.197 in. ± 0.010 in.). Bearing Cap |
4. Cylinder Head Dowel |
|
2. Rocker Arm Shaft |
5. Cylinder Head |
|
3. Camshaft Cap |
6. 5143033 Dowel (Diamond) (3 places). Install to a height of 6.1 mm ± 0.5 mm (0.240 in. ± 0.010 in.) |
Figure 26. Cylinder Head Dowel Chart

|
1. 5109157 Cup Plug (11 places) * † |
5. 8926991 Fuse Plug. Torque to 19-24 N·m (14-18 lb·ft). |
|
2. 5139991 Cup Plug (2 places) * † |
6. 8923313 3/4 in. Pipe Plug (2 places). Torque to 45-56 N·m (33-41 lb·ft). |
|
3. 23513197 3/8 in. Pipe Plug (Square Drive) (2 places). Torque to 30-33 N·m (22-24 lb·ft). |
7. 8924750 1 in. Pipe Plug (1 place). Torque to 102-127 N·m (75-94 lb·ft). |
|
4. 8923916 1/2 in. Pipe Plug (2 places). Torque to 31-39 N·m (23-29 lb·ft). |
|
|
|
|
|
*Cup plugs 1 and 2 are installed 2.5-3.0 mm (0.098 in. -0.118 in.) below the machined surface. |
|
|
† Use tool set (J–35653) to install the cup plugs. Coat the outside sealing edge of the cup plugs with a good grade of non-hardening sealant such as Loctite® 620 (or equivalent) before installing. |
|
Figure 27. Cylinder Head Cup, Pipe Plug, and Dowel Chart

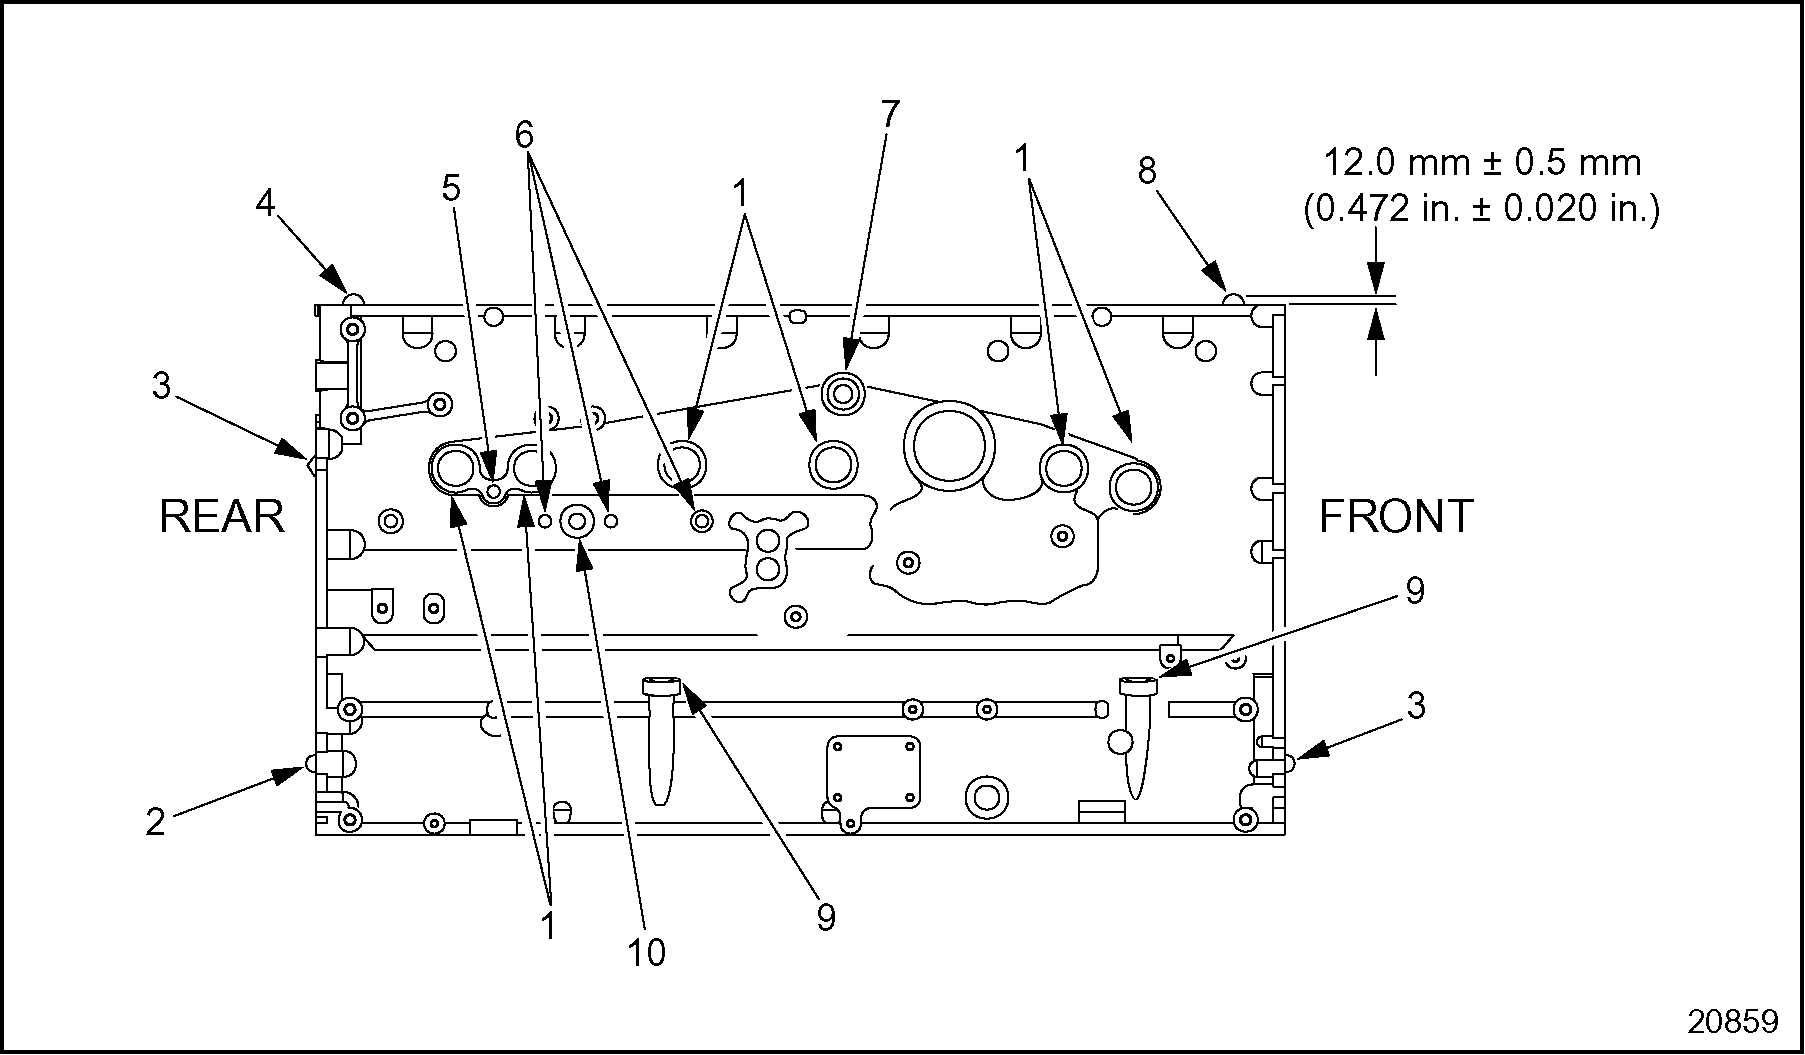
Figure 28. Gear Case Dowel Chart
SPECIFICATIONS
Specifications, clearances and wear limits are listed below. It should be specifically noted that the clearances apply only when all new parts are used at the point where the various specifications apply. This also applies to references within the text of the manual. The column entitled "Limits" in this chart lists the amount of wear or increase of clearance which can be tolerated in used engine parts and still ensure satisfactory performance. It should be emphasized that the figures given as "Limits" must be qualified by the judgment of personnel responsible for installing new parts. These wear limits are, in general, listed only for the parts more frequently replaced in engine overhaul work. For additional information, refer to the text.
Specifications, New Clearances, and Wear Limits
These limits also apply to oversize and undersize parts.
Refer to the following tables to obtain specifications, new clearances, and wear limits for the Series 60 Engine.
|
Component |
Reference |
|
Cylinder block |
|
|
Cylinder liner |
|
|
Cross-head piston and piston rings |
|
|
Articulated 14L piston and piston rings |
|
|
Cross-head cast-iron piston pin |
|
|
Articulated 14L piston pin |