Section 10.17
Maintenance Alert System
The following procedures will troubleshoot the Maintenance Alert System (MAS).
Section 10.17.1
Maintenance Alert System Troubleshooting
The following procedures will troubleshoot a Maintenance Alert System (MAS) display problem. Listed in Table "Maintenance Alert System Faults" are typical faults.
|
Fault |
Typical Fault |
Refer to |
|
No lights, blank display. |
Loss of power to display module |
|
|
All red LEDs flashing. |
Data link wire fault |
|
|
Single item LED blank. |
Sensor fault Refer to sensor troubleshooting. |
Section 10.17.2
Checking for Power to Display
Perform the following steps to check for power to the display:
- Unplug MAS display harness.
- Check connectors for bent, corroded, or unseated pins.
- If connectors are bent, corroded or otherwise damaged, replace them and test the operation.
- If connectors are in good condition, continue the inspection.
- Turn the ignition ON.
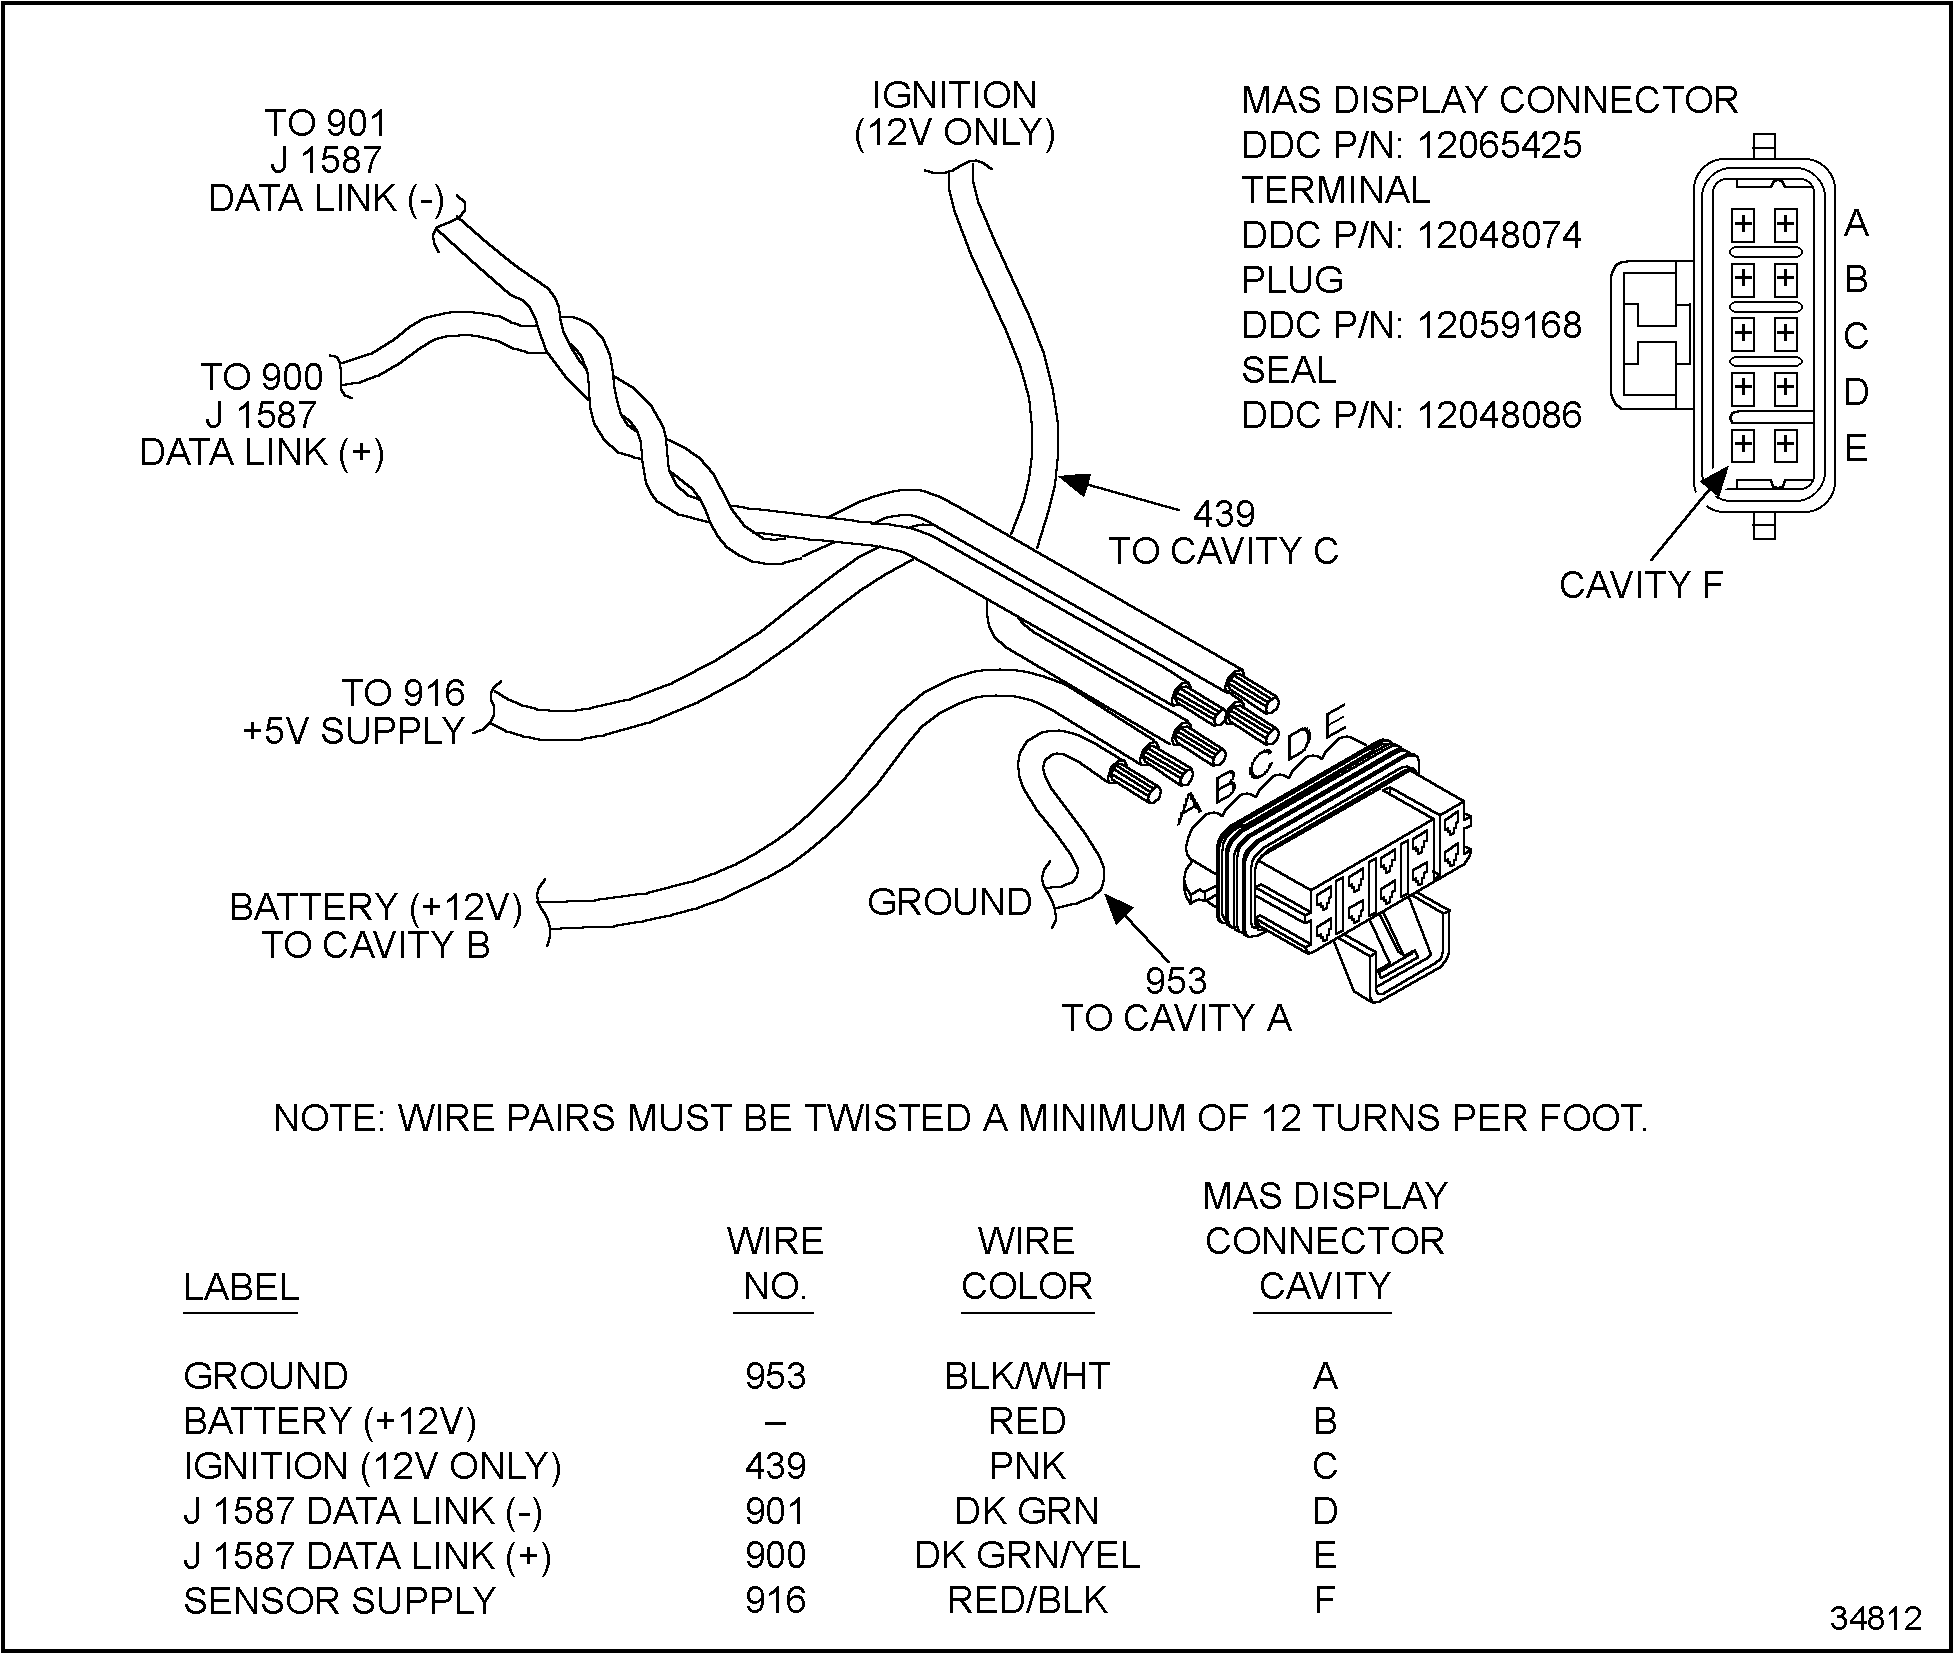
- Measure the voltage between cavity A (#953) ground and cavity C (#439) ignition. See Figure
"Maintenance Pro Display Harness"
.
- If voltage is less than 10.5 volts, determine the reason for low voltage. Refer to OEM guidelines. One possibility is a battery fault.
- If voltage is greater than 10.5 volts, refer to Step 5
.

Figure 1. Maintenance Pro Display Harness
- Measure voltage between cavity A (#953) ground and cavity B, battery (+). See Figure
"Maintenance Pro Display Harness"
.
- If the measured voltage is less than 10.5 volts, charge the batteries or check for bad 12 volt wire. Refer to "10.17.7 Verify Repairs" .
- If the voltage is greater than 10.5 volts, replace the display; verify repair. Refer to "10.17.7 Verify Repairs" .
Section 10.17.3
Check for Open Data Link Wires
Perform the following steps to check for open data link wires:
- Unplug the MAS display harness connector at the display.
- Insert a jumper wire between cavity E (#900) and cavity D (#901). See Figure "Maintenance Pro Display Harness" .
- Unplug the vehicle interface harness at the ECM.
- Measure resistance between cavity C1 and C2 of the vehicle interface harness connector. See Figure
"ECM Vehicle Harness Connector"
.

Figure 2. ECM Vehicle Harness Connector
- If measured resistance is greater than 10 Ω, one of the data link wires is open. Locate the open circuit and repair or replace the wire; then test. Refer to "10.17.7 Verify Repairs" .
- If measured resistance is less than 10 Ω, proceed with the troubleshooting. Refer to "10.17.4 Check for Shorted Data Link" .
Section 10.17.4
Check for Shorted Data Link
Perform the following steps to check for shorted data link wires:
- Remove jumper wire.
- Measure resistance between cavity C1 and C2 of the vehicle interface harness connector. See Figure
"ECM Vehicle Harness Connector"
.
- If the measured resistance is less than 10 Ω, the data link wires are shorted to each other. Replace wire or repair the short; test. Refer to "10.17.7 Verify Repairs" .
- If the measured resistance is greater than 10 Ω, proceed with the troubleshooting. Refer to "10.17.5 Check for Short to Ignition" .
Section 10.17.5
Check for Short to Ignition
Perform the following steps to check for a short to the ignition:
- Measure resistance between cavity B3 and C2. Measure again between cavity B3 and C1. See Figure
"ECM Vehicle Harness Connector"
.
- If any of the readings are less than 10 Ω, that wire is shorted to the ignition wire where the reading was recorded. Repair the short; replace the wire; then test. Refer to "10.17.7 Verify Repairs" .
- If both readings are less than 10 Ω, replace the MAS display and test. Refer to "10.17.7 Verify Repairs" .
Section 10.17.6
Information
A blank LED for an item indicates a fault in the sensor used for that display. If all lights (green and red) illuminate during the bulb check sequence, refer to the affected sensor troubleshooting section.
Section 10.17.7
Verify Repairs
Perform the following steps to verify repairs.
- Turn ignition ON.
- Observe the MAS display.
- If MAS display operates correctly, troubleshooting is complete.
- If MAS display does not operate correctly, repeat the checks. Refer to "10.17.2 Checking for Power to Display" .
| DDEC III/IV Single ECM Troubleshooting Guide - 6SE497 |
| Generated on 10-13-2008 |