Section 10.3
Air Compressor Drive Assembly
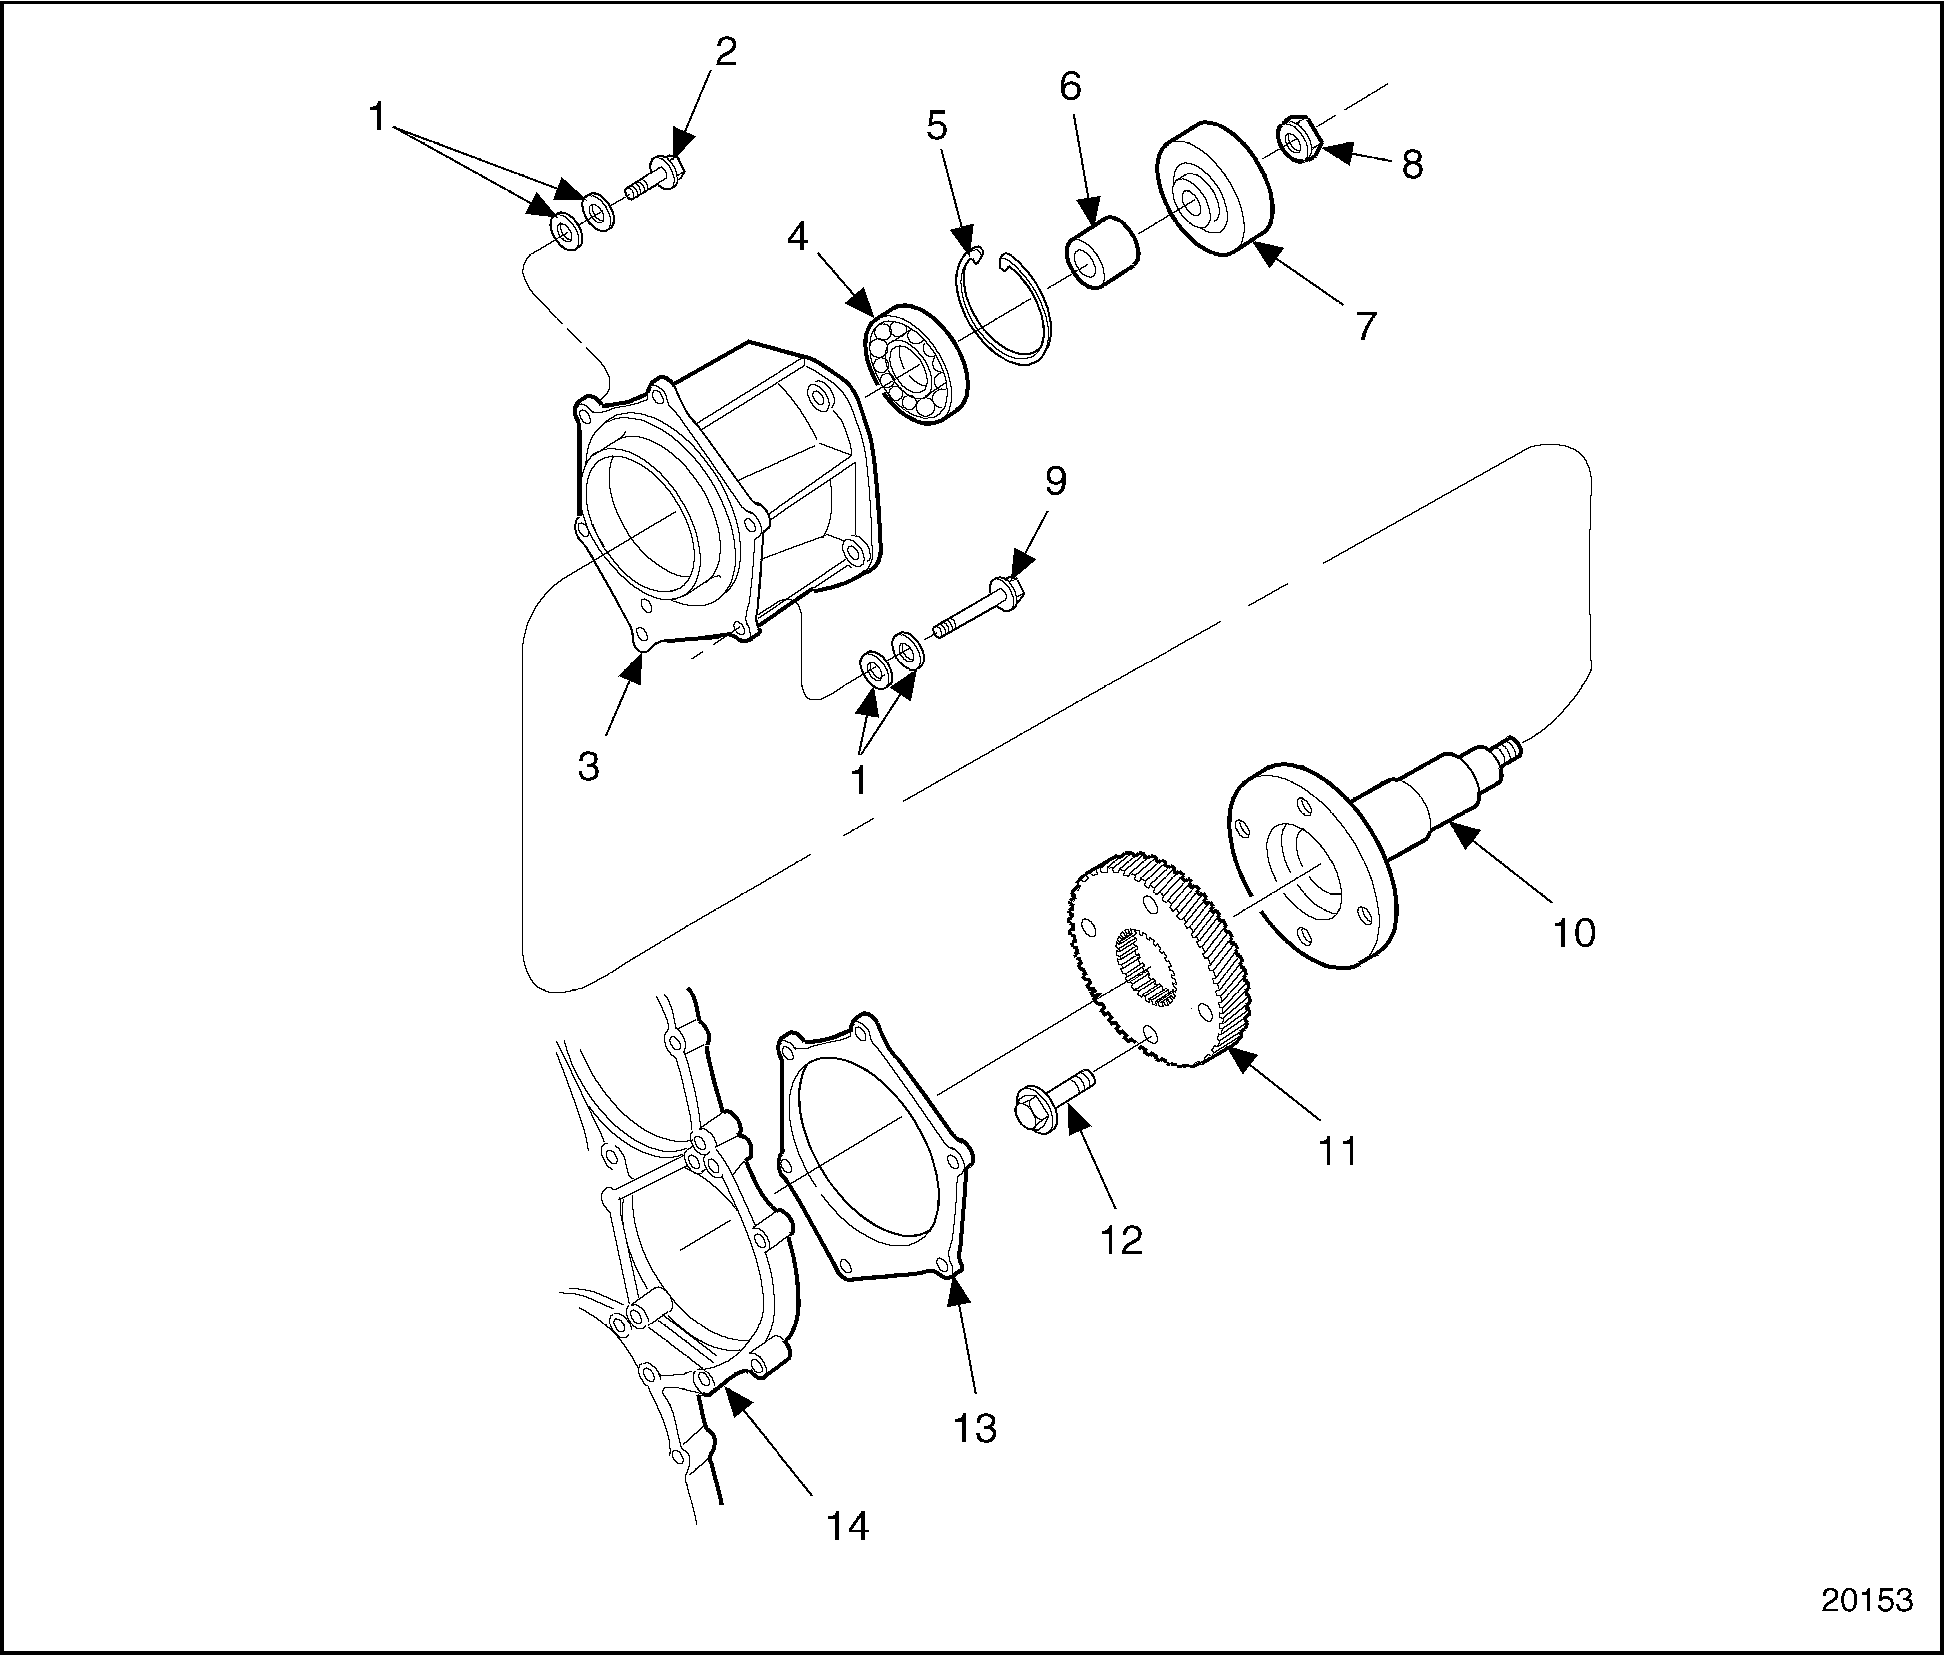
The air compressor drive assembly mounts to the rear of the gear case on the intake side of the engine. See Figure "Air Compressor Drive Detail and Location of Parts" .
|
1. Plain Washers (Shims) |
8. Flange Nut, Air Compressor Drive Hub |
|
2. Short Bolt, Air Compressor Drive Housing-to-Gear Case (1) |
9. Plain Washers (Shims) Long Bolt |
|
3. Housing, Air Compressor |
10. Shaft, Air Compressor Drive |
|
4. Ball Bearing, Air Compressor Drive |
11. Gear, Air Compressor Drive |
|
5. Snap Ring |
12. Bolt, Air Compressor Drive Gear-to-Shaft |
|
6. Spacer |
13. Gasket, Air Compressor Drive Housing-to-Gear Case |
|
7. Hub, Air Compressor Drive |
14. Drive Gear Case |
Figure 1. Air Compressor Drive Detail and Location of Parts
A drive gear meshes with the bull gear and is driven at a ratio of 1.19:1.
The drive gear is bolted to the air compressor drive shaft. A drive hub is installed onto the opposite end of the air compressor drive shaft, and is used to drive the air compressor. On vehicles with power steering, a short splined coupling connects the drive gear to the power steering pump. The coupling is inserted in the splined center of the air compressor drive gear.
Two composition gaskets are used, one to seal the air compressor drive housing to the gear case, and one to seal the air compressor to the drive housing.
Section 10.3.1
Replacement of Air Compressor Drive Assembly
To replace the air compressor drive assembly, perform the following procedure. See Figure "Flowchart for Replacement of Air Compressor Drive Assembly" .

Figure 2. Flowchart for Replacement of Air Compressor Drive Assembly
Section 10.3.2
Cleaning and Removal of Air Compressor Drive Assembly
Cleaning is not necessary.
Remove the drive assembly as follows:
- If equipped, remove the air compressor. Refer to "10.1.2 Cleaning and Removal of Air Compressor" .
- If equipped with power steering, loosen and remove the five bolts securing the power steering pump and cover assembly to the gear case cover.
- Remove the pump and cover assembly.
- Remove the power steering drive coupling from the air compressor drive gear.
- Disconnect the oil supply lines from the "T" fitting, if applicable, at the top of the air compressor drive housing.
- Remove the six bolts that secure the air compressor drive assembly to the gear case.
- Remove the assembly by pulling it straight out of the gear case.
Note: The short bolt in the two o'clock position is for installation reference.
Section 10.3.3
Disassembly of Air Compressor Drive Assembly
Disassemble the air compressor drive assembly as follows:
- Secure the holding fixture, see Figure
"Holding Fixture "
, in a suitable vise with the drive coupling facing up. See Figure
"Air Compressor Drive Hub Disassembly"
.
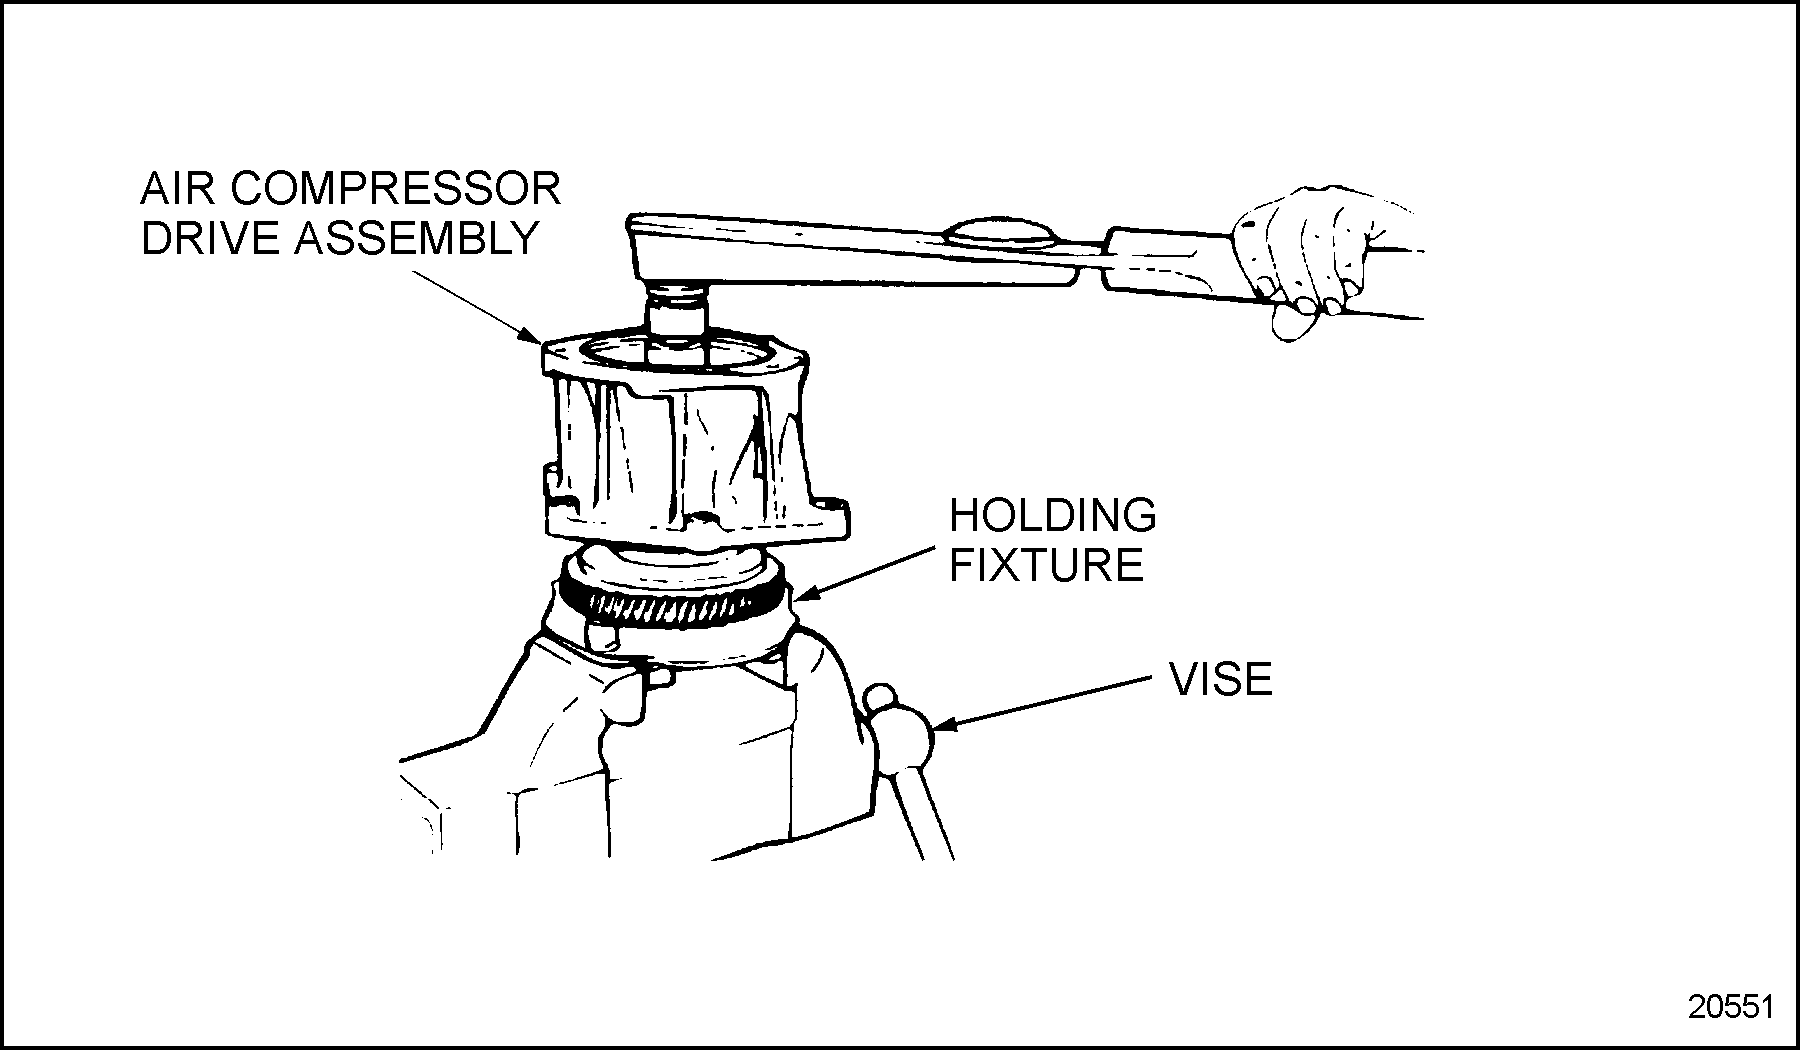
Figure 3. Air Compressor Drive Hub Disassembly
- Position the air compressor drive assembly onto the holding fixture, engaging the internal teeth of the drive gear with the coupling on the holding fixture.
- Loosen and remove the flanged nut retaining the drive hub to the drive shaft.
- Remove the drive hub from the air compressor drive assembly.
- Remove the spacer from the drive shaft (current air compressor drive only).
- Remove the drive assembly from the holding fixture and place on bench.
- Remove the four bolts that secure the drive gear to the drive shaft flange and remove gear.
- Use the air compressor and fan drive service tool set, J 36310-A
, for disassembly. See Figure
"Air Compressor and Fan Drive Service Kit Set"
.

Figure 4. Air Compressor and Fan Drive Service Kit Set
- Support the air compressor drive housing on press plates with the drive hub side facing up.
- Press the air compressor drive shaft out of the drive housing.
Note: Whenever the drive shaft is removed from the housing, the ball bearing assembly must be replaced.
- Remove the large snap ring retaining the ball bearing in the air compressor drive hub housing using snap ring pliers. See Figure
"Roller Bearing Snap Ring Removal"
.
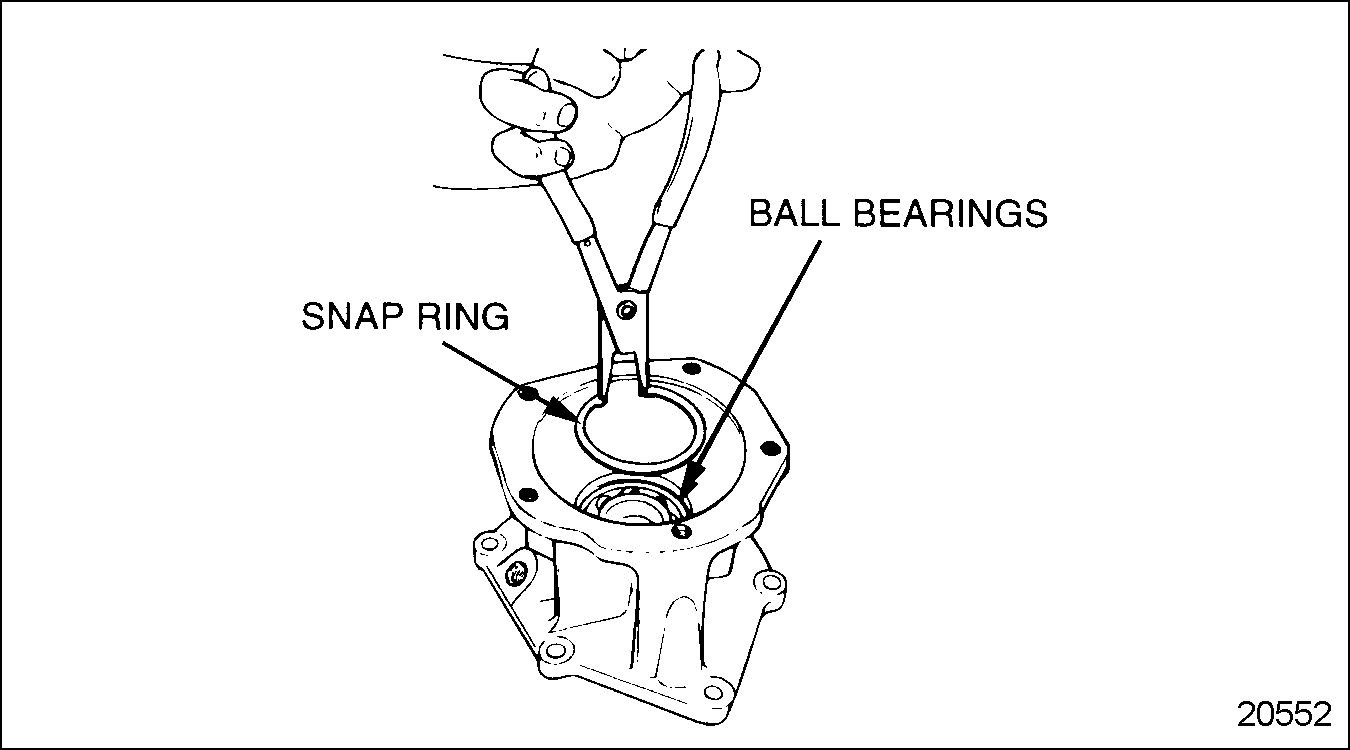
Figure 5. Roller Bearing Snap Ring Removal
- On current design air compressor drive only, turn the air compressor drive housing over and support it on the press bed.
- Using the narrow end of bearing installer, J 36310-6, part of tool set J 36310–A , against the bearing, press the bearing from the housing.
- Discard the bearing.
Note: The following steps apply only to the former design air compressor drive.
- Using the snap ring pliers, turn the drive assembly over, and remove the large snap ring retaining the roller bearing in the air compressor drive housing. See Figure
"Ball Bearing Snap Ring Removal"
.
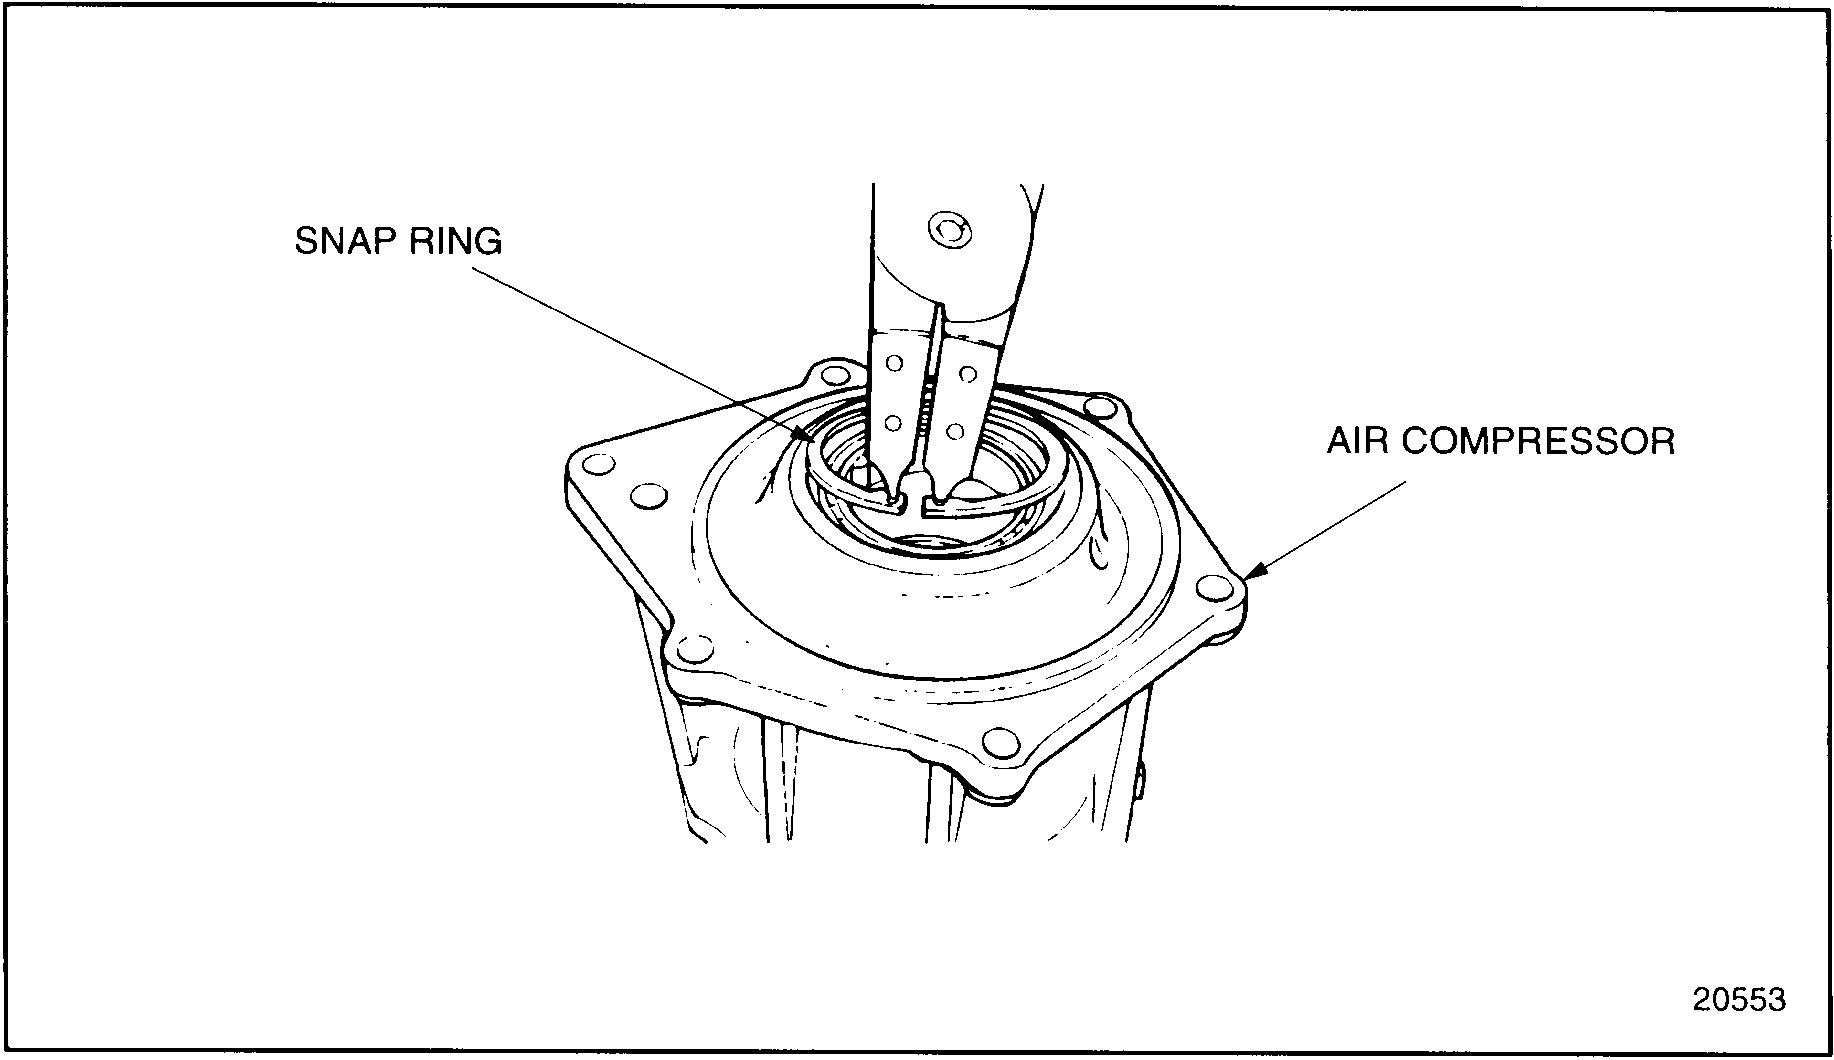
Figure 6. Ball Bearing Snap Ring Removal
Note: Whenever the bearings are removed from the housing, the bearing assemblies must be replaced.
- Install the lip of the bearing remover, J 26941
, under the bearing. See Figure
"Roller Bearing Remover"
.
1. Lip
3. Thumb Screw
2. Slide Hammer Attaching Point
Figure 7. Roller Bearing Remover
- Tighten the thumb screw on the bearing remover until it is snug against the bearing.
- Install a suitable slide hammer to the top of the bearing remover. Remove the bearing.
- Repeat this procedure to remove the other bearing from the housing.
- Using snap ring pliers, remove the small snap ring retaining the roller bearing inner race on the air compressor drive shaft. See Figure
"Roller Bearing Inner Race Snap Ring Removal"
.

Figure 8. Roller Bearing Inner Race Snap Ring Removal
- Using a punch and hammer, work through the two access holes to drive the roller bearing inner race from the air compressor drive shaft. See Figure
"Bearing Inner Race Removal"
.
Note: Whenever the roller bearing inner race is removed from the shaft, the roller bearing assembly must be replaced.

Figure 9. Bearing Inner Race Removal
Clean the air compressor drive assembly prior to inspection as follows:
- Clean all of the parts with clean fuel oil.

EYE INJURY
To avoid injury from flying debris when using compressed air, wear adequate eye protection (face shield or safety goggles) and do not exceed 276 kPa (40 psi) air pressure.
- Dry with compressed air.
Section 10.3.3.1
Inspection of the Air Compressor Drive Assembly
Inspect the air compressor drive assembly as follows:
- Inspect the drive shaft for damage.
- Check drive shaft for galling, pitting, cracks, or other damage.
- If drive shaft is damaged, replace with new part.
Section 10.3.4
Assembly of Air Compressor Drive Assembly
Assemble the air compressor drive assembly as follows:
- Turn the housing over.
Note: The bearing identification numbers must face the installer when installing the bearing.
- Install the ball bearing in the air compressor drive housing using a press and the large end of the ball bearing installer, J 36310-1, part of tool set J 36310–A , for the former design or, J 36310-6, part of tool set J 36310–A , for the current design.
- Press on the outer race of the bearing only. See Figure
"Ball Bearing Installation"
.
Note: Be sure the bearing is fully seated against the shoulder in the housing for the snap ring to be installed.
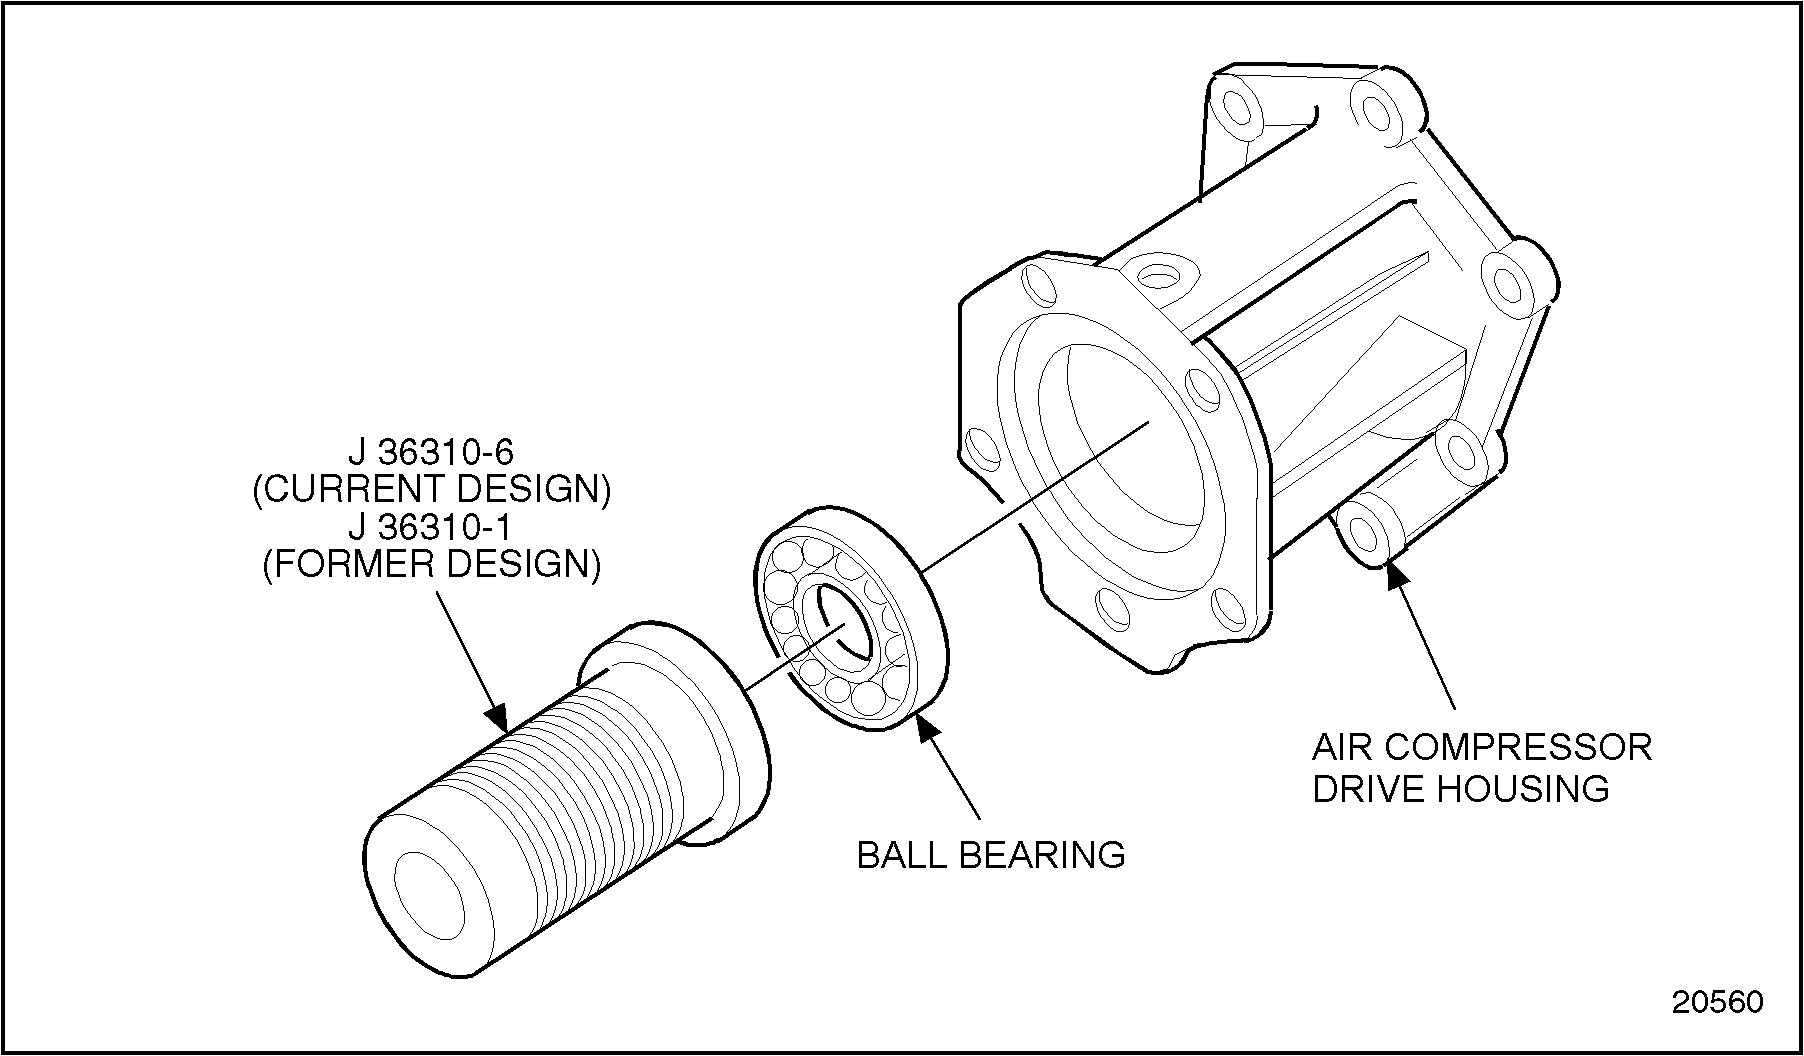
Figure 10. Ball Bearing Installation
Note: There is a plastic sleeve in the current design ball bearing which must not be removed when installing the bearing. The sleeve will be pushed out when the drive shaft is installed.
- Install the snap ring retaining the ball bearing in the housing using snap ring pliers. See Figure
"Snap Ring Installation"
.
Note: Be sure the snap ring is fully seated in its groove in the housing.
Figure 11. Snap Ring Installation
- Place wide end of ball bearing installer, J 36310-6, part of tool set J 36310–A , on press bed.
- Place the air compressor drive housing on the bearing installer, making sure that the installer is centered on the bearing inner race.
- Position the drive shaft in the bearing inner race.
- Press the drive shaft into the bearing and housing assembly until the shaft shoulder is seated against the bearing inner race.
- Remove the air compressor drive assembly from the tool.
- Remove the plastic sleeve from inside of the tool.
- Discard plastic sleeve.
- Install the air compressor drive gear to the shaft. See Figure
"Air Compressor Drive Gear Installation"
.
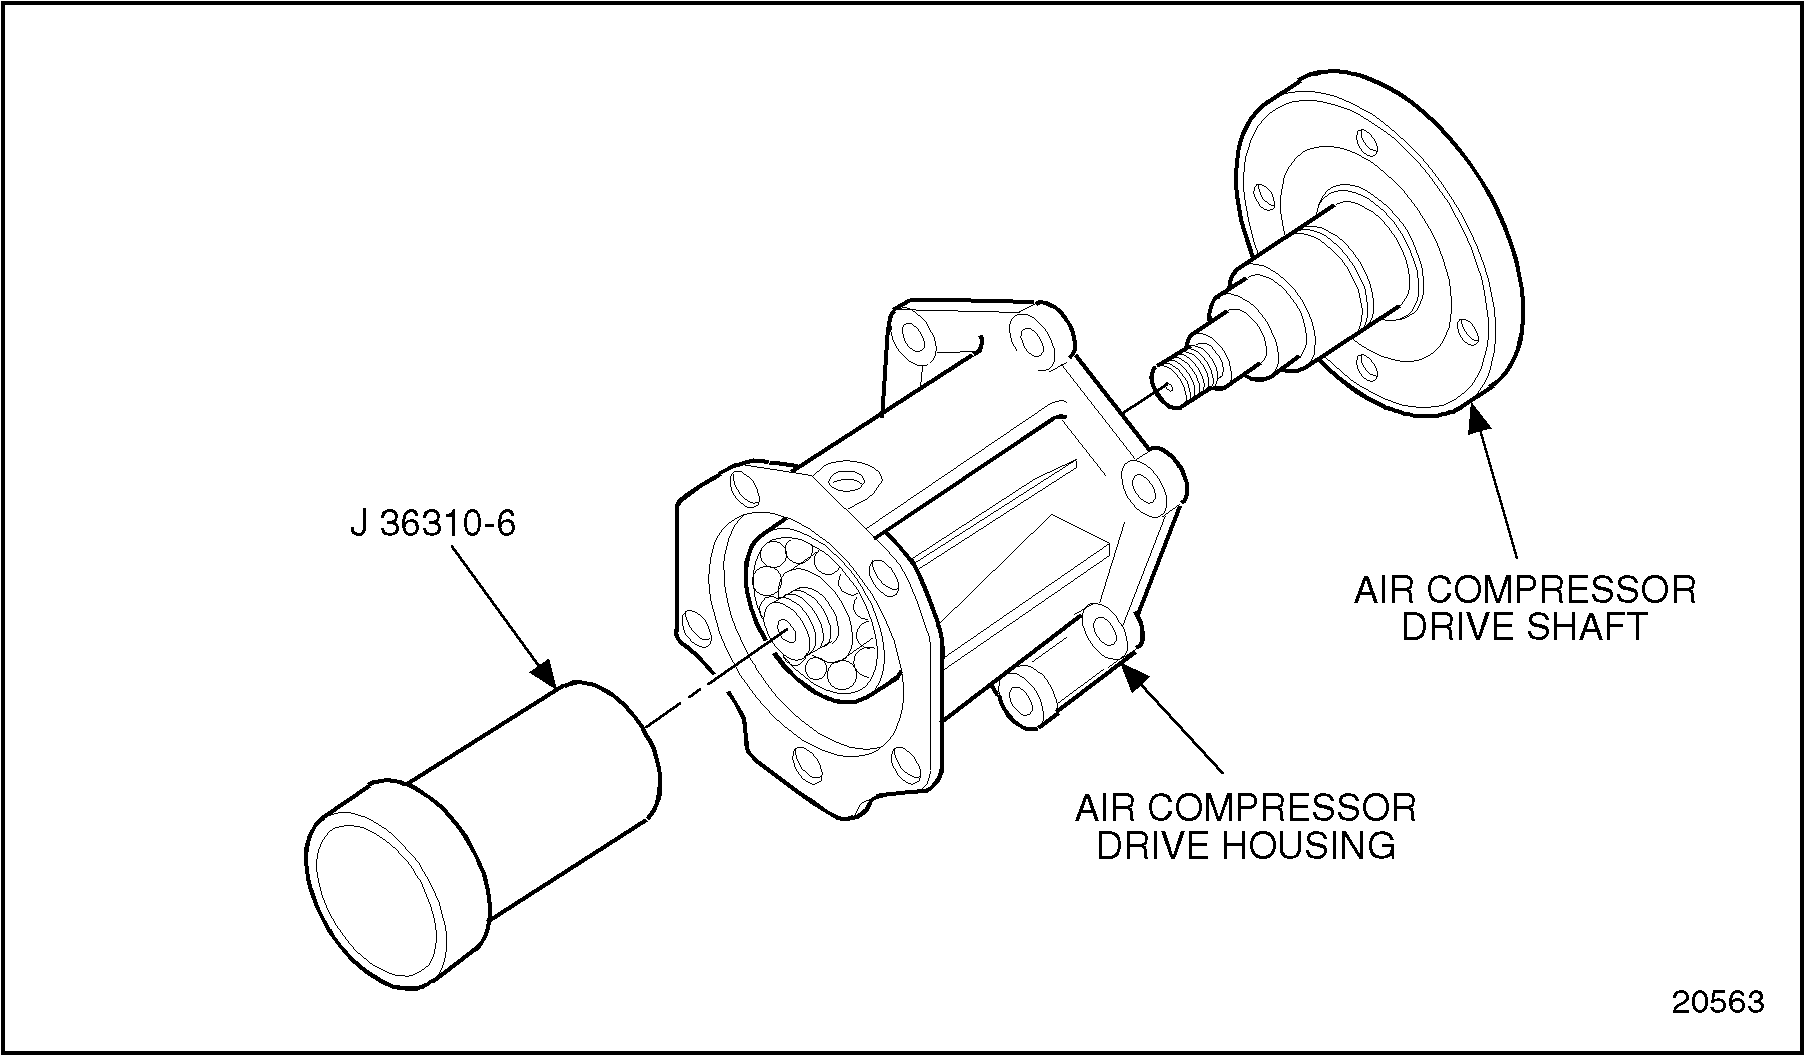
Figure 12. Air Compressor Drive Gear Installation
- Install the four drive gear-to-drive shaft bolts and torque to 58-73 N·m (43-54 lb·ft).
- Secure the holding fixture, See Figure "Holding Fixture " , in a suitable vise with the drive coupling positioned up.
- Position the air compressor drive assembly on the holding fixture, engaging the internal teeth of the drive gear with the coupling on the fixture.
- Lubricate the ball bearing with clean engine oil.
- Place the spacer on the drive shaft seating it against bearing inner race.
- Place the air compressor drive hub on the drive shaft. See Figure
"Drive Hub Installation"
.
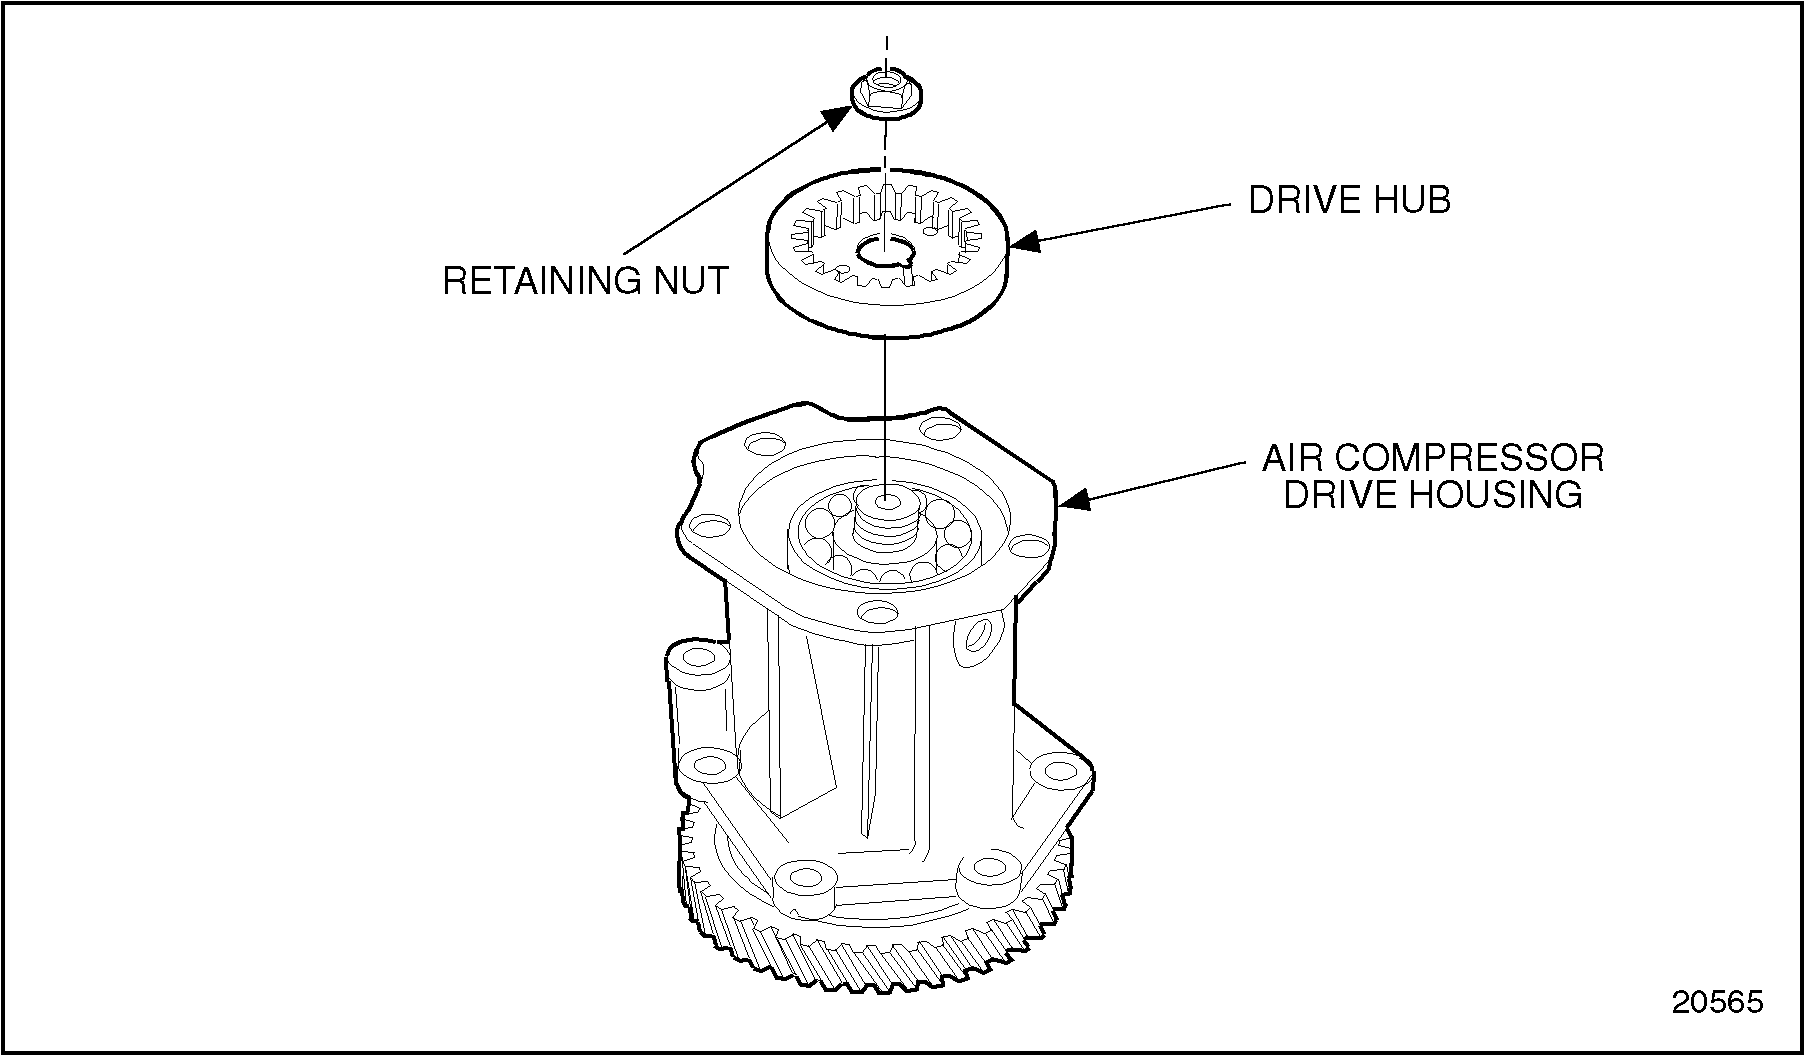
Figure 13. Drive Hub Installation
- Install the flanged nut retaining the drive hub to the drive shaft. Torque the nut to 300-345 N·m (221-255 lb·ft).
- Remove the drive assembly from the holding fixture and position it on a suitable flat surface with the drive gear facing up.
- Assemble a dial indicator and magnetic base so that the indicator stem rests on the face of the drive gear just inboard of the drive gear teeth. See Figure
"Measuring Air Compressor Drive Gear TIR"
.

Figure 14. Measuring Air Compressor Drive Gear TIR
- Zero the dial indicator.
- Rotate the drive gear two full revolutions. As the gear is rotated, the dial indicator may register both to the left and right of zero. The total amount the indicator needle moves to the left and right of zero, added together, gives the total indicated runout (TIR). Maximum allowable TIR is 0.08 mm (0.003 in.).
Section 10.3.5
Installation of Air Compressor Drive Assembly
Install the air compressor drive assembly as follows:
- Install the air compressor drive assembly to its original position in the gear case, using a new gasket between the housing and gear case.
- Install the bolts and nut that secure the air compressor drive assembly to the gear case.
- Using the required torque pattern, torque the five bolts and nut to 58-73 N·m (43-54 lb·ft). See Figure
"Bolt Torque Sequence"
.
Note: The shorter bolt is installed in the two o'clock position.
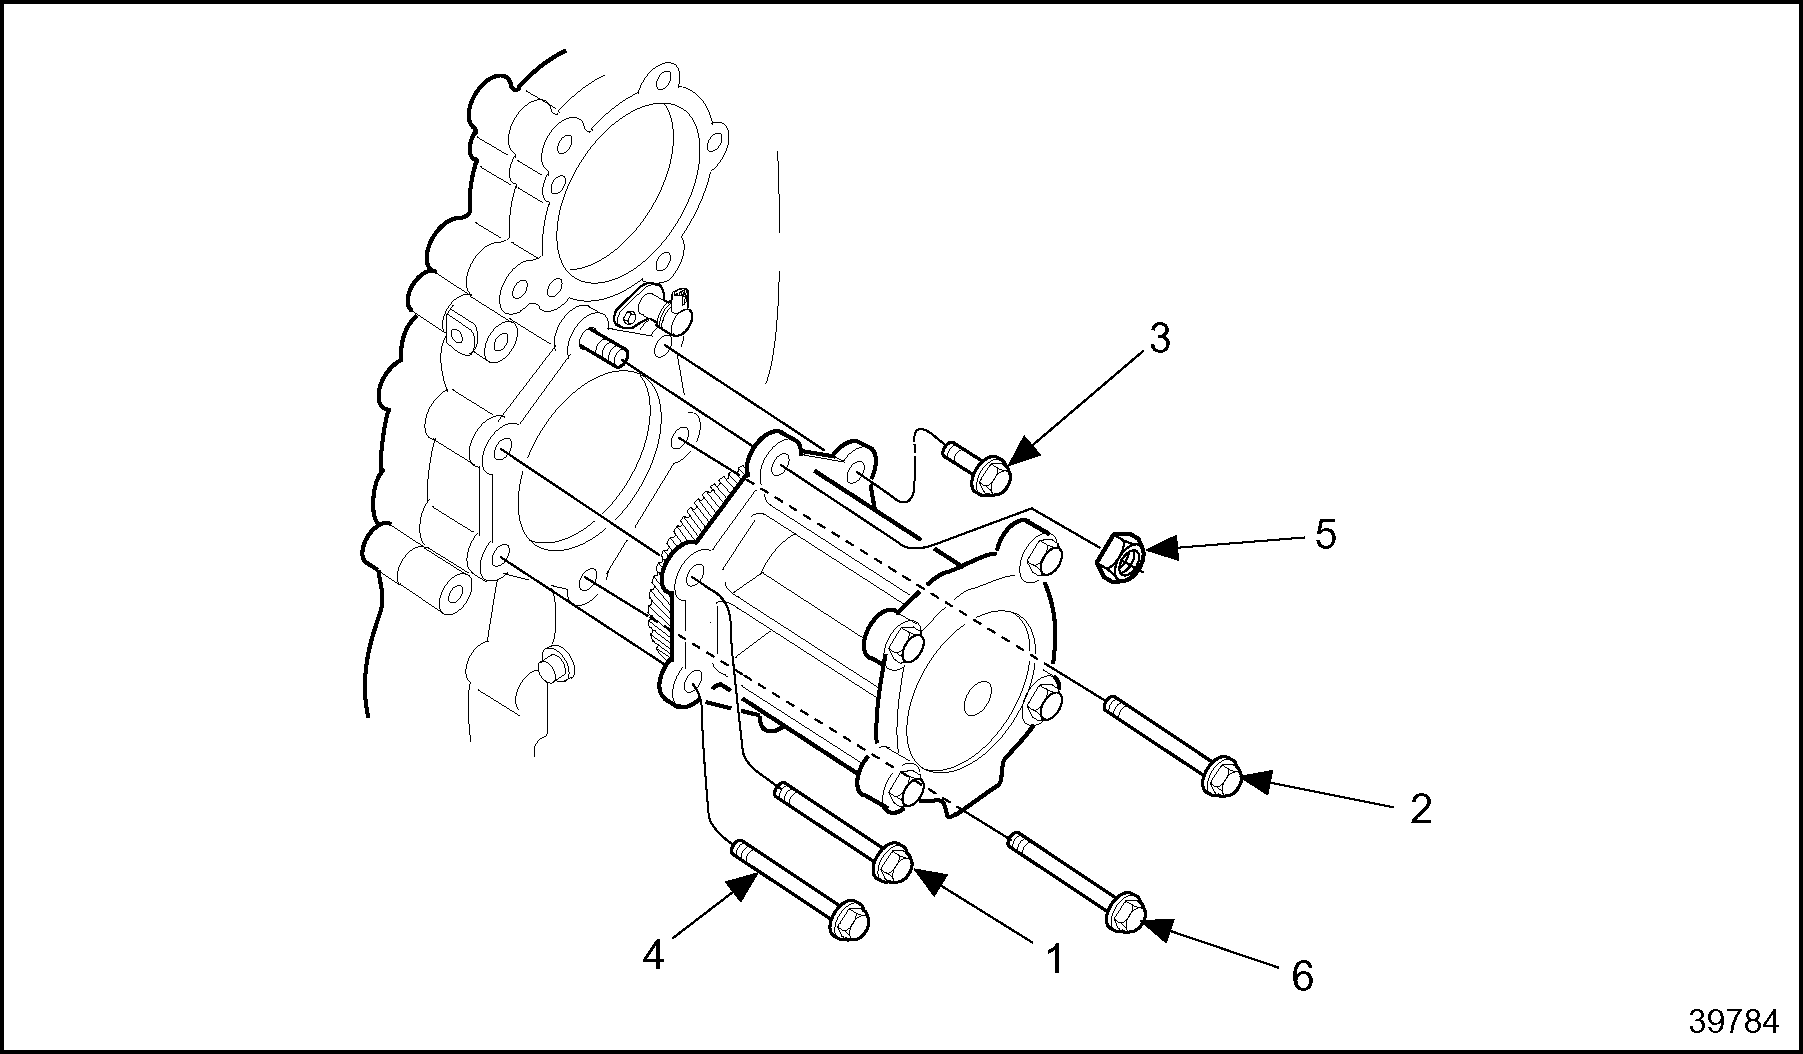
Figure 15. Bolt Torque Sequence
- Measure the bull gear-to-air compressor drive gear lash. Refer to "1.21.2.1 Check Engine Timing" .
- Install the access cover. Use a new gasket between the access cover and the gear case cover, and torque the 5 bolts to 30-38 N·m (22-28 lb·ft) in a star-shaped tightening pattern.
- If the engine is equipped with a power steering pump, install the proper steering drive coupling and power steering pump and cover assembly to the gear case cover. Install a new gasket between the cover and the gear case cover, and torque the 5 bolts to 30-38 N·m (22-28 lb·ft) in a star-shaped tightening pattern.
- Connect the oil supply line at the "T" fitting, if applicable, at the top of the air compressor drive housing.
- Install the air compressor. Refer to "10.1.4 Installation of Air Compressor"
.
Note: For engines used in coach applications, a high strength air compressor supply hose must be installed between the intake manifold and the air compressor inlet. This hose can be identified by the light blue color on the inside of the hose. Flat band spring type hose clamps must be used.
EYE INJURY
To avoid injury from flying parts when working with components under spring tension, wear adequate eye protection (face shield or safety goggles).
- Install any other components that were removed for this procedure.
| Series 50 Service Manual - 6SE50 |
| Generated on 10-13-2008 |