Section 1.21
Gear Train and Engine Timing
The gear train is completely enclosed between the gear case and gear case cover and is located at the front of the engine. The gear train consists of a camshaft drive gear, camshaft idler gear, fuel pump drive gear, air compressor and power steering pump drive gear, bull gear, oil pump drive gear, crankshaft timing gear, water pump drive gear, accessory pulley drive gear, and adjustable idler gear. The gear ratio of each gear in relationship to the crankshaft timing gear is shown directly below the gear title. See Figure "Engine Gear Train" .

Figure 1. Engine Gear Train
The crankshaft timing gear, pressed onto the front end of the crankshaft, directly drives the bull gear and oil pump drive gear, and indirectly (through the bull gear), drives the fuel pump drive gear, air compressor and power steering pump drive gear, accessory pulley drive gear and water pump drive gear.
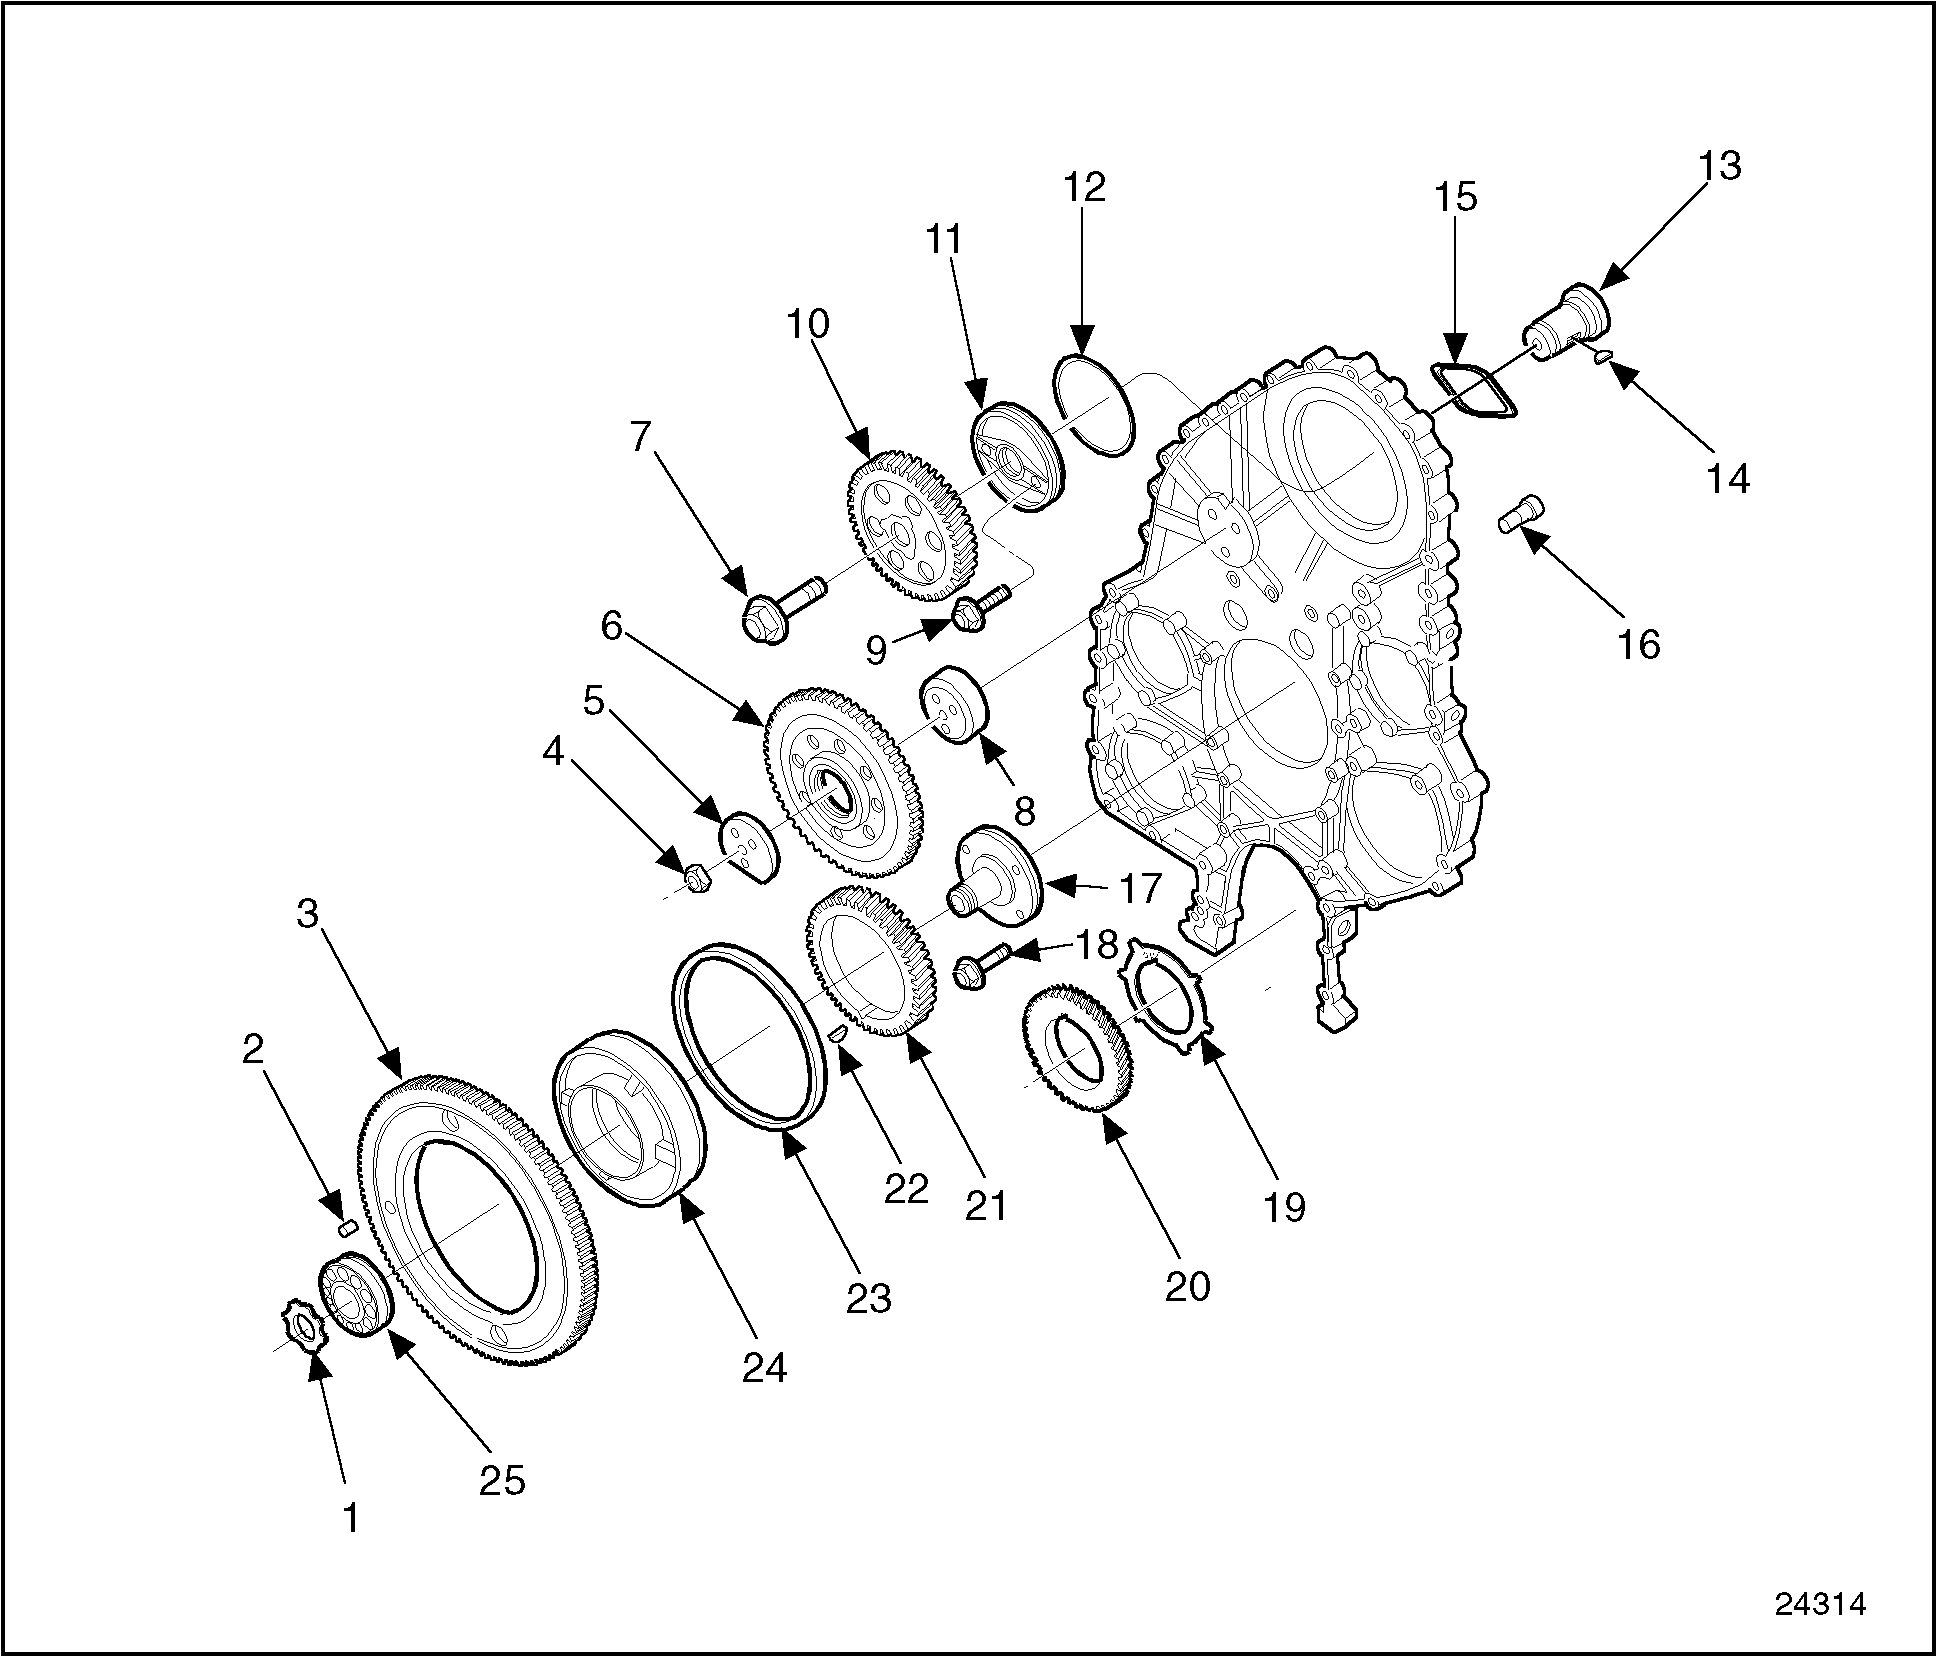
The camshaft idler gear is mounted to the rear of the bull gear on the same carrier, and rotates along with the bull gear at the same speed. This camshaft idler gear drives the adjustable idler gear, which in turn, drives the camshaft drive gear. See Figure "Gear Train and Related Parts" .
|
1. Bull Gear Retaining Nut |
14. Camshaft Drive Gear Hub Key |
|
2. Timing Pin |
15. Camshaft Thrust Plate Seal |
|
3. Bull Gear |
16. Adjustable Idler Gear Hub Retaining Stud |
|
4. Adjustable Idler Gear Locknut (3) |
17. Bull Gear/Idler Gear Hub |
|
5. Adjustable Idler Gear Plate |
18. Bull Gear Hub Retaining (4) Bolt |
|
6. Adjustable Idler Gear |
19. Crankshaft Timing Ring |
|
7. Camshaft Retaining Bolt |
20. Crankshaft Timing Gear |
|
8. Adjustable Idler Gear Hub |
21. Camshaft Idler Gear |
|
9. Thrust Plate Retaining (2) Bolt |
22. Bull Gear/Idler Gear Key |
|
10. Camshaft Drive Gear |
23. Spacer |
|
11. Camshaft Thrust Plate |
24. Bull Gear/Idler Gear Carrier |
|
12. Camshaft Thrust Plate Seal O-ring |
25. Bull Gear/Idler Gear Bearings |
|
13. Camshaft Drive Gear Hub |
|
Figure 2. Gear Train and Related Parts
The bull gear and camshaft idler gear are a press-fit to the bull gear and camshaft idler gear carrier. Both gears are keyed to the carrier by the same key. The carrier is supported by two tapered roller bearings, which ride on a hub bolted to the engine block by four bolts. The bull gear and camshaft idler gear assembly is retained to the hub by a left-hand threaded nut .
The camshaft idler gear drives the camshaft drive gear through an adjustable idler gear. The adjustable idler gear is supported by a bushing and is mounted on an adjustable hub secured by three studs pressed into the gear case from the rear.
The balance shaft idler gear drives the right balance shaft gear and oil pump gear. The oil pump gear drives the left hand balance shaft, causing the balance shafts to counter-rotate.
The camshaft must be in time with the crankshaft timing gear. Since there are three gears between them, timing marks have been stamped or etched on the face of the gears to facilitate correct gear train timing. See Figure "Engine Gear Train and Timing Marks" .
The balance shafts must be in time with the crankshaft. Timing marks are stamped on the balance shaft idler gear, balance shaft gears, and oil pump gear.

|
1. Camshaft Idler Gear |
4. Bull Gear |
|
2. Adjustable Idler Gear |
5. Crankshaft Timing Gear |
|
3. Camshaft Drive Gear |
|
Figure 3. Engine Gear Train and Timing Marks
The symbol system of marking the gears makes gear train timing a comparatively easy operation. When assembling the engine, work from the crankshaft timing gear to the camshaft drive gear and line up the appropriate symbols on the gears as each gear assembly is installed on the engine.
There are no timing marks on the drive gears for the fuel pump, air compressor and power steering pump, water pump or accessory drive pulley. Therefore, it is not necessary to align these gears in any particular position during their installation.
Alignment of the symbols on the balance shaft idler gear, balance shaft drive gears, and oil pump gear is done with balance shaft counter weights in the bottom, 6 o'clock, position and cylinder number one at TDC.
The backlash between the various mating gears in the gear train should be 0.051-0.229 mm (0.002-0.009 in.), and should not exceed 0.305 mm (0.012 in.) backlash between worn gears.
Gear train noise is usually an indication of excessive gear lash, chipped, pitted or burred gear teeth or excessive bearing wear. Therefore, when noise develops in a gear train, the gear case should be removed and the gear train and its bearings inspected. A rattling noise usually indicates excessive gear lash whereas a whining noise indicates too little gear lash.
The gear train is lubricated by oil splash. The bull gear and camshaft idler gear are pressure-fed lubricating oil through two holes in the bull gear recess area of the engine block. See Figure "Gear Train Lubricating Oil Hole Locations" .

Figure 4. Gear Train Lubricating Oil Hole Locations
These two holes are connected to the main oil gallery. The adjustable idler gear assembly is pressure-fed by an oil gallery in the gear case that indexes with a hole in the engine block. The hole in the engine block is connected to the main oil gallery.
The correct relationship between the crankshaft and the camshaft must be maintained to properly control the opening and closing of the intake and exhaust valves, and the operation of the fuel injectors and to help maintain engine balance.
The crankshaft and camshaft gears can only be mounted in one position as they are both keyed to their mating parts. Therefore, when the engine is properly timed, the timing marks on the various gears will match. See Figure "Engine Gear Train and Timing Marks" .
An "out of time" engine may result in valve-to-piston dome contact, a no-start condition or loss of power.
Section 1.21.1
Repair or Replacement of Gear Train and Engine Timing
To determine if repair is possible or replacement is necessary, perform the following procedure. See Figure "Flowchart for Repair or Replacement of Gear Train and Engine Timing - Part 1 of 3" .

|
To go to " A", see Figure "Flowchart for Repair or Replacement of Gear Train and Engine Timing - Part 2 of 3" |
|
Figure 5. Flowchart for Repair or Replacement of Gear Train and Engine Timing - Part 1 of 3

|
To go to " B", see Figure "Flowchart for Repair or Replacement of Gear Train and Engine Timing - Part 3 of 3" |
|
Figure 6. Flowchart for Repair or Replacement of Gear Train and Engine Timing - Part 2 of 3
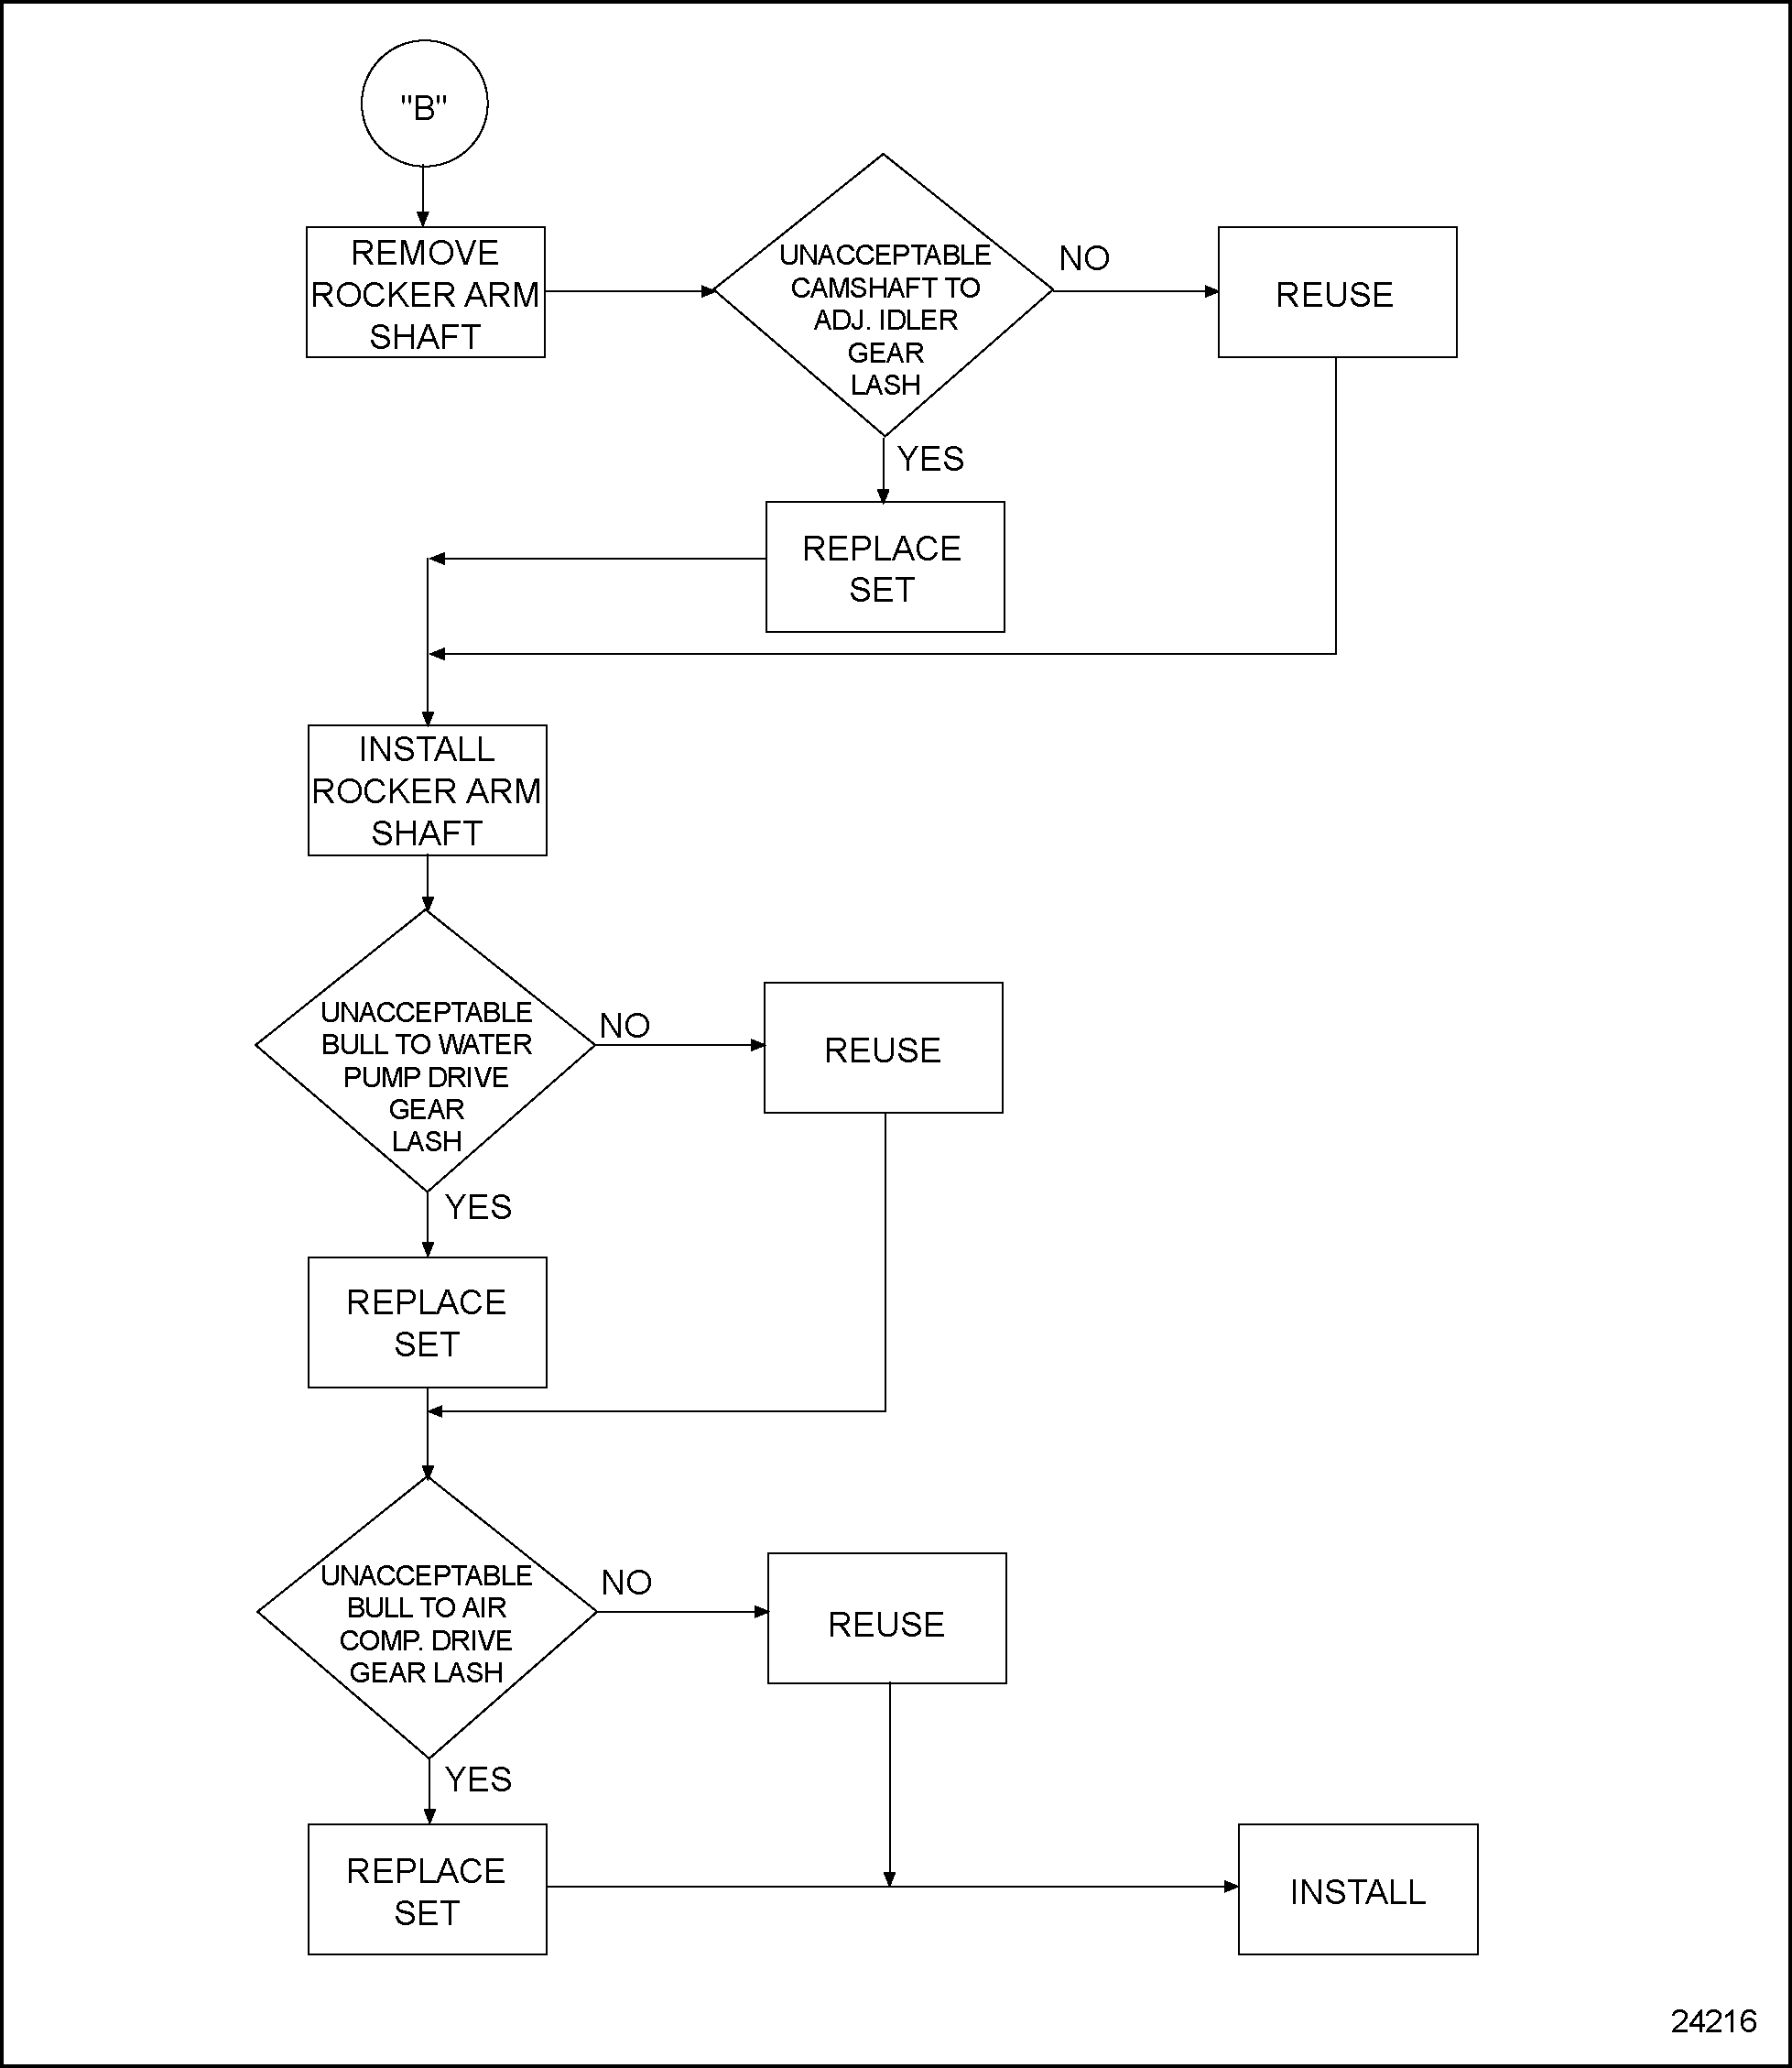
Figure 7. Flowchart for Repair or Replacement of Gear Train and Engine Timing - Part 3 of 3
Section 1.21.2
Cleaning and Removal of Gear Train and Engine Timing
When an engine is out of time, the camshaft timing can be checked by following the camshaft timing check procedure. Refer to "1.22.6.1 Test of Camshaft Timing on Diesel Engines" . If the engine is out of time, a visual inspection of the gear train is required.
Refer to "1.10.2 Removal of Gear Case Cover" and perform all of the steps under "Removal of Gear Case Cover".
Section 1.21.2.1
Check Engine Timing
Gear train noise is usually an indication of excessive gear lash, chipped, pitted or burred gear teeth, or excessive bearing wear. Therefore, when noise develops in a gear train, the gear case cover should be removed and the gear train and its bearings inspected. A rattling noise usually indicates excessive gear lash. A whining noise indicates too little gear lash.
- Check engine timing as follows:
- Examine all timing marks to ensure they are aligned. See Figure "Engine Gear Train and Timing Marks" .
- It may be necessary to remove the gears to align the timing marks. Refer to "1.26.2 Removal of Bull Gear and Camshaft Idler Gear Assembly" .
- If any gears are removed or installed, or if lash between any two gears is out of specification, check the lash between the mating gears.
Note: The gear ratio between the adjustable idler gear and the camshaft drive gear causes a "hunting-tooth" situation. Therefore, the bull gear and rocker arm assemblies should be removed to align the timing marks. See Figure "Engine Gear Train and Timing Marks" .
- Check the crankshaft timing gear-to-oil pump idler gear lash measurement as follows:
- Fasten a dial indicator and magnetic base to the cylinder block so that the stem of the dial indicator rests on a tooth of the balance shaft idler gear. See Figure "Crankshaft Timing Gear-to-Oil Drive Gear Lash Measurement" .
- Hold the crankshaft timing gear stationary, and rotate the balance shaft idler gear in one direction, as far as it will go, without moving the crankshaft timing gear.
- Zero the dial indicator.
- Move the balance shaft idler gear in the opposite direction, as far as it will go, without moving the crankshaft timing gear.
- Read and record the total gear lash.
- Remove or install shims as necessary to obtain the proper gear lash clearance.
- If the use of shims cannot bring gear lash within acceptable limits, the gear or gears for that gear set must be replaced.

Figure 8. Crankshaft Timing Gear-to-Oil Drive Gear Lash Measurement
Note: The lash between the crankshaft timing gear and oil pump idler gear must be measured with the engine in a running position. See Figure "Engine Gear Train and Timing Marks" .
Note: The gear lash must be checked in four positions 90° apart.
Proper lash between the crankshaft timing gear and balance shaft idler gear is 0.051-0.229 mm (0.002-0.009 in.) for new parts, with a maximum of 0.305 mm (0.012 in.) for used parts.
The gear lash between the crankshaft timing gear and the balance shaft idler gear can be adjusted utilizing shims inserted between the balance shaft assembly and the cylinder block. See Figure "Lubricating Oil Pump Shim Installation" .

Figure 9. Lubricating Oil Pump Shim Installation
- Check the crankshaft timing gear-to-bull gear lash measurement as follows:
- Install a dial indicator and magnetic base. See Figure "Crankshaft Timing Gear-to-Bull Gear Lash Measurement" .
- Adjust the stem of the dial indicator to rest on the center of a tooth on the bull gear.
- Preload the bull gear.
- Zero the dial indicator pointer.
- Hold the crankshaft timing gear stationary with one hand. Rotate the bull gear and check the total gear lash in four positions of crank gear, approximately 90° apart.
- Although gear lash for the remaining gear sets is not adjustable, the lash must still be measured. Lash specification is 0.051-1.229 mm (0.002-0.009 in.) for new parts and a maximum of 0.305 mm (0.012 in.) for used parts.
- If lash measurement is exceeded, replace gear with a new part.
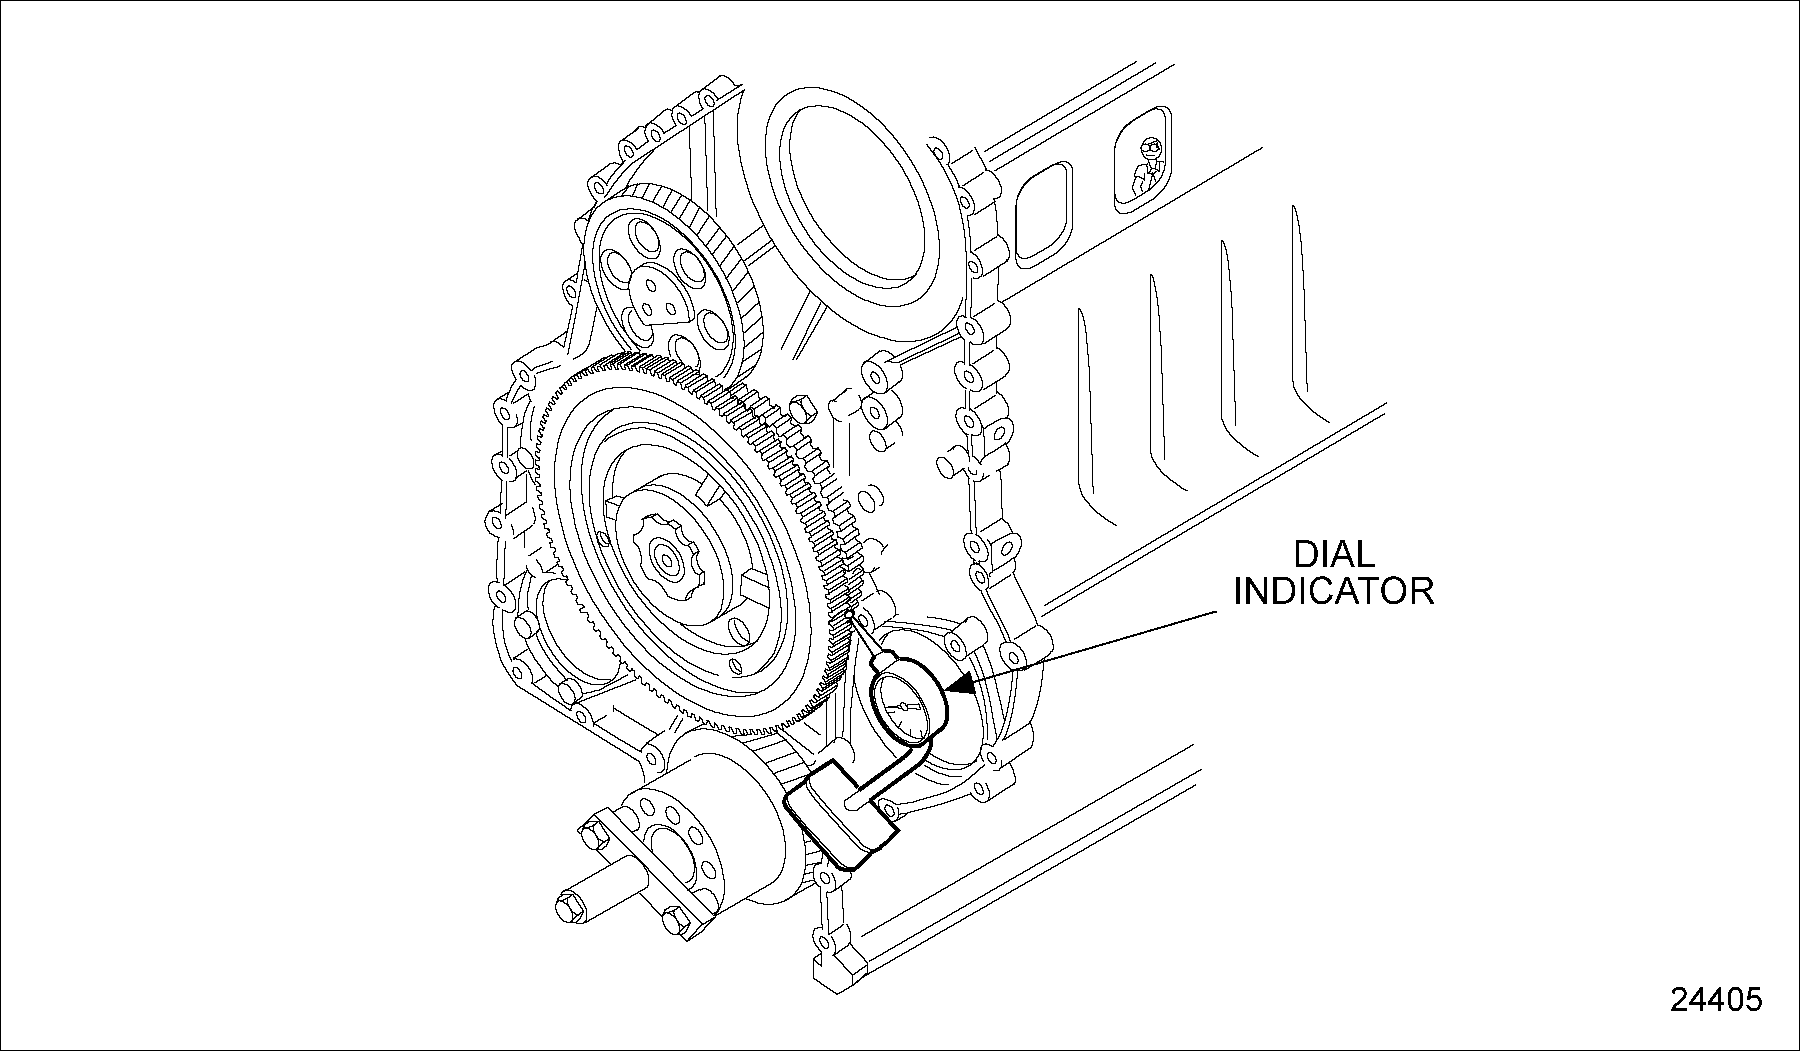
Figure 10. Crankshaft Timing Gear-to-Bull Gear Lash Measurement
- The procedure for measuring the lash between the bull gear and the fuel pump drive gear (if applicable) and the air compressor and power steering pump drive gear is similar to the steps just mentioned. Refer to step 3a , as the first step and refer to step 3g , as the final step.
- Gear case cover must be installed to continue or checking the engine timing. Refer to "1.8.5 Removal of Rear Crankshaft Oil Seal (Flywheel Housing Installed)" and perform all of the steps under gear case cover installation.
- The procedure for measuring the lash between the accessory drive gear and air compressor pump drive gear (on vehicle without power steering) is similar to the steps just mentioned. Refer to step 3
, as the first step and refer to step 9
, as the final step.
Note: Lash can be measured with the gear case cover installed. Access covers are provided for checking the lash between these gears and the bull gear. For engines with no access cover for accessory drive, gear lash is to be measured off the accessory drive pulley.
- The procedure for measuring the lash between the adjustable idler gear and camshaft drive gear is similar to the steps just mentioned. Refer to step 3
, as the first step and refer to step 9
, as the final step.
Note: These gears are measured and adjusted with the gear case cover installed.
- The procedure for measuring the lash between the bull gear and the water pump drive gear is similar to the steps just mentioned. Refer to step 3
, as the first step and refer to step 9
, as the final step.
Note: These gears can be measured with the pump installed.
Refer to "1.3.2 Removal of Rocker Arm Assembly" and perform all of the steps under "Removal of Rocker Arm Assembly," in order to continue checking the engine timing.
- When measuring or adjusting the gear lash between the adjustable idler gear and the camshaft drive gear, the valve and injector spring pressures must be removed from the camshaft lobes. Use the following procedure for this adjustment:
Note: The front and rear rocker arm shafts look identical, but must not be interchanged due to different oil passage patterns. The outboard ends of the rocker arm shafts are marked for identification with the DDC logo. See Figure "Rocker Arm Shaft Identification Mark" . Use care to ensure that the rocker arm shaft assemblies are replaced exactly as removed.
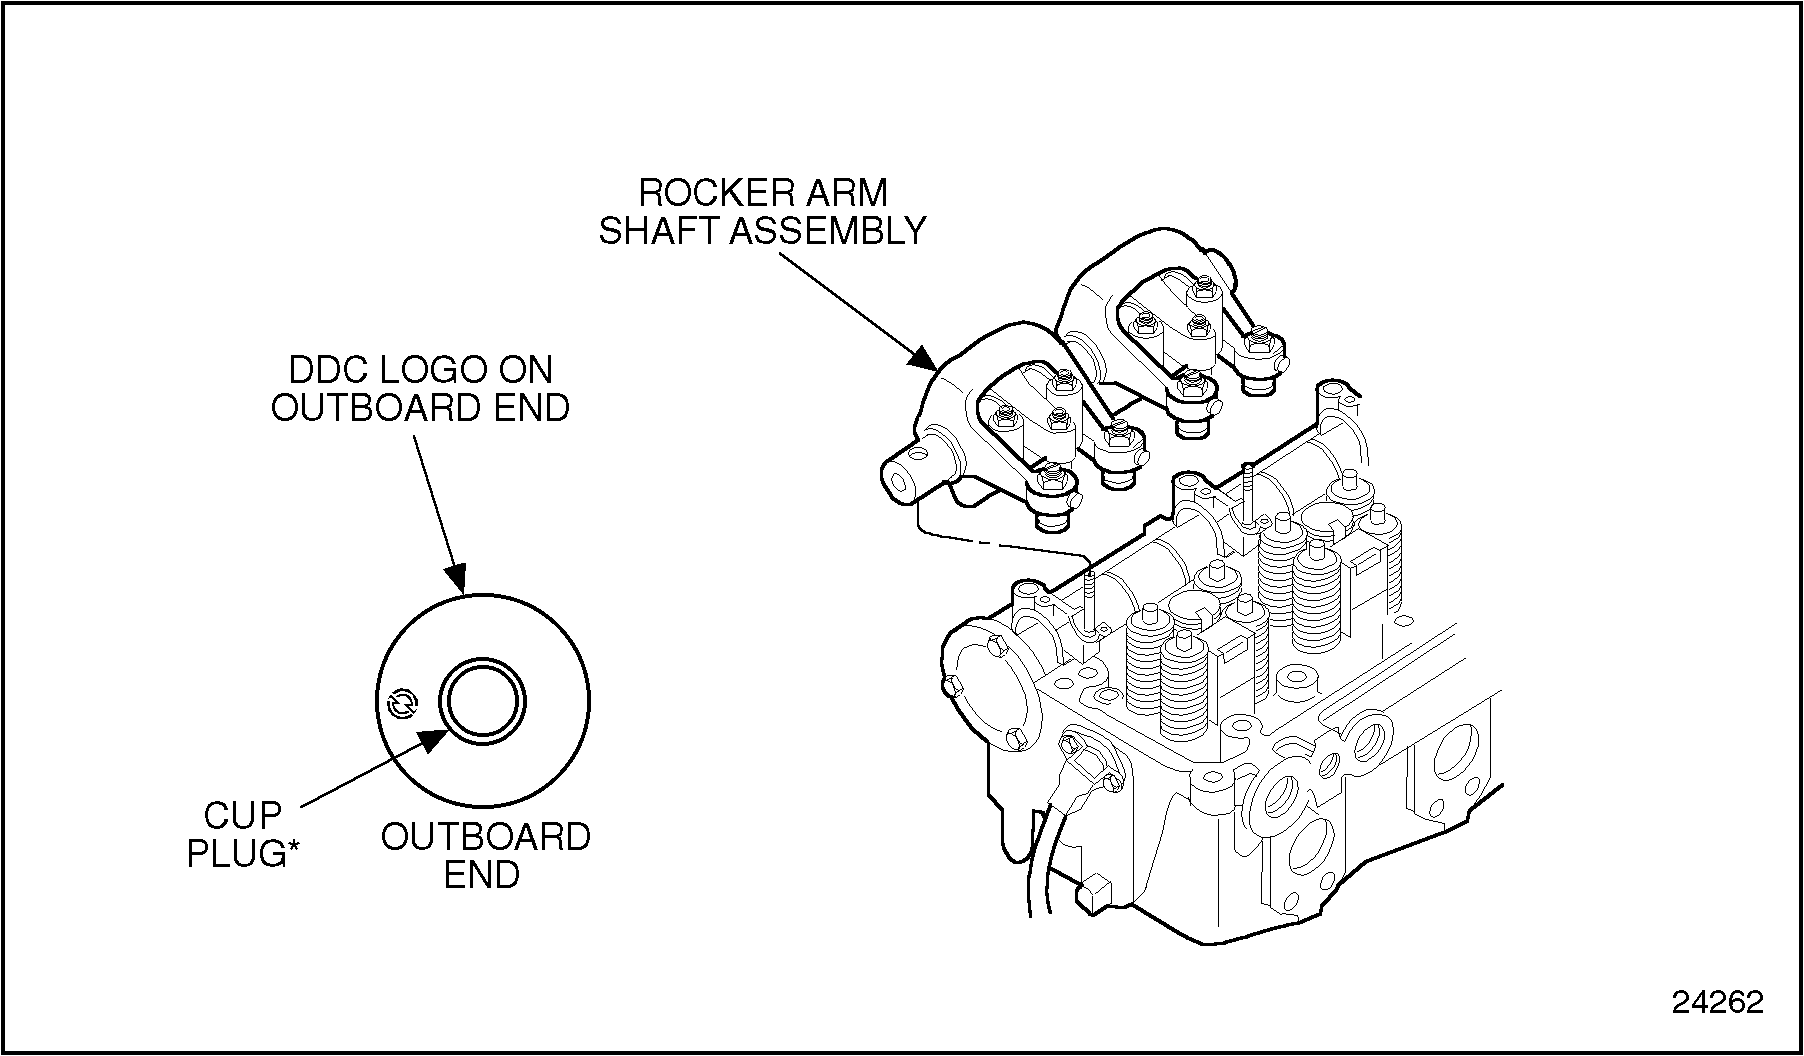
Figure 11. Rocker Arm Shaft Identification Mark
- Install the gear lash pedestal, J 35596-15 part of J 35596 , into the threaded hole of the camshaft drive gear. Bar the engine over until the tool is at the three o'clock position. See Figure "Camshaft Drive Gear-to-Adjustable Idler Gear Lash Measurement" .
- Mount a dial indicator adaptor and dial indicator. See Figure "Camshaft Drive Gear-to-Adjustable Idler Gear Lash Measurement" .
- Adjust the stem of the dial indicator to rest on the flat of the pedestal.
- If the adjustable idler gear has been removed, torque the three flanged nuts that retain the adjustable idler gear hub to the gear case to 57-67 N·m (42-49 lb·ft) to seat the assembly before proceeding.
- Loosen the three locknuts that retain the adjustable idler gear hub to the gear case until they are hand tight.
- Insert the dowel portion of the gear lash adjusting tool, J 35596 , through the hole in the adjustable idler gear retaining plate and into the adjustable idler gear hub, using the bottom two adjustable idler gear cover bolt holes. See Figure "Camshaft Drive Gear-to-Adjustable Idler Gear Lash Measurement" .
- Turn the adjusting screw of the tool in a clockwise direction to force the adjustable idler gear against the camshaft drive gear, until there is zero lash between the two gears. See Figure "Adjustable Idler Gear-to-Camshaft Drive Gear Lash Adjustment" .
- Zero the dial indicator.
- Hold the adjustable idler gear by inserting a screwdriver through the hole provided in the gear case. Engage one of the adjustable idler gear teeth and apply pressure on the screwdriver to move the gear in a counterclockwise direction. This will prevent the gear from moving.
- Attempt to turn the camshaft drive gear, and watch the dial indicator pointer.
- Turn the adjusting screw of the tool approximately 1-1/2 turns or until the proper gear lash is obtained.
- When checking gear lash, hold the adjustable idler gear stationary. Refer to step 9i as the first step and refer to step 9j as the final step, and rotate the camshaft drive gear with your right hand. See Figure "Checking Adjustable Idler Gear-to-Camshaft Drive Gear Lash" .
- Check the gear lash with the pedestal at the 3,6,9 and 12 o'clock positions, exactly as previously performed.
- When the proper readings of 0.025-0.114 mm (0.001-0.0045 in.) are obtained at all four (4) positions, hold the idler gear. Refer to step 9i as the first step and refer to step 9j as the final step, and torque the top two adjustable idler gear flanged nuts to 57-67 N·m (42-49 lb·ft).
- Check the gear lash again as outlined above, with the flanged nuts torqued, to ensure that gear lash is still within limits.
- If proper lash measurement cannot be obtained, replace gear(s) with new part(s). Refer to "1.26.3 Installation of Bull Gear and Camshaft Idler Gear Assembly" .
- Remove the gear lash adjusting tool from the gear case.
- Torque the bottom adjustable idler gear flanged nut to 57-67 N·m (42-49 lb·ft).
- Remove the dial indicator and pedestal from the gear case.
- Before installing the rocker arm shaft assemblies, check the torque on the end studs to ensure they were not loosened at time of removal. The torque specification is 101-116 N·m (75-86 lb·ft).
- Install the front and rear rocker arm shaft assemblies to the cylinder head. Install the six rocker arm shaft thru-bolts and two nuts, finger tight.
- Install the rocker arms and torque the rocker arm shaft's thru-bolts and nuts to 101-116 N·m (75-86 lb·ft) using the sequence. See Figure "Rocker Arm Shaft Bolt and Nut Torque Sequence" .
-
Refer to "12.2 Valve Lash, Injector Height (Timing) and Jake Brake
® Lash Adjustments" and adjust the intake and exhaust valve clearances, and fuel injector heights. - Install the rocker cover. Refer to "1.6.6 Pre-installation of Rocker Cover Base" .
- Insert a new gasket between the camshaft drive gear access cover and the gear case cover. Install the camshaft drive gear access cover to the gear case cover. Torque the bolts to 30-38 N·m (22-28 lb·ft) using the tightening sequence. See Figure "Camshaft Drive Gear Access Cover Bolt Torque Sequence" .
- Install the fan support bracket if required as follows:

Figure 12. Camshaft Drive Gear-to-Adjustable Idler Gear Lash Measurement
Note: Since the teeth of the camshaft drive gear are not accessible with the gear case cover installed, the lash is measured on the pedestal installed in the threaded hole, which is located exactly half-way between the center and edge of the camshaft drive gear. For this reason, the reading obtained will be exactly 1/2 of the actual gear lash.
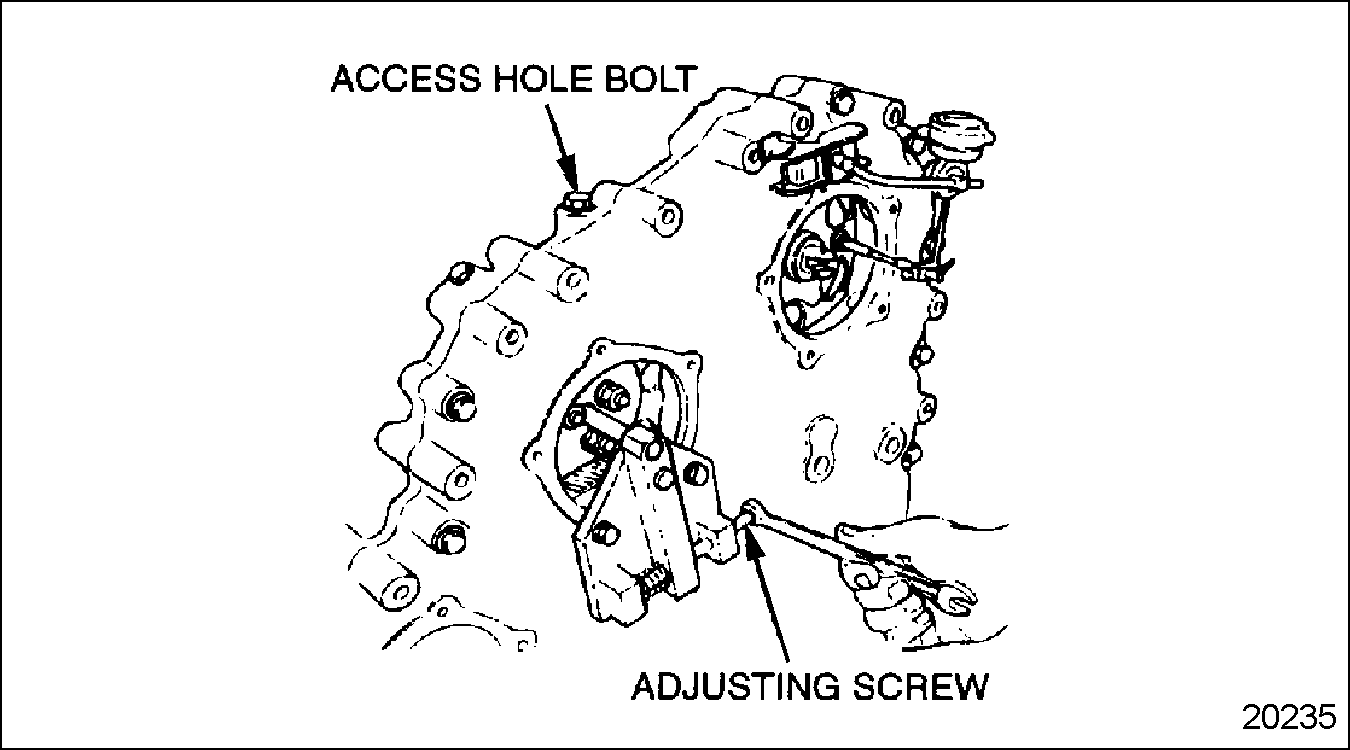
Figure 13. Adjustable Idler Gear-to-Camshaft Drive Gear Lash Adjustment
Note: If there is zero lash between the two gears, the dial indicator pointer will not move from zero.
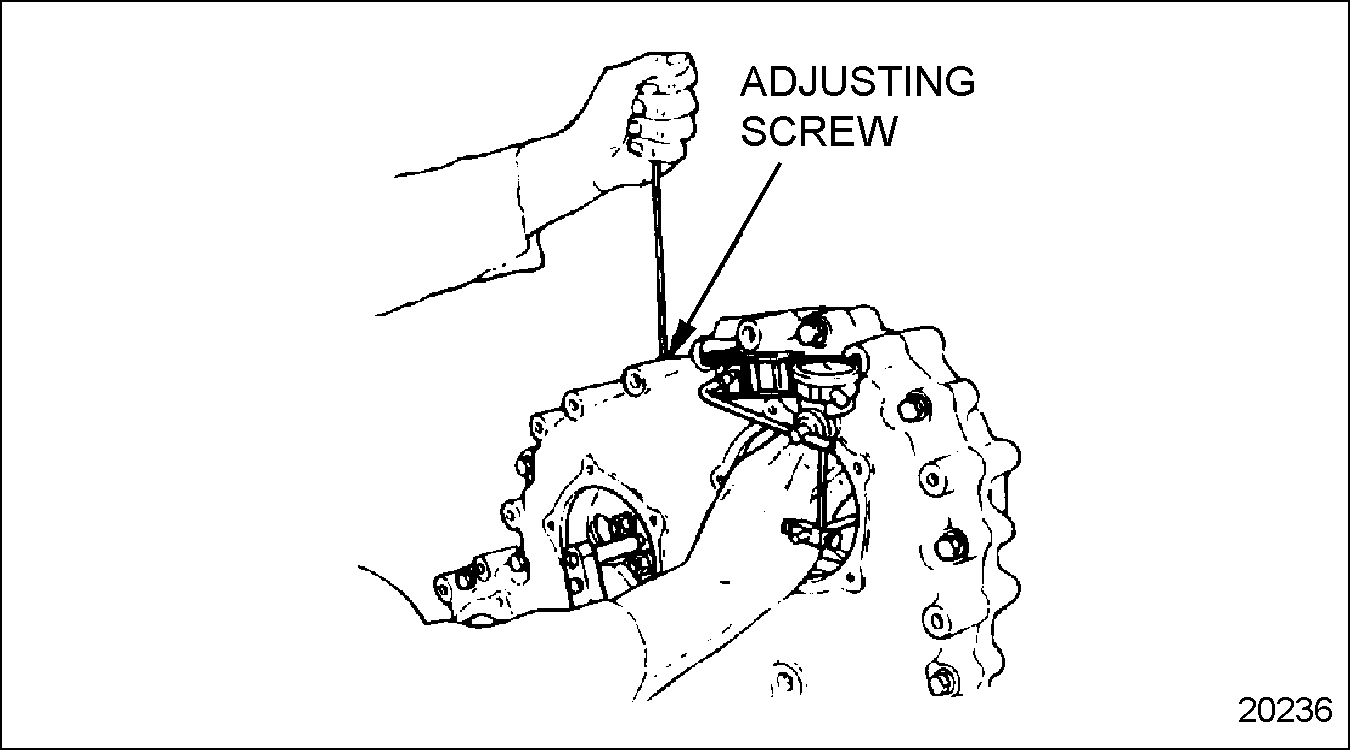
Figure 14. Checking Adjustable Idler Gear-to-Camshaft Drive Gear Lash
Note: Remember to multiply the reading obtained by two to get the actual lash measurement. The specification of gear lash is 0.051-0.229 mm (0.002-0.009 in.) with a maximum of 0.305 mm (0.012 in.) for used parts.

Figure 15. Rocker Arm Shaft Bolt and Nut Torque Sequence

Figure 16. Camshaft Drive Gear Access Cover Bolt Torque Sequence
Clean the mating surfaces of the fan support bracket and gear case of all old gasket eliminator. Gasket eliminator removal information may be found in the "General Information" section of this manual.
Apply a 1/16 in. bead of Gasket Eliminator PT-7276 (Loctite 51580), or equivalent, to the machined surface of the gear case cover surrounding the adjustable idler gear access.
Install the fan support bracket to the gear case cover using the torque values and tightening sequence. See Figure "Fan Support Bracket Bolt Torque Sequence" .

BOLT
TORQUE
1-3-5
58-73 N·m (43-45 lb·ft)
2-4
160-200 N·m (118-148 lb·ft)
6 to 10
30-38 N·m (22-28 lb·ft)
Figure 17. Fan Support Bracket Bolt Torque Sequence
- Check the bull gear-to-accessory drive gear lash measurement as follows:
- Mount a magnetic dial indicator base and dial indicator to the gear case cover. See Figure "Accessory Drive Gear-to-Bull Gear Lash Measurement" .
- Install the gear lash tool J 38662 . See Figure "Accessory Drive Gear-to-Bull Gear Lash Measurement" .
- Position the dial indicator to read between the scribed lines on the tool. See Figure "Accessory Drive Gear-to-Bull Gear Lash Measurement" .
- Rotate the accessory drive pulley, read and record the total gear lash.
- Lash should be 0.051-0.229 mm (0.002-0.009 in.) for new parts, with a maximum of 0.305 mm (0.012 in.) for used parts.
- If proper lash measurement cannot be obtained, replace gear with a new part. Refer to "1.26.2 Removal of Bull Gear and Camshaft Idler Gear Assembly" .
- Remove the dial indicator and gear lash tool.

Figure 18. Accessory Drive Gear-to-Bull Gear Lash Measurement
- Check the bull gear-to-water pump drive gear lash measurement with water pump impeller slip tester, J 35687
as follows:
Note: The bull gear-to-water pump drive gear lash can be measured using the water pump impeller slip tester, J 35687 , refer to step 11 Or by using the water pump gear lash tool, J 38977-A , refer to step 1 .

EYE INJURY
To avoid injury from flying debris, wear a face shield or goggles.
- Remove the water pump cover snap ring with snap ring pliers. Remove water pump cover and seal ring.
- Install the water pump impeller slip tester, J 35687 , to the water pump impeller with two 5/16-18 bolts, using the instructions supplied with the tool. See Figure "Water Pump Impeller Slip Tester Method" .
- One leg (the long one) of the tool has an inscribed line. Measuring with a dial indicator at this line of the tool, the gear lash measurement will be an exact 1:1 reading. Lash should be 0.051-0.229 mm (0.002-0.009 in.).
- If proper lash cannot be obtained, replace gear with a new part.
- Remove the dial indicator.
- Remove the tool from the water pump.
- Inspect the water pump cover seal for cracks or splitting. Refer to "4.2.3.1 Inspection of Water Pump" .
- Install a new seal, if necessary, between the water pump cover and the water pump housing.
- Using snap ring pliers, install the water pump snap ring in groove of water pump body.
- Tap around the inside rim of snap ring with a brass drift, and hammer to seat snap ring in groove fully.
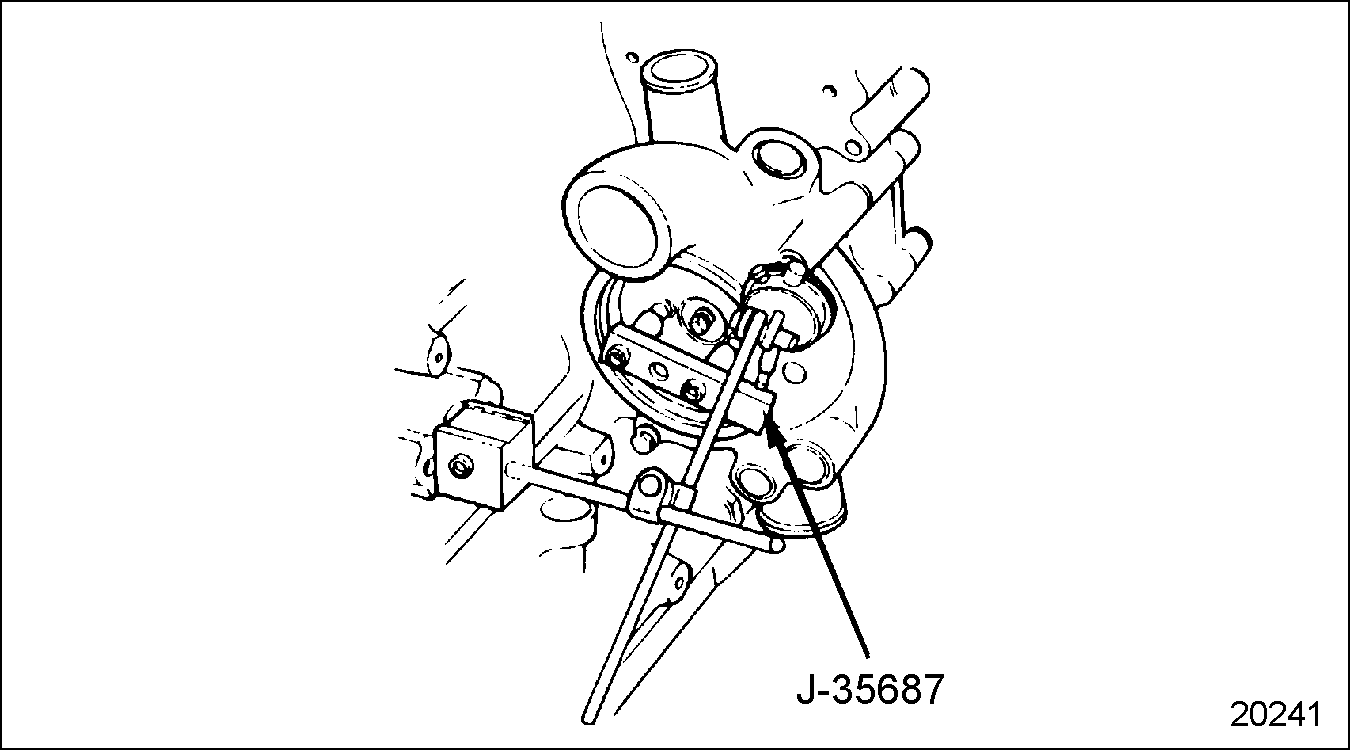
Figure 19. Water Pump Impeller Slip Tester Method
- Check the bull gear-to-water pump drive gear lash measurement with water pump gear lash tool, J 38977-A
, as follows:
- Remove the pipe plug in the gear case cover.
- Install the water pump gear lash tool, J 38977-A , through the hole in the gear case and thread it into the special water pump drive gear retaining bolt. See Figure "Water Pump Gear Lash Tool Method" .
- The arm of this tool has an inscribed line. Measuring with a dial indicator at this line of the tool, the gear lash measurement will be an exact 1:1 reading. Lash should be 0.051-0.229 mm (0.002-0.009 in.).
- If proper lash cannot be obtained, replace the gear with a new part.
- Remove the dial indicator and the gear lash tool.
- Install the pipe plug in the gear case cover. Torque to 24-31 N·m (18-23 lb·ft).

Figure 20. Water Pump Gear Lash Tool Method
- Check the bull gear-to-air compressor drive gear lash measurement as follows:
- Mount a magnetic dial indicator base and dial indicator to the gear case cover so that the stem of the dial indicator may be positioned on a tooth of the air compressor drive gear.
- Preload the drive gear in one direction.
- Zero the dial indicator.
- Rotate the air compressor drive gear, read and record the total gear lash. Lash should be 0.051-0.229 mm (0.002-0.009 in.) for new parts, with a maximum of 0.305 mm (0.012 in.) for used gears.
- If proper lash cannot be obtained, replace the gear with a new part.
- Remove the dial indicator and magnetic base.
- Install the power steering drive coupling to the air compressor drive gear (if equipped with power steering).
- Insert a new O-ring on the power steering pump (if so equipped).
- Install the power steering pump to the gear case cover, meshing the drive coupling properly
- Install and torque the power steering pump mounting bolts to 30-38 N·m (22-28 lb·ft). Tighten the five bolts alternately and evenly, in a star-shaped pattern, to progressively draw the power steering pump into the gear case cover
- If the engine is not equipped with power steering, install the air compressor drive gear access cover using a new gasket.
- Install and torque the retaining bolts to 30-38 N·m (22-28 lb·ft), using a star-shaped pattern.
Note: Do not force the bolts. If resistance is encountered, remove the power steering pump and re-engage the drive hub with the coupling.
Section 1.21.3
Installation of Gear Train and Engine Timing
After all of the gear lash measurements have been taken, assemble the engine components as follows:
- Install the air conditioner compressor and brackets (if so equipped). Install the air conditioner drive belt.
- Install the alternator and brackets. Refer to OEM guidelines. Install the alternator drive belts.
- Install the alternator drive belts. Refer to OEM guidelines.
- Install the fan and fan hub assembly. Refer to "4.5.5 Installation of the Engine Cooling Fan" .
- Adjust the alternator, fan and air conditioner compressor drive belts to the specifications. Refer to "13.5.7 Drive Belts" . Torque the accessory mounting bolts to specifications.
- Install any other equipment such as hoses, brackets, lines or electrical looms that were removed to gain access to the engine gear case cover.
- Install the engine oil pan. Refer to "3.9.3 Installation of Oil Pan" .
- Fill the engine crankcase. Refer to "13.5.1 Lubricating Oil" .
- Continue engine assembly.
| Series 50 Service Manual - 6SE50 |
| Generated on 10-13-2008 |