Section 1.8
Crankshaft Oil Seals
An oil seal is used at each end of the crankshaft to retain the lubricating oil in the crankcase. The sealing element of the crankshaft oil seal runs against a wear sleeve which is pressed onto the crankshaft, thus preventing oil from escaping from the engine crankcase.
A unidirectional laydown-lip crankshaft oil seal, with a dust lip, is used at the front of the crankshaft. The rear oil seal is pressed into the flywheel housing. With dry flywheel housings, a single Teflon-lip seal is used. With a wet flywheel housings, a two-lip, laydown type seal is used. See Figure "Crankshaft Rear Oil Seal " .
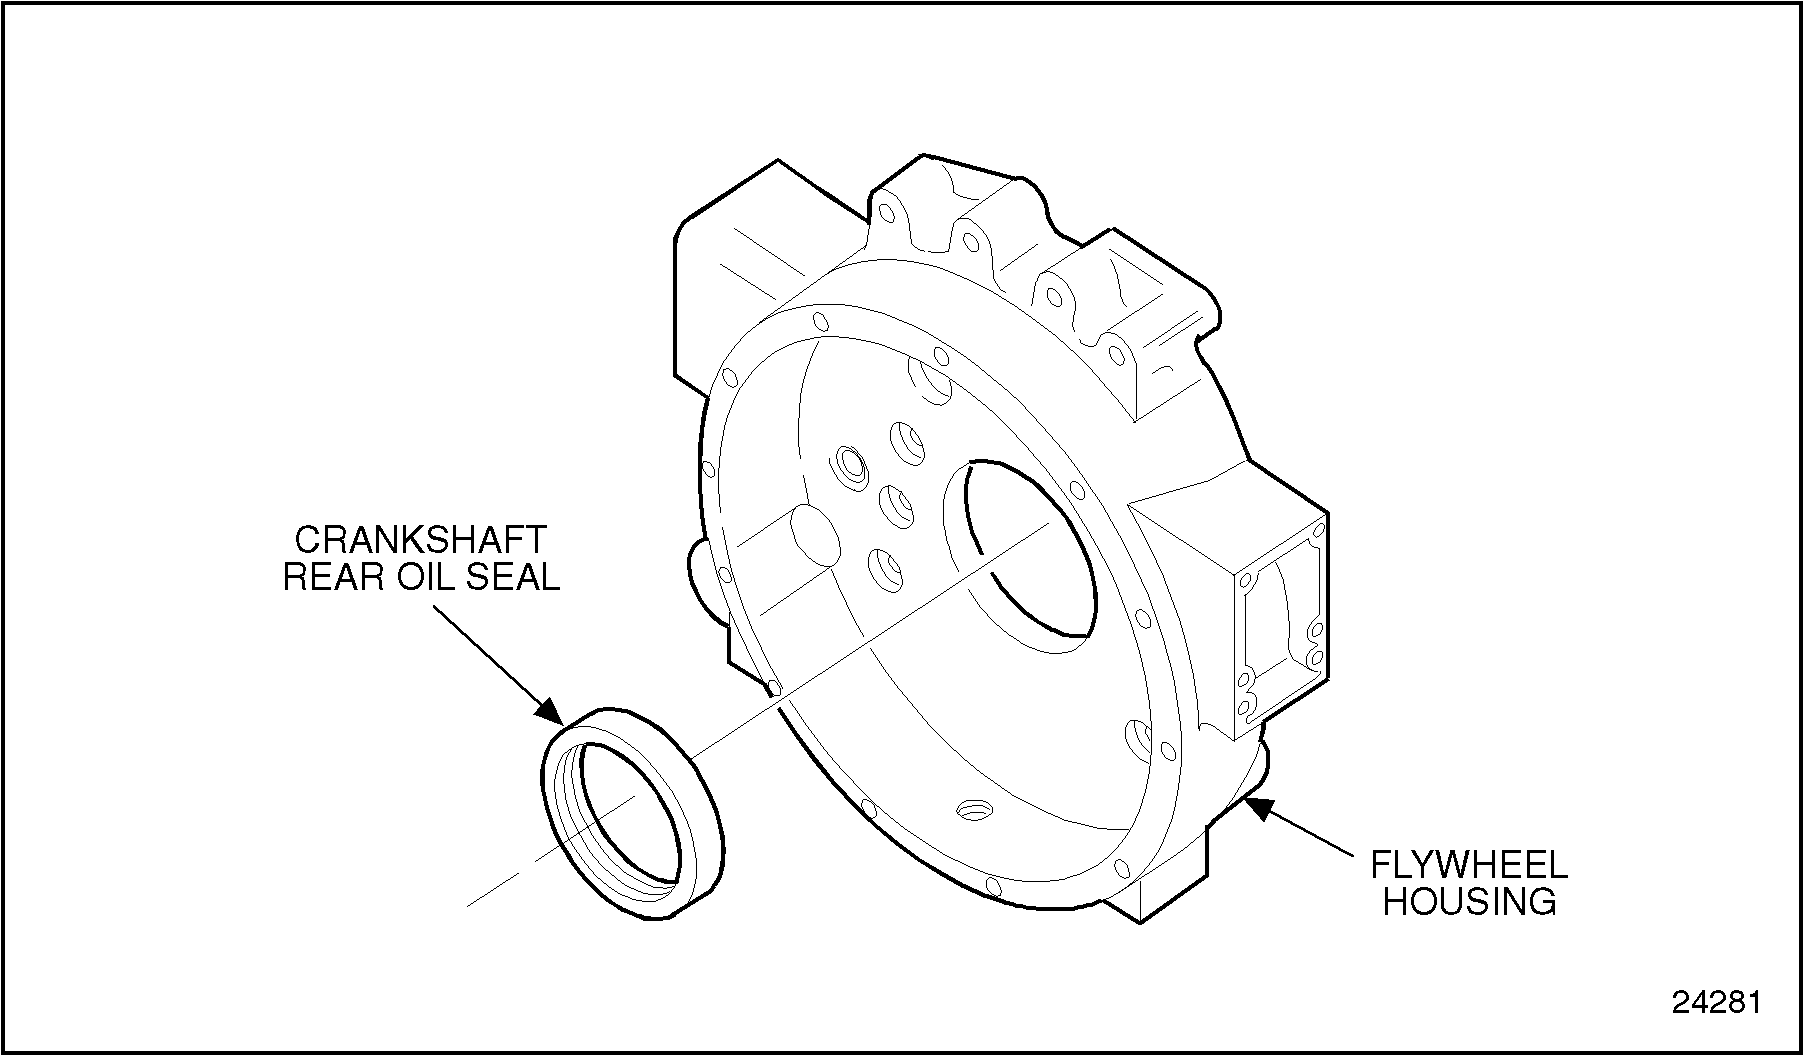
Figure 1. Crankshaft Rear Oil Seal
NOTICE: |
|
Failure to use the required seal in a dry or wet flywheel housing environment may result in seal damage and oil leakage. |
Teflon ® is a registered trademark of E.I. DuPont de Nemours and Co., Inc.
The Chicago Rawhide® unitized front oil seal is pressed onto the crankshaft and into the gear case cover after the cover is installed. See Figure "Crankshaft Front Oil Seal " .

Figure 2. Crankshaft Front Oil Seal
The seal element runs against a wear sleeve which is an integral part of the seal assembly for the Chicago Rawhide® seal.
Chicago Rawhide® is a registered trademark of CR Industries.
Section 1.8.1
Repair or Replacement of Oil Seal
To determine if repair is possible or replacement is necessary perform the following procedure. See Figure "Flowchart for Repair or Replacement of Crankshaft Oil Seal" .

Figure 3. Flowchart for Repair or Replacement of Crankshaft Oil Seal
Section 1.8.2
Removal of Front and Rear Crankshaft Oil Seal
The rear crankshaft oil seals can be removed with either the flywheel housing installed or removed. The front crankshaft seal can be removed with the front gear case housing removed or installed.
NOTICE: |
|
Due to the possibility of damage to the crankshaft oil seals, any time the gear case cover or flywheel housing is removed from the engine, the crankshaft oil seals must be replaced. |
- Remove the crankshaft oil seal as follows:
- If the gear case housing is installed, refer to "1.8.3 Removal of Front Crankshaft Oil Seal (Gear Case Housing Installed)" .
- If the gear case housing is removed, refer to "1.8.4 Removal of Front Crankshaft Oil Seal (Gear Case Housing Removed)" .
- For the flywheel housing seal, refer to "1.8.5 Removal of Rear Crankshaft Oil Seal (Flywheel Housing Installed)" .
Section 1.8.3
Removal of Front Crankshaft Oil Seal (Gear Case Housing Installed)
The front crankshaft oil seal may be taken out without removing the gear case housing. This may be done by using oil seal removal tool J 41329 part of J 35993 .
Note: Before proceeding, determine if seal to be removed is Federal Mogul® or Chicago Rawhide® brand. Remove and clean all rust and dirt from the crankshaft surface.
Remove the Federal Mogul seal as follows:
- Install puller, J 41329 part of J 35993
, over crankshaft and hold against seal. See Figure
"Removing Front Crankshaft Oil Seal from Gear Case Cover"
.
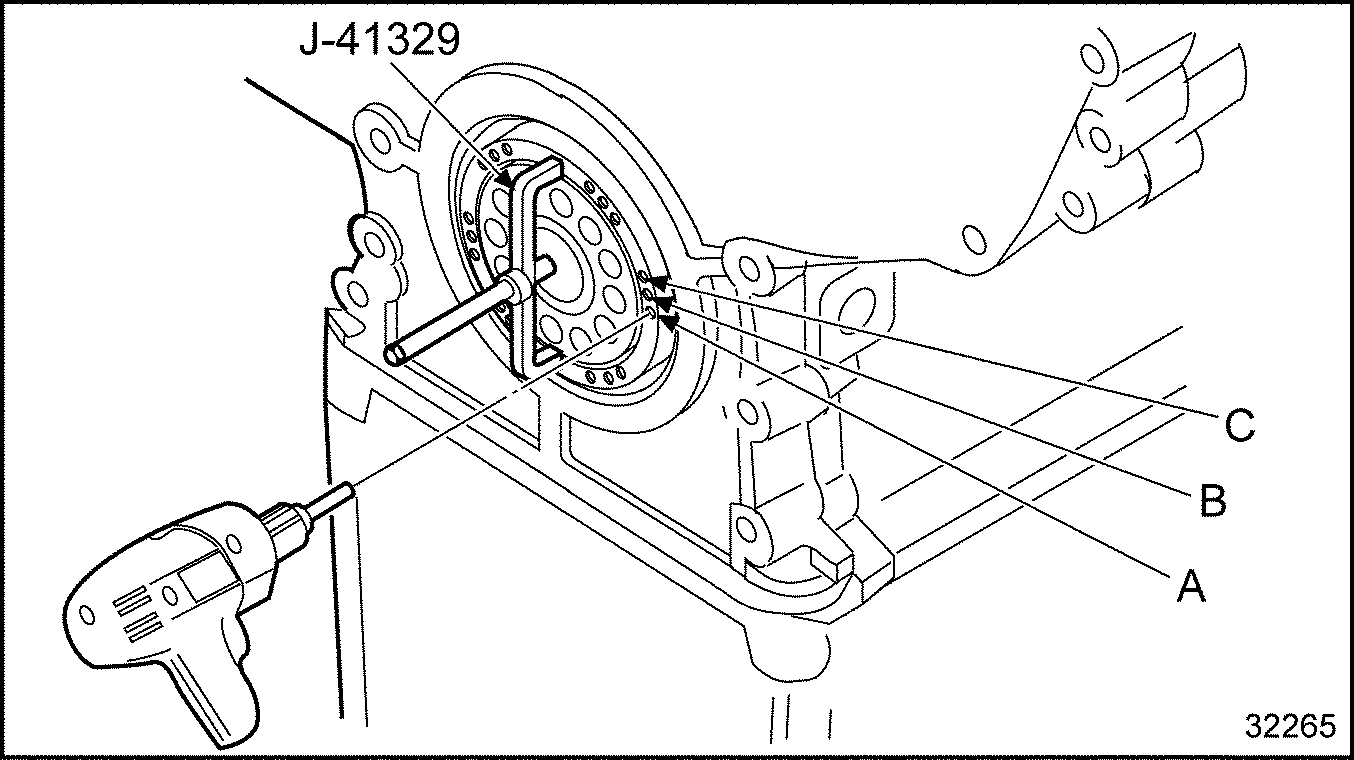
Figure 4. Removing Front Crankshaft Oil Seal from Gear Case Cover
- Using variable speed drill motor and 5/32" bit, drill through outer and inner case of seal using smallest hole "A" as a guide.
- Without moving J 41329 part of J 35993
, drill two additional "A" holes equally spaced.
Note: All six holes may be drilled if using three holes proves unsuccessful in pulling seal.
- Rotate J 41329 part of J 35993 clockwise until the "B" holes align with drilled holes and install sheet metal screws.
- Apply thread lubricant, J 23444-A part of J 35686–A , to forcing screw and remove seal.
- Remove the sheet metal screws from the tool. Discard the oil seal.
- Remove oil sleeve using crank oil sleeve remover, J 37075-A
. See Figure
"Oil Seal Sleeve Removal Tool for the Federal Mogul Seal"
.

Figure 5. Oil Seal Sleeve Removal Tool for the Federal Mogul Seal
-
- Install hardened steel sleeve removal tool into flywheel housing bore. using socket and breaker bar, rotate tool in three different locations, 2, 4, and 8 o'clock positions, to score the sleeve until the sleeve stretches sufficiently so it can be slipped off the end of the crankshaft.
- Crocus cloth may be used to clean up the high spots from the surface of the crankshaft. Clean the crankshaft contact surface thoroughly.
Remove the Chicago Rawhide® seal as follows:
Chicago Rawhide® is a registered trademark of CR Industries.
- Install puller, J 41329 part of J 35993
, over crankshaft and hold against seal. See Figure
"Removing Front Crankshaft Oil Seal from Gear Case Cover"
.
Figure 6. Removing Front Crankshaft Oil Seal from Gear Case Cover
- Using variable speed drill motor and 5/32" it, drill through outer and inner case of seal using smallest hole "A" as a guide.
- Without moving J 41329 part of J 35993
, drill two additional "A" holes equally spaced.
Note: All six holes may be drilled if using three holes proves unsuccessful in pulling seal.
- Rotate J 41329 part of J 35993 clockwise until the "A" holes align with drilled holes and install sheet metal screws.
- Apply thread lubricant, J 23444-A part of J 35686–A
, to forcing screw and remove seal.
Note: If seal is difficult to remove, there is probably debris on the crankshaft preventing the wear sleeve from passing over the crankshaft. push the seal in 1/8", clean crankshaft surface thoroughly and repeat the removal procedure.
- Remove the sheet metal screws from the tool. Discard the oil seal.
Section 1.8.4
Removal of Front Crankshaft Oil Seal (Gear Case Housing Removed)
The Federal Mogul front crankshaft oil seal may be removed with the gear case housing removed from the engine.
Perform the following steps if the gear case housing has been removed from the engine.
Note: The crankshaft oil seal must be removed if the gear case housing has been removed from the engine.
- Support the outer face of the gear case housing on wood blocks.
- Drive the oil seal out with a brass drift and hammer. Clean the seal bore in the housing. See Figure
"Front Crankshaft Oil Seal Removal"
.

Figure 7. Front Crankshaft Oil Seal Removal
Section 1.8.5
Removal of Rear Crankshaft Oil Seal (Flywheel Housing Installed)
The rear crankshaft oil seal may be taken out without removing the flywheel housing. This may be done by using oil seal removal tool, J 41329 part of J 35993 .
- To replace the rear oil seal, with transmission removed, remove the flywheel. Refer to "1.14.2 Cleaning and Removal of Flywheel" .
Note: Before proceeding, determine if seal to be removed is Federal Mogul or Chicago Rawhide brand. Remove and clean all rust and dirt from the crankshaft surface.
Remove the Federal Mogul seal as follows:
- Install puller, J 41329 part of J 35993 , over crankshaft and hold against. seal.
- Using variable speed drill motor and 5/32" bit, drill through outer and inner case of seal using smallest hole "A" as a guide. See Figure
"Rear Oil Seal Removal"
.

Figure 8. Rear Oil Seal Removal
- Without moving J 41329 part of J 35993
, drill two additional "A" holes equally spaced.
Note: All six holes may be drilled is using three holes proves unsuccessful in pulling seal.
- Rotate J 41329 part of J 35993 clockwise until the "B" holes align with drilled holes and install sheet metal screws.
- Apply thread lubricant, J 23444-A part of J 35686–A , to forcing screw and remove seal.
- Remove the sheet metal screws from the tool. Discard the oil seal.
Remove the Chicago Rawhide seal as follows:
- Install puller, J 41329 part of J 35993 , over crankshaft and hold against. seal.
- Using variable speed drill motor and 5/32" bit, drill through outer and inner case of seal using smallest hole "A" as a guide. See Figure
"Rear Oil Seal Removal"
.
Figure 9. Rear Oil Seal Removal
Note: All six holes may be used if using three holes proves unsuccessful in pulling seal.
- Apply thread lubricant J 23444-A part of J 35686–A
to forcing screw and remove seal.
Note: If seal is difficult to remove, push seal in 1/8", clean crankshaft surface thoroughly and repeat the removal procedure above.
- Remove the sheet metal screws from the tool. Discard the oil seal.
Section 1.8.6
Removal of Rear Oversized Seal with Wear Sleeve
If seal removed is an oversized seal with wear sleeve, the oil wear sleeve must also be removed.
- To remove a worn wear sleeve, use crankshaft wear sleeve remover, J 37075-A
. See Figure
"Rear Oil Seal Wear Sleeve Removal"
.

Figure 10. Rear Oil Seal Wear Sleeve Removal
- Install hardened steel sleeve removal tool into flywheel housing bore. Using socket and breaker bar, rotate tool in three different locations, 2, 4, and 8 o'clock positions, to score the sleeve, until the sleeve stretches sufficiently so it can be slipped off the end of the crankshaft.
- Crocus cloth may be used to clean up the high spots from the surface of the crankshaft. Clean the crankshaft contact surface thoroughly.
Section 1.8.7
Installation of Front and Rear Crankshaft Oil Seal and Wear Sleeve
Install the oil seal as follows:
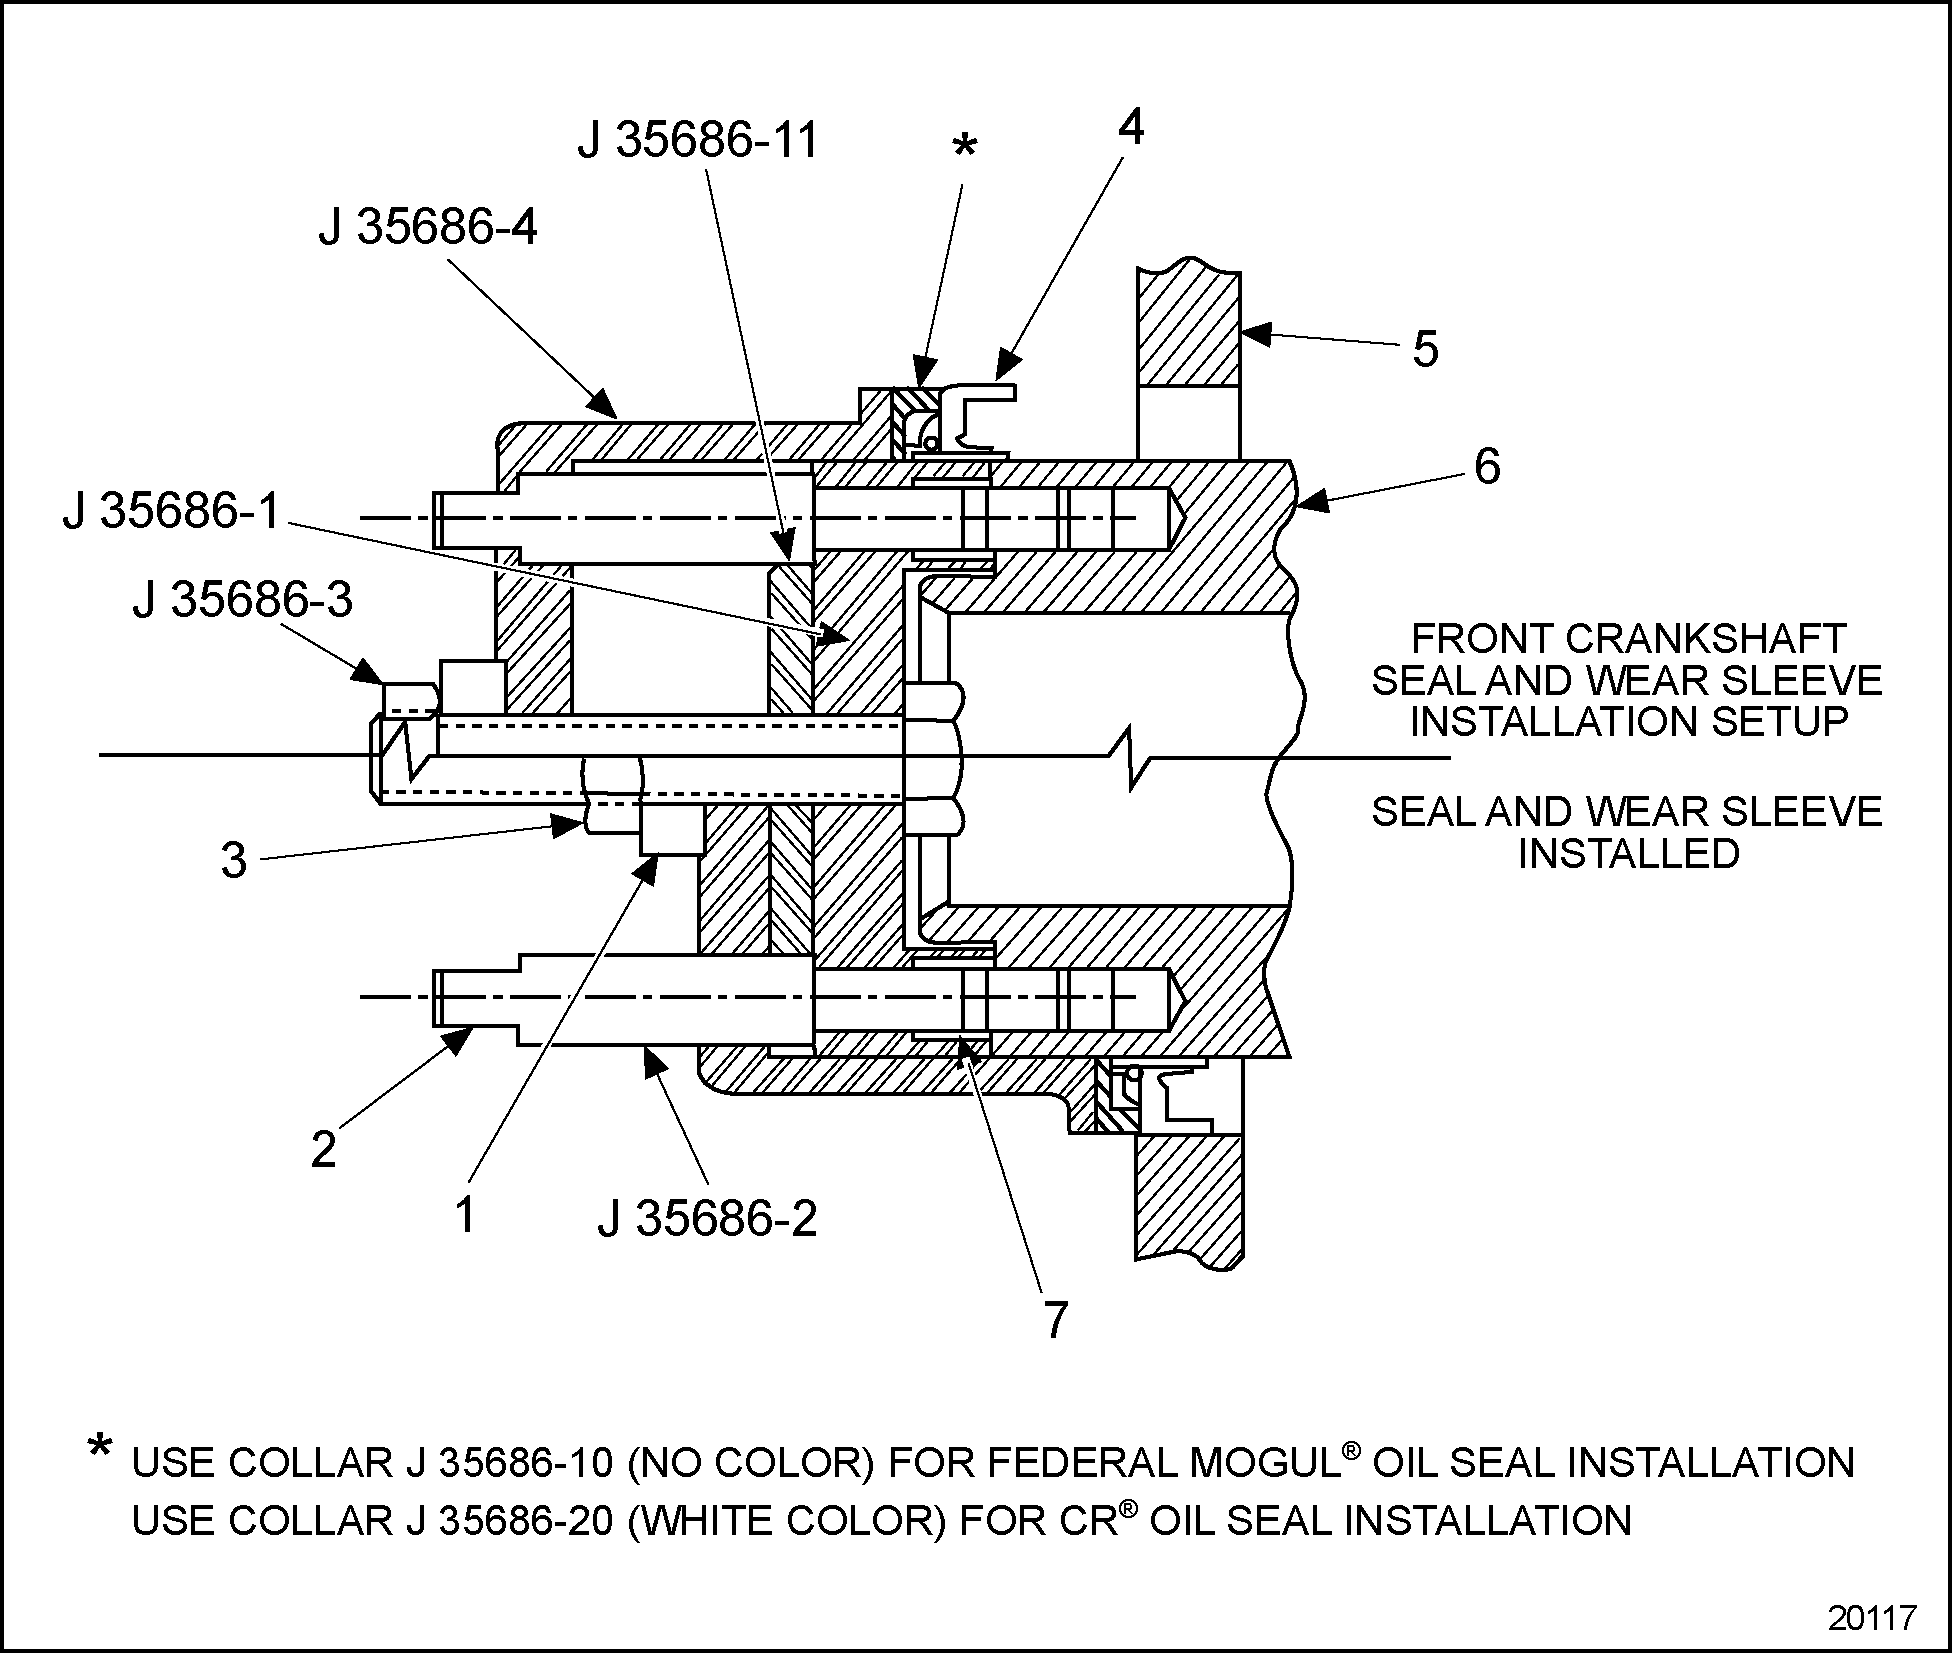
An oil seal sleeve, integral to the seal assembly, is pressed onto the end of the crankshaft and provides a replacement wear surface at the point of contact with the oil seal. The sleeve and seal are supplied assembled. The assembly is installed using the crankshaft oil seal and sleeve installation tool. The Federal Mogul® oil seal is installed using tool, J 35686-A , with collar J 35686-10 . The Chicago Rawhide® (CR) oil seal is installed using tool, J 35686-A , but uses collar J 35686-20 . See Figure "Crankshaft Oil Seal and Sleeve Installation Tool Set" and see Figure "Crankshaft Oil Seal Installer Stack-up (Front)" .

|
1. Washer |
3. Seal |
|
2. Washer |
|
Figure 11. Crankshaft Oil Seal and Sleeve Installation Tool Set
|
1. Thrust Plate |
5. Gear Case/Flywheel Housing |
|
2. Wrench Flat 1/2 in., Guide Stud |
6. Crankshaft |
|
3. 3/4-10 Hex Nut |
7. Guide Stud Retainer (O-ring) |
|
4. Seal and Wear Sleeve Assembly DDC Part No. 23513485 |
|
Figure 12. Crankshaft Oil Seal Installer Stack-up (Front)
Install an oversize oil seal/sleeve, as follows:
- Install the new, oversize oil seal and wear sleeve assembly to the housing, J 35686-4 .
- Add new J 35686-10 adapter ring and J 35686-11 spacer along with J 35686-6 spacer. Do not separate the two.
Install the rear oil sleeve as follows:
Note: The assembly used in dry flywheel housings has a unidirectional, laydown type Teflon inner sealing lip and a forward facing Teflon dust lip. The assembly used in wet flywheel housings has a double-lip seal with unidirectional inner and outer laydown type Teflon sealing lips.
- Install the two guide studs, J 35686-2
, through the holes provided in the base, J 35686-1
and into two of the tapped holes in the crankshaft, 180° apart. See Figure
"Rear Oil Seal Installation"
. Tighten the guide studs using the appropriate wrench on the flats of the studs. The base must be tight against the end of the crankshaft.
1. Washer
3. Seal
2. Washer
Figure 13. Rear Oil Seal Installation
- For rear crankshaft oil seal installations only, install spacer J 35686-6
and J 35686-11
, to the center screw of the base. See Figure
"Rear Oil Seal Installation"
and see Figure
"Crankshaft Oil Seal Installer Stack-up (Front)"
.

Figure 14. Rear Oil Seal Installation
- Install the rear housing and adapter ring with seal and sleeve assembly in place on the guide studs. See Figure
"Rear Oil Seal and Sleeve Installation"
.

Figure 15. Rear Oil Seal and Sleeve Installation
- Install the thrust bearing tool with the case side toward the installer housing. Install the hex nut to the center screw of the base. See Figure
"Thrust Bearing Installation"
.
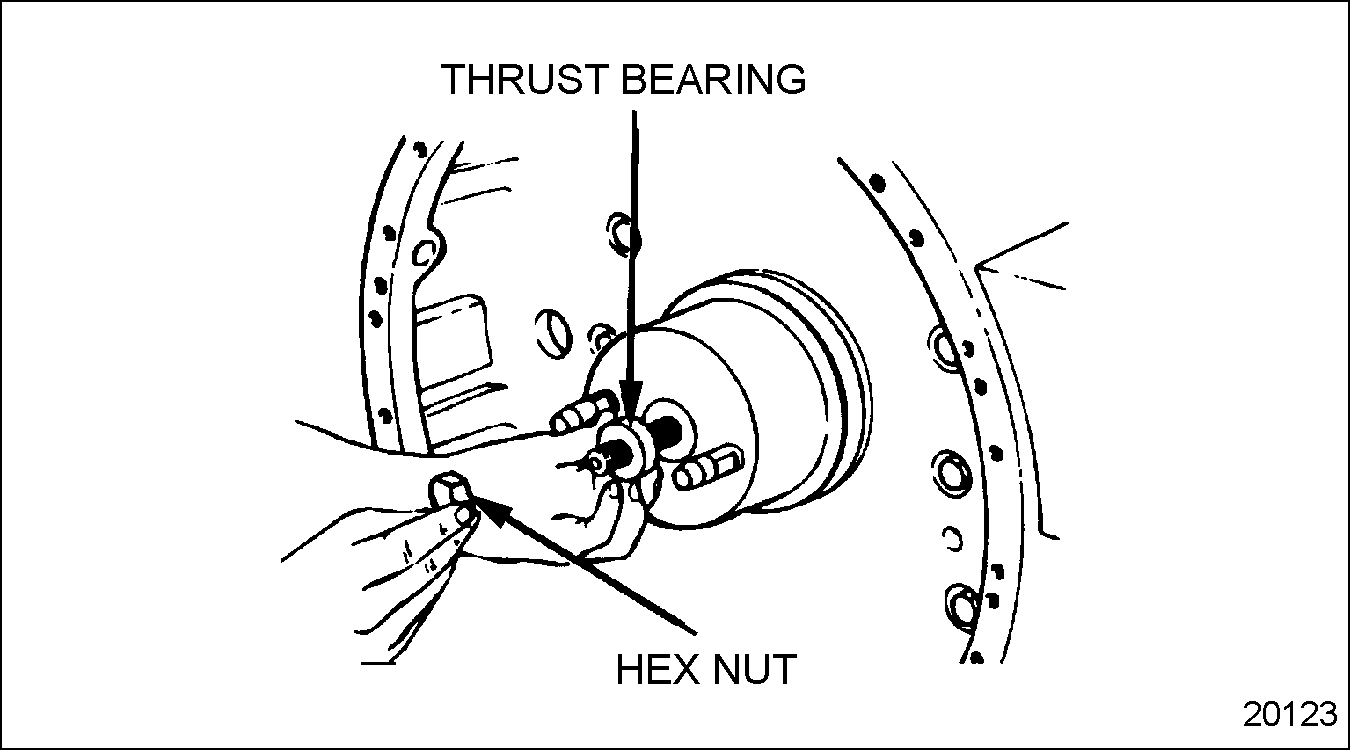
Figure 16. Thrust Bearing Installation
- Tighten the hex nut by hand until all the slack is taken up. Use a ratchet and socket to tighten the hex nut, and install the wear sleeve to the crankshaft and the oil seal to the flywheel housing and/or gear case cover. See Figure
"Oil Seal and Sleeve Installation"
.

Figure 17. Oil Seal and Sleeve Installation
- When the inside surface of the housing is seated against the base (or spacers on rear oil seal installation), the seal and sleeve are properly positioned and installed.
Section 1.8.7.1
Inspection of Crankshaft Oil Seal
Crankshaft oil seal leaks may indicate worn or damaged oil seals. Oil seals may become worn or damaged due to improper installation, excessive main bearing clearances, excessive flywheel housing bore run-out, grooved sealing surfaces on the crankshaft hubs or out of square installation. To prevent a repetition of any oil seal leaks, these conditions must be checked and corrected.
The maximum run-out of the oil seal bore in the gear case cover or flywheel housing is 0.330 mm (0.013 in.). The bore may be checked with a dial indicator mounted on the end of the crankshaft in a manner similar to the procedure for checking the flywheel housing concentricity. Refer to "1.16.3.1 Test for Flywheel Housing Bore Concentricity" . This check must be made with the flywheel housing or gear case cover in place on the engine and the oil seal removed.
Inspect the seal contact surface of the crankshaft for wear caused by the rubbing action of the oil seal, dirt buildup or by the fretting action of the flywheel. The crankshaft surface must be clean and smooth when a new wear sleeve and seal are installed.
| Series 50 Service Manual - 6SE50 |
| Generated on 10-13-2008 |