Section 12.7
Engine Run-in Instructions
Following a complete overhaul or any major repair that uses replacement piston rings, pistons, or bearings, for example, the engine should be run-in on a dynamometer prior to release for service.
The dynamometer is a device for applying specific loads to an engine to determine if the engine will perform to published specifications and to permit a physical inspection for leaks of any kind. It is an excellent method for detecting improper tune-up, misfiring injectors, low compression and other malfunctions, and may save an engine from damage at a later date.
The operating temperature within the engine affects the operating clearances between the various moving parts of the engine and determines to a degree how the parts will wear.
NOTICE: |
|
Thermostats are required to control the coolant flow and to help maintain a constant engine temperature. Therefore, be sure that they are in place and fully operative or the engine may overheat during the run-in. Furthermore, a deaeration line must be installed in the uppermost portion of the engine to prevent any overheat problems during run-in. |
The rate of water circulation through the engine on a dynamometer should be sufficient to avoid having the engine outlet water temperature more than 5.6°C (42°F) higher than the water inlet temperature. A 5.6°C (42°F) rise across an engine is recommended; however, an 8.3°C (47°F) temperature rise maximum is permitted.
Section 12.7.1
The Basic Engine
A basic engine includes only those components actually necessary to run the engine. The addition of any engine driven accessories will result in a brake horsepower figure less than the values shown in the Engine Run-In Check. The fan and battery-charging alternator typify accessories not considered on the basic engine.
Since the DDEC system requires a source of electrical power to operate the Electronic Unit Injectors, all DDEC equipment should be connected and operating properly. In addition, a fully charged battery must be connected to the system. Refer to OEM guidelines.
In situations where other than basic engine equipment is used during the test, a proper record of this fact should be made on the Engine Test Report. The effects of additional equipment on engine performance should then be considered when evaluating test results.
Section 12.7.2
Chassis Dynamometer Room Ventilation Recommendations
For accurate dynamometer readings during a Series 60 engine run-in, the chassis dynamometer room must be properly ventilated. See Figure "California Proposition 65 Warning" .

Figure 1. California Proposition 65 Warning
If an engine is tested on a dynamometer located in an area without proper ventilation, the engine will be subject to high ambient air temperatures. High air inlet temperatures can result in false low power readings on the dynamometer.
To help ensure accurate dynamometer readings, the dynamometer room should have a ceiling-mounted fan with a 850 to 1133 m3 /min (30,000 to 40,000 ft3 /min) capacity. This will provide proper ventilation of exhaust gases and heat radiated by the operating engine.
In situations where air circulation and proper room cooling are questionable, Detroit Diesel recommends the use of an additional 368 m3 /min (13,000 ft3 /min) or greater capacity barrel-type ram air fan. This should be portable so that it can be conveniently placed three to five feet (approximately one to two meters) in front of the truck and aimed directly at the charge air cooler.
Section 12.7.3
Dynamometer Test and Run-in Procedure
The function of the dynamometer is to absorb and measure the engine output. Its basic components are a frame, provisions for engine mounting, the absorption unit, a heat exchanger, and a torque loading and measuring device.
The engine is connected through a universal coupling to the absorption unit. The load on the engine may be varied from zero to maximum by decreasing or increasing the resistance in the unit. The amount of power absorbed in a water brake type dynamometer, as an example, is governed by the volume of fluid within the working system. The fluid offers resistance to a rotating motion. By controlling the volume of water in the absorption unit, the load may be increased or decreased as required.
The power absorbed is generally measured in torque N m (lb·ft) or Non a suitable scale. This value for a given engine speed will show the brake horsepower developed in the engine by the following formula, see Figure "Formulas for Brake Power Developed in the Engine" .
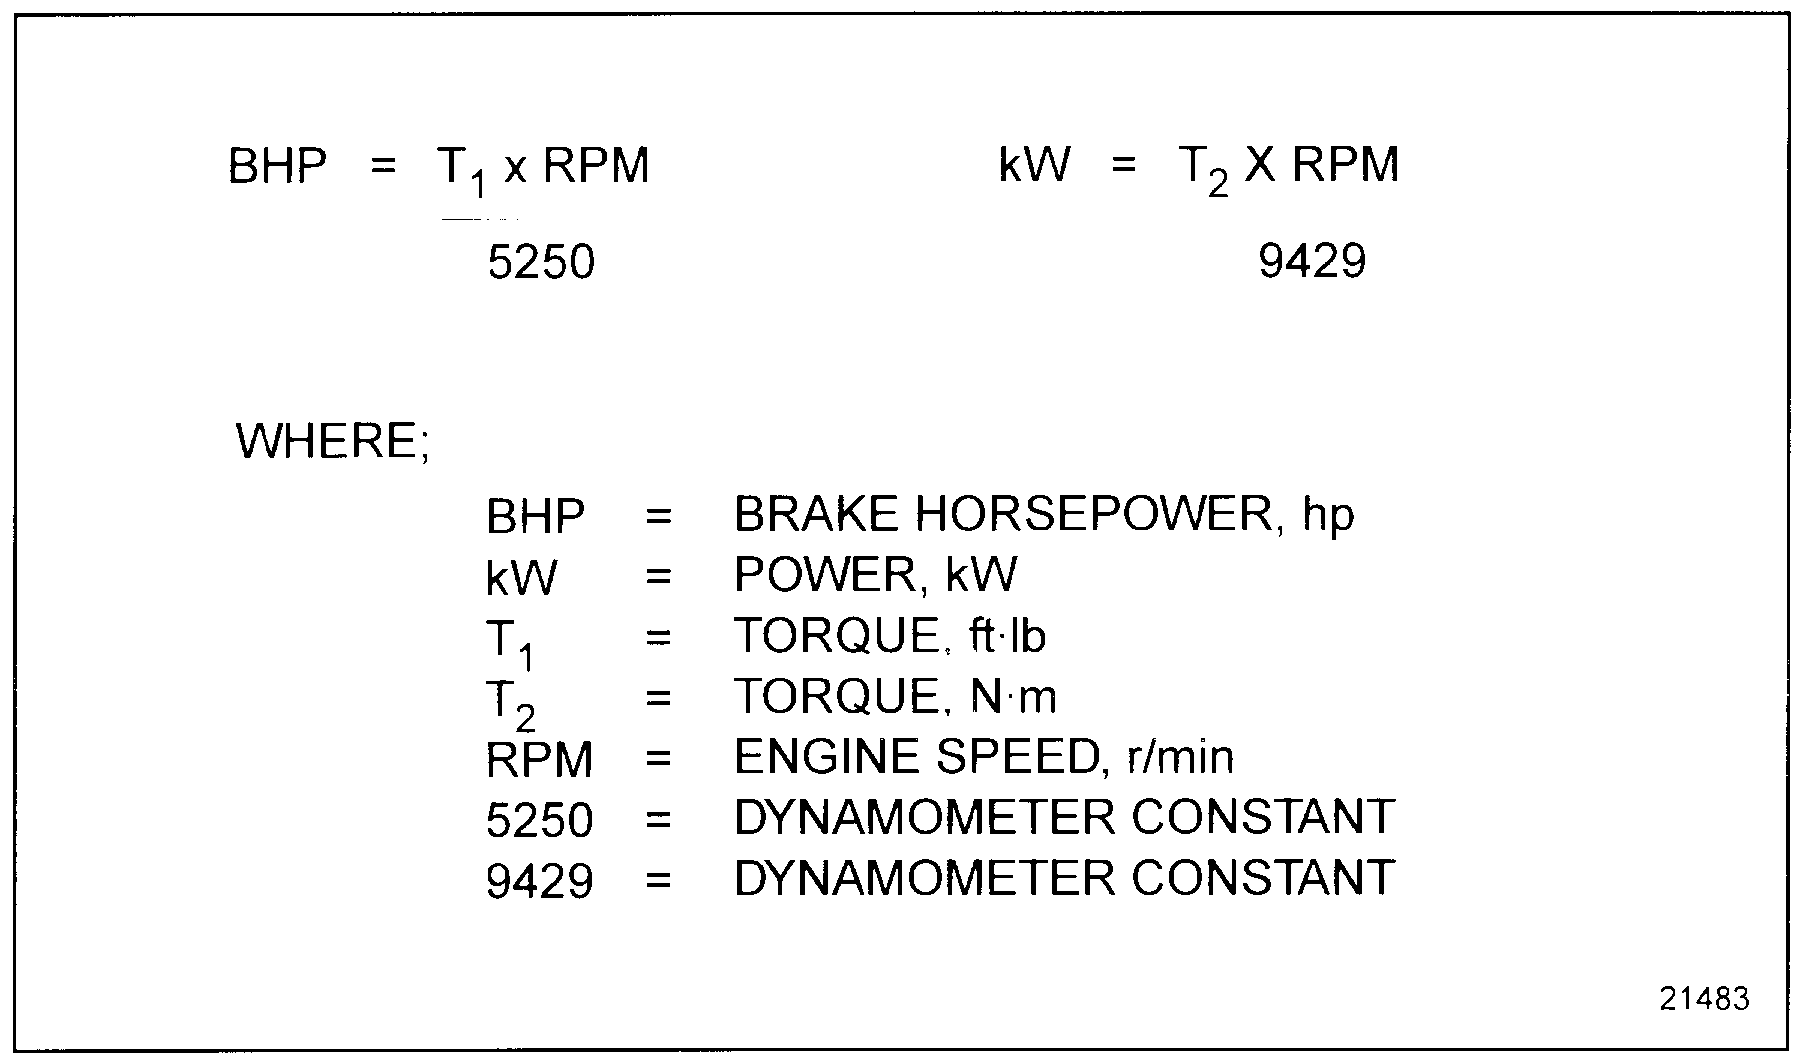
Figure 2. Formulas for Brake Power Developed in the Engine
Some dynamometers indicate direct brake horsepower readings. Therefore, the use of the formula is not required when using these units.
During the actual operation, all data taken should be recorded immediately on an Engine Test Report, see Figure "Series 60 Engine Test Report Form" .
Section 12.7.3.1
Instrumentation
Certain instrumentation is necessary so that data required to complete the Engine Test Report may be obtained. The following list contains the minimum amount of instruments and the proper location of the fittings on the engine so that the readings represent a true evaluation of engine conditions.
- Oil pressure gage installed in one of the engine main oil galleries (DDEC data can also be used)
- Water temperature gage installed in the thermostat housing or water outlet manifold
- Adaptor for connecting a pressure gage or water manometer to the crankcase
- Fuel pressure gage at the rear of the cylinder head
In some cases, gages reading in pounds per square inch are used for determining pressures while standard characteristics are given in inches of mercury or inches of water. It is extremely important that the scale of such a gage be of low range and finely divided if accuracy is desired. This is especially true of a gage reading in lb/in.2 , the reading of which is to be converted to inches of water. The following conversion factors may be helpful.
NOTICE: |
|
Before starting the run-in or starting the engine for any reason following an overhaul, it is of extreme importance to observe the instructions; see "Preparation for a First Time Start:'' refer to "12.1 Preparation for a First Time Start" . Failure to follow instructions could result in engine damage. |
Gage reading = (lb/in.2 ) x 27.7 = inches of water
Gage reading = (lb/in.2 ) x 2.04 = inches of mercury
Section 12.7.3.2
Run-in Procedure
Use the following procedure for preparation of engine run-in. See Figure "Series 60 Engine Test Report Form" , part A.
- Fill the lubrication system as outlined under Lubrication System , "Preparation for a First Time Start.'' Refer to "12.1 Preparation for a First Time Start" .
- Prime the fuel system as outlined under Fuel System, "Preparation for a First Time Start.'' Refer to "12.1 Preparation for a First Time Start" .
- Make a preliminary valve clearance adjustment before the engine is started. Refer to "13.2 Valve Lash, Injector Height (Timing) and Jake Brake® Lash Adjustments" .
- Make a preliminary injector timing check before starting the engine. Refer to "13.2 Valve Lash, Injector Height (Timing) and Jake Brake® Lash Adjustments" .
- Ensure that the turbocharger has been prelubricated by adding oil to the turbocharger oil inlet or by pressurizing the lubrication system.
- Check to be sure all test stand water valves, fuel valves, etc. are open.
- Inspect the exhaust system, checking that it is properly connected to the engine.
Use the following procedures for engine run-in:
-
See Figure
"California Proposition 65 Warning"
for exhaust caution before proceeding. Start the engine with minimum dynamometer resistance.
NOTICE:
All Series 60 engines should be operated at idle for at least one minute after starting to ensure oil supply and pressure to the turbocharger bearings. Inadequate lubrication will result in bearing damage.
- Set the engine throttle at idle speed; idle for 30 seconds. Record oil pressure and water temperature values on the engine Test Report; see Figure "Series 60 Engine Test Report Form" , Part B. Check all connections to be sure there are no leaks.
- The Engine Test Report sample, see Figure
"Series 60 Engine Test Report Form"
, establishes the sequence of events and specifications for the test and run-in. Also, refer to "12.5 Operating Conditions"
, "Operating Conditions''
which presents the engine operating characteristics. These characteristics will be a guide for tracing faulty operation or lack of power. After checking the engine performance at idle speed and being certain the engine and dynamometer are operating properly, increase the engine speed to half speed and apply the load indicated on the Warm-Up - 5 minutes; see Figure
"Series 60 Engine Test Report Form"
, Part C. Complete leak information.

Figure 3. Series 60 Engine Test Report Form
- See Figure "California Proposition 65 Warning" for exhaust caution before preceding. Run the engine at this speed and load for 5 minutes to allow sufficient time for the coolant temperature to reach the normal operating range. Record length start and stop times, speed, brake horsepower, coolant temperature and lubricating oil pressure on the Engine Test Report; see Figure "Series 60 Engine Test Report Form" , Part D.
- See Figure "California Proposition 65 Warning" for exhaust caution before preceding. Run the engine at each speed and rating for the length of time indicated in the Engine Run-In Schedule. During this time, engine performance will improve as new parts begin to seat in.
- Inspect the engine for fuel oil, lubricating oil and water leaks.
- Upon completion of the run-in and inspection, remove the load from the dynamometer and reduce the engine speed gradually to idle and then stop the engine.
- Record all data requested; see Figure
"Series 60 Engine Test Report Form"
, Part E.
Note: Allow the engine to idle with no load for 4 or 5 minutes in order for the turbocharger to cool and reduce speed before shutdown.
After all the tests have been made and the Engine Test Report is completed, see Figure "Series 60 Engine Test Report Form" , Part D., the engine is ready for final test, see Figure "Series 60 Engine Test Report Form" , Part E. This portion of the test and run-in procedure will assure the engine owner that his engine has been rebuilt to deliver factory rated performance at the same maximum speed and load which will be experienced in the installation.
If the engine has been shut down for one hour or longer, it will be necessary to have a warm up period of five minutes at the same speed and load used for warm-up. If piston rings or bearings have been replaced as a result of problems during the warm-up, the entire run-in must be repeated as though the test and run-in procedure were started anew.
All readings observed during the final run-in should fall within the range specified in the "Operating Conditions'', refer to "12.5 Operating Conditions" , and should be taken at full load unless otherwise specified. Following is a brief discussion of each condition to be observed.
- The engine water temperature should be taken during the last portion of the run-in at full load. It should be recorded and should be within the specified range.
- The lubricating oil pressure should be recorded in kPa or psi after being taken at engine speeds indicated in the "Operating Conditions,'' refer to "12.5 Operating Conditions" .
- Check the crankcase pressure while the engine is operating at maximum run-in speed. Attach a manometer to the oil dipstick opening to measure crankcase pressure.
The following steps are necessary to complete the final Engine Repair Schedule.
- Determine the maximum rated brake horsepower and the full-load speed to be used during the final run-in.
- Apply this load to the dynamometer.
- The engine should be run at this speed and load for five minutes.
Note: While making the final run-in, the engine should develop the maximum rated brake horsepower indicated for the speed at which it is operating. If this brake horsepower is not developed, the cause should be determined and corrections made.
- All information, see Figure "Series 60 Engine Test Report Form" , Part E, should be recorded.
- After the prescribed time for the final run-in has elapsed, remove the load from the dynamometer and reduce the engine speed gradually to idle speed and then stop the engine.
- A final inspection must be made. This inspection will provide final assurance that the engine is in proper working order. During this inspection, the engine is also made ready for any brief delay in delivery or installation which may occur. This is accomplished by rustproofing the fuel system, (refer to "14.6.2 Fuel Tanks" ) and adding a rust inhibitor to the cooling system, (refer to "14.6.4 Cooling System" ).
- Change the lubricating oil filters.
| Series 60 Service Manual - 6SE483 |
| Generated on 10-13-2008 |