Section 1.2
Rocker Covers
The Turbotronic 638 uses two separate rocker covers that are constructed of cast aluminum. Each rocker cover is secured with three retaining bolts and has caps that can be removed to torque the cylinder heads without having to remove the rocker cover.
Section 1.2.1
Replacement of Rocker Covers
To determine if replacement of the rocker covers is necessary, perform the following procedure. See Figure "Flowchart for Replacement of Rocker Covers" .
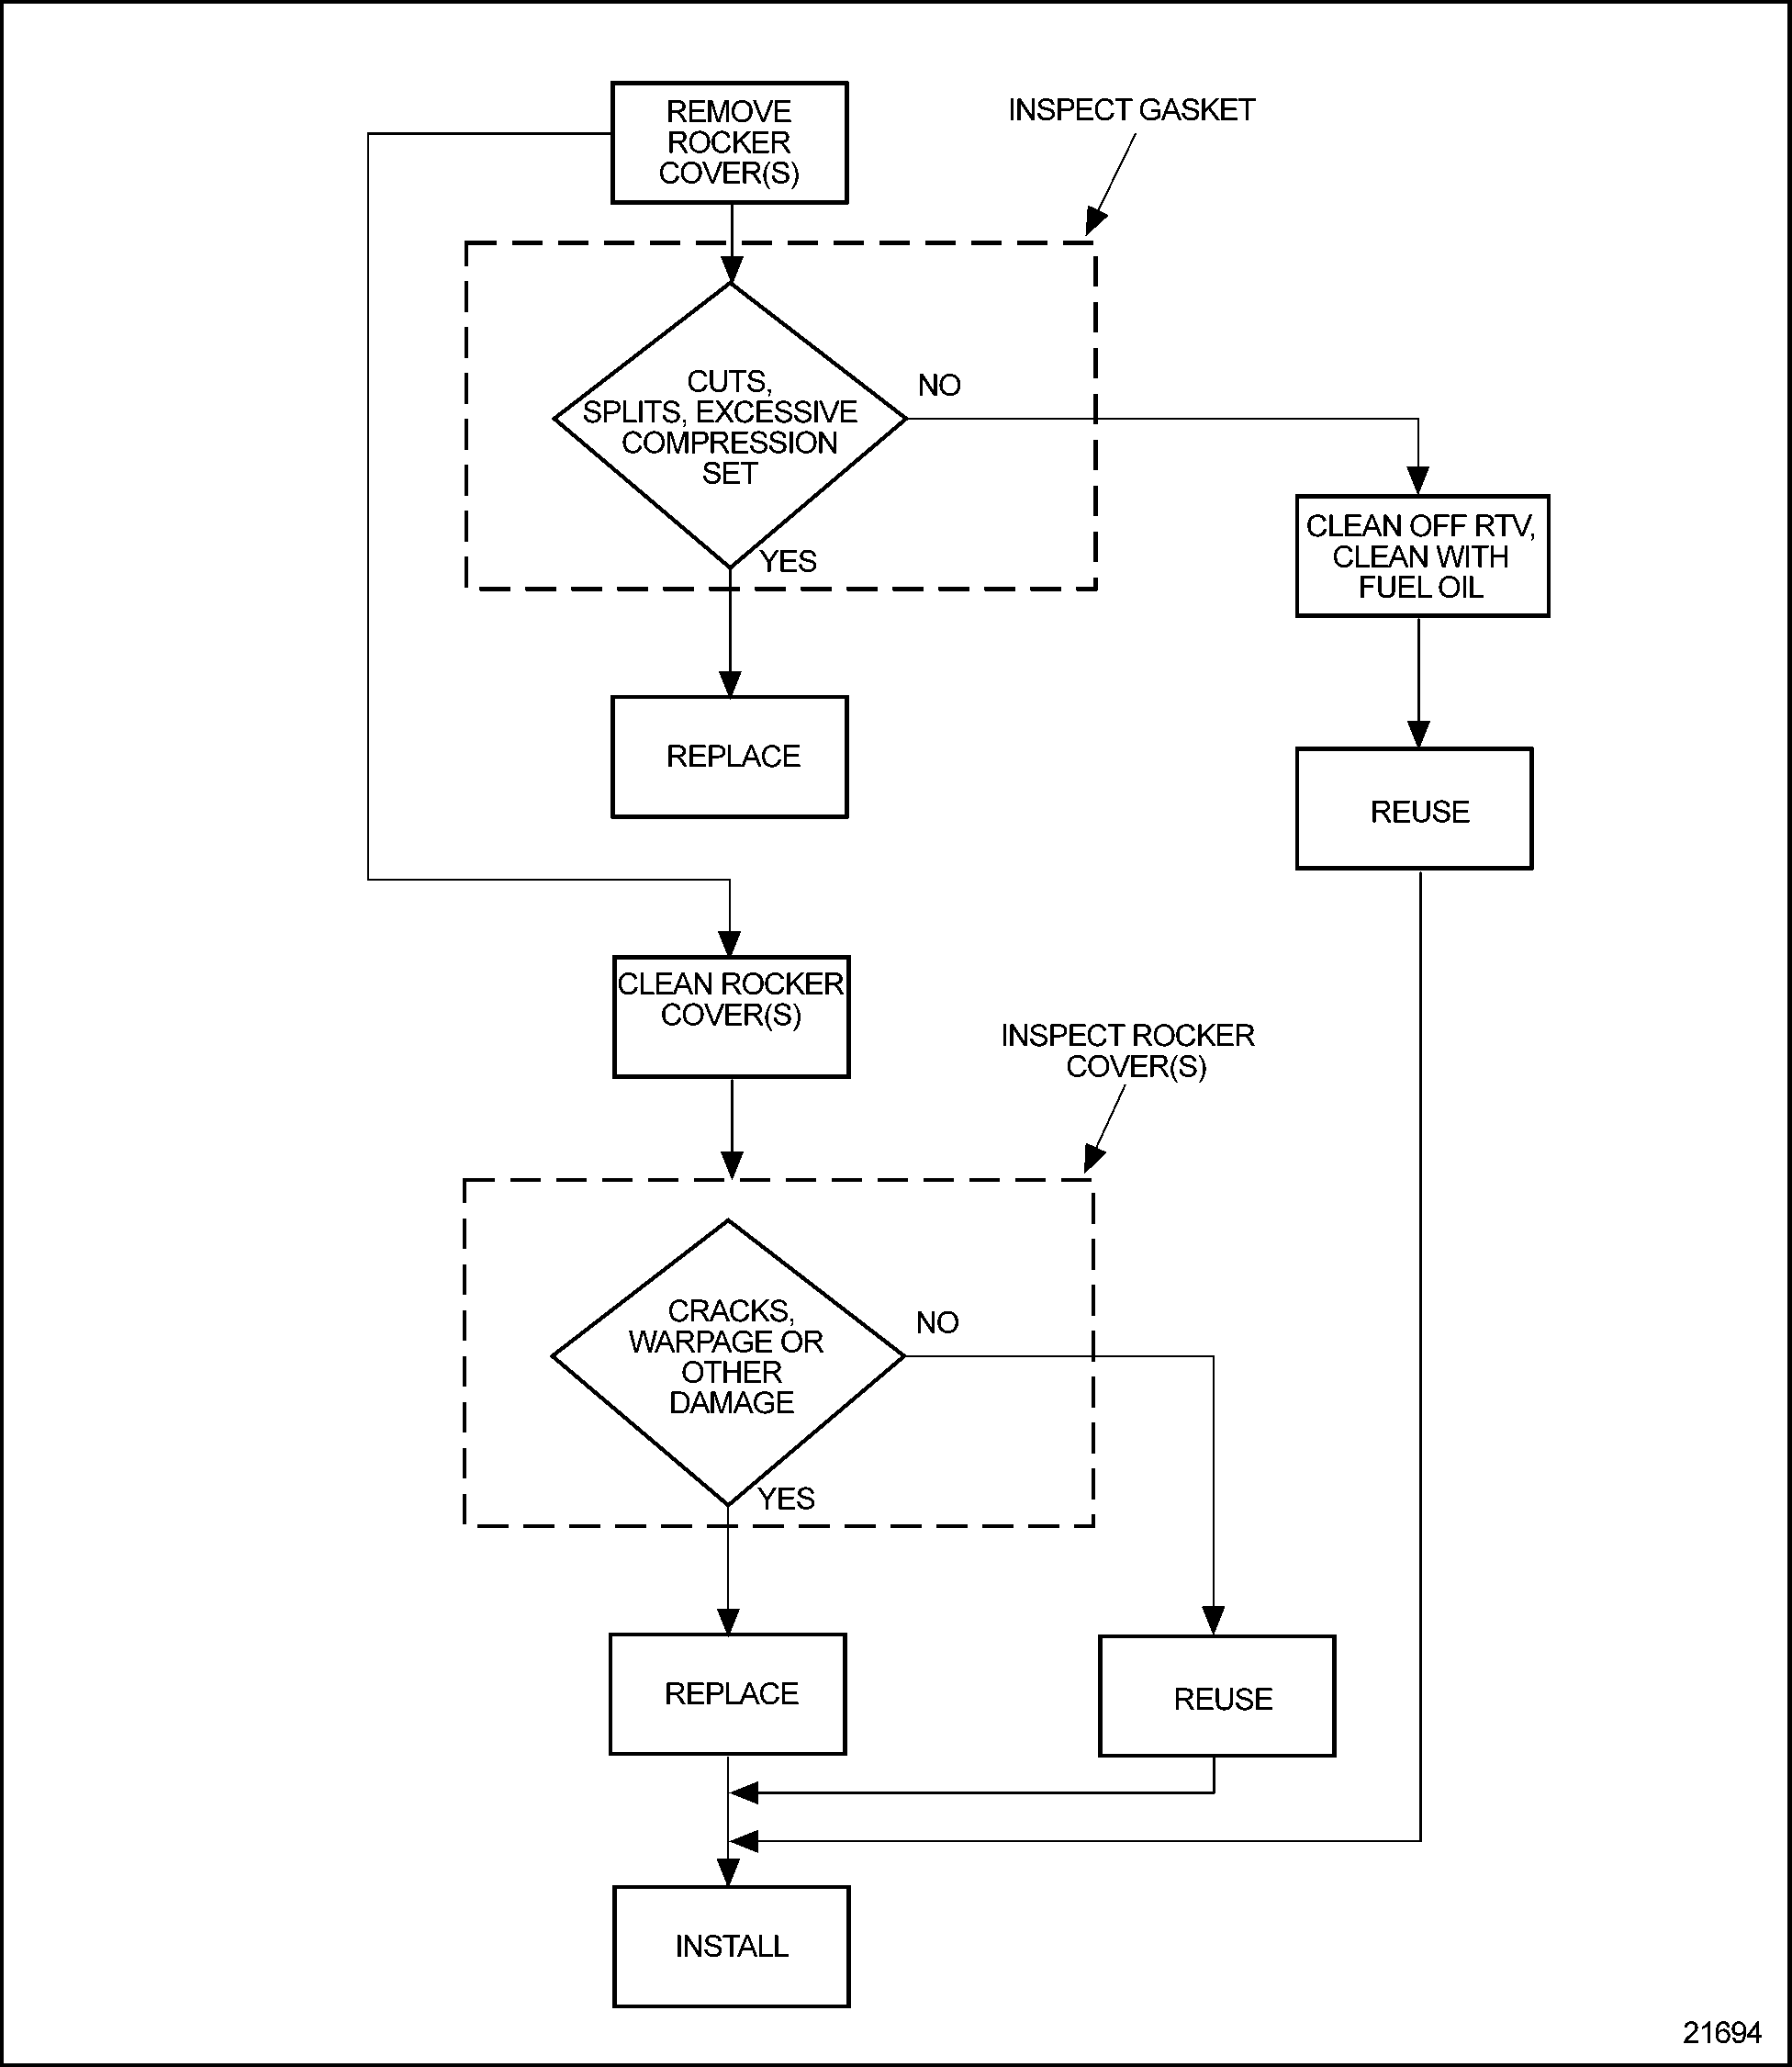
Figure 1. Flowchart for Replacement of Rocker Covers
Section 1.2.2
Removal of Front Rocker Cover
Remove the front rocker cover as follows:
|
|
|
To avoid personal injury when blow drying, wear adequate eye protection (safety glasses or face plate) and do not exceed 276 kPa (40 lb/in. 2 ) air pressure. |
- Preclean the front rocker cover to keep dirt and debris out of the valve gear chamber using clean fuel oil and blow dry with compressed air.
- Unplug glow plug harness at the glow plugs. See Figure
"Glow Plug Harness Removal"
.
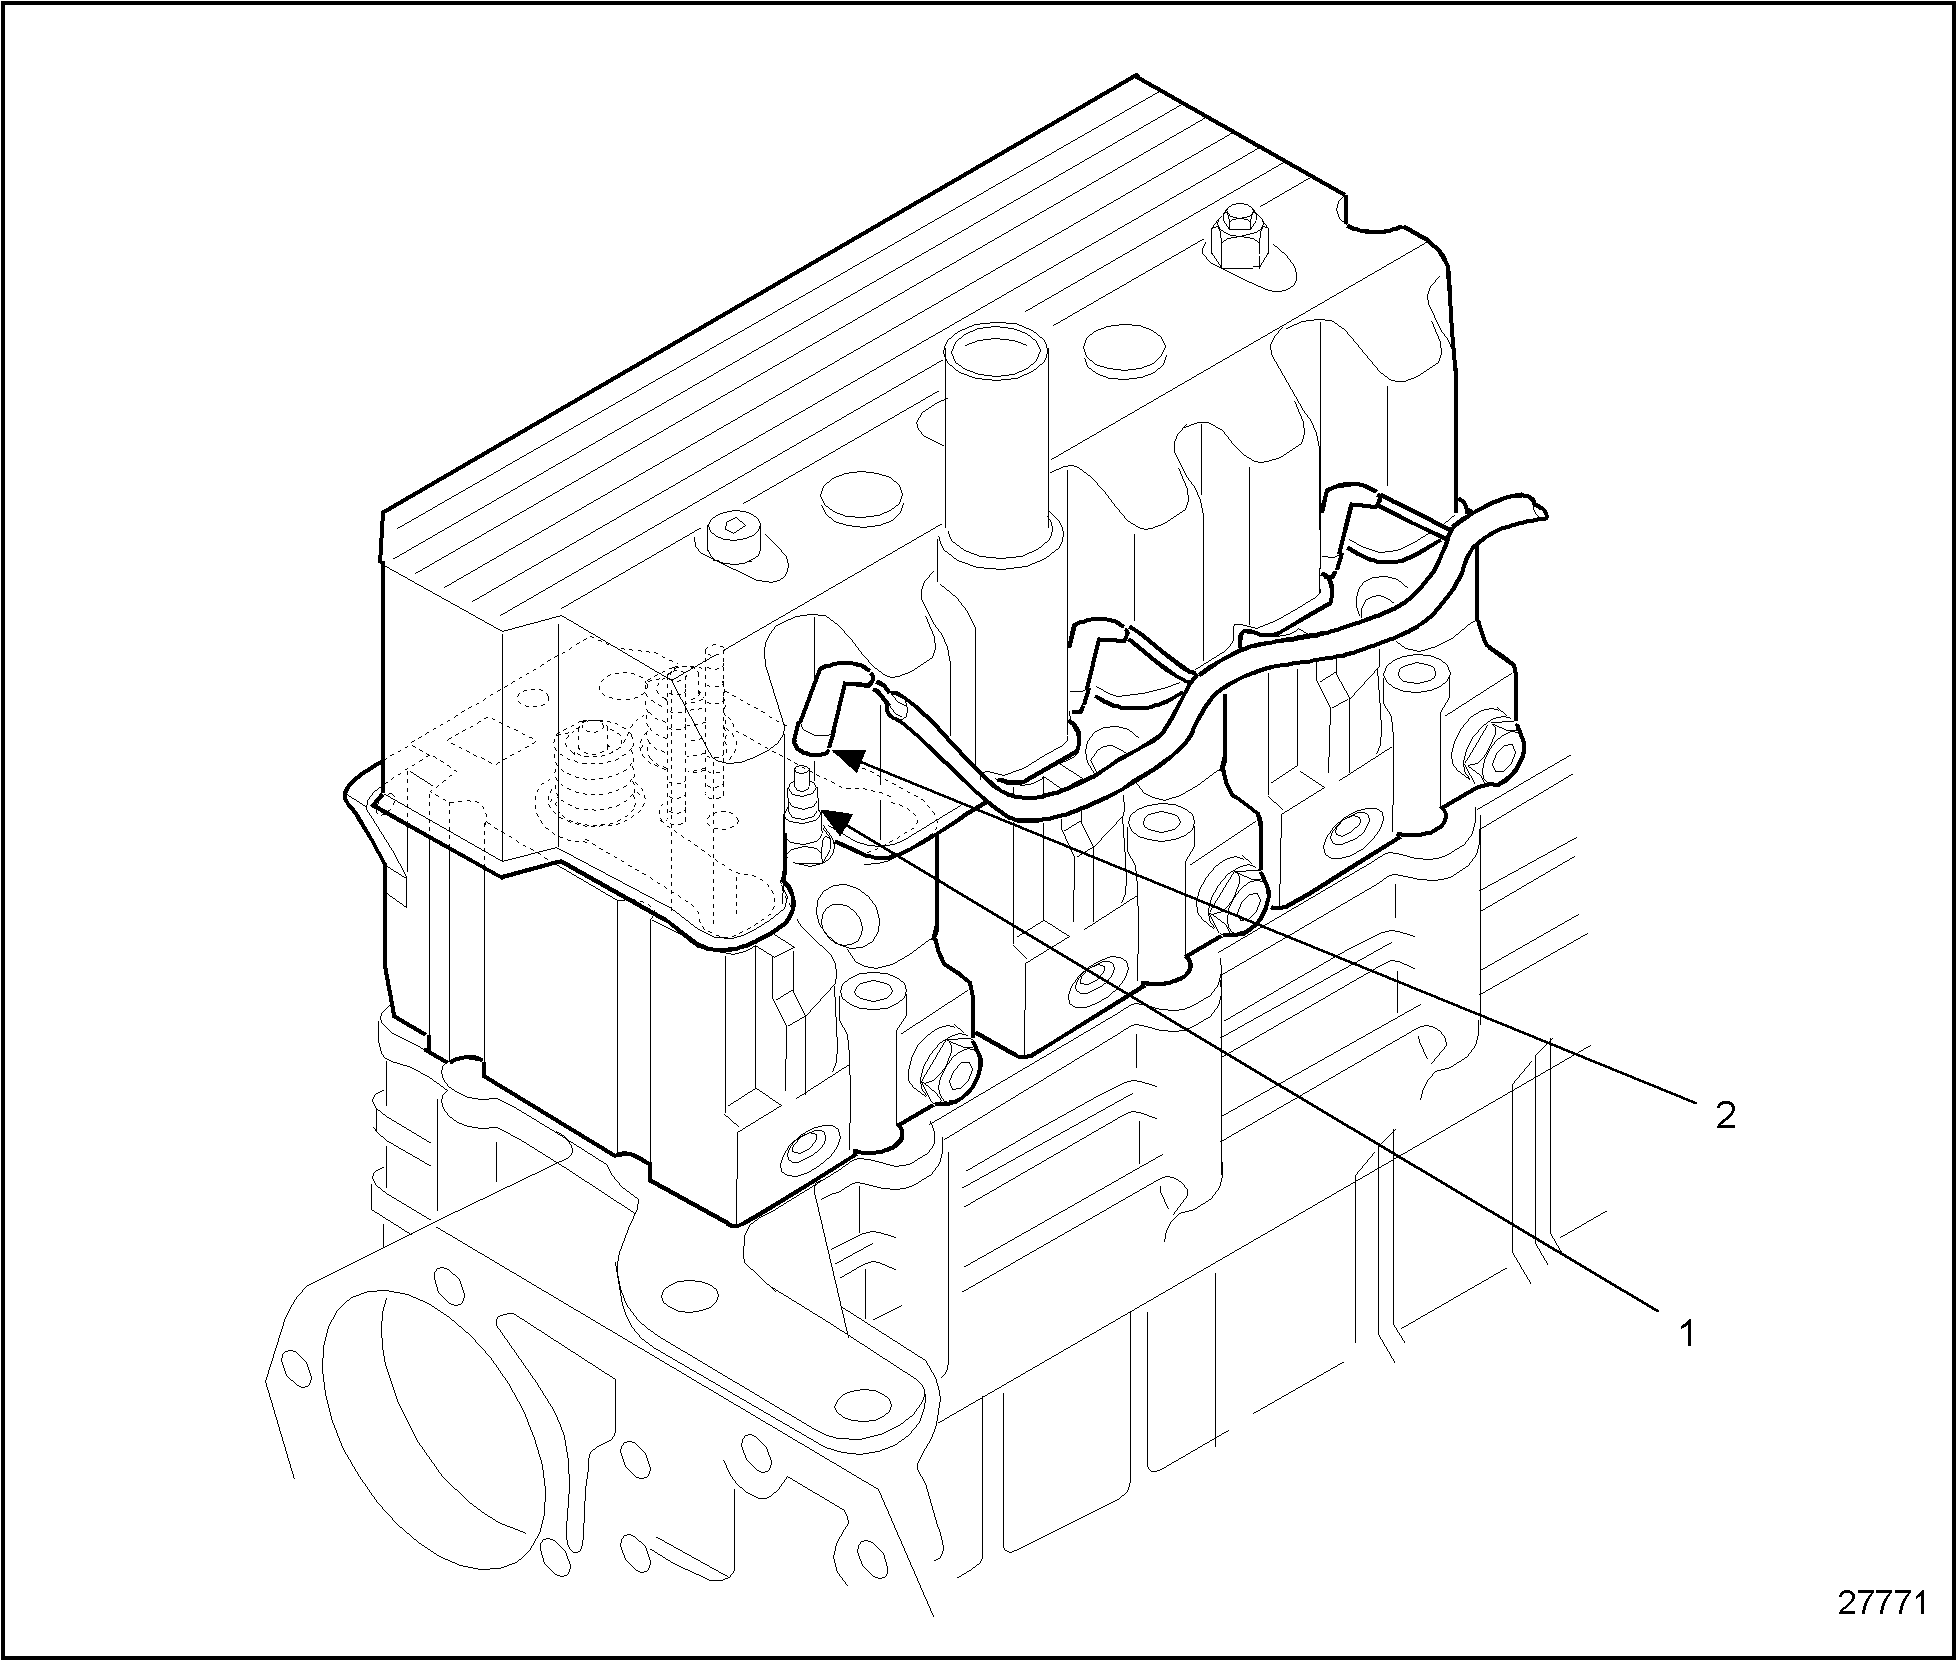
1.Glow Plug
2.Glow Plug Harness
Figure 2. Glow Plug Harness Removal
- Remove center plug from between the rocker covers. See Figure
"Front Rocker Cover Center Plastic Plug Removal"
.

1.Plastic Plugs
Figure 3. Front Rocker Cover Center Plastic Plug Removal
- Remove oil fill tube. See Figure
"Oil Fill Tube Removal"
.

1.Clamp
2.Oil Fill Tube
Figure 4. Oil Fill Tube Removal
- Remove three front rocker cover retaining bolts. See Figure
"Front Cover Retaining Bolts Removal"
.

1.Retaining Bolts (3)
Figure 5. Front Cover Retaining Bolts Removal
- Remove front rocker cover and gasket from the cylinder heads.
Section 1.2.2.1
Cleaning of Front Rocker Cover
Clean the front rocker cover as follows:
- Remove old gasket material from front rocker cover surfaces.

To avoid personal injury when blow drying, wear adequate eye protection (safety glasses or face plate) and do not exceed 276 kPa (40 lb/in. 2 ) air pressure.
- Cleanse the front rocker cover with clean fuel oil and blow dry with compressed air.
Section 1.2.2.2
Inspection of Front Rocker Cover
Inspect the front rocker cover as follows:
- Visually check the rocker cover for cracks or warpage.
- If the front rocker cover has cracks or warpage, replace the component. Refer to "1.2.3 Installation of Front Rocker Cover" .
- If the front rocker cover has no cracks or warpage, reuse the component. Refer to "1.2.3 Installation of Front Rocker Cover" .
Section 1.2.3
Installation of Front Rocker Cover
Install the front rocker cover as follows:
- Install front rocker cover and new gasket to the cylinder heads with three retaining bolts. Torque bolts to 15 N · m (11 lb · ft). See Figure
"Front Rocker Cover and Gasket Installation"
.

1.Cylinder Block
4.Front Rocker Cover
2.Cylinder Head
5.Front Cover Retaining Bolts
3.Front Rocker Cover Gasket
Figure 6. Front Rocker Cover and Gasket Installation
- Install oil fill tube. Refer to OEM guidelines.
NOTICE:
Plugs must be installed during operation of the engine to ensure that dirt and debris will not fill the access holes.
- Install front rocker cover plugs, if removed.
- Reconnect glow plug harness connectors to the glow plugs. See Figure
"Glow Plug Harness Connector"
.
1.Glow Plug
2.Glow Plug Harness
Figure 7. Glow Plug Harness Connector
- Run the engine to verify repair.
Section 1.2.4
Removal of Rear Rocker Cover
Remove rear rocker cover as follows:
|
|
|
To avoid personal injury when blow drying, wear adequate eye protection (safety glasses or face plate) and do not exceed 276 kPa (40 lb/in. 2 ) air pressure. |
- Preclean the rear rocker cover to keep dirt and debris out of the valve gear chamber using clean fuel oil and blow dry with compressed air.
- Unplug glow plug harness at the glow plugs. See Figure
"Glow Plug Harness Removal"
.
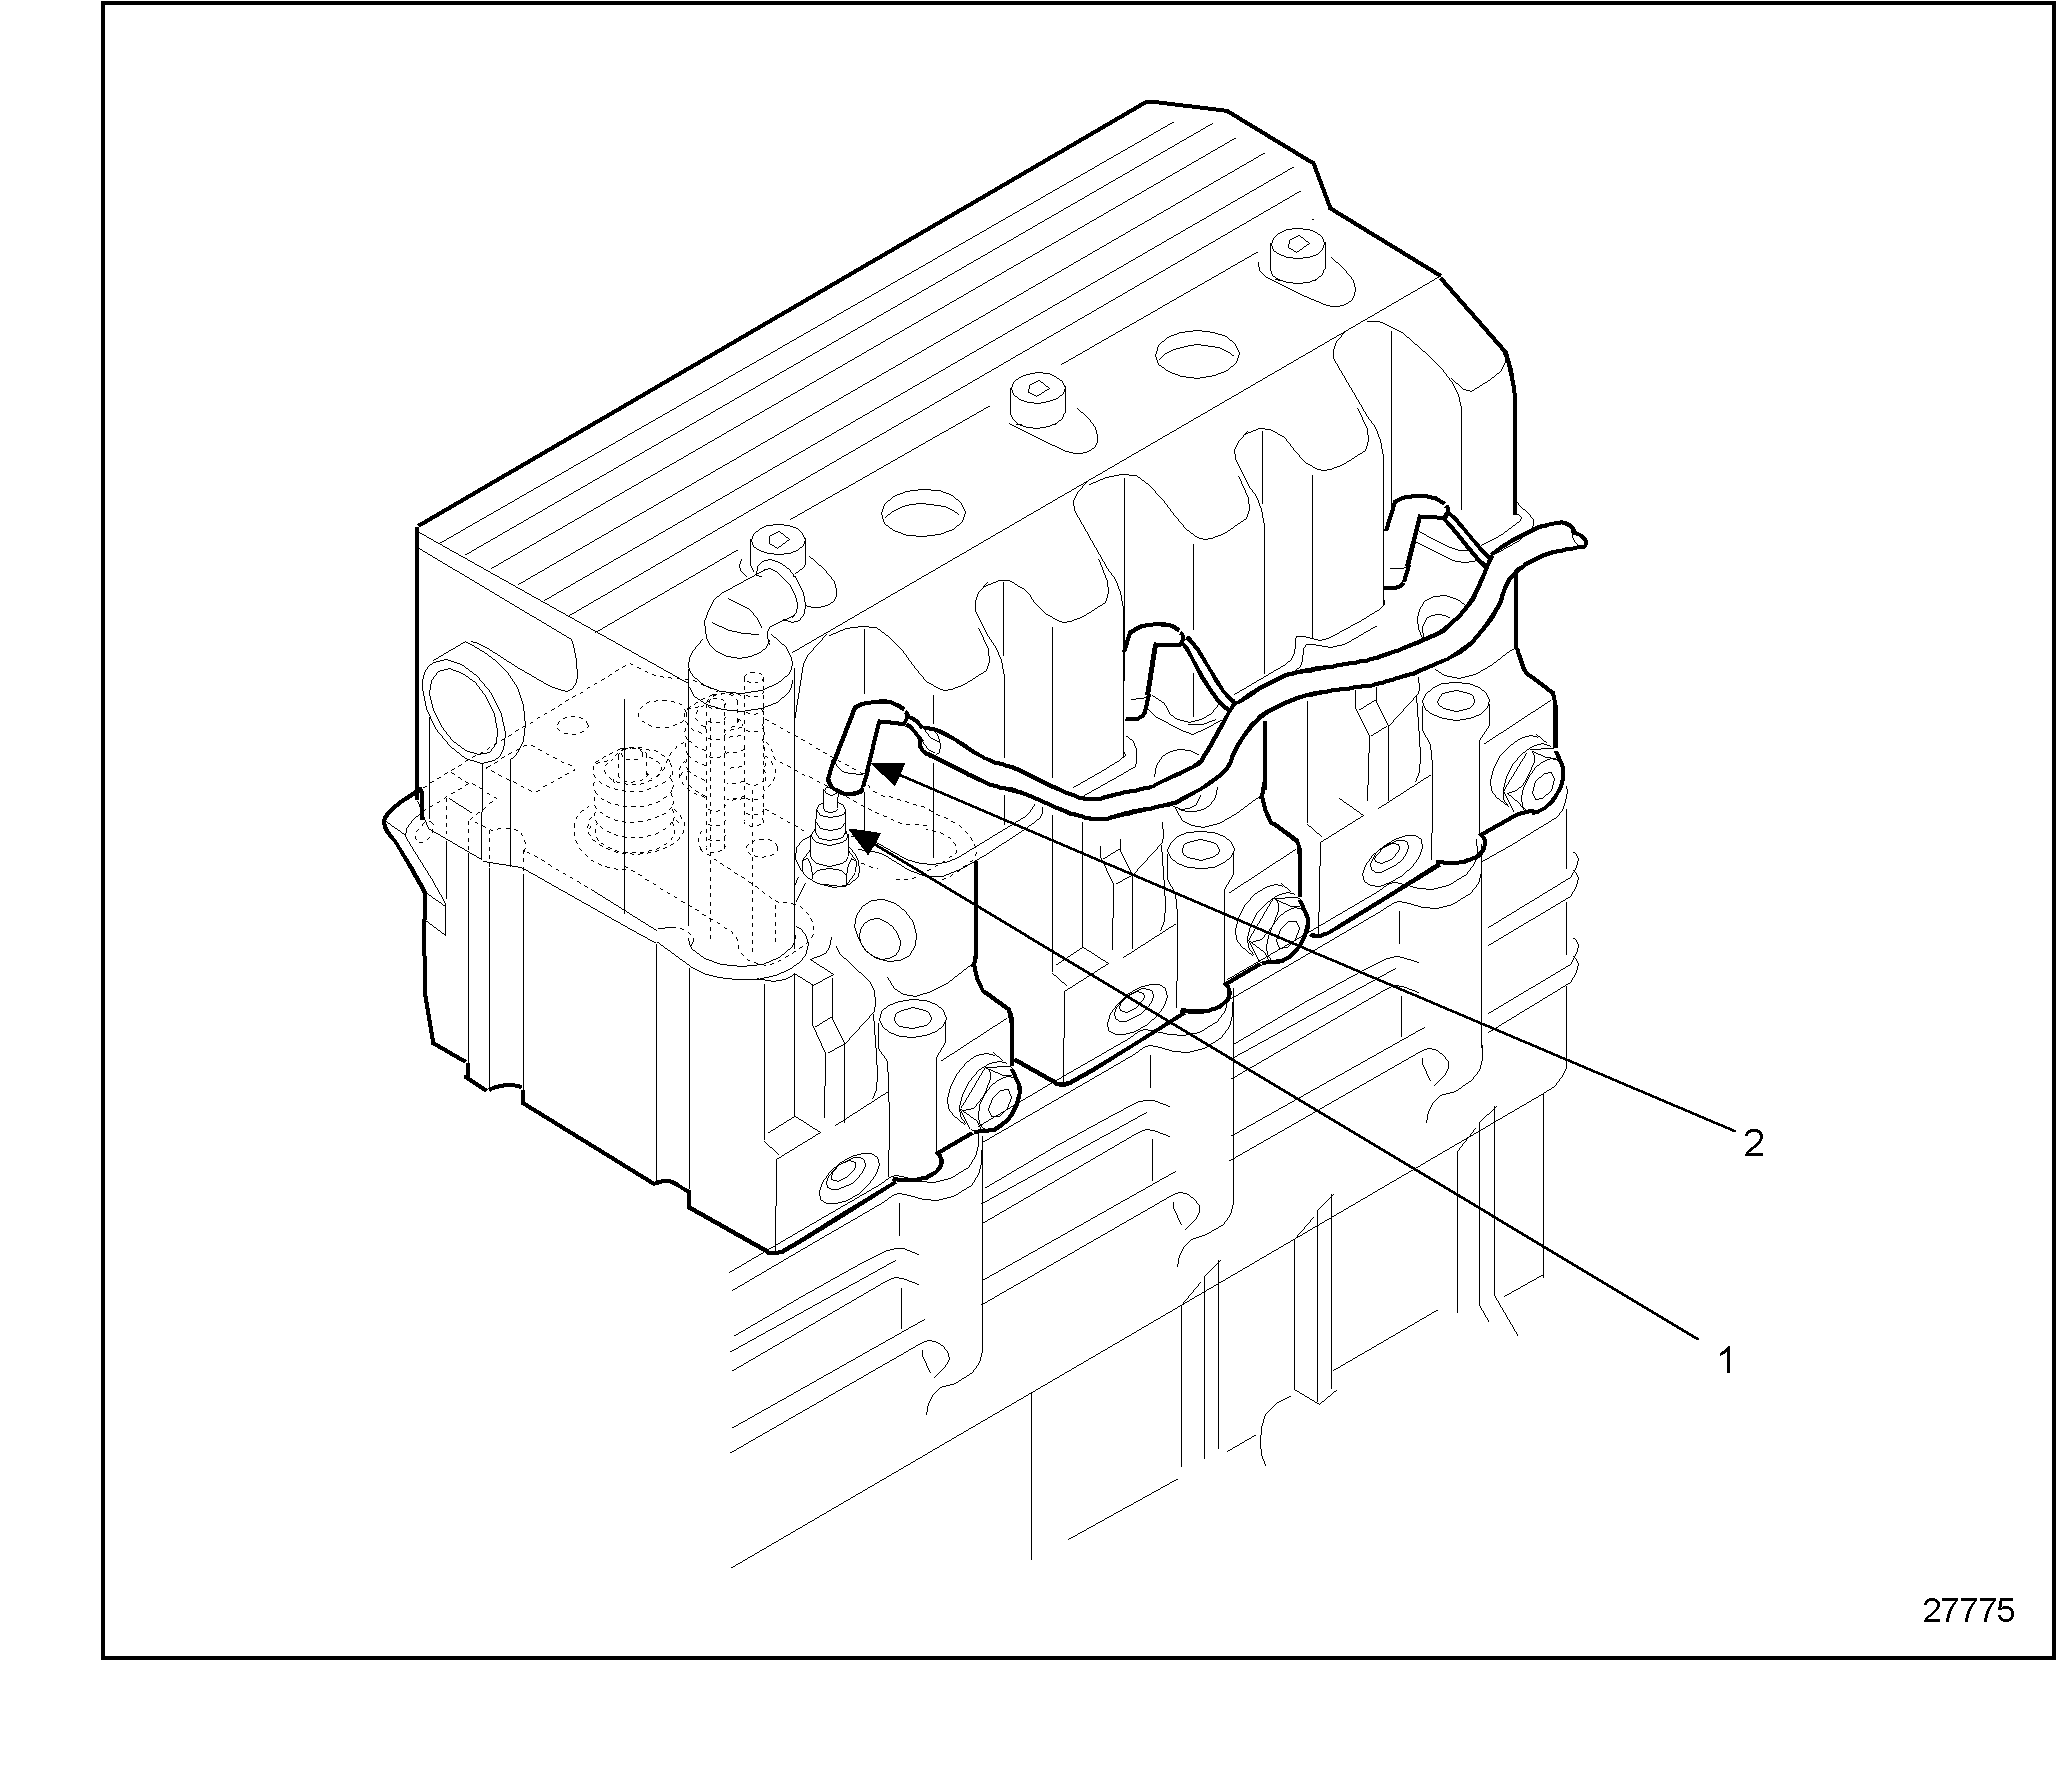
1.Glow Plug
2.Glow Plug Harness
Figure 8. Glow Plug Harness Removal
- Remove center plastic plug between front and rear valve covers, if necessary. See Figure
"Removal of Rear Rocker Cover Center Plastic Plug"
.

1.Plastic Plugs
Figure 9. Removal of Rear Rocker Cover Center Plastic Plug
- Remove crankcase breather hose. See Figure
"Crankcase Breather Hose Removal"
.

1.Clamp
2.Breather Hose
Figure 10. Crankcase Breather Hose Removal
- Remove three rear rocker cover retaining bolts. See Figure
"Rear Rocker Cover Retaining Bolt Removal"
.

1.Rocker Cover Retaining Bolts
Figure 11. Rear Rocker Cover Retaining Bolt Removal
- Remove rear rocker cover and gasket from the cylinder heads. See Figure "Rear Rocker Cover Retaining Bolt Removal" .
Section 1.2.4.1
Cleaning of Rear Rocker Cover
Clean the rear rocker cover as follows:
- Remove old gasket material from rear rocker cover surfaces.
To avoid personal injury when blow drying, wear adequate eye protection (safety glasses or face plate) and do not exceed 276 kPa (40 lb/in. 2 ) air pressure.
- Cleanse rear rocker cover with clean fuel oil and blow dry with compressed air.
Section 1.2.4.2
Inspection of Rear Rocker Cover
Inspect the rear rocker cover as follows:
- Visually check the rear rocker cover for cracks or warpage.
- If the rear rocker cover has cracks or warpage, replace the component. Refer to "1.2.5 Installation of Rear Rocker Cover" .
- If the rear rocker cover has no cracks or warpage, reuse the component. Refer to "1.2.5 Installation of Rear Rocker Cover" .
Section 1.2.5
Installation of Rear Rocker Cover
Install the rear rocker cover as follows:
- Install rear rocker cover and new gasket to the cylinder heads with three retaining bolts. Torque bolts to 15 N · m (11 lb · ft).
- Install crankcase breather hose. See Figure
"Crankcase Breather Hose Installation"
.
1.Clamp
2.Breather Hose
Figure 12. Crankcase Breather Hose Installation
- Install rear rocker cover center plugs, if removed. See Figure
"Rear Rocker Cover Plastic Plugs Installation"
.
1.Plastic Plugs
Figure 13. Rear Rocker Cover Plastic Plugs Installation
- Reconnect glow plug harness connectors to the glow plugs. See Figure
"Glow Plug Harness Installation"
.
1.Glow Plug
2.Glow Plug Harness
Figure 14. Glow Plug Harness Installation
- Run the engine to verify repair.
| Series 638 Service Manual - 6SE648 |
| Generated on 10-13-2008 |