Section 13.6
Restricted or Cracked Charge Air Cooler
To determine if a restricted or cracked charge air cooler is causing lack of power, perform the following steps:
NOTICE: |
|
To avoid engine damage, follow the installation instructions provided with the air-to-air charge air cooler test kit. |
- Visually inspect the core, tanks, and welds for cracks and holes. If cooler fails visual inspection replace the charge air cooler; refer to "13.6.2 Charge Air Cooler Replacement" .
- Pressure test the charge air cooler;refer to "13.6.1 Pressure Testing the Charge Air Cooler" .
- Evaluate the results from pressure testing the charge air cooler.
- If the pressure drop is 34 kPa (5 psi) or less in 15 seconds, the cooler is good. Check for faulty air intake manifold; refer to "13.7 Faulty Air Intake Manifold Gasket" .
- If the pressure drop is greater than 34 kPa (5 psi) in 15 seconds, replace the charge air cooler; refer to "13.6.2 Charge Air Cooler Replacement" .
Section 13.6.1
Pressure Testing the Charge Air Cooler
Perform the following to pressure test the charge air cooler:
- Use the charge air cooler tester (J-41473)
to test cooler for leaks.See Figure
"Charge Air Cooler Tester J-41473"
for component parts.
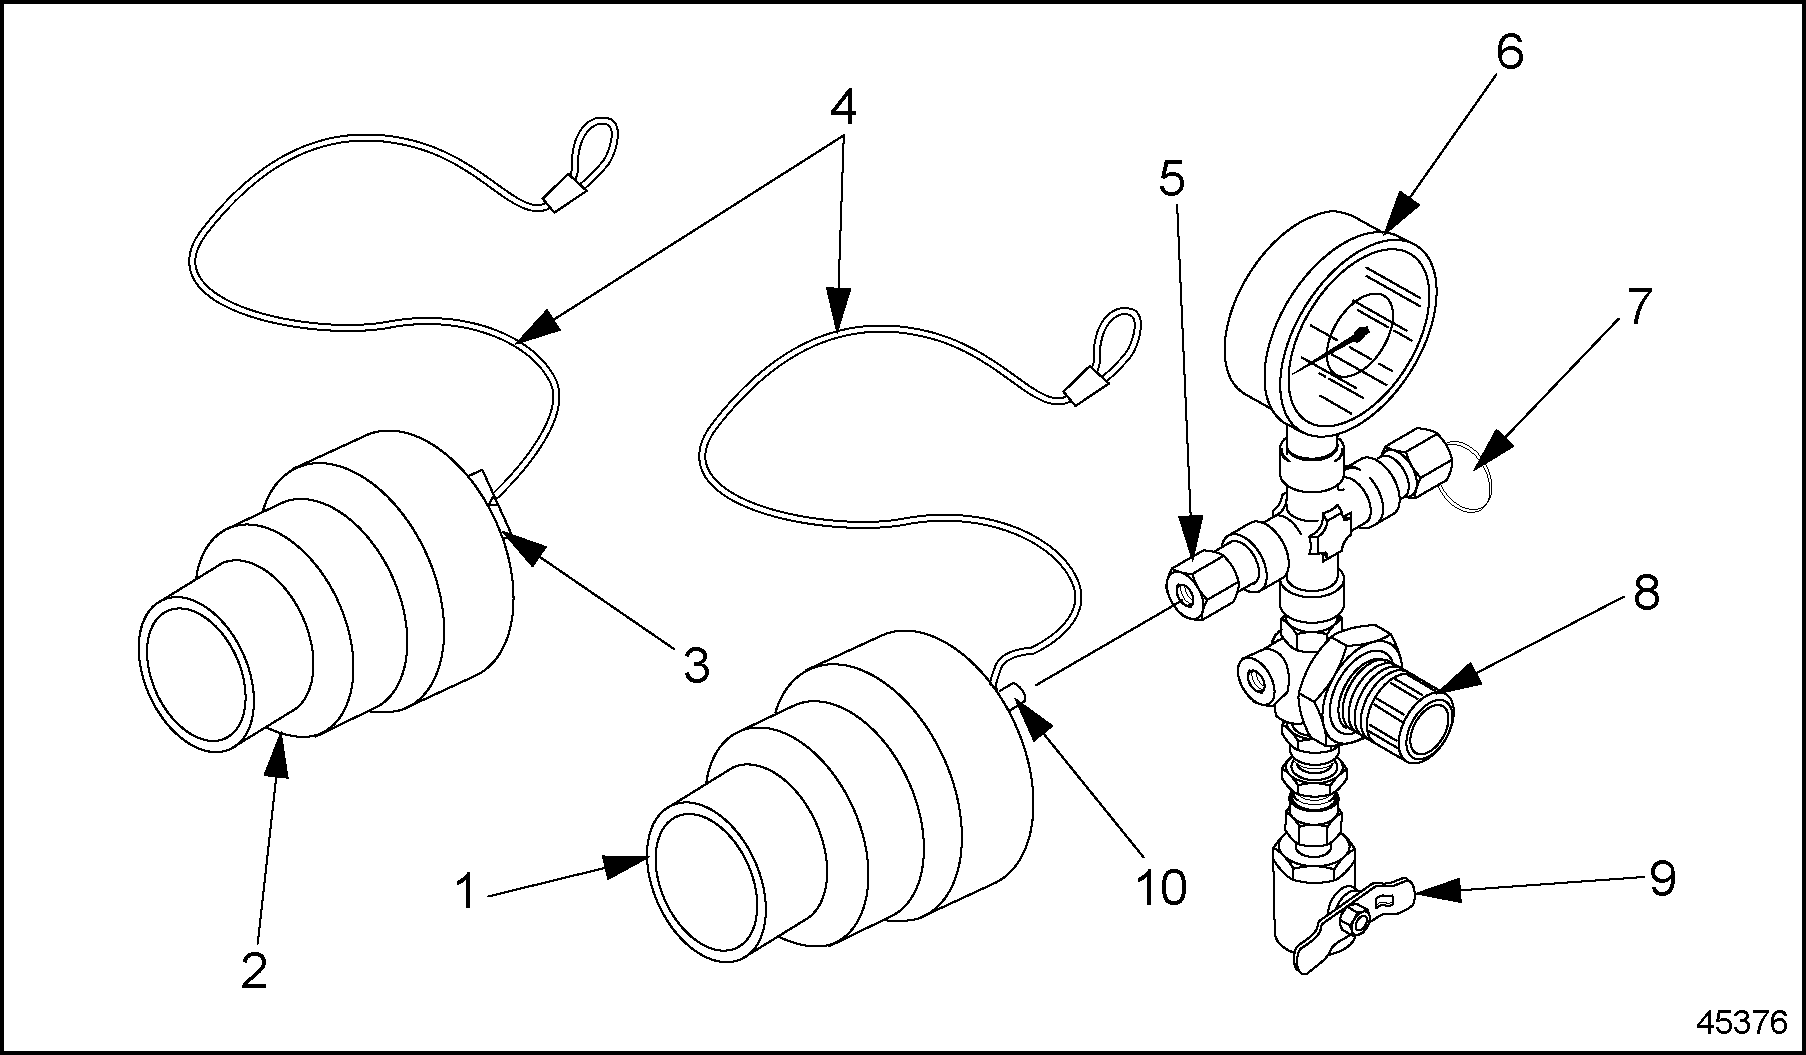
1. Gauge Coupler
6. Gauge
2. Bleed-off Coupler
7. Pressure Relief Valve
3. Bleed Valve
8. Air Regulator Valve
4. Safety Straps
9. Air Shutoff Valve
5. Quick Disconnect
10. Quick Disconnect Fitting
Figure 1. Charge Air Cooler Tester J-41473
- Disconnect the air inlet and outlet piping connecting the charge air cooler to the engine.
- Install the charge air cooler test gauge coupler into the inlet hose (hot side) of the charge air cooler coming from the turbocharger compressor. Secure hose and coupler with clamp removed and torque the clamp to 5.6-6.78 N·m (50-60 lb·in.). See Figure
"Charge Air Cooler and Tester J-41473"
.

1. Gauge/Regulator Assembly
6. Bleed-off Coupler
2. Quick Disconnect Fitting
7. Charge Air Cooler Hose (Cold Side)
3. Gauge Coupler
8. Clamp
4. Charge Air Cooler Hose (Hot Side)
9. Charge Air Cooler
5. Safety Strap
Figure 2. Charge Air Cooler and Tester J-41473
- Attach the gauge/regulator assembly to the quick disconnect fitting on the gauge coupler.
- Use the clamp removed to attach the bleed-off coupler to the outlet hose (cold side) of the charge air cooler. Torque the clamp to 5.6-6.78 N·m (50-60 lb·in.).
- Connect the safety straps on the couplers to any convenient screw on the radiator mounting bracket.

PRESSURIZED AIR AND FLYING PARTICLES
To avoid injury to eye or face, wear a face shield or goggles when conducting a pressure test.
- Attach an air pressure line, with filtered air, to the air shutoff valve and gradually pressurize the charge air cooler to a pressure of 205 kPa (30 psi). If necessary, perform the following steps to adjust the air regulator until the gauge reads 205 kPa (30 psi):
- Pull regulator knob outward to unlock.
- Turn knob to adjust pressure to 205 kPa (30 psi).
- Push the regulator knob back into locked position.
- Close the air shutoff valve and monitor the gauge with a stop watch for 15 seconds. Note any decrease in air pressure.
- Repeat test at least three times to verify results.
- In pressure drop is 34 kPa (5 psi) or less in 15 seconds the cooler is good.
- If the pressure drop is greater than 34 kPa (5 psi) in 15 seconds, replace the charge air cooler. Refer to "13.6.2 Charge Air Cooler Replacement" .
- Slowly release pressure with the charge air cooler by opening the valve in the bleed-off coupler.
- Remove all charge air cooler tester pieces and reconnect charge air cooler piping to the engine.
- Reconnect air inlet and outlet piping to engine. Torque hose clamps to 5.6 - 6.78 N·m (50 - 60 lb·in.).
Section 13.6.2
Charge Air Cooler Replacement
Perform the following steps to replace the charge air cooler:
- Remove and replace the charge air cooler; refer to OEM guidelines.
- Verify replacement of the charge air cooler; refer to "13.7 Faulty Air Intake Manifold Gasket" .
| EPA07 MBE 4000 DDEC VI Troubleshooting Guide - 6SE568 |
| Generated on 10-13-2008 |