Section 1.18
Connecting Rods
Follow these procedures to remove and replace the connecting rod assembly.
Section 1.18.1
Repair or Replacement of Connecting Rod
To determine if repair is possible or replacement is necessary, perform the following procedure. See Figure "Repair or Replacement of Connecting Rod Flowchart" .

Figure 1. Repair or Replacement of Connecting Rod Flowchart
Section 1.18.1.1
Inspection of Connecting Rods
Inspect connecting rods as follows:
- Visually inspect the connecting rod bolts for nicks or damage.
- Visually inspect the rod and cap mating surfaces for fretting. Replace as required.
- Inspect the connecting rod piston pin bushing for wear as follows:
- Using a telescoping gage and an outside micrometer, measure the pin bore at two (2) locations 90 degrees from one another and record the readings. See Figure "Measure Pin Bore" .
- If piston pin bushing I.D. exceeds minimum specification, it is worn and must be replaced.
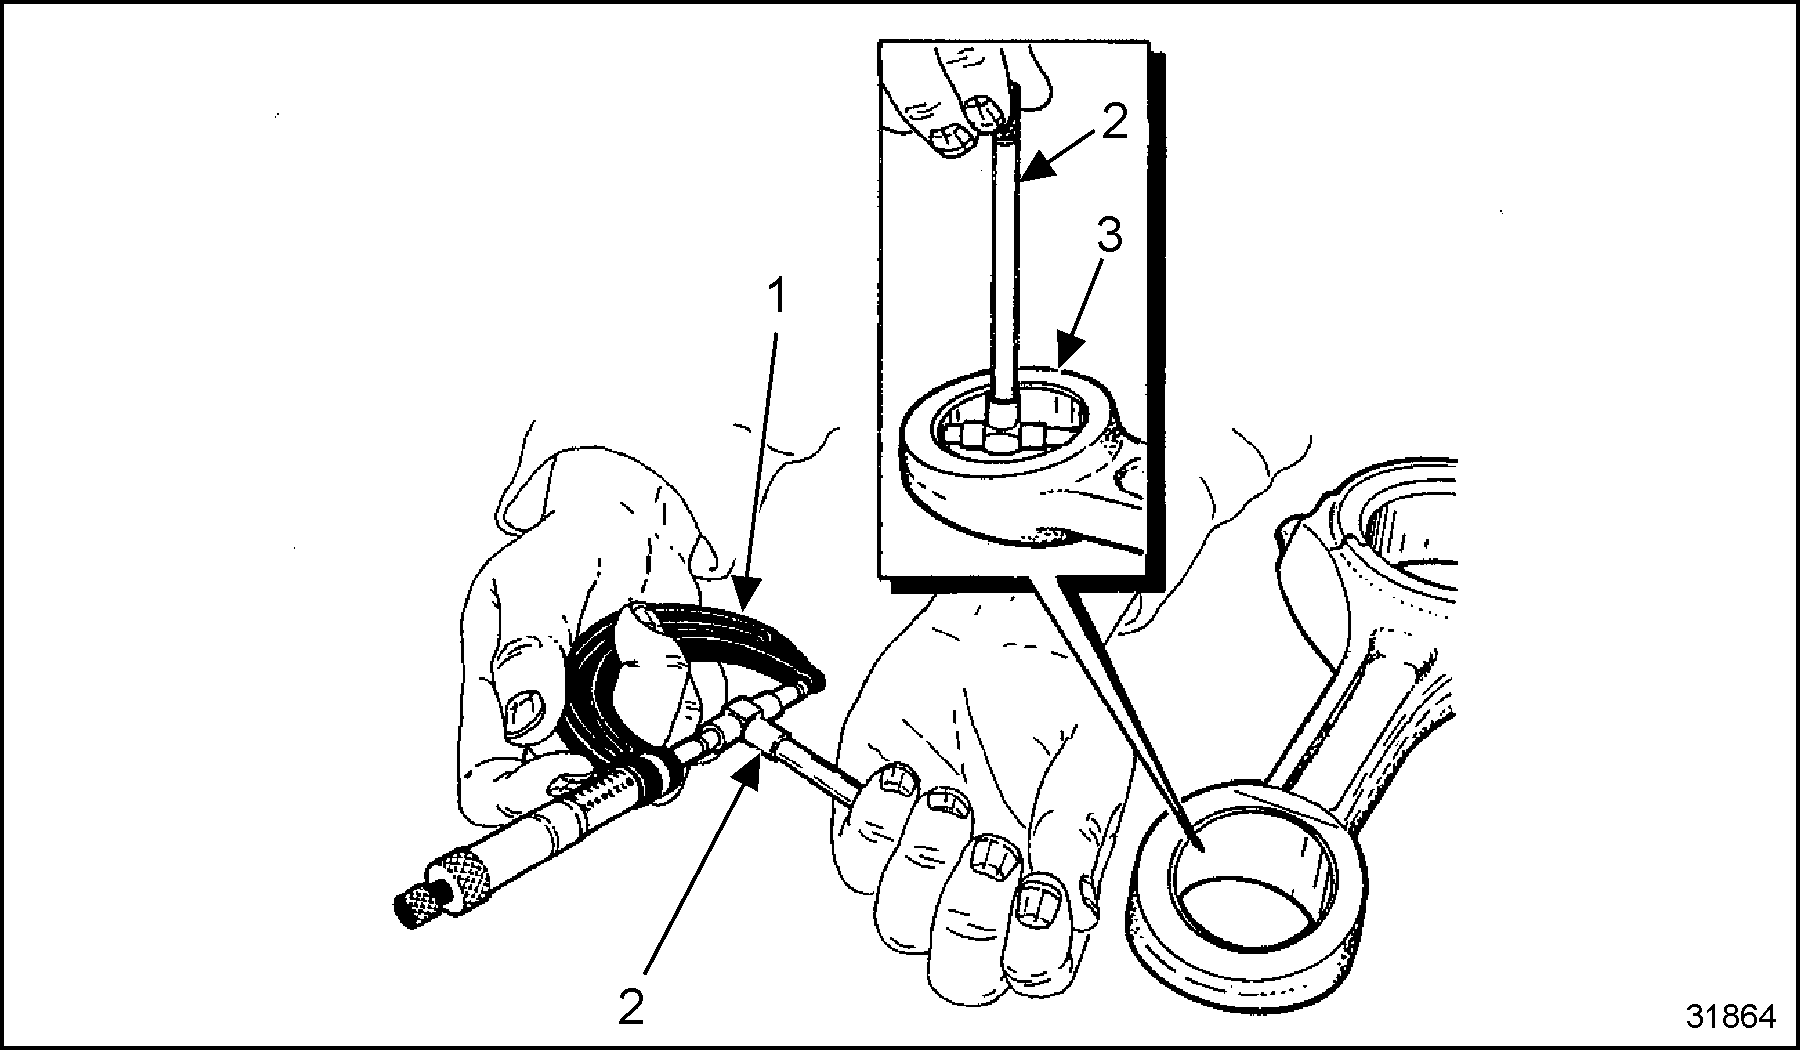
1. Micrometer
3. Connecting Rod
2. Telescoping Gage
Figure 2. Measure Pin Bore
- Remove any worn bushing using a press and a driver.
Note: When lubricated with clean engine oil, the bolts must screw into the rod by hand. If resistance is met, clean the rod threads and try a new bolt. If a new bolt does not screw in freely, the rod must be discarded. Rod threads cannot be re-tapped.
- Check connecting rod bearing bore for "out-of-round" as follows:
- Lubricate connecting rod bolts with clean engine oil and assemble the cap to rod with out bearing insert. Torque bolts to specifications. Refer to Specifications in Section 1.A.
- Use an inside micrometer and measure connecting rod in three locations.
- If the difference between point "B" and average of points "A" and "C" ([A+C] ÷ 2), exceeds the specifications, the rod must be replaced. Refer to Specifications in Section 1.A. See Figure "Connecting Rod Measurement" .
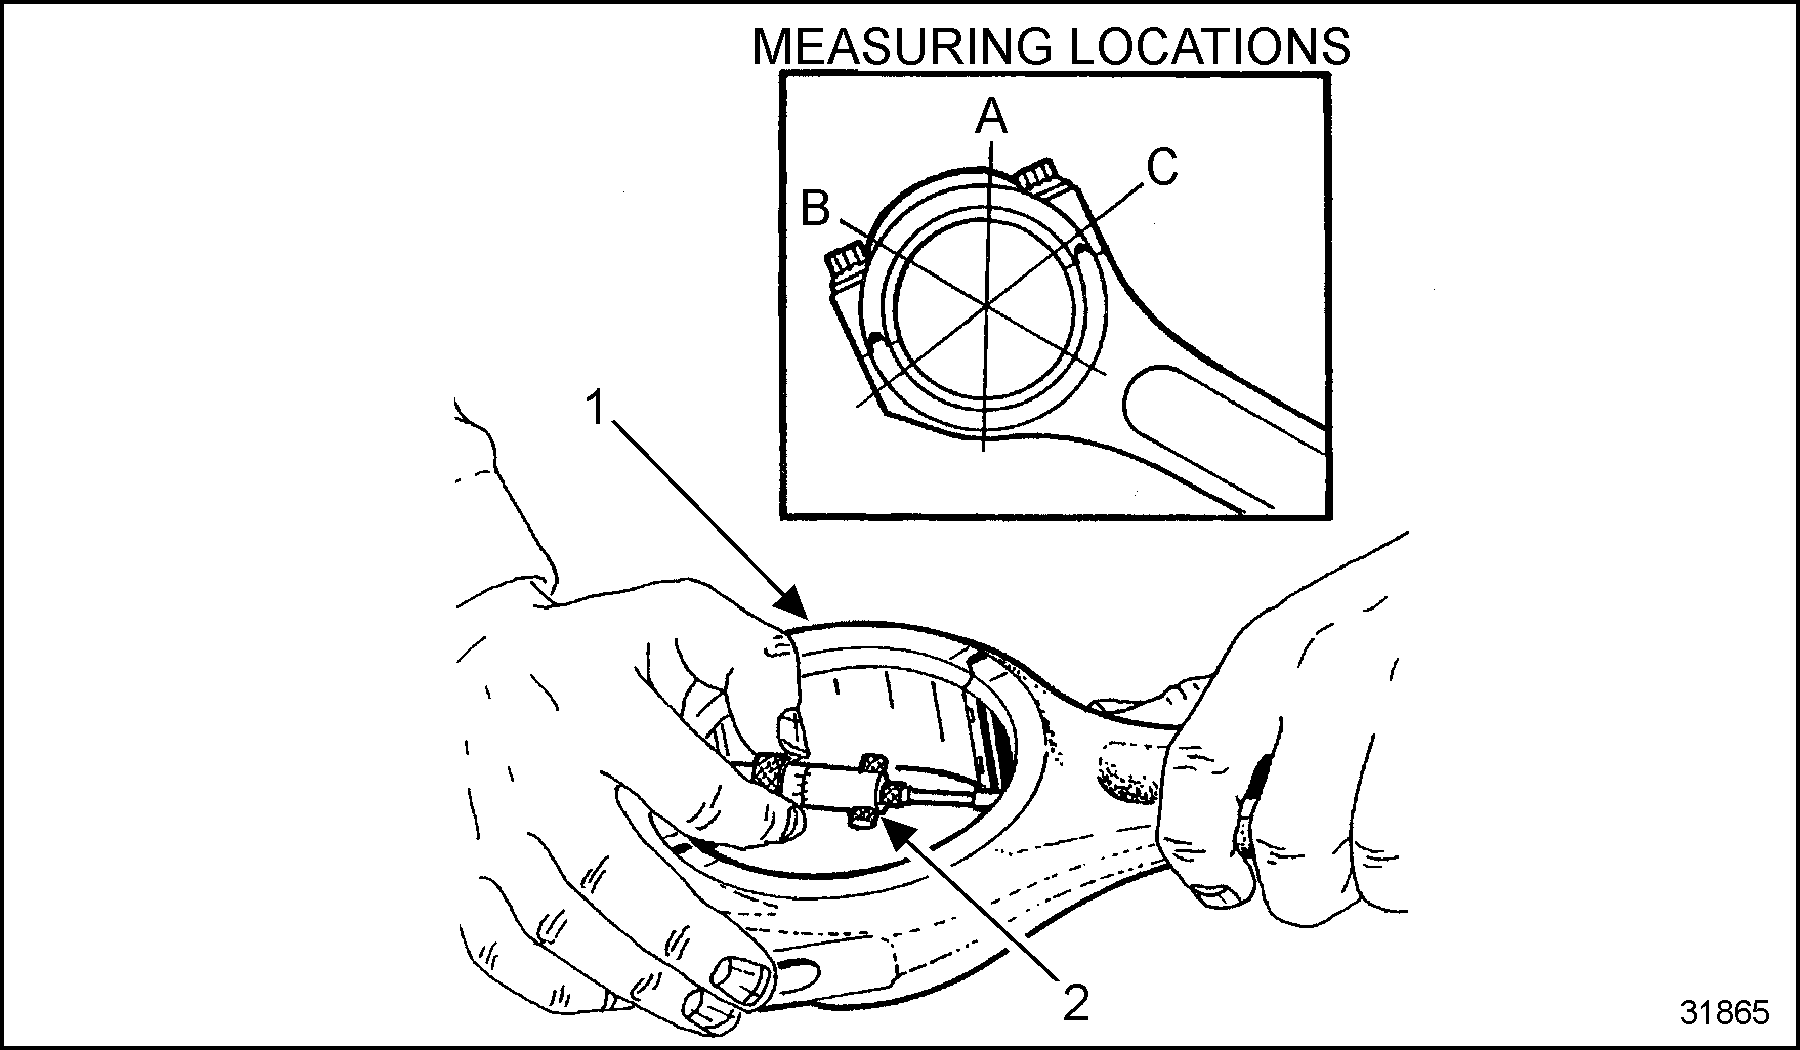
1. Connecting Rod
2. Micrometer
Figure 3. Connecting Rod Measurement
- Measure connecting rod bearing bore taper, by measuring bore I.D. on each side of bearing bore. Record the readings. The difference between the two readings is the bore taper. Refer to Specifications
in Section 1.A. Replace rod as required. See Figure
"Connecting Rod Measurements"
.
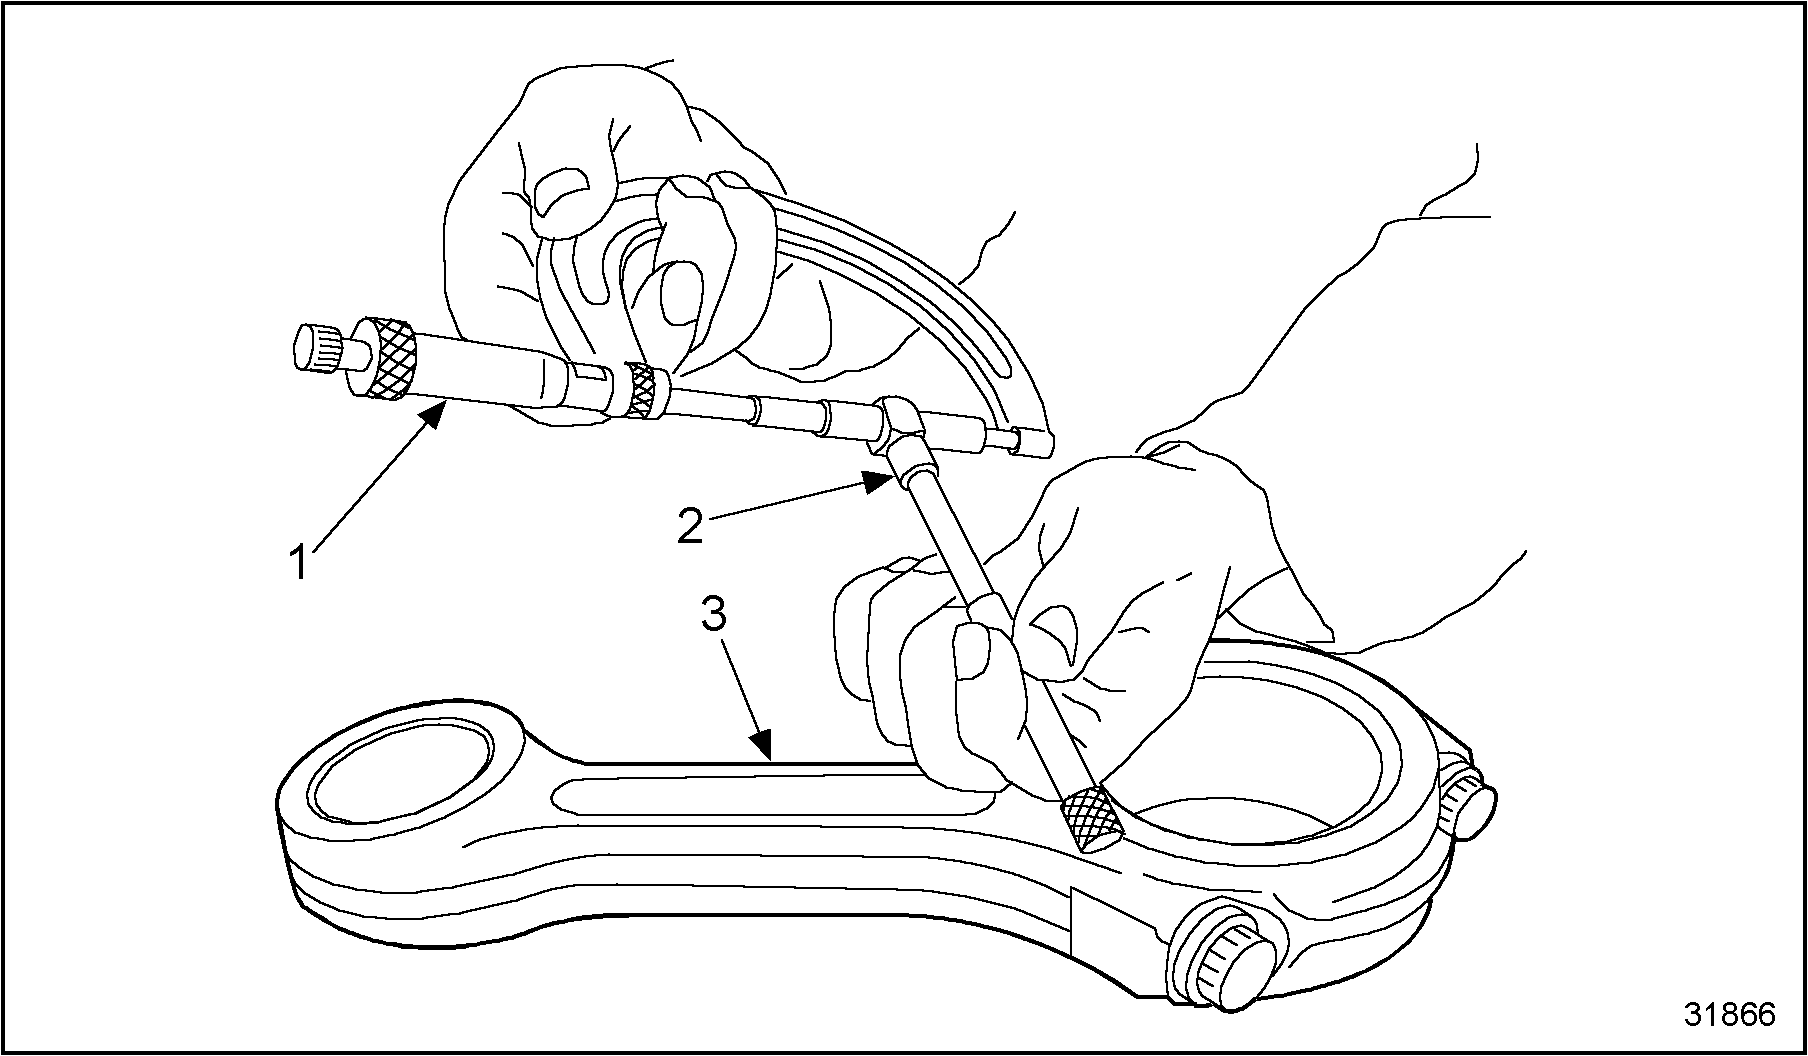
1. Micrometer
3. Connecting Rod
2. Telescoping Gage
Figure 4. Connecting Rod Measurements
- With connecting rod cap removed, visually inspect surface finish of connecting rod bearing bore. The bore must be smooth and free of scoring, nicks or burrs. Replace as required.
- Connecting rod bend and twist: Often engine component wear patterns can be identified and used to diagnose a problem. Some common examples of connecting rod wear patterns include:
- A shiny surface on edge of piston pin bushing usually indicates that a connecting rod is bent or piston pin hole is not in proper relation to piston skirt and ring grooves.
- Abnormal connecting rod bearing wear can be caused by either a bent connecting rod or a tapered connecting rod bore.
- Twisted connecting rods will not create an easily identifiable wear pattern but badly twisted rods will disturb action of entire piston, rings and connecting rod assembly and may be the cause of excessive oil consumption.
Note: If any of these conditions exist, check the connecting rods for bends or twists using a suitable alignment fixture. Follow the instructions of the fixture manufacturer. If bend or twist exceeds specifications, replace the connecting rod.
Section 1.18.1.2
Inspection of Piston Pins
Follow these steps to inspect piston pins.
- Visually inspect piston pins for corrosion or wear. Replace as required. See Figure
"Measure Piston Pin Outer Diameter"
.

1. Micrometer
3. Connecting Rod
2. Piston Pin
Figure 5. Measure Piston Pin Outer Diameter
- Use a micrometer to measure piston pin O.D. at two (2) locations. Record the readings. See Figure "Measure Piston Pin Outer Diameter" . If piston pin wear exceeds the specifications, replace the pin. Refer to Specifications in Section 1.A.
- Check piston pin clearance in rod as follows:
- Subtract piston pin O.D. from piston pin bushing I.D. measurement.
- If clearance exceeds the specifications, replace the bushing. Refer to Specifications in Section 1.A.
Section 1.18.1.3
Inspection of Cylinder Liners
Follow these steps to inspect the cylinder liners. Inspect cylinder liners. If liner is worn beyond specifications, replace the liner.
- Visually inspect inside surface of liner for scuffing or scoring and polishing. Replace liner and piston as required. Examine outer surface of liner for cavitation erosion. Replace as required.
- Check cylinder liners for wear (taper) using any one of the three (3) methods described.
Section 1.18.1.4
Inspection Method One
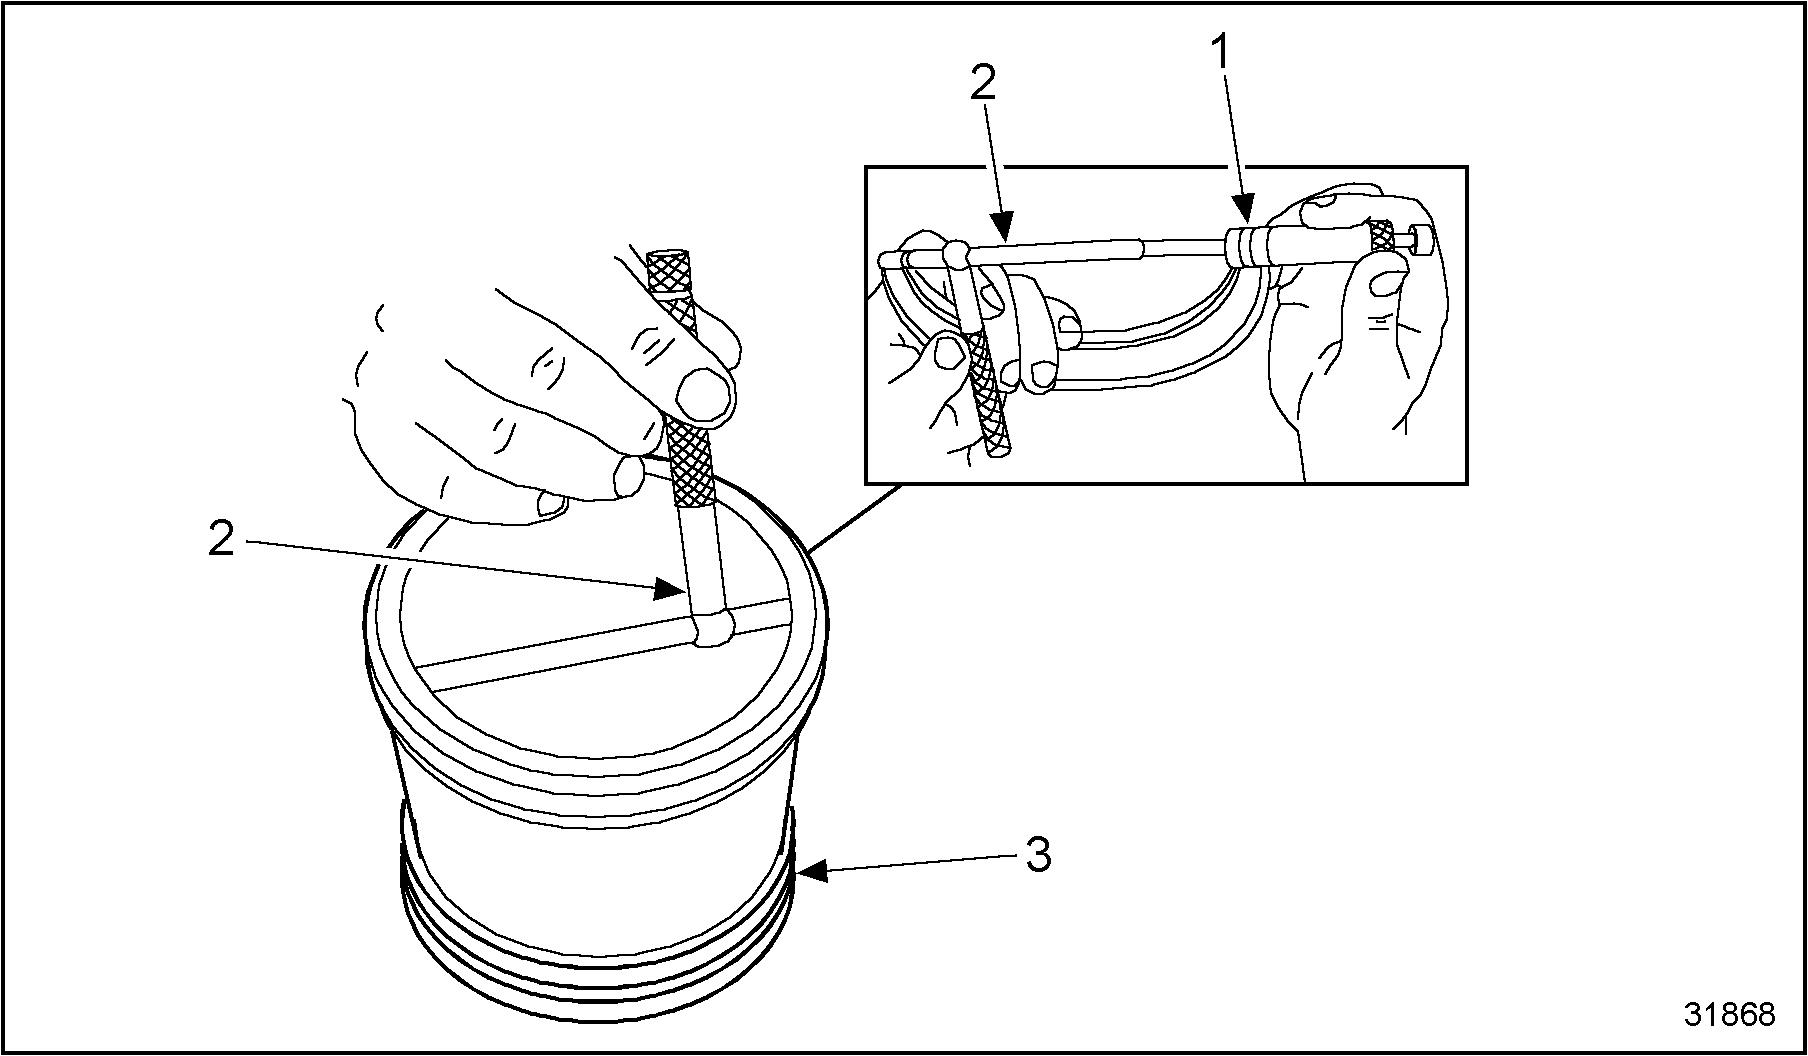
Using a telescoping gage, and an outside micrometer:
- Measure liner I.D. at top of piston ring travel (just below carbon ridge area) and record reading. See Figure
"Telescoping Gage Method"
.

Figure 6. Telescoping Gage Method
- Measure liner I.D. below ring travel area and record reading. See Figure
"Liner Measurement Below Ring Travel Area"
.
1. Micrometer
3. Cylinder Liner
2. Telescoping Gage
Figure 7. Liner Measurement Below Ring Travel Area
- The difference between two readings is cylinder liner taper. If specifications are exceeded, replace liner.
Section 1.18.1.5
Inspection Method Two
Using a dial bore gage:
- Measure at the top of the piston ring travel just below the carbon ridge area and record the reading. See Figure
"Dial Bore Gage Method"
.

1. Liner
2. Dial Bore Gage
Figure 8. Dial Bore Gage Method
- Measure below ring travel area and record the reading.
- The difference between the two readings is the cylinder liner taper. If specifications are exceeded, replace liner.
Section 1.18.1.6
Inspection Method Three
The feeler gage method:
- Install a top compression ring squarely at top of ring travel and measure ring end gap with a feeler gage. Record the reading. See Figure
"Feeler Gage Method"
.
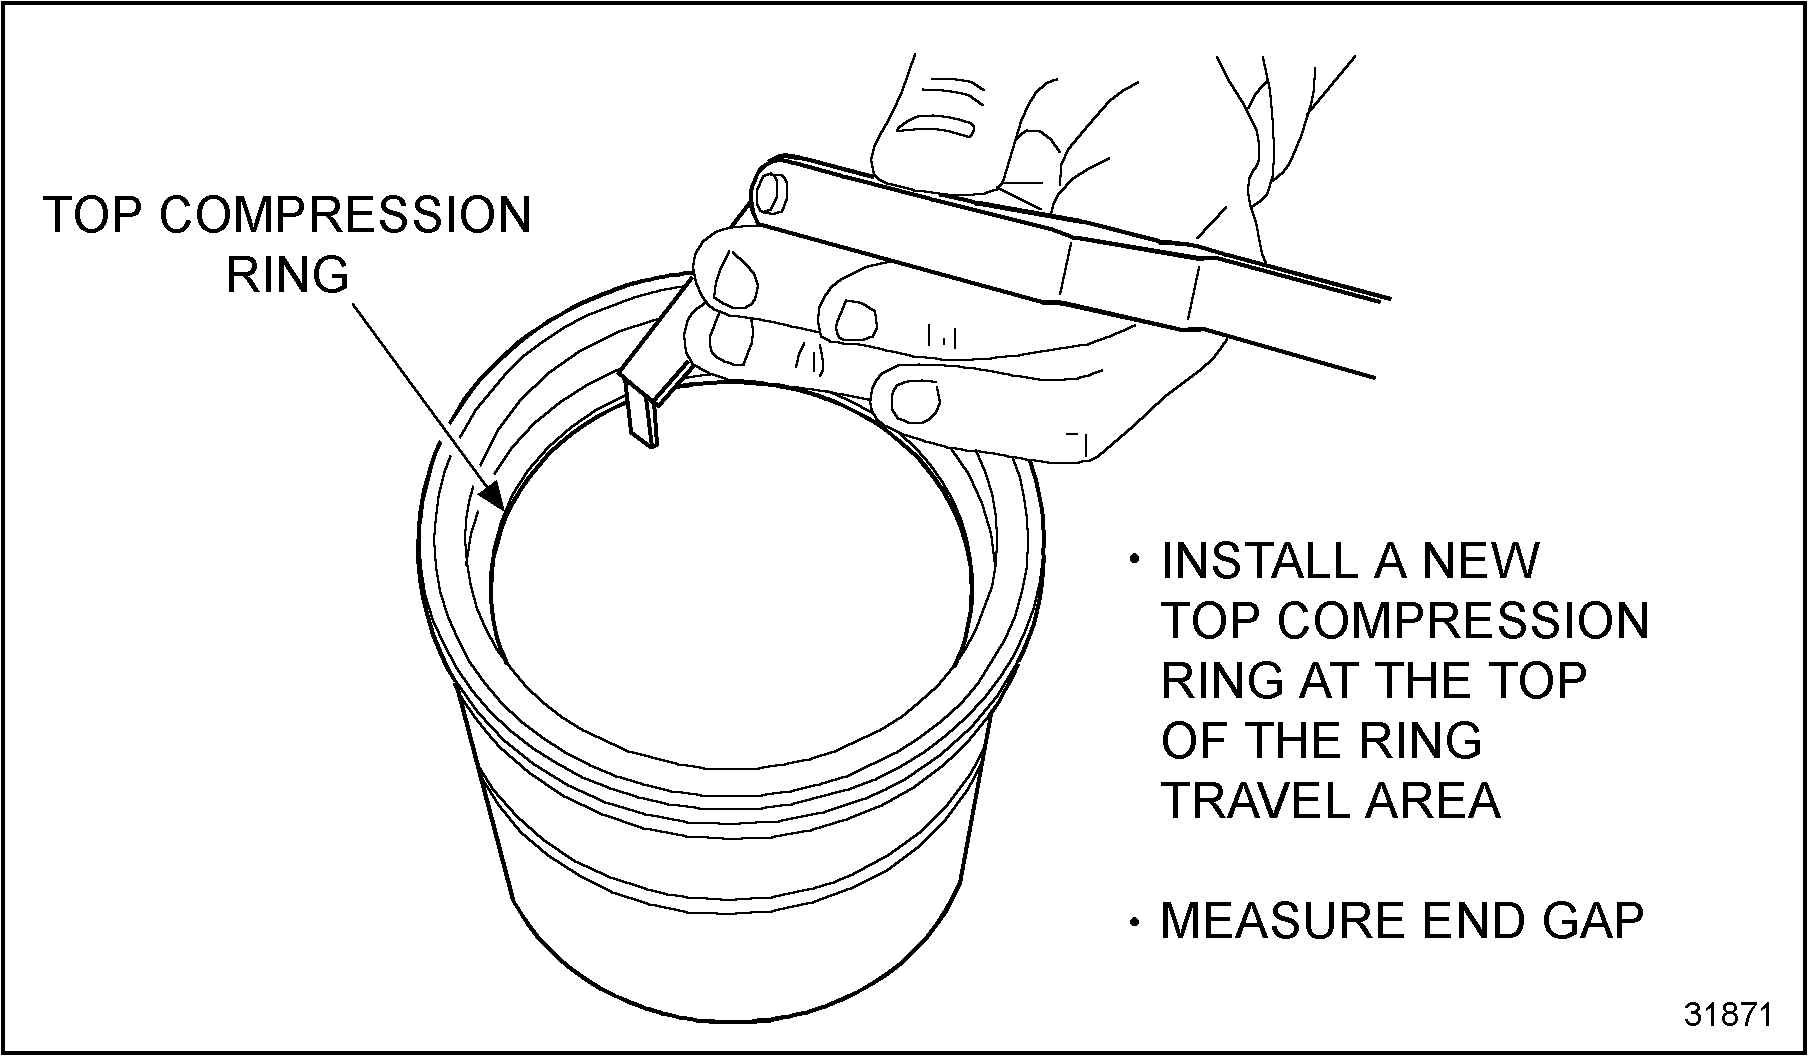
Figure 9. Feeler Gage Method
- Install same piston ring squarely below ring travel area and measure ring end gap. Record the readings.
- Every 0.07 mm (0.003 in.) increase in ring gap equals a 0.025 mm (0.001 in.) increase in bore size.
Section 1.18.2
Bearing Fitting Procedure
When the assembly is drawn up tight, the bearing is compressed, assuring a positive contact between the bearing back and the bore.
- If bearing-to-crankshaft running clearances exceed specifications because of wear on the crankshaft, replace or re-grind the crankshaft and install undersize precision type bearing shells.
- Torque the connecting rod bolts alternately and evenly to specifications. Refer to Specifications
in Section 1.A.
Note: Bearing shells must fit tightly in the bore. When bearing shells are inserted into the connecting rod and cap, they protrude above the parting line. This protrusion is required to achieve "Bearing Crush". Bearing shells are designed with "spread". That is, the width across the open ends are slightly larger than the diameter of the connecting rod bore into which they are assembled, see Figure "Spread of Bearing " . This condition is designed into the bearing shell causing it to spread outward at the parting line when "Crush" load is applied by tightening the bolts. Some snap may be lost in normal use but bearing replacement is not required because of a nominal loss of snap.

Figure 10. Spread of Bearing
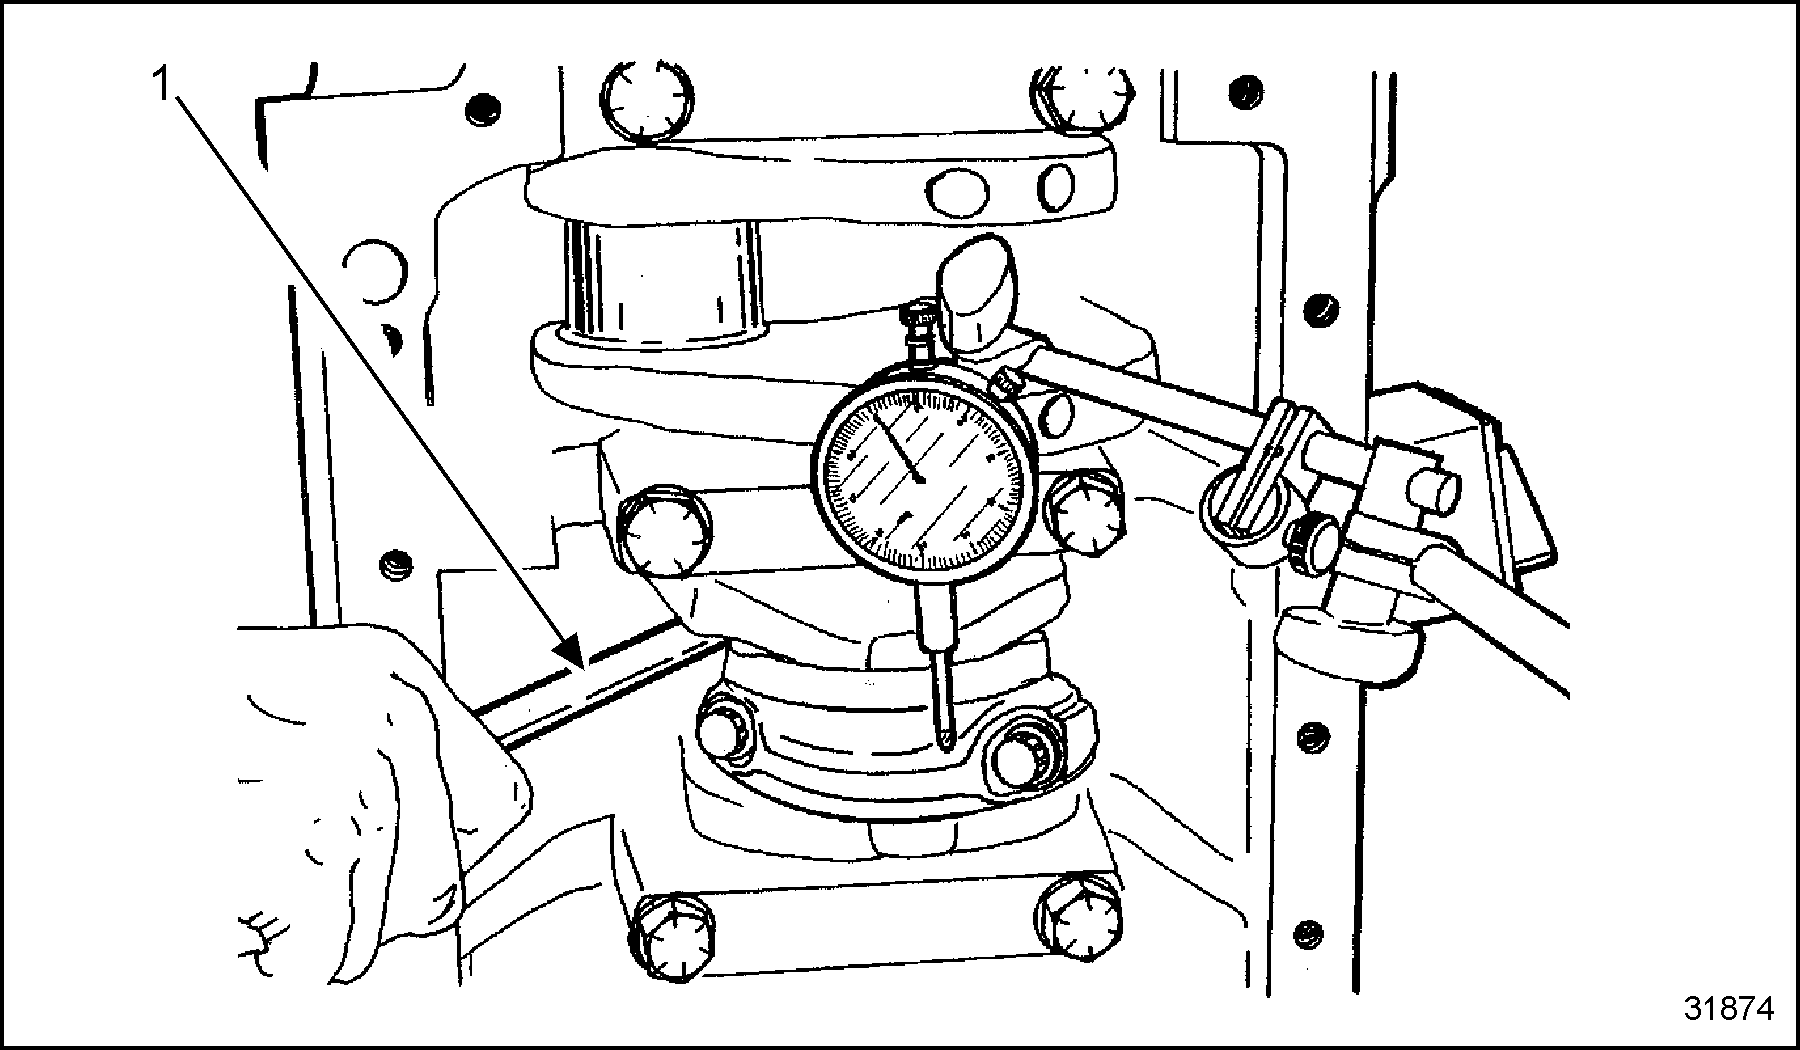
- Fit connecting rod bearings and measure bearing running clearance as follows:
Note: Do not turn the crankshaft during the running clearance check. See Figure "Clearance Check" .

Figure 11. Clearance Check
- With bearing cap removed, wipe oil from the face of the bearing insert and exposed portion of the crankshaft journal.
- Place a piece of plastigage across the full width of the bearing about 6 mm (1/4 in.) off center.
- Install the cap and torque bolts evenly and alternately to specifications. Refer to Specifications in Section 1.A.
- Remove main bearing cap. The plastigage material will be found adhering to either the bearing shell or the crankshaft. Use plastigage scale to measure widest point of flattened plastic material. The number within the graduated marks on the scale indicates the clearance in thousandths of an inch or millimeters.
- Remove the test material and repeat the test for each connecting rod bearing.
Note: With the precision bearings used, no problem should be encountered. If proper clearance is NOT achieved, a problem with the crankshaft may exist which requires re-grinding and the use of undersize bearings. Bearing cap torque is very important. Repeat running clearance check procedure before condemning the crankshaft.
- Check clearance of connecting rod by placing a feeler gage between the connecting rod and the crankshaft journal.
- Check connecting rod side clearance using a dial indicator. See Figure
"Check Rod Side Clearance"
.
1. Pry Bar
Figure 12. Check Rod Side Clearance
- Place the tip of the dial indicator on the connecting rod cap.
- Pry the connecting rod towards the rear of the engine and "zero" the dial indicator.
- Pry the connecting rod toward the front of the engine and read the indicator. Repeat for all connecting rods.
Note: Lack of clearance could indicate a damaged rod or a rod bearing out of position. Excessive clearance may require replacement of the rods or crankshaft. Correct as required.
Section 1.18.3
Cylinder Liner Reconditioning
Check the crankcase counterbore depth using the surface gage or a depth micrometer as follows:
Section 1.18.3.1
Surface Gage Method
Follow these steps when using the surface gage method.
- "Zero" the dial indicator on the crankcase deck.
- Move the indicator onto the counterbore ledge and check the depth at four (4) points.
- For counterbore depth and maximum variation between the four (4) measurement points, refer to Specifications in Section 1.A.
- If maximum variation between the four (4) points exceeds specifications, resurface the counterbore.
Section 1.18.3.2
Depth Micrometer Method
Follow these steps when using the depth micrometer method.
- Check the counterbore depth at four (4) points around the crankcase counterbore.
- Record the measurements.
- Resurface the counterbore if the maximum variation between measurement points is exceeded. Refer to Specifications in Section 1.A.
Section 1.18.4
Resurface Cylinder Liner
Follow these steps to resurface the liner.
Resurface the counterbore using the counter-boring tool, along with the appropriate cutter head as follows:
- Preset tool bit by placing a 0.20 to 0.25 mm (0.008 to 0.010 in.) feeler gage on the O.D. of the cutter head. Push the tool bit out until it touches the feeler gage. Lock the tool bit in place using an Allen wrench.
- Install the cutter head onto the driver unit and adaptor plate of the counter-boring tool.
- Raise the cutter head by pulling the plunger and lifting up on the handle. Mount the counter-boring tool assembly to the crankcase. Tighten the cap screw with washers finger-tight; then apply 45 N·m (33 lb·ft.) of torque. See Figure
"Raise Cutter Head"
.

1. Handle
3. Lower Turn Knuckle
2. Upper Turn Knuckle
4. Cylinder Head
Figure 13. Raise Cutter Head
- Lower the cutting head by loosening locking screws on turn knuckles. Pull plunger up to desired height. Tighten turn knuckle in opposite direction and lock in place with locking screws.
- Set the depth of the cut using one of two (2) methods.
Section 1.18.4.1
Method One, Using Graduated Marks on Tool
Follow these steps if using the graduated marks on the tool:
- Loosen locking screw.
- Rotate the adjusting nut in a counterclockwise direction until the nut contacts the driver unit housing.
- Back off the adjusting nut by the amount of cut desired.
- Tighten the adjusting nut lock screw.
Section 1.18.4.2
Method Two, Using Feeler Gage
Follow these steps if using the feeler gage.
- Loosen locking screw. See Figure
"Cylinder Liner Protrusion Check "
.

1. Handle
4. Lower Turn Knuckle
2. Upper Turn Knuckle
5. Cylinder Block
3. Feeler Gage
Figure 14. Cylinder Liner Protrusion Check
Note: Never attempt to remove more than 0.052 mm (0.002 in.) material at a time.
- Insert an appropriate size feeler gage 0.05 mm (0.002 in.) maximum between upper and lower turn knuckle. Rotate upper turn knuckle until feeler gage is just held in place.
- Tighten the locking screw and remove the feeler gage.
NOTICE:
To avoid damage to the tool bit, never rotate counterclockwise when the tool bit is in contact with the counterbore ledge.
- Measure counterbore depth once counterbore has been resurfaced and cleaned. Refer to cylinder liner fitting procedure.
- Check cylinder liner protrusion as follows:
- Clean cylinder bore and crankcase counter bore area.
- Install the liner into its bore without O-rings and install the holding adaptors. Fasten the holding adaptors using grade 8 bolts and hardened washers. Tighten the bolts in two (2) stages, first 55 N·m (40 lb·ft) and then 110 N·m (80 lb·ft). See Figure "Cylinder Liner Protrusion Check" .
- Using a surface gage, place the dial indicator tip on the cylinder liner flange. "Zero" the indicator and move the block until the indicator tip slides off the flange to the crankcase deck. Record the reading. See Figure "Sleeve Protrusion Measurement" .

1. Wrench
3. Crankcase
2. Sleeve
4. Holding Adaptors
Figure 15. Cylinder Liner Protrusion Check
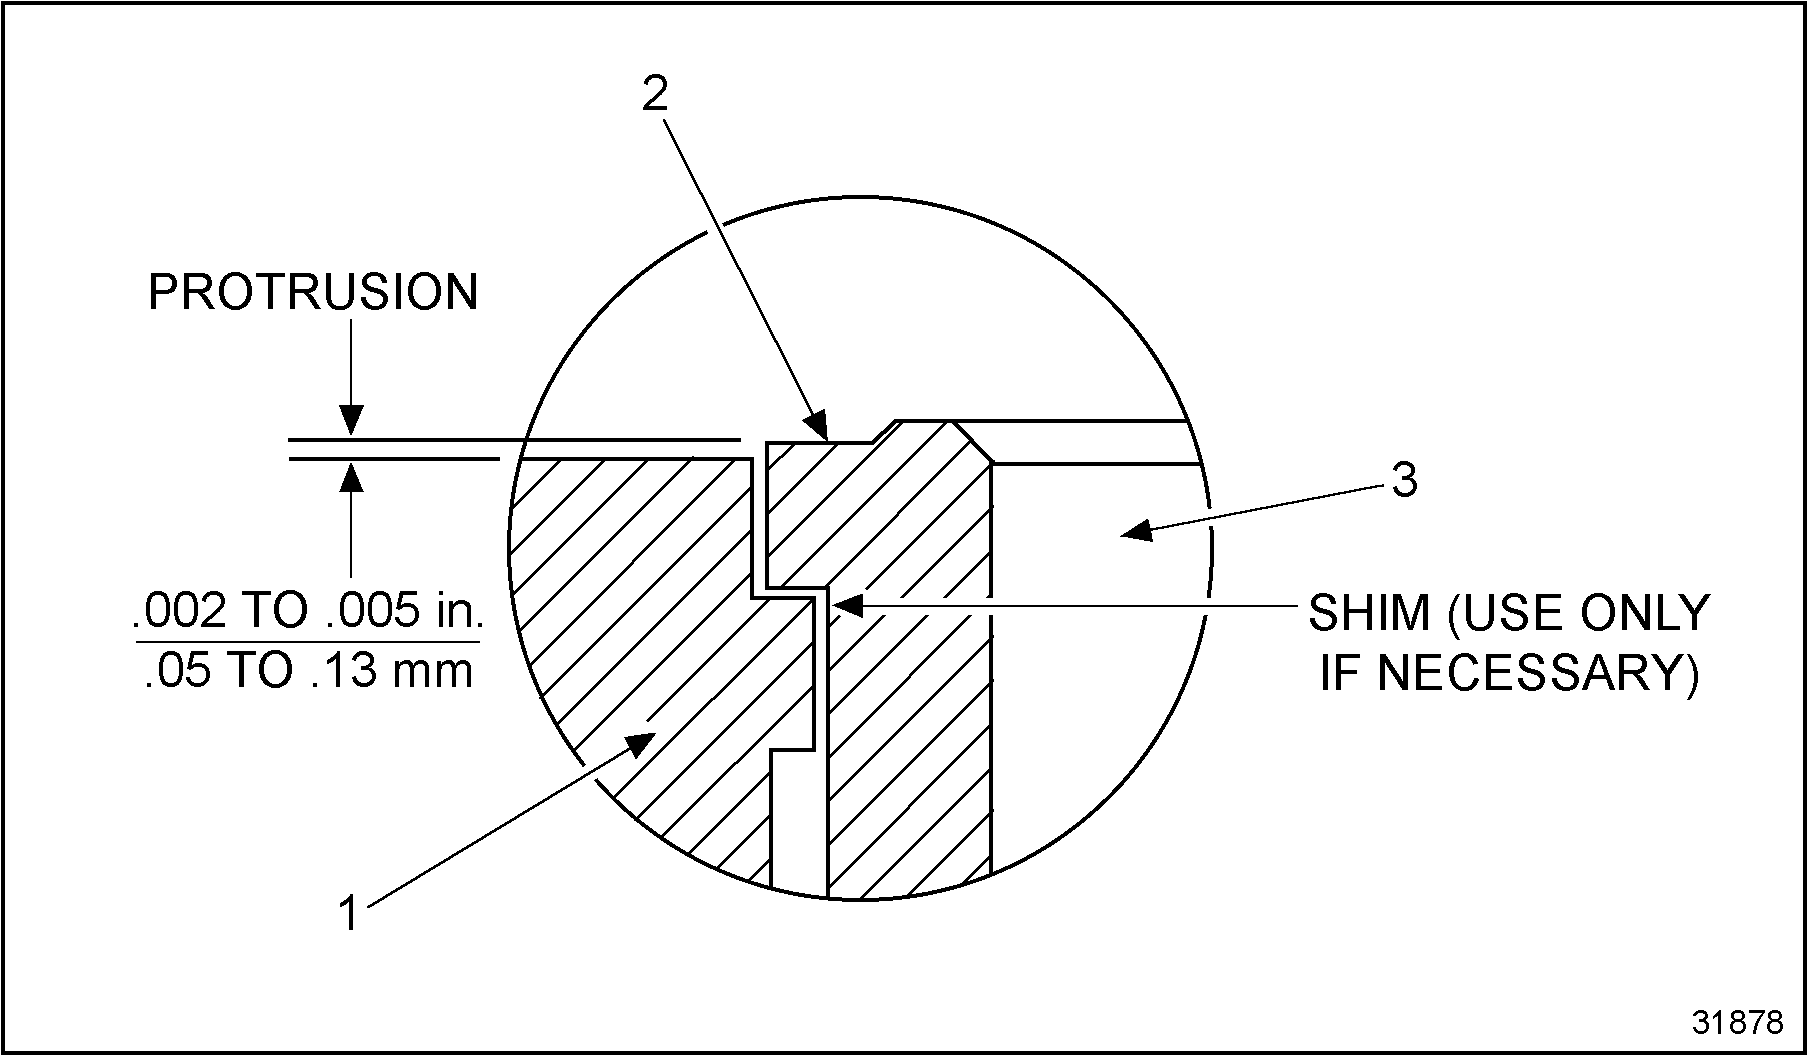
Figure 16. Sleeve Protrusion Measurement
- Adjust the liner protrusion as follows:
- Remove the holding adaptors and cylinder liner.
- Clean the top deck of the crankcase and the cylinder liner counterbore.
- Install the shim(s) as required to bring the protrusion above the crankcase deck within specifications. Shim sizes listed in Table "Available Shim Sizes in Package" , are available as a package.
- Follow cylinder liner installation instructions.
Shim Size
Shim Size in.
Shim Size
Shim Size in.
0.05 mm
0.002 in.
0.51 mm
0.020 in.
0.01 mm
0.004 in.
0.81 mm
0.032 in.
0.25 mm
0.010 in.
Table 12. Available Shim Sizes in Package
Section 1.18.5
Assembly of Connecting Rods, Pistons and Rings
Follow these steps to assemble the connecting rods, pistons and rings.
- For two-piece pistons only: Assemble the piston skirt onto the piston crown. Refer to Specifications
in Section 1.A.
Note: If the piston skirt and crown are not assembled as shown, piston slapping will occur. Two-piece articulated pistons are used on the 8.7L engine rated at 275 hp @ 950 peak torque, and all 8.7L engines rated at 300 hp and above. See Figure "Two-Piece Piston Assembly" .
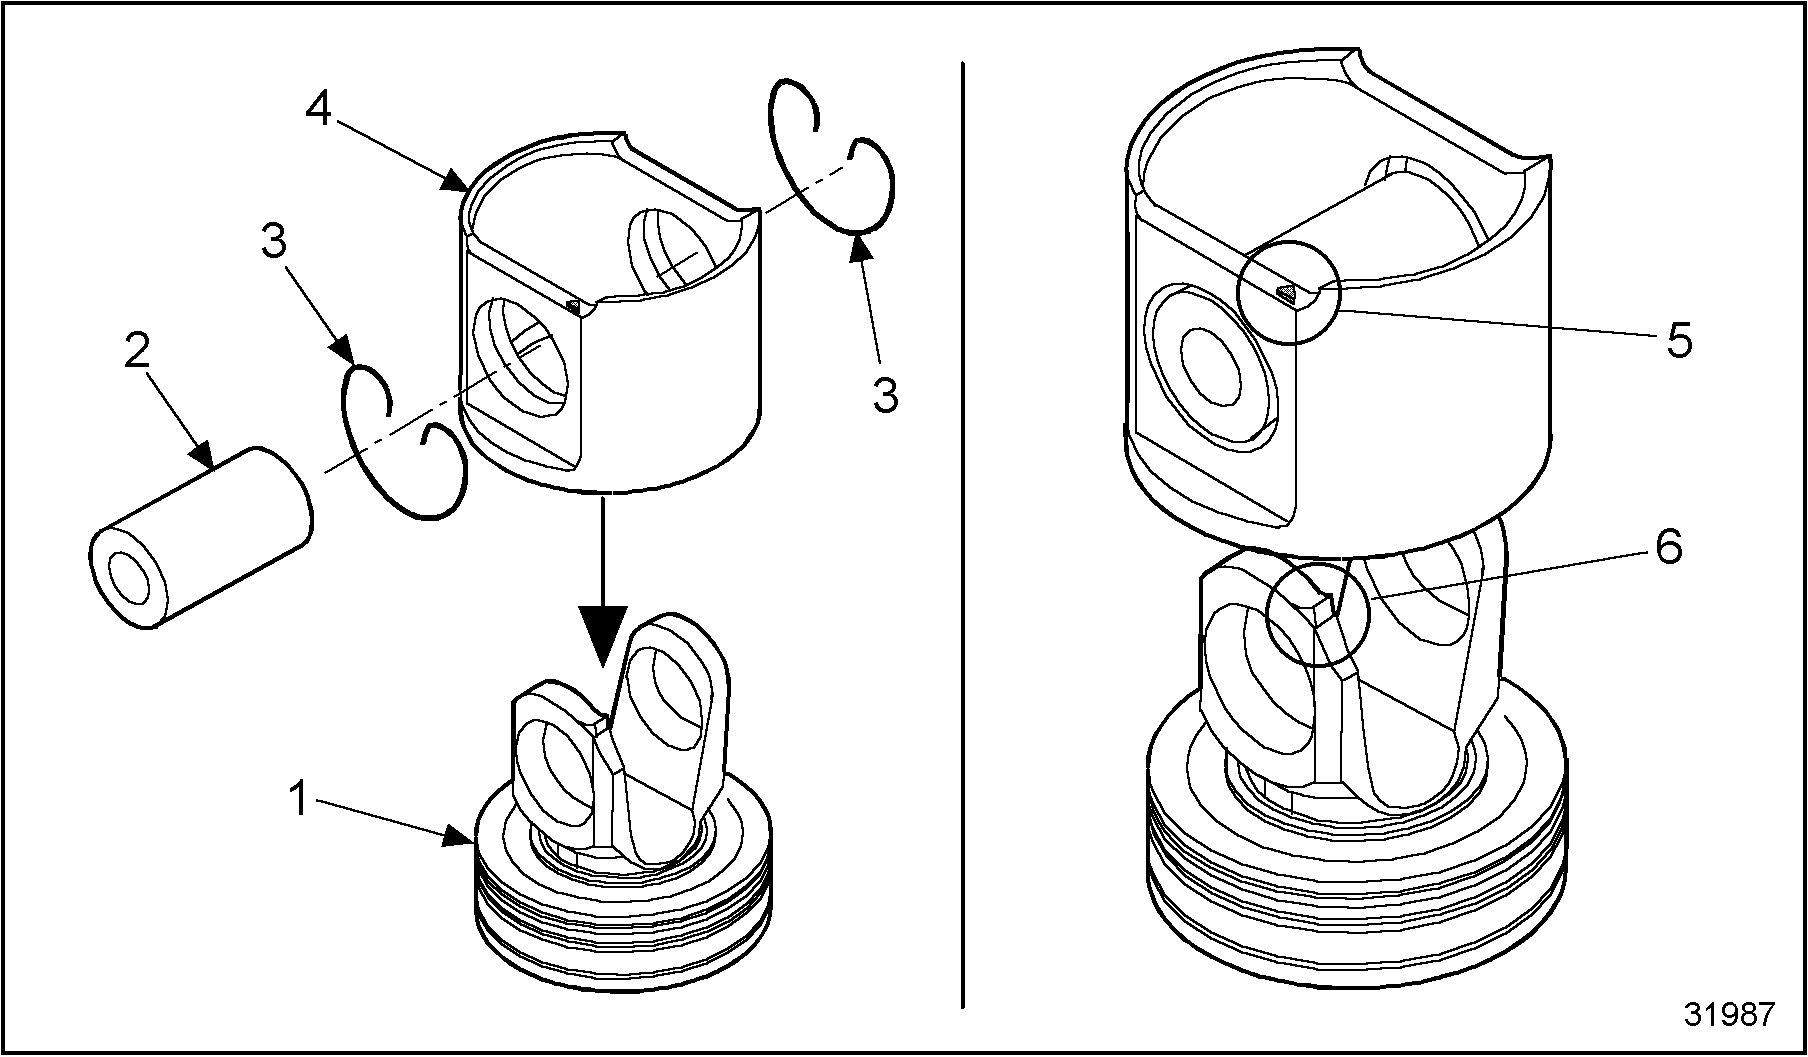
1. Piston Crown
4. Piston Skirt
2. Piston Pin
5. Raised Triangle (darkened for clarification)
3. Snap Ring
6. Piston Pin Boss (side with Nib)
Figure 17. Two-Piece Piston Assembly
- Install the rings onto the pistons using a piston ring expander tool in the following order: top compressing ring first, then the second compression ring followed by the oil control ring.
- Intermediate Keystone Rings: Identification marks must face up. (Top ring has UP-TOP. Second ring has UP-2nd.) Stagger the ring gaps 120 degrees apart.
- Intermediate Rectangular Negative Twist Ring: Identification marks must face up. The second ring has a permanently marked "O" on the top side and an orange paint stripe on it. Stagger the rings 120 degrees apart.
Note: The oil ring does NOT have identification marks. There is no top or bottom, it may be installed in either direction.
- Assemble the piston and connecting rod as follows:
- Lubricate the connecting rod piston pin bushing with clean engine oil.
- Install the retaining ring at one end of the piston pin bore.
- Insert the connecting rod into the piston aligning bored holes of the rod and piston (the short side of the split on the crank end of the rod is to be toward the side of the piston marked CAM SIDE.
- Align the pin bores and insert the piston pin.
- Install the second retaining ring. See Figure
"Ring Installation"
.

1. Piston Ring Expander Tool
4. Oil Control Ring
2. Top Ring
5. Piston
3. Intermediate Ring
Figure 18. Ring Installation
Note: The connecting rod and cap matching numbers must be opposite the cam side of the pistons.
Ensure the new two-piece piston is properly orientated when assembled. For assembly alignment identification, the piston crown has a nib (obstruction block) on one of the piston pin bosses and the piston skirt has a raised triangle as part of the skirt casting. When assembling the piston, the raised formed triangle on the skirt and the piston pin boss side with the nib on the piston crown, must be lined up.
Section 1.18.6
Installation of Cylinder Liner
Follow these steps to install the cylinder liners.
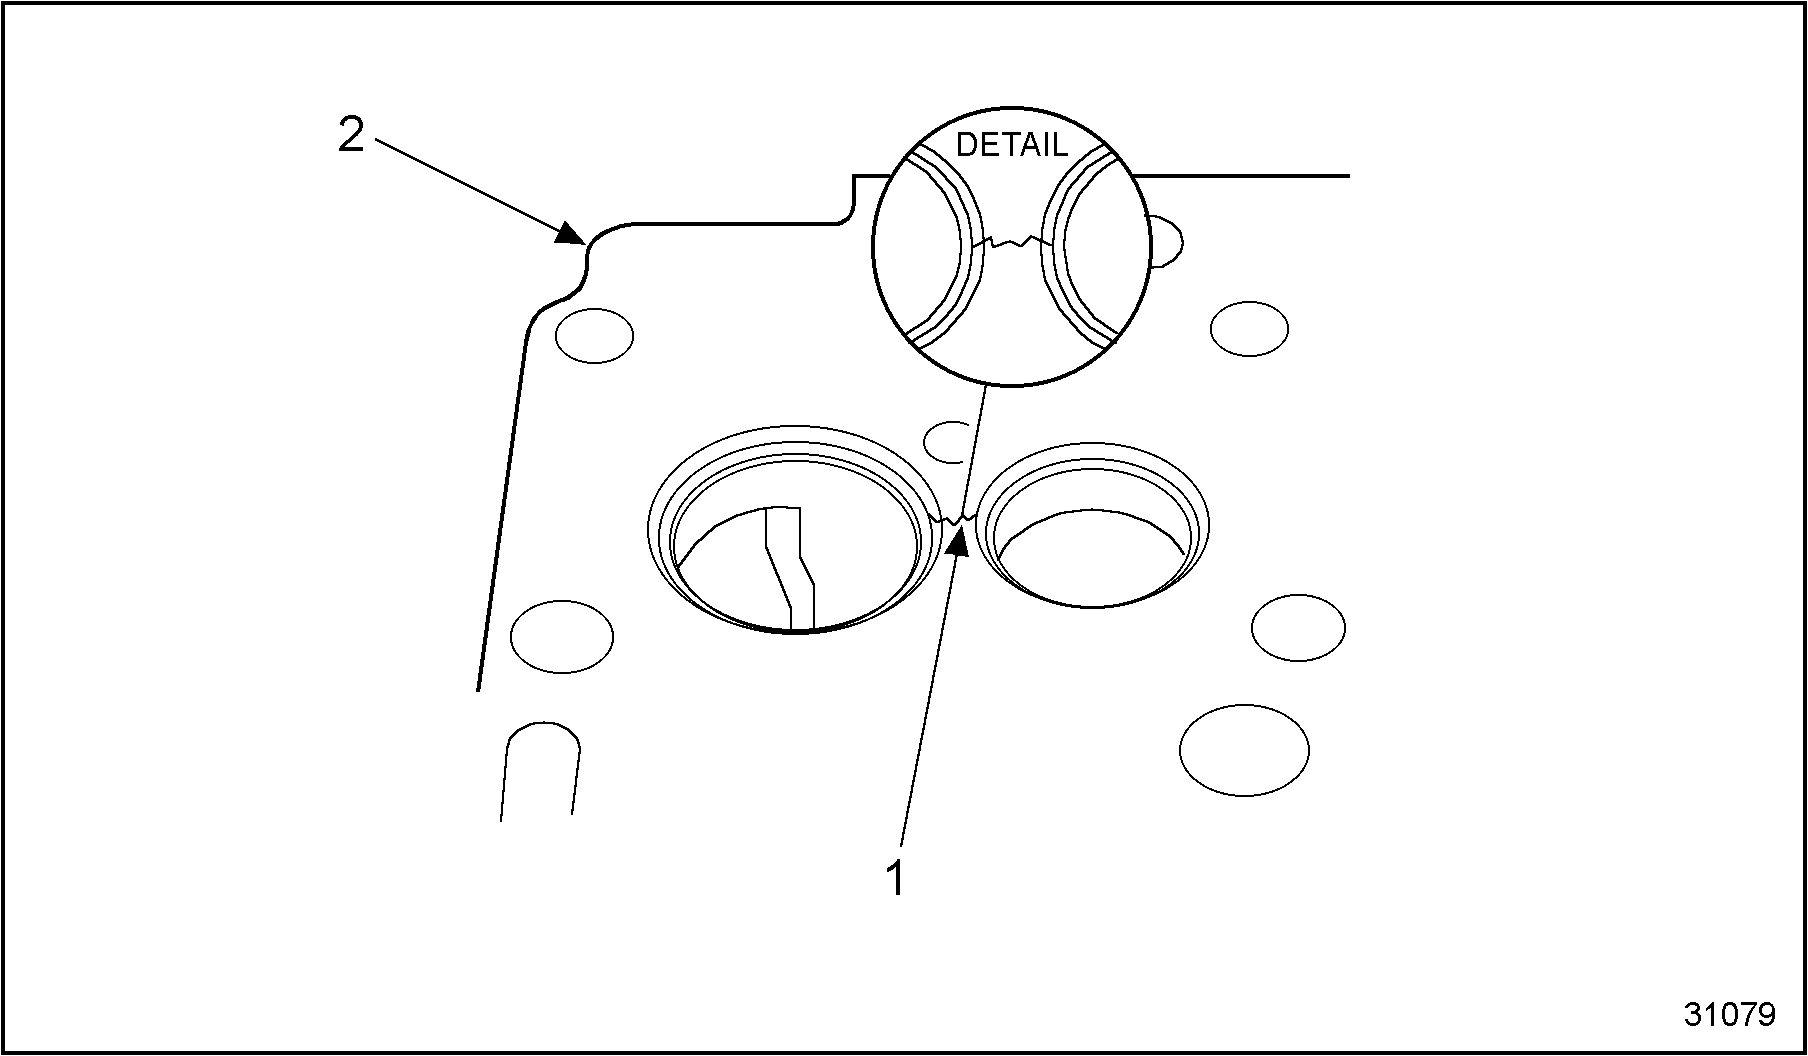
- Lubricate the O-rings with clean engine oil and install into cylinder liner groove (without twist). See Figure
"Lubricate Cylinder Sleeve and Rings"
.

1. Crankcase
3. Oil Can
2. Liner
Figure 19. Lubricate Cylinder Sleeve and Rings
- If required, assure the proper shim(s) is installed in the crankcase counterbore so cylinder liner protrusion is within specifications.
- Ensure the O-rings are properly aligned in the groove.
- Apply clean engine oil to the lower crankcase counterbore, then carefully install cylinder liner. If reusing liner, rotate 90 degrees from its original position and install in the same bore from which it was removed. See Figure
"Install Cylinder Sleeve"
.
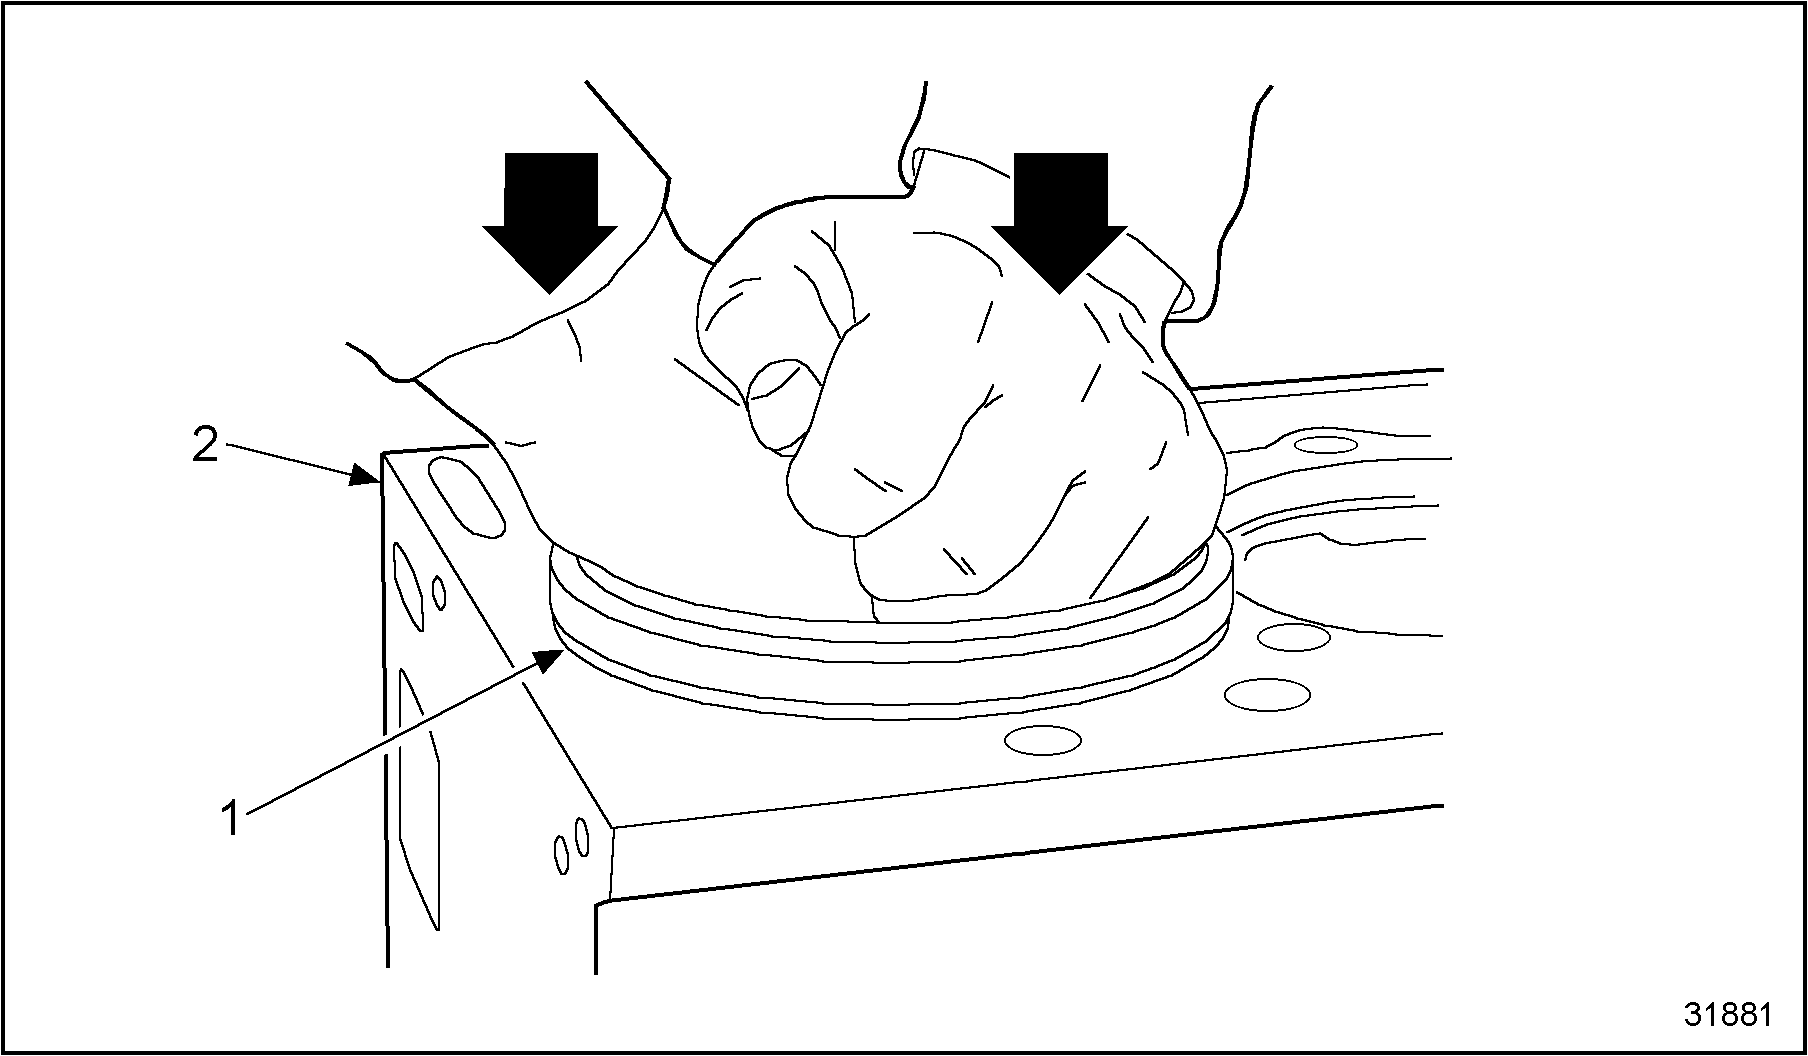
1. Cylinder Liner
2. Crankcase
Figure 20. Install Cylinder Sleeve
- After installation, check cylinder liner (liner) protrusion.
- Check cylinder liner bore dimensions and liner taper. If the liner is not measuring up to specifications, check for improperly aligned O-rings.
Section 1.18.7
Assembly of Piston and Connecting Rod
Follow these steps to assemble the piston and connecting rod again.
- Lubricate the piston rings with clean engine oil and stagger the ring gaps 120 degrees apart.
- Install the piston ring compressor over the piston rings. See Figure
"Piston Ring Compressor"
.

1. Crankcase
2. Ring Compressor
Figure 21. Piston Ring Compressor
- Lubricate the cylinder liner with clean engine oil.
Note: The piston and rod assemblies can be installed by turning the crankshaft three (3) times. Position the No. 1 and 6 crank pins at BTDC. Install the No.1 and 6 piston assemblies. Repeat this procedure for the No. 2 and 5 and No. 3 and 4 piston and rod assemblies.
- Insert piston and connecting rod assembly into liner. The numbers on connecting rod must face away from camshaft while markings on top of piston face toward the camshaft side of the engine.
- Push piston and connecting rod into the cylinder liner with a wooden or plastic handle.
- Guide the connecting rod into place on the crankshaft. See Figure
"Guide Rod Onto Crankshaft"
.

Figure 22. Guide Rod Onto Crankshaft
Section 1.18.8
Assembly of Connecting Rod Bearing Inserts and Caps
Follow these steps to assemble the connecting rod bearing inserts and caps.
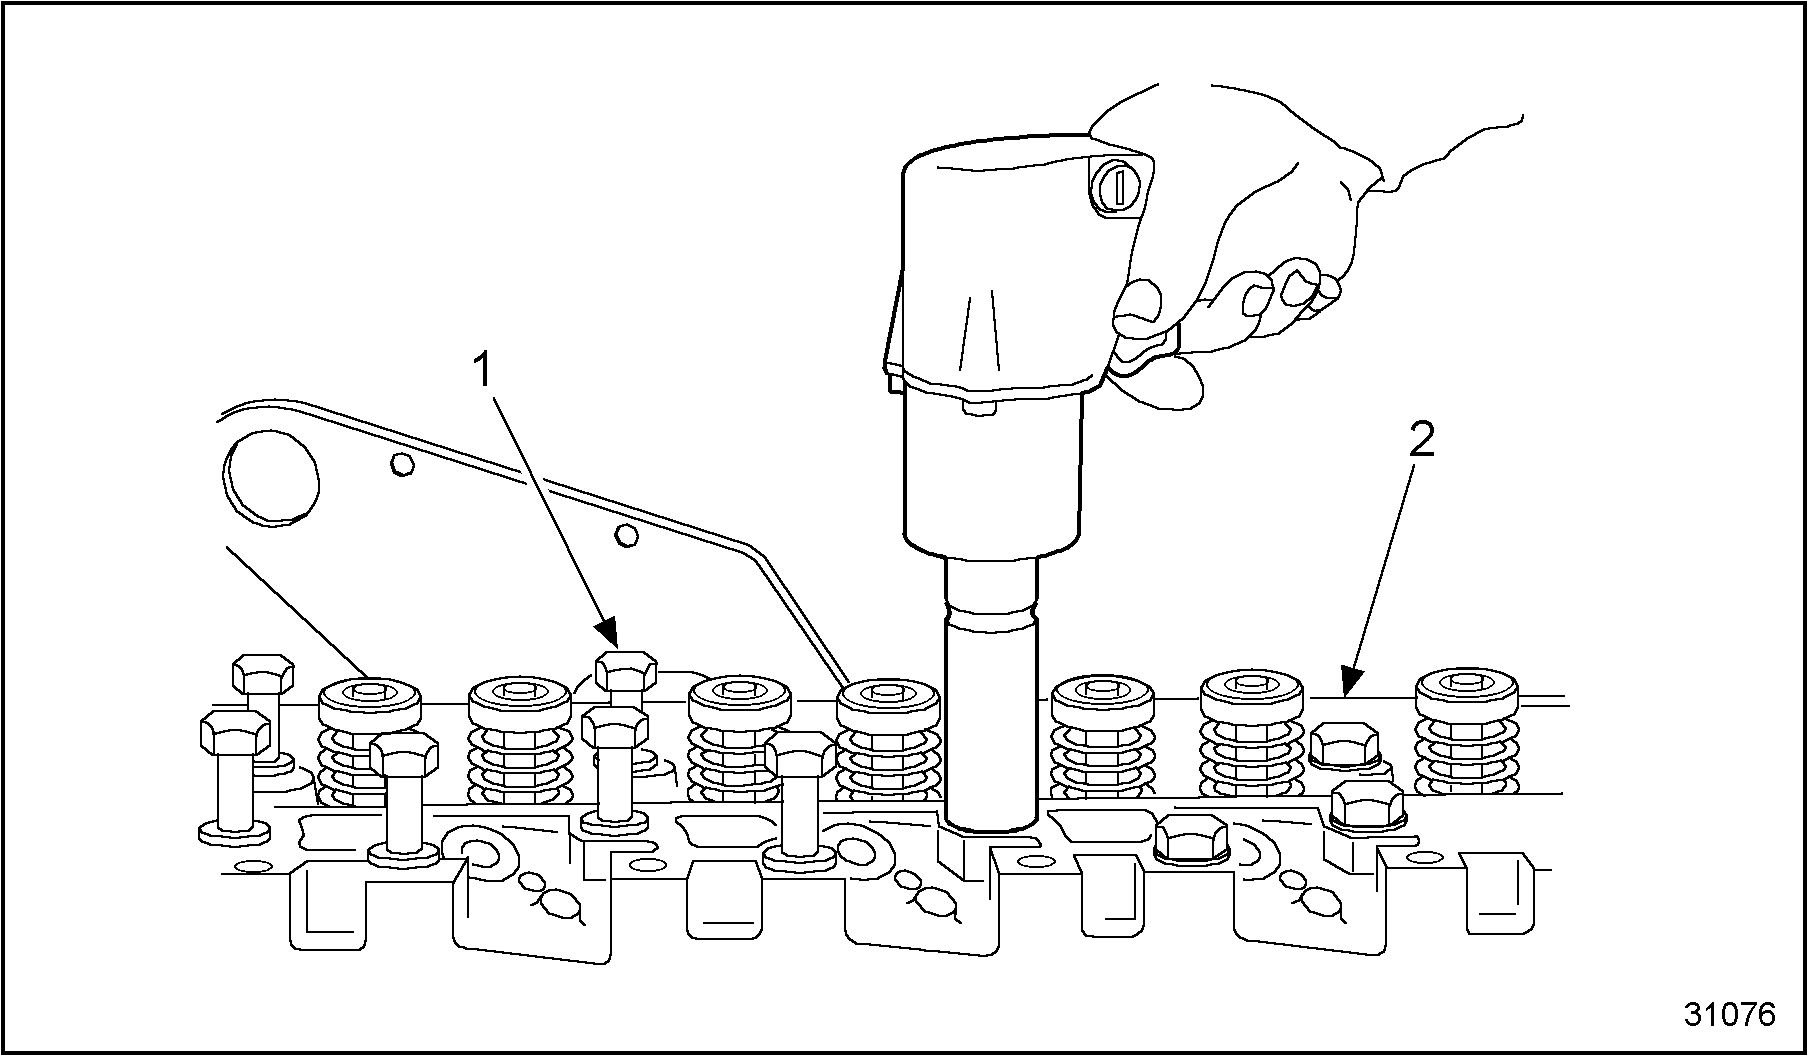
- With the bearing inserts lubricated, install the connecting rod cap so the numbers on the cap and rod match.
- Install mounting bolts, by hand, into connecting rods until finger-tight. Torque mounting bolts. Refer to Specifications
in Section 1.A. See Figure
"Torque Mounting Bolts"
.

1. Crankcase
3. Torque Wrench
2. Connecting Rod Mounting Bolt (12)
Figure 23. Torque Mounting Bolts
- Check connecting rod side clearance.
Section 1.18.9
Priming the Lubricating System
When the engine has been assembled, it is recommended the engine be lubricated with oil before starting. This is done to prevent any damage to internal parts. The preferred method to use when priming the lubricating system follows.
Section 1.18.9.1
Preferred Method
Install the new lube oil filters.
- Pressure prime the lubrication system with oil, prior to starting, as follows:
- Inject sufficient oil into the engine to fill the oil filters and charge the entire system.
- After priming, check the oil level before the engine is put back into service. Oil capacity with a filter change is 28 quarts; without a filter change capacity is 22 quarts.
Note: Engines equipped with a bypass filtering system require additional oil.
Section 1.18.9.2
Alternate Method
Use the following instructions prior to starting the engine. This is done to prevent any damage to internal parts.
- Spin but DO NOT start the engine using the cranking motor until oil pressure is read on the oil pressure gage.
- When oil pressure is read, the engine may be started.
Section 1.18.10
Engine Run-in Procedure
After installing new pistons and/or new rings, the engine must be run-in as follows:
- Operate engine at low idle (no load) for 5 minutes. Check for leaks in the water, lube oil, fuel and air induction systems.
- Operate engine at 3/4 rated speed (r/min) and 1/2 to 3/4 throttle for 10 minutes.
- Operate engine at rated speed and full throttle for 30 minutes. Recheck for lube oil, fuel, water and air leaks
Section 1.18.11
Removal of Fuel Injector
Remove the fuel injector as follows:
- Remove bolts securing the wiring harness channels and oil deflectors to the fuel injector hold-down clamps.
- Remove all fuel injector hold-down clamp mounting bolts (bolts at the front of the fuel injector).
Note: The shoulder bolt at the rear of the fuel injector does not require removal.
- Disengage the fuel injector hold-down clamp from the shoulder bolt by sliding the clamp toward the rear of the engine, then, up and over the head of the shoulder bolt.
NOTICE:
Ensure the clamp is free of the shoulder bolt when prying up on the clamp to prevent damage to the bolt.
- Remove fuel injector from the cylinder head bore. Insert a pry bar under the hold-down clamp and pry up.
- Lift the fuel injector straight up and out of the injector bore of the cylinder head. O-rings should be replaced whenever the fuel injector is removed. If required, remove the six shoulder bolts.
Section 1.18.12
Pushrod Removal
Remove pushrods as follows:
- Number the pushrods for matching to the same location at installation.
- Remove all pushrods from the cylinder head. See Figure
"Pushrod Removal"
.

1. Pushrod
2. Cylinder Head
Figure 24. Pushrod Removal
Section 1.18.13
Removal of Cylinder Head
Remove the cylinder head as follows:
- Remove remaining 20 cylinder head bolts. See Figure
"Cylinder Head Removal"
.
1. Cylinder Head Bolts
2. Cylinder Head
Figure 25. Cylinder Head Removal
- With a small pry bar, carefully pry the cylinder head loose from the gasket to enable easy lift off.
Note: Only light force should be required on the pry bar to break the cylinder head loose from the gasket.
- Lift the cylinder head from the crankcase using appropriate lifting equipment.
Note: Place the cylinder head on wood blocks to protect the valves and bottom deck surface.
- Remove the cylinder head gasket from the crankcase.
Section 1.18.13.1
Cleaning of Cylinder Head
Clean the cylinder head as follows:
Note: Before proceeding, remove the lifting eyes and their hardware from the cylinder head.
- With the valves installed to protect the seats, remove deposits and gasket material from the gasket surface of the cylinder head using a rotary wire brush or sanding block with mineral spirits.

To avoid injury from flying debris when using compressed air, wear adequate eye protection (face shield or safety goggles) and do not exceed 40 psi (276 kPa) air pressure.
- Clean all bolt holes with appropriate size tap. Clear debris from bolt holes, oil return and water passages, using filtered compressed air.
- Clean the cylinder head bolt threads.
- Wash all bolts and washers with a suitable solvent and dry thoroughly.
Note: Dirt in threads or damaged threads may cause binding and result in a false torque reading.
Section 1.18.13.2
Inspection of Cylinder Head
Inspect the cylinder head as follows:
- Warpage--Use a straightedge and feeler gage and check the cylinder head gasket surface for warpage, utilizing the checking pattern shown. See Figure
"Warpage Check Pattern"
.

Figure 26. Warpage Check Pattern
- Check thickness. Measure the cylinder head deck thickness using a micrometer. The measurement should be taken at six locations (four corners and two center points). If the minimum deck-to-deck dimension is not maintained after resurfacing, replace the cylinder head. See Figure
"Check Thickness"
.

Figure 27. Check Thickness
- Check for valve leakage using mineral spirits.
- Position the cylinder head on wood blocks with the gasket surface facing down.
- Squirt mineral spirits into the intake and exhaust ports.
- Wait five minutes. Then use an inspection mirror and visually inspect the valve seat area for leakage of the mineral spirits. Repeat and check all intake and exhaust valves.
- Visually inspect for cracks. in the cylinder head, using the four-step dye penetrant method that follows:
- Spray the cleaner onto the lower deck (gasket surface) of the head and wipe dry.
- Spray on the dye penetrant. Allow the dye to remain on the surface from 1-10 minutes.
- Wipe the dye from the surface.
- Spray on developer, and let dry for 5-15 minutes. See Figure "Dye Penetrant Test" .
- If cracks are present, replace the cylinder head.
Note: Dye will remain in any cracks during the wipe-off procedure.
Note: Cracks will show as purple lines against the white developer.
1. Purple Line Showing Crack
2. White Developer
Figure 28. Dye Penetrant Test
Section 1.18.14
Pressure Check Cylinder Head
Pressure testing the cylinder head will reveal cracks in ports or liner leakage that cannot be observed using dye penetrant. Pressure-test the cylinder head as follows:
- If removed, install shoulder bolt into cylinder head. Torque bolt.
- Install fuel injectors into cylinder head injector bores and secure. Refer to Fuel Injector Installation in this section for instructions.
- Remove the valves, using a valve spring compressor.
- Pressure test the cylinder head.
- Fasten the pressure plate and head gasket to the cylinder head gasket surface using the 24 mounting bolts and nuts supplied with the kit.
- Remove thermostat and install air regulator. Secure to cylinder head with two mounting bolts.
- Remove the pipe plug next to the thermostat opening. Fill cylinder head with hot water and reinstall pipe plug.
- Install a hose fitting to the cylinder head at the removed plug. Apply 124 - 138 kPa (18-20 psi) air pressure and visually inspect for leaks at the fuel injector nozzle liner area, ports, and both the upper and lower deck.
Note: If leakage is observed at any port or at the upper and lower deck, replace the cylinder head.
| Series 40E Service Manual - 6SE410 |
| Generated on 10-13-2008 |