Section 1.19
Cylinder Head Reconditioning
For cylinder head reconditioning, replace the nozzle liner first.
Section 1.19.1
Nozzle Liner Replacement
Replace the nozzle liner if leakage is present.
- Insert a nozzle liner puller adaptor threaded into the liner to be removed. Start the adaptor into the nozzle liner by striking it with a hammer. Then screw the nozzle liner puller adaptor into the liner using a wrench. See Figure
"Nozzle Liner Replacement"
.

Figure 1. Nozzle Liner Replacement
- Connect a slide hammer to the adaptor and pull the liner from its bore. See Figure
"Slide Hammer"
.

Figure 2. Slide Hammer
- Discard the liner.

To avoid injury from flying debris when using compressed air, wear adequate eye protection (face shield or safety goggles) and do not exceed 40 psi (276 kPa) air pressure.
- Clean the nozzle bore at the top and bottom, using a rotary wire brush. Blow out with filtered compressed air.
- Apply Loctite® 262 or equivalent to the nozzle liner contact points (two places). See Figure
"Nozzle Liner Contact Points"
.

Figure 3. Nozzle Liner Contact Points
- Install the nozzle liner using the fuel injector sleeve installer J 42947
. Drive the liner until it bottoms in the bore. See Figure
"Nozzle Liner Installation"
.
Note: If performing a nozzle liner installation in the chassis, ensure the coolant is drained before replacement of the nozzle liners. The piston should be bottom dead center or the installation tool may contact the piston.

Figure 4. Nozzle Liner Installation
Section 1.19.2
Valve and Valve Guide Reconditioning
For valve and valve guide reconditioning, remove the intake and exhaust valves as follows:
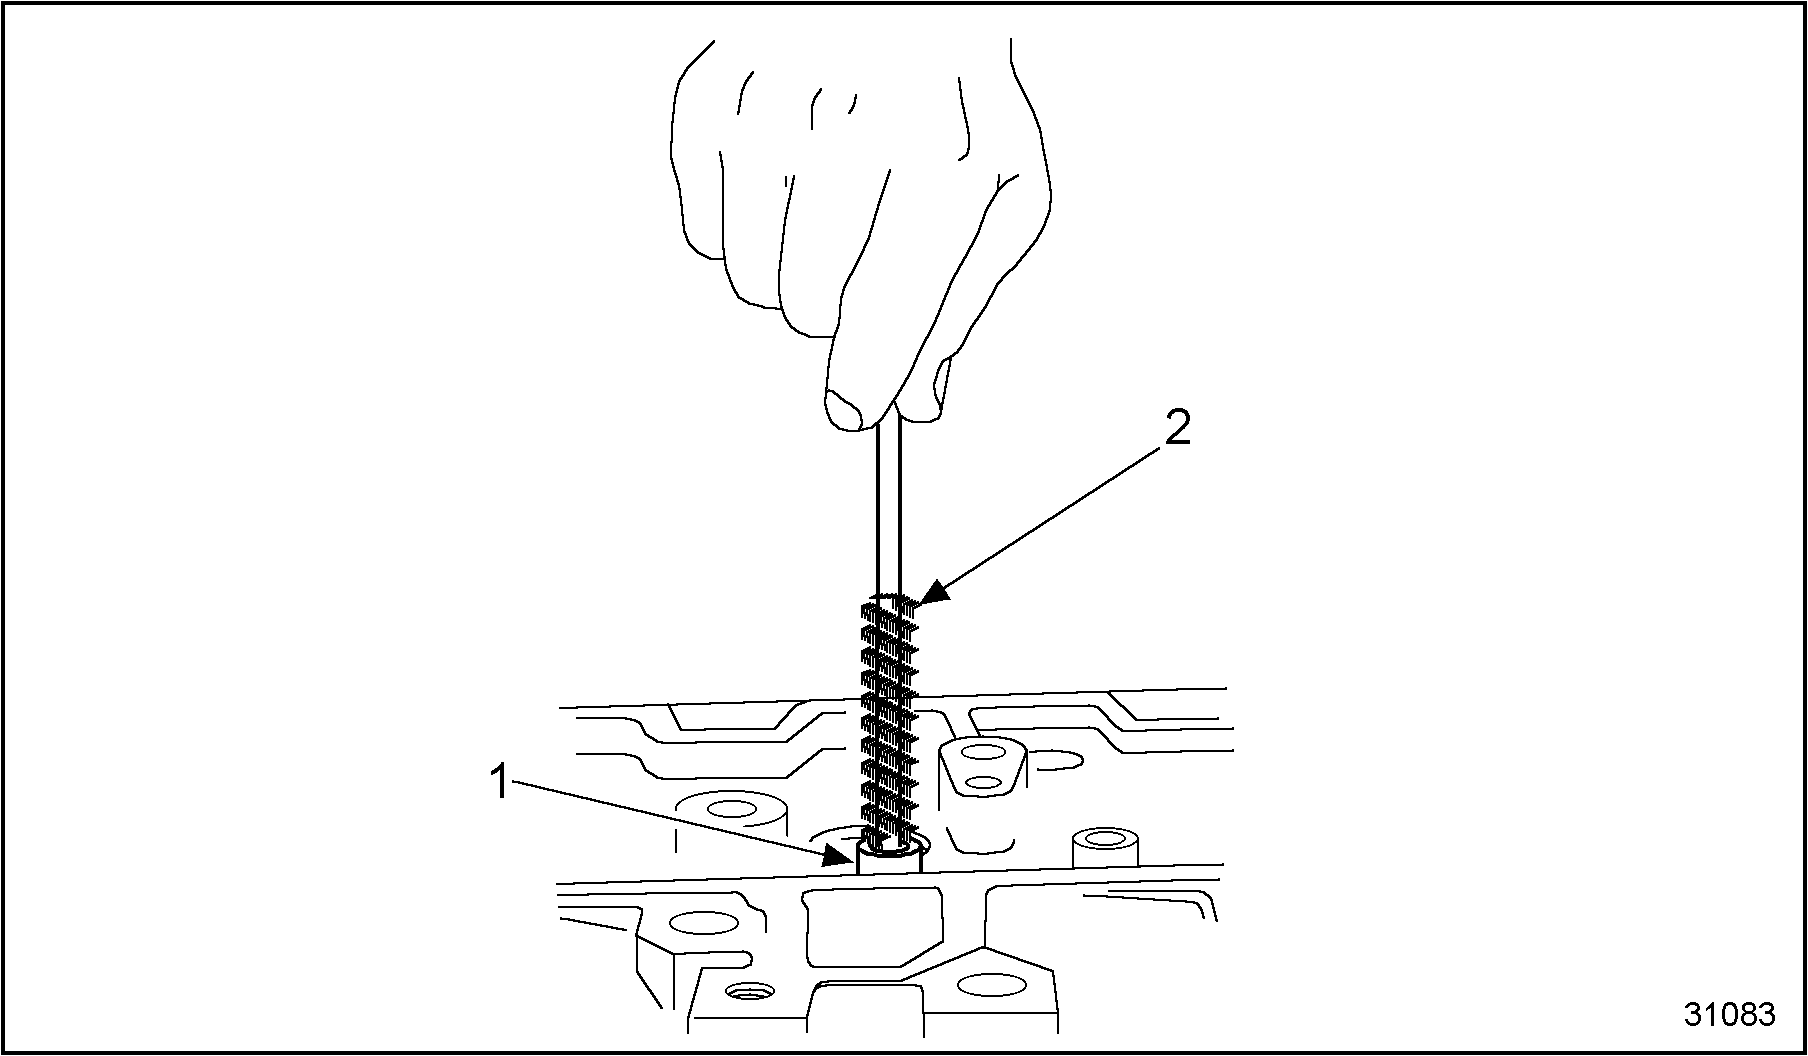
- Install the valve spring compressor tool over the valve to be removed. Compress the spring.
- Remove the valve spring locks (keepers).
- Remove the valve spring compressor tool.
- Remove the valve rotator, valve spring, valve seal and valve. If the nylon rotator seal is dislodged from the rotator and sticks to the valve stem, remove the seal from the stem with your fingers. Discard all 12 rotator seals.
Note: Separate the intake and exhaust springs at time of removal. The spring rates are different and cannot be mixed on the cylinder head during assembly.
- Remove valve stem seal assemblies and valves. Discard all 12 stem seal assemblies due to damage from removal across the valve keeper grooves. See Figure
"Valve Removal"
.
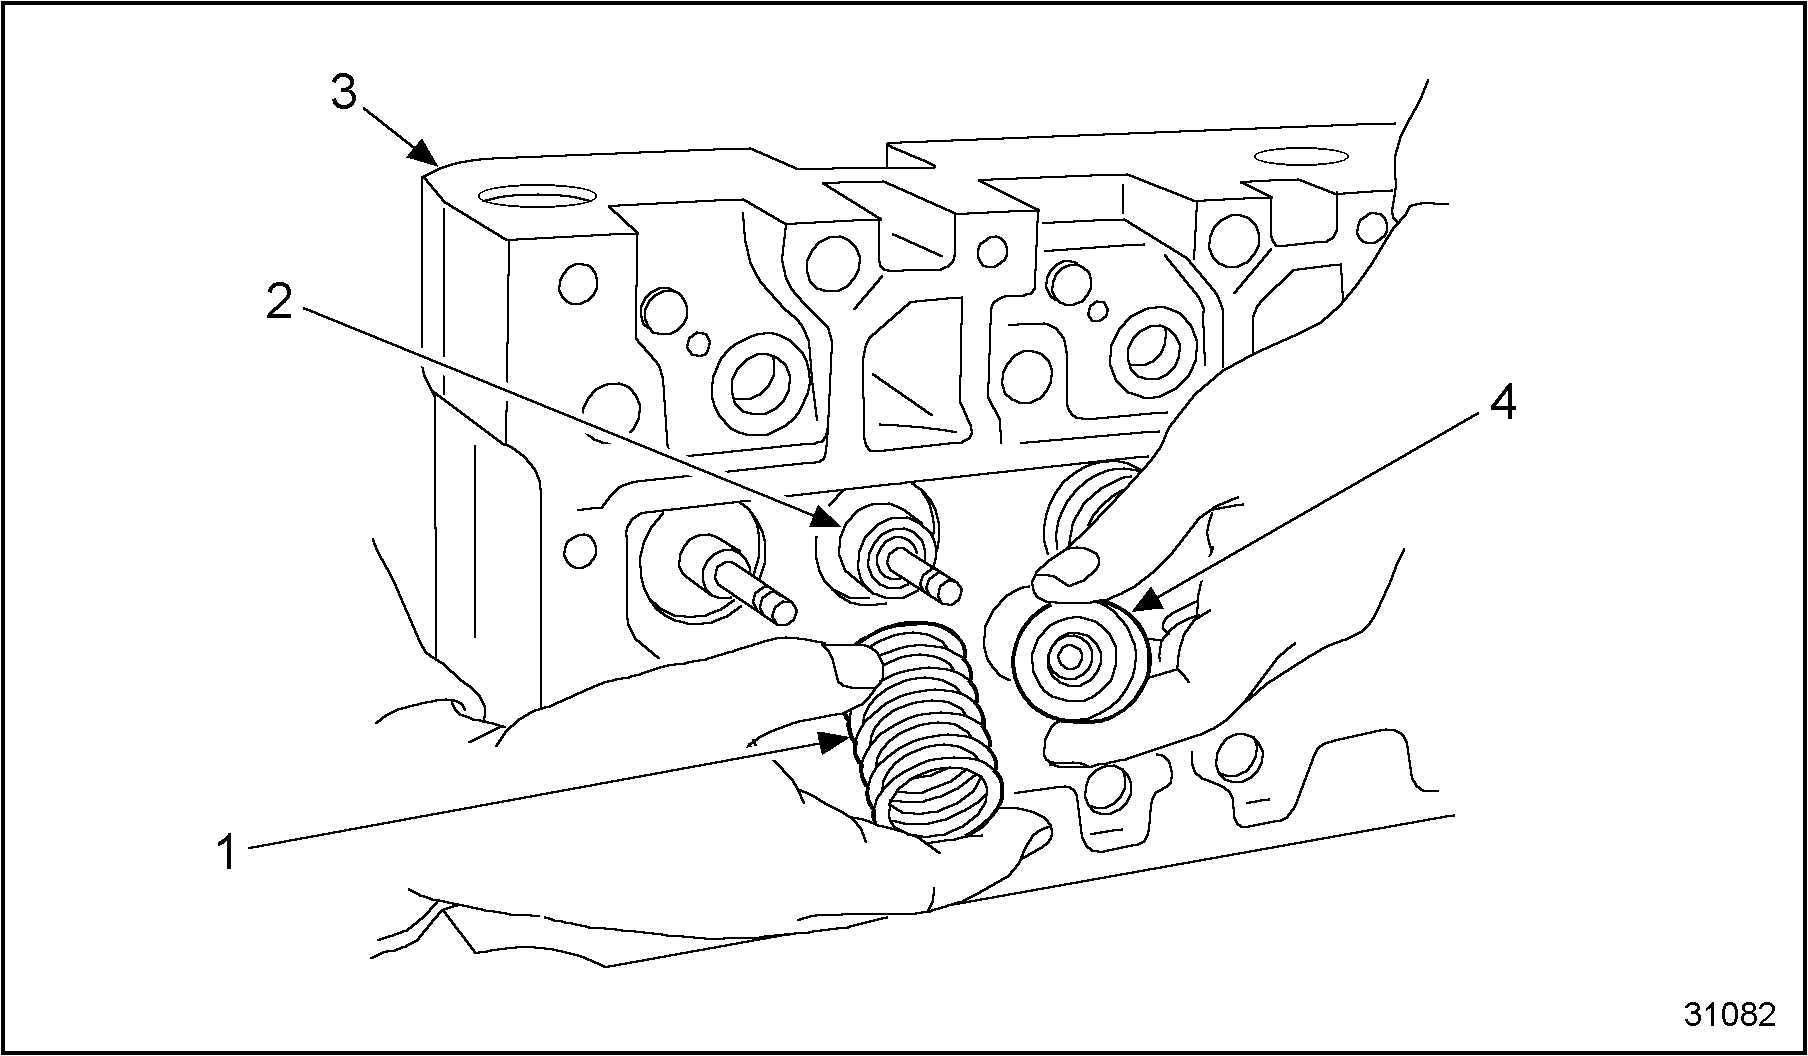
1. Spring
3. Cylinder Head
2. Valve Stem Seal
4. Valve Rotator with Nylon Seal
Figure 5. Valve Removal
Section 1.19.2.1
Clean Valve Guides
Perform the following steps to clean the valve guides.
- With valves removed, clean all valve guides using a nylon brush, soap and water. See Figure
"Valve Guide Cleaning"
.
1. Valve Guide
2. Brush
Figure 6. Valve Guide Cleaning
Section 1.19.2.2
Inspection of Valve Guides
Perform the following steps to inspect the valve guides.
- Position an inspection light at the bottom of the valve guide bores and visually examine the walls for burning or cracking. Replace any guides that do not pass the visual inspection. See Figure
"Valve Guide Cleaning"
.

1. Valve Guide
2. Ball Gage
Figure 7. Valve Guide Cleaning
- Measure each valve guide using a ball gage and outside micrometer. If the valve guide exceeds specifications, replace the guide. See Figure
"Inspection of Valve Guides"
.

1. Micrometer
2. Ball Gage
Figure 8. Inspection of Valve Guides
- Measure the valve guides within 0.025 in. (0.64 mm) of each end of the guide and 90 degrees from the crankshaft centerline. Record valve guide I.D. readings so valve-to-guide running clearance may be determined later.
Section 1.19.3
Valve Guide Replacement
Perform the following steps to replace the valve guides.
- Use the following procedure to remove any valve guides that do not pass the inspection criteria.
- Insert the valve guide remover, J 41164 , into the guide from the valve port side of the cylinder head. See Figure "Valve Guide Replacement" .
- Press/drive out the valve guide with a hammer.
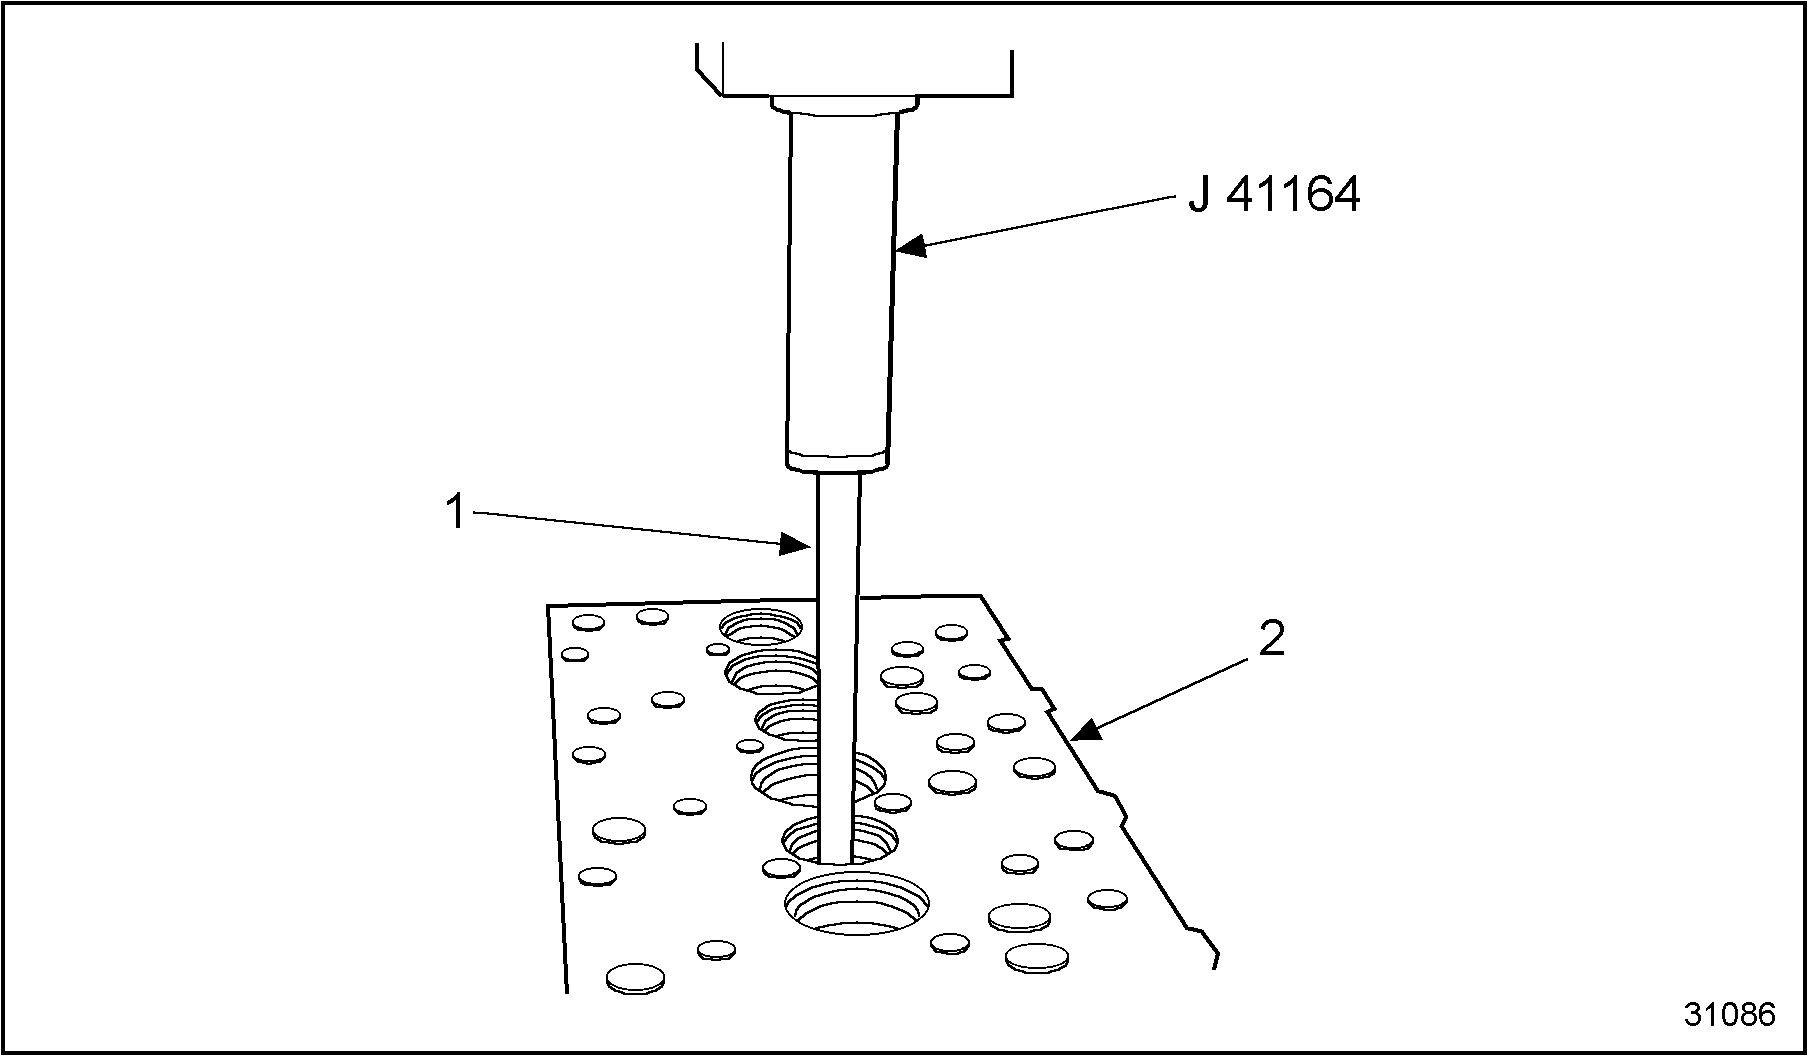
1. Valve Guide
2. Cylinder Head
Figure 9. Valve Guide Replacement
- Install new valve guide inserts as follows:
- Adjust the valve guide installer tool, J 39292 , with a caliper. See Figure "Valve Guide Replacement" .
- Install the valve guide inserts with the large 15 degree chamfer end down.
- Lubricate the valve guide insert using clean engine oil and press into the cylinder head until the installer tool bottoms against the cylinder head. Chilling guide may facilitate installation. Do not hammer or pound the valve guide insert into the cylinder head.
- Deburr the valve guide after installation.
Note: Tool insert must be reversed to enable the flat side to contact the guide. Refer to specifications for correct valve guide height (above top deck of the cylinder head) before installing valve guide. Adjust the tool to correspond to the desired valve guide height.

1. Caliper/Indicator
3. Cylinder Head
2. Locknut
Figure 10. Valve Guide Replacement
Note: Do not ream valve guide I.D. after installation. Service guides are provided in a finish reamed condition. Clean valve guides as described. See Figure "Valve Guide Replacement" .

1. Press
3. Installer Tool
2. Insert
Figure 11. Valve Guide Replacement
Section 1.19.3.1
Clean Valves
Remove all carbon from the valve stems and valve heads.
Section 1.19.3.2
Inspection of Valves
Perform the following steps to inspect the valves.
- Visually inspect each valve, replacing any that show evidence of burn marks, warpage, scuffing or bending.
- Measure each valve stem for wear using a micrometer to measure valve stem diameter. Record the measurements. Measure the valves at three locations 90 degrees apart. Refer to Specifications in Section 1.A. Replace valves that exceed the minimum stem diameter specification.
- Using the valve stem diameter and valve guide inside diameter measurements, determine valve stem-to guide running clearance. Refer to Specifications in Section 1.A. Replace the valve or valve guide as required.
Section 1.19.4
Reface Valves
If valves are in serviceable condition, reface the valve to the specified angle, as required. See Figure "Valve Angle" .

Figure 12. Valve Angle
- Reface the valves as follows:
- Dress the cutting stone, prior to refacing the valves, using the dressing stud attachment on the grinder.
- Install the valve in the grinder and set to the specified angle.
- Grind the valve face. Remove only the minimum amount of material necessary to true up the valve face. See Figure "Grind Valve Guide " .
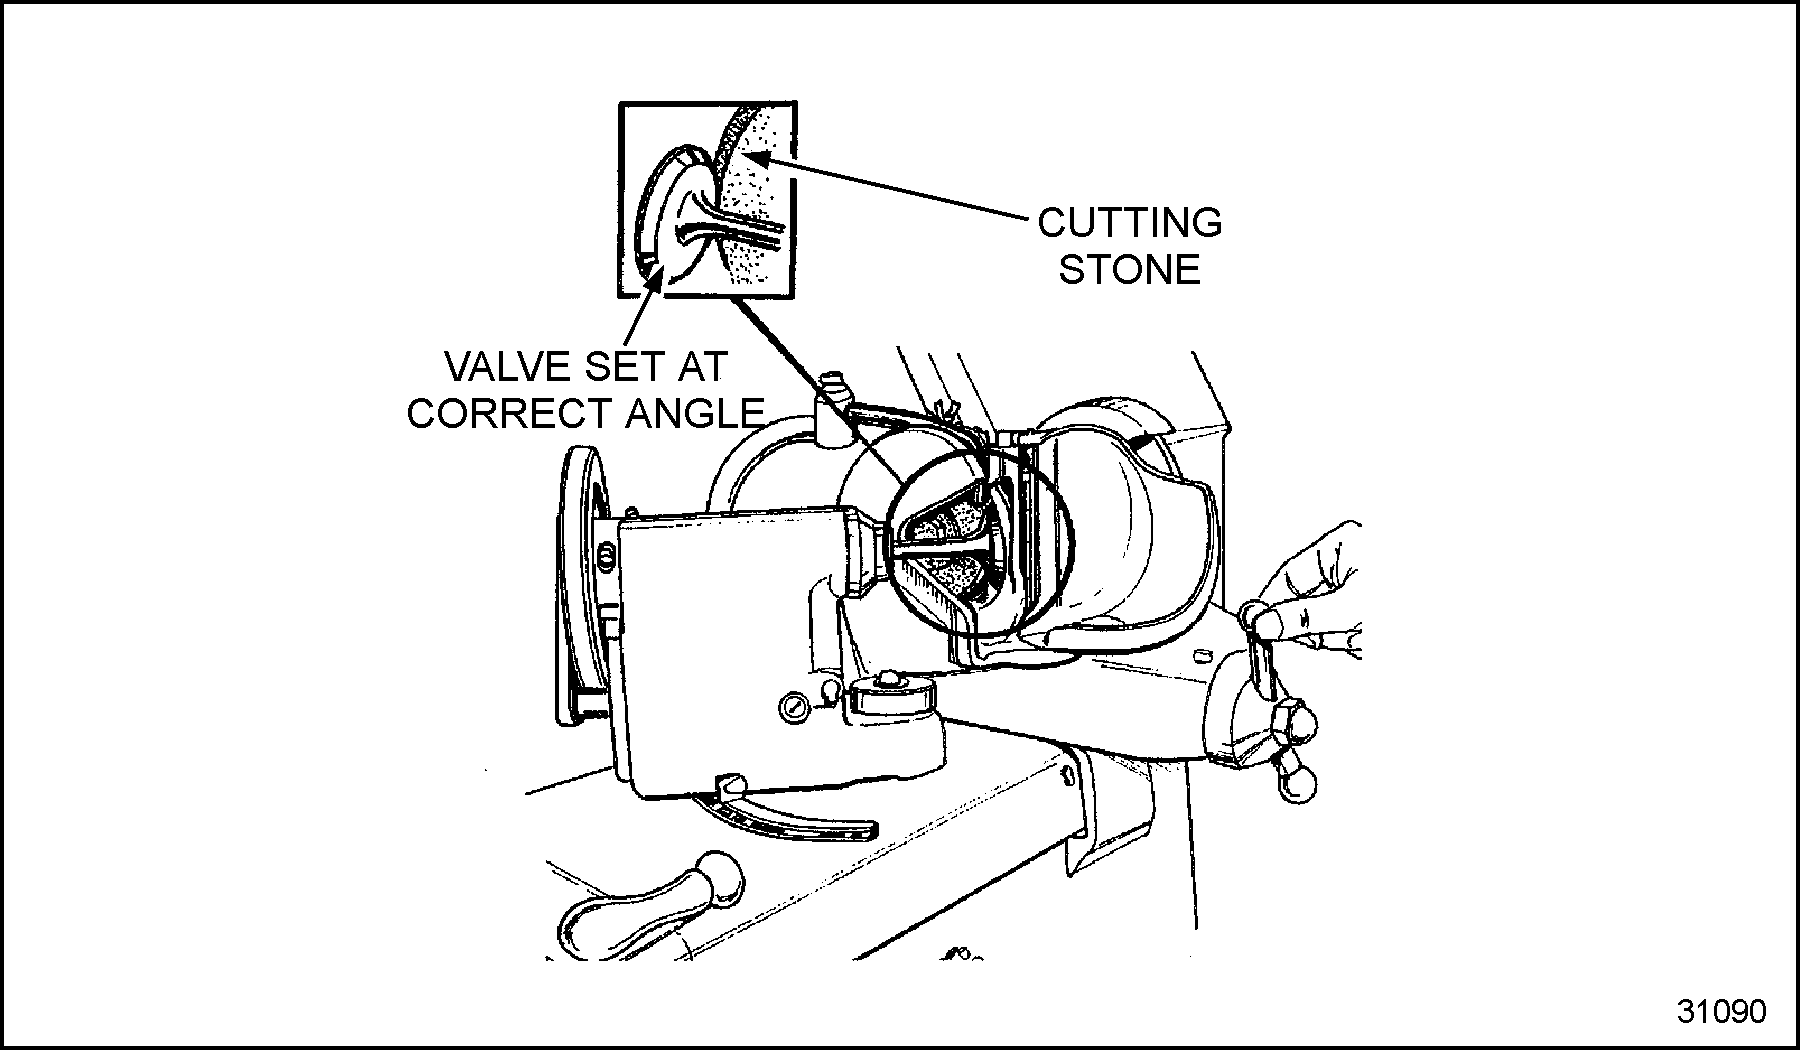
Figure 13. Grind Valve Guide
- Measure valve face margin at four locations using a caliper. See Figure
"Valve Face Margin Measurement"
.
Note: The minimum valve face margin must be maintained across the entire valve face. An insufficient margin will not provide proper heat dissipation and lead to valve warpage or breakage. Intake and exhaust valve margins are different. Replace the valve if the margin is less than the specified minimum.
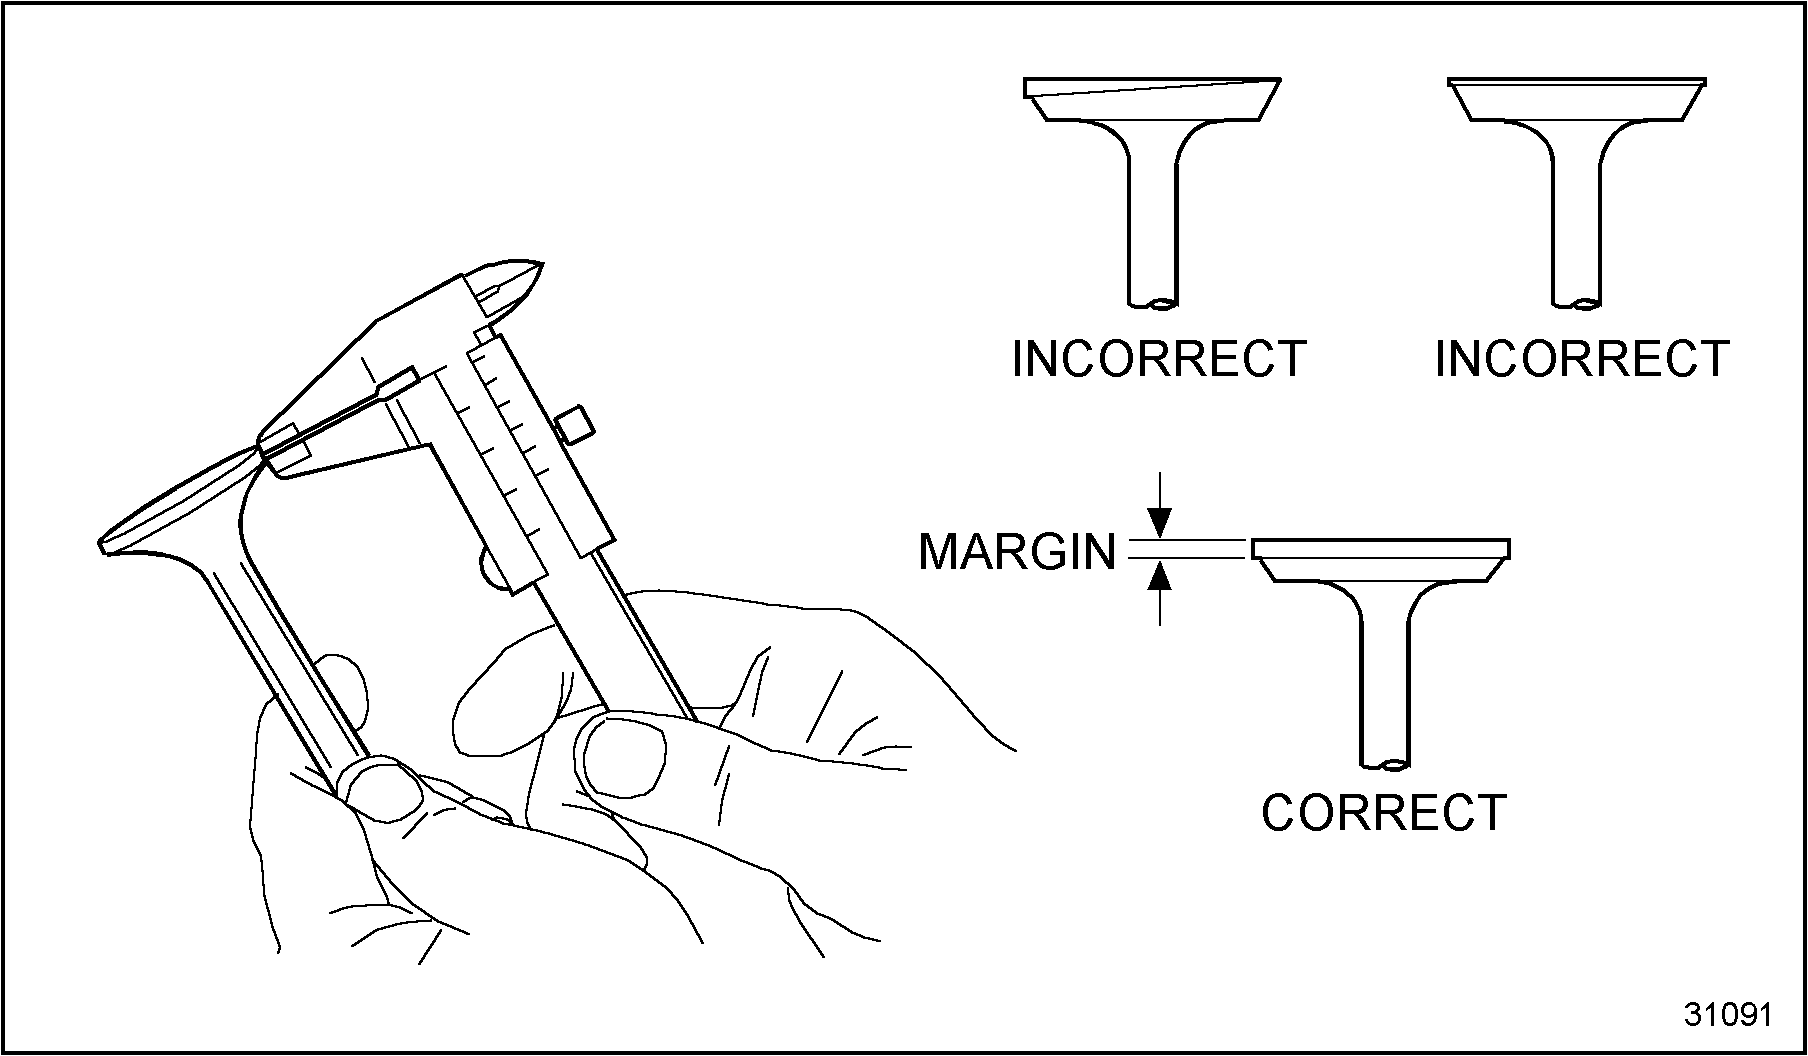
Figure 14. Valve Face Margin Measurement
- Reface the valve stem tip as follows:
- Dress the cutting stone with the dressing stud attachment on the grinder.
- Install the valve in the grinder. See Figure "Valve Stem Tip at Cutting Stone " .
- Touch the valve stem tip to the cutting stone removing only a minimum of material. Refacing the valve stem tip provides a new wear surface for the rocker arm.
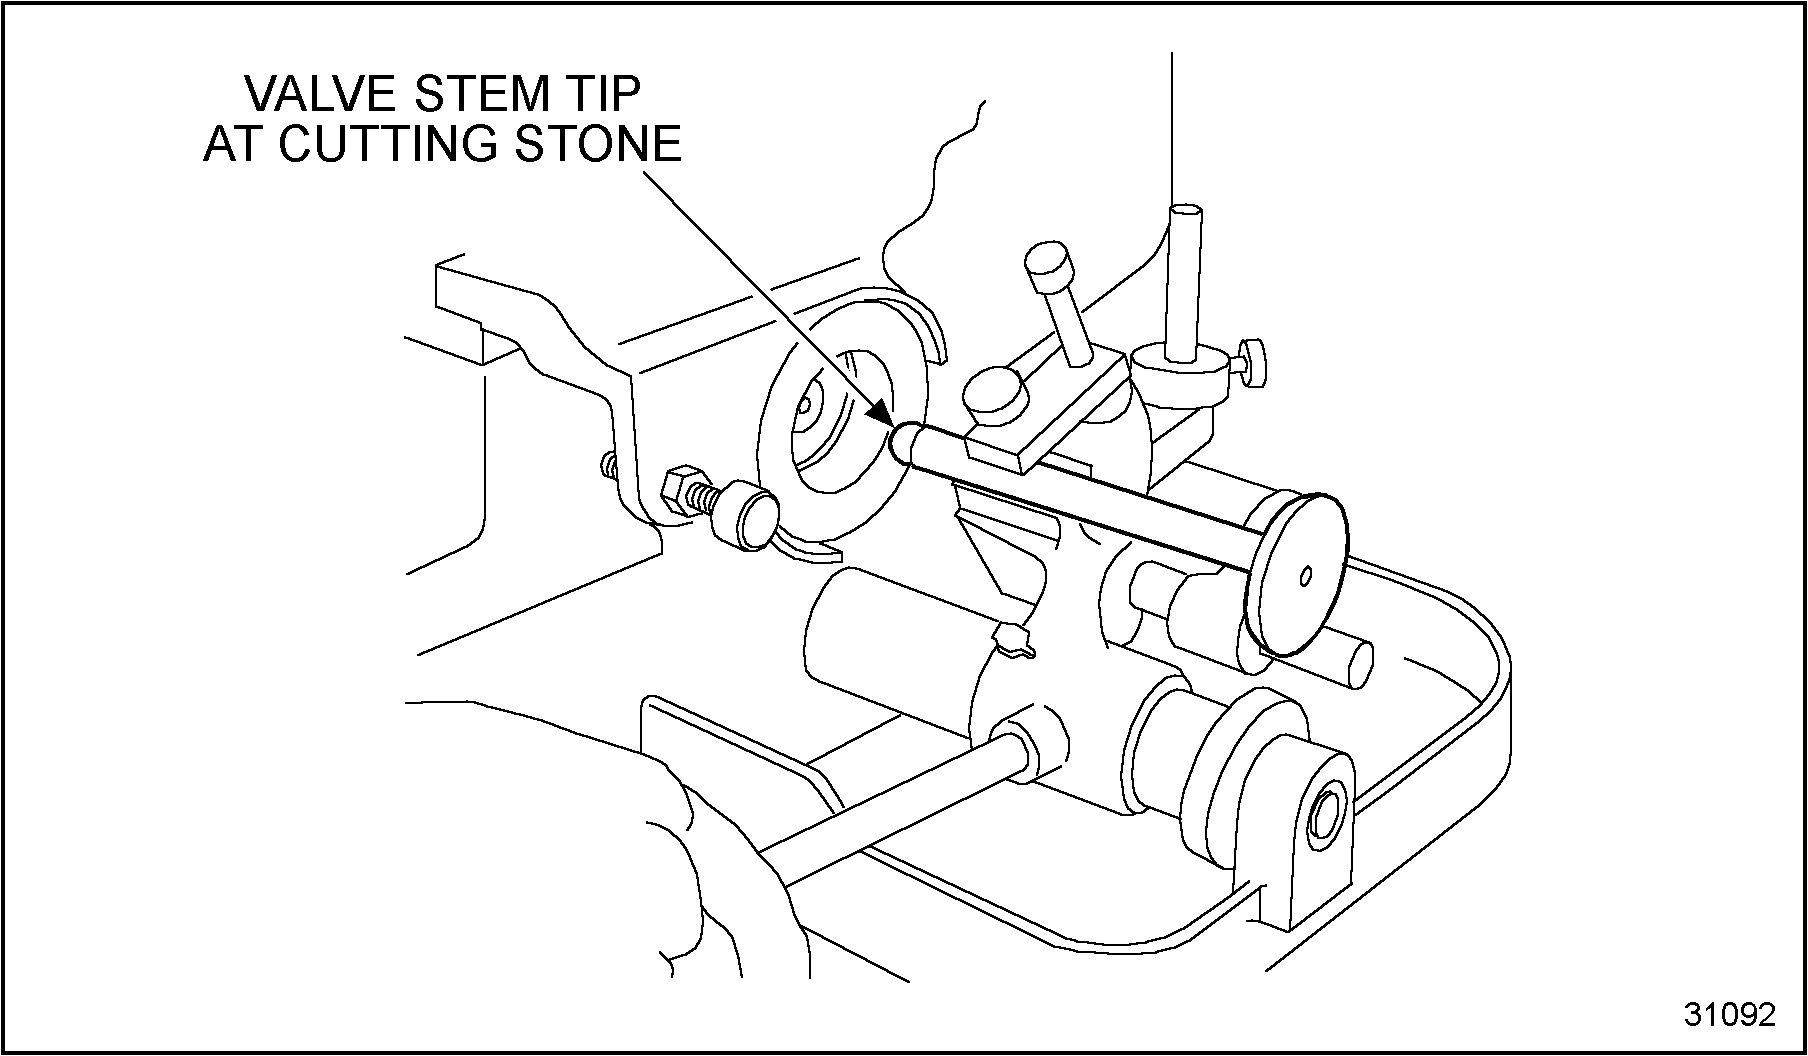
Figure 15. Valve Stem Tip at Cutting Stone
- Insert valves in clean valve guide and check valve face contact with valve seat using Prussian Blue, or equivalent.
- Spread thin film of Prussian Blue on valve face. Insert valve into its guide. See Figure "Valve Face Margin Measurement" .
- Apply pressure on exact center of valve head while making a quarter turn in the seat.
- Remove valve; inspect impression made on seat and on valve face. See Figure "Valve Center Head " .
- Bluing should appear around entire contact surface of the valve face and valve seat. Check several times to prevent error. If acceptable, proceed with valve installation.

Figure 16. Valve Face Margin Measurement

Figure 17. Valve Center Head
Section 1.19.5
Valve Seat Grinding
Follow these steps to grind the valve seat.
- If required, resurface the valve seat as follows: See Figure
"Grind Valve Seat "
.
- Lightly lubricate and install the correct size pilot into the valve guide.
- Choose the correct angle grinding stone and dress the stone. Refer to Specifications in Section 1.A, for valve seat angles.
- Install the grinding stone over the pilot.
- Lower grinder head over pilot shank until wheel barely clears the valve seat. Turn on power. Gently apply grinding wheel to valve seat with little pressure other than weight of the wheel.
- Raise wheel frequently to prevent overheating.
- Grind seat to a smooth even finish.
1. T-handle
4. Grinding Stone
2. Pilot Shank
5. Dressing Stud
3. Collet
6. Grinding Stone Installed on Pilot
Figure 18. Grind Valve Seat
- After resurfacing, check valve seat width with a caliper. See Figure
"Caliper Check of Valve Seat Width"
. If seat widths are excessive, they may be corrected by grinding with a 15 degree or smaller angle stone.

Figure 19. Caliper Check of Valve Seat Width
- Check valve recession with a straightedge and feeler gage or a surface gage. If valve recession is excessive, install a new valve or replace the valve seat. If the valve protrudes above the deck, grind the valve seat. Refer to Specifications
in Section 1.A. See Figure
"Valve Recession Check"
.

1. Straightedge
3. Feeler Gage
2. Valve
Figure 20. Valve Recession Check
Note: If a new valve will not correct the excessive recession condition, the valve seat must be replaced and reground. If the valve face protrudes above the deck, the valve seat must be ground deeper into the head. Check the seat width and confirm valve seat contact using Prussian Blue.
- After resurfacing the valve seat, check the seat for run-out, using a dial indicator. Refer to Specifications
in Section 1.A, for valve seat run-out limits. See Figure
"Valve Recession Check"
.
Note: If valve seat run-out, concentricity, and/or seat width cannot be maintained, replace and resurface the valve seats.
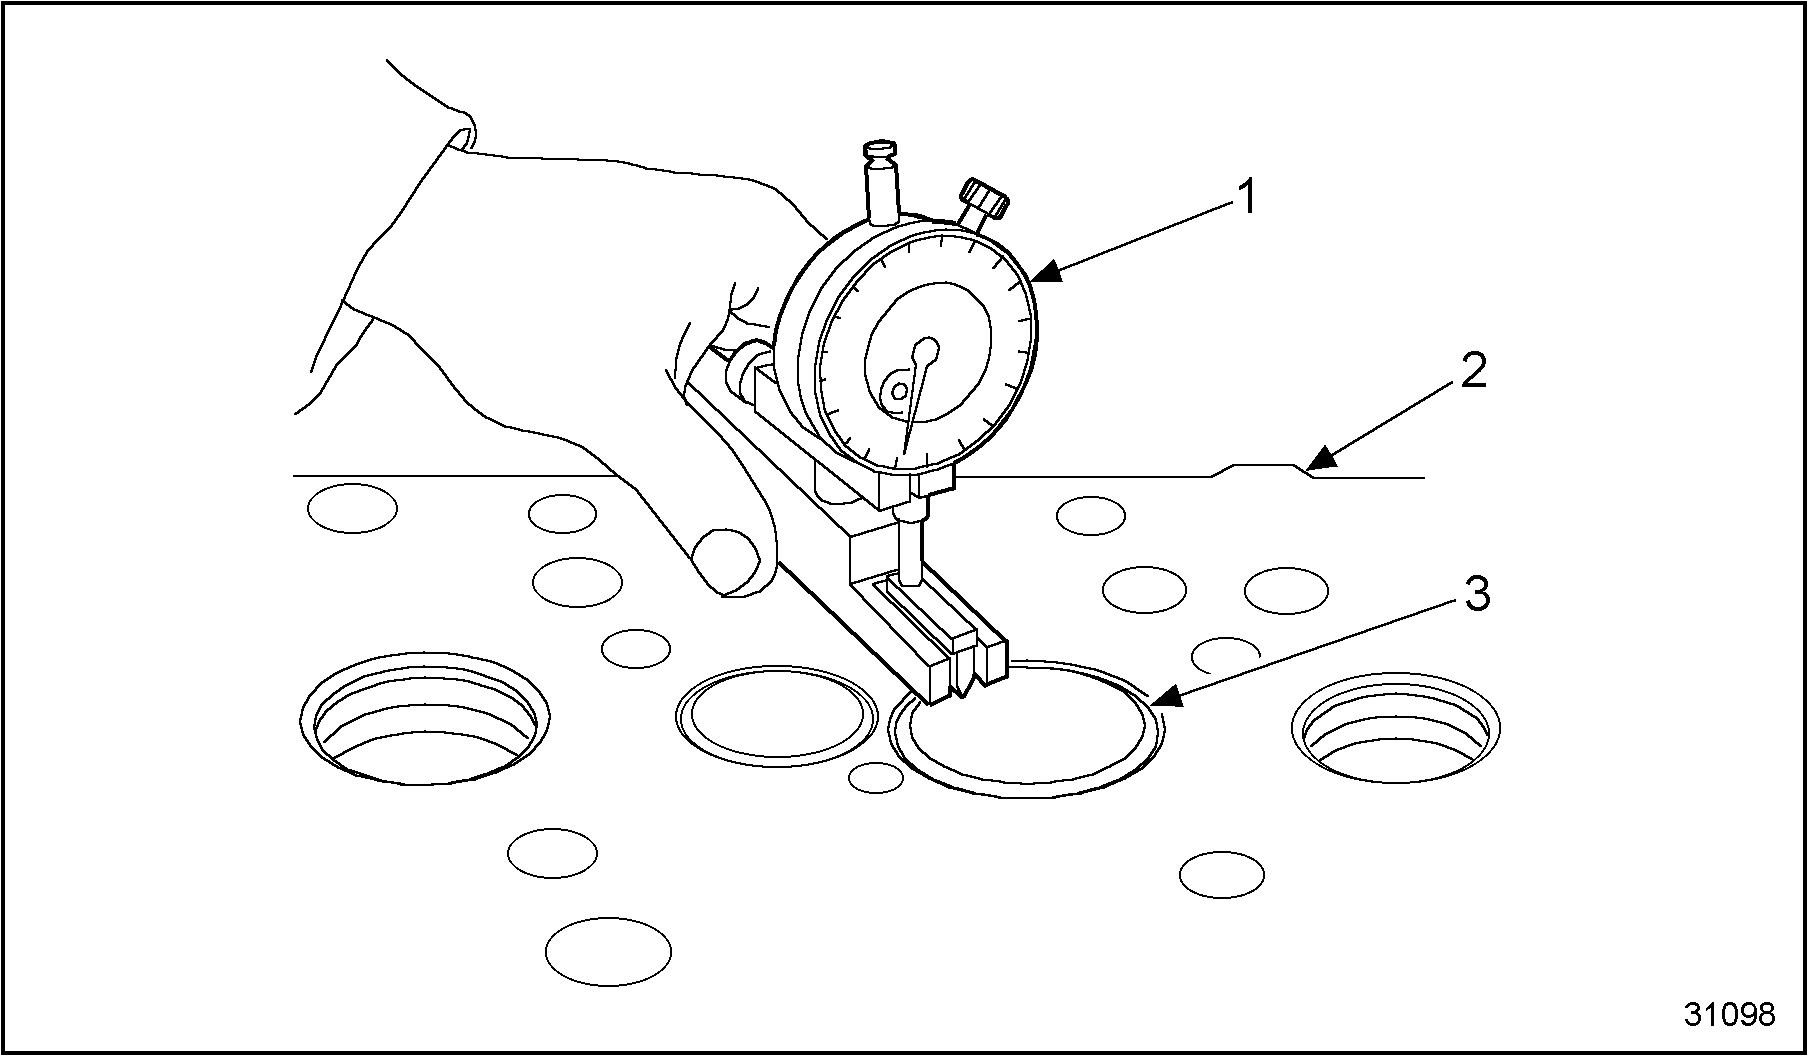
1. Dial Indicator
3. Valve
2. Cylinder Head
Figure 21. Valve Recession Check
Section 1.19.6
Valve Seat Replacement
Perform the following steps to replace the valve seat.
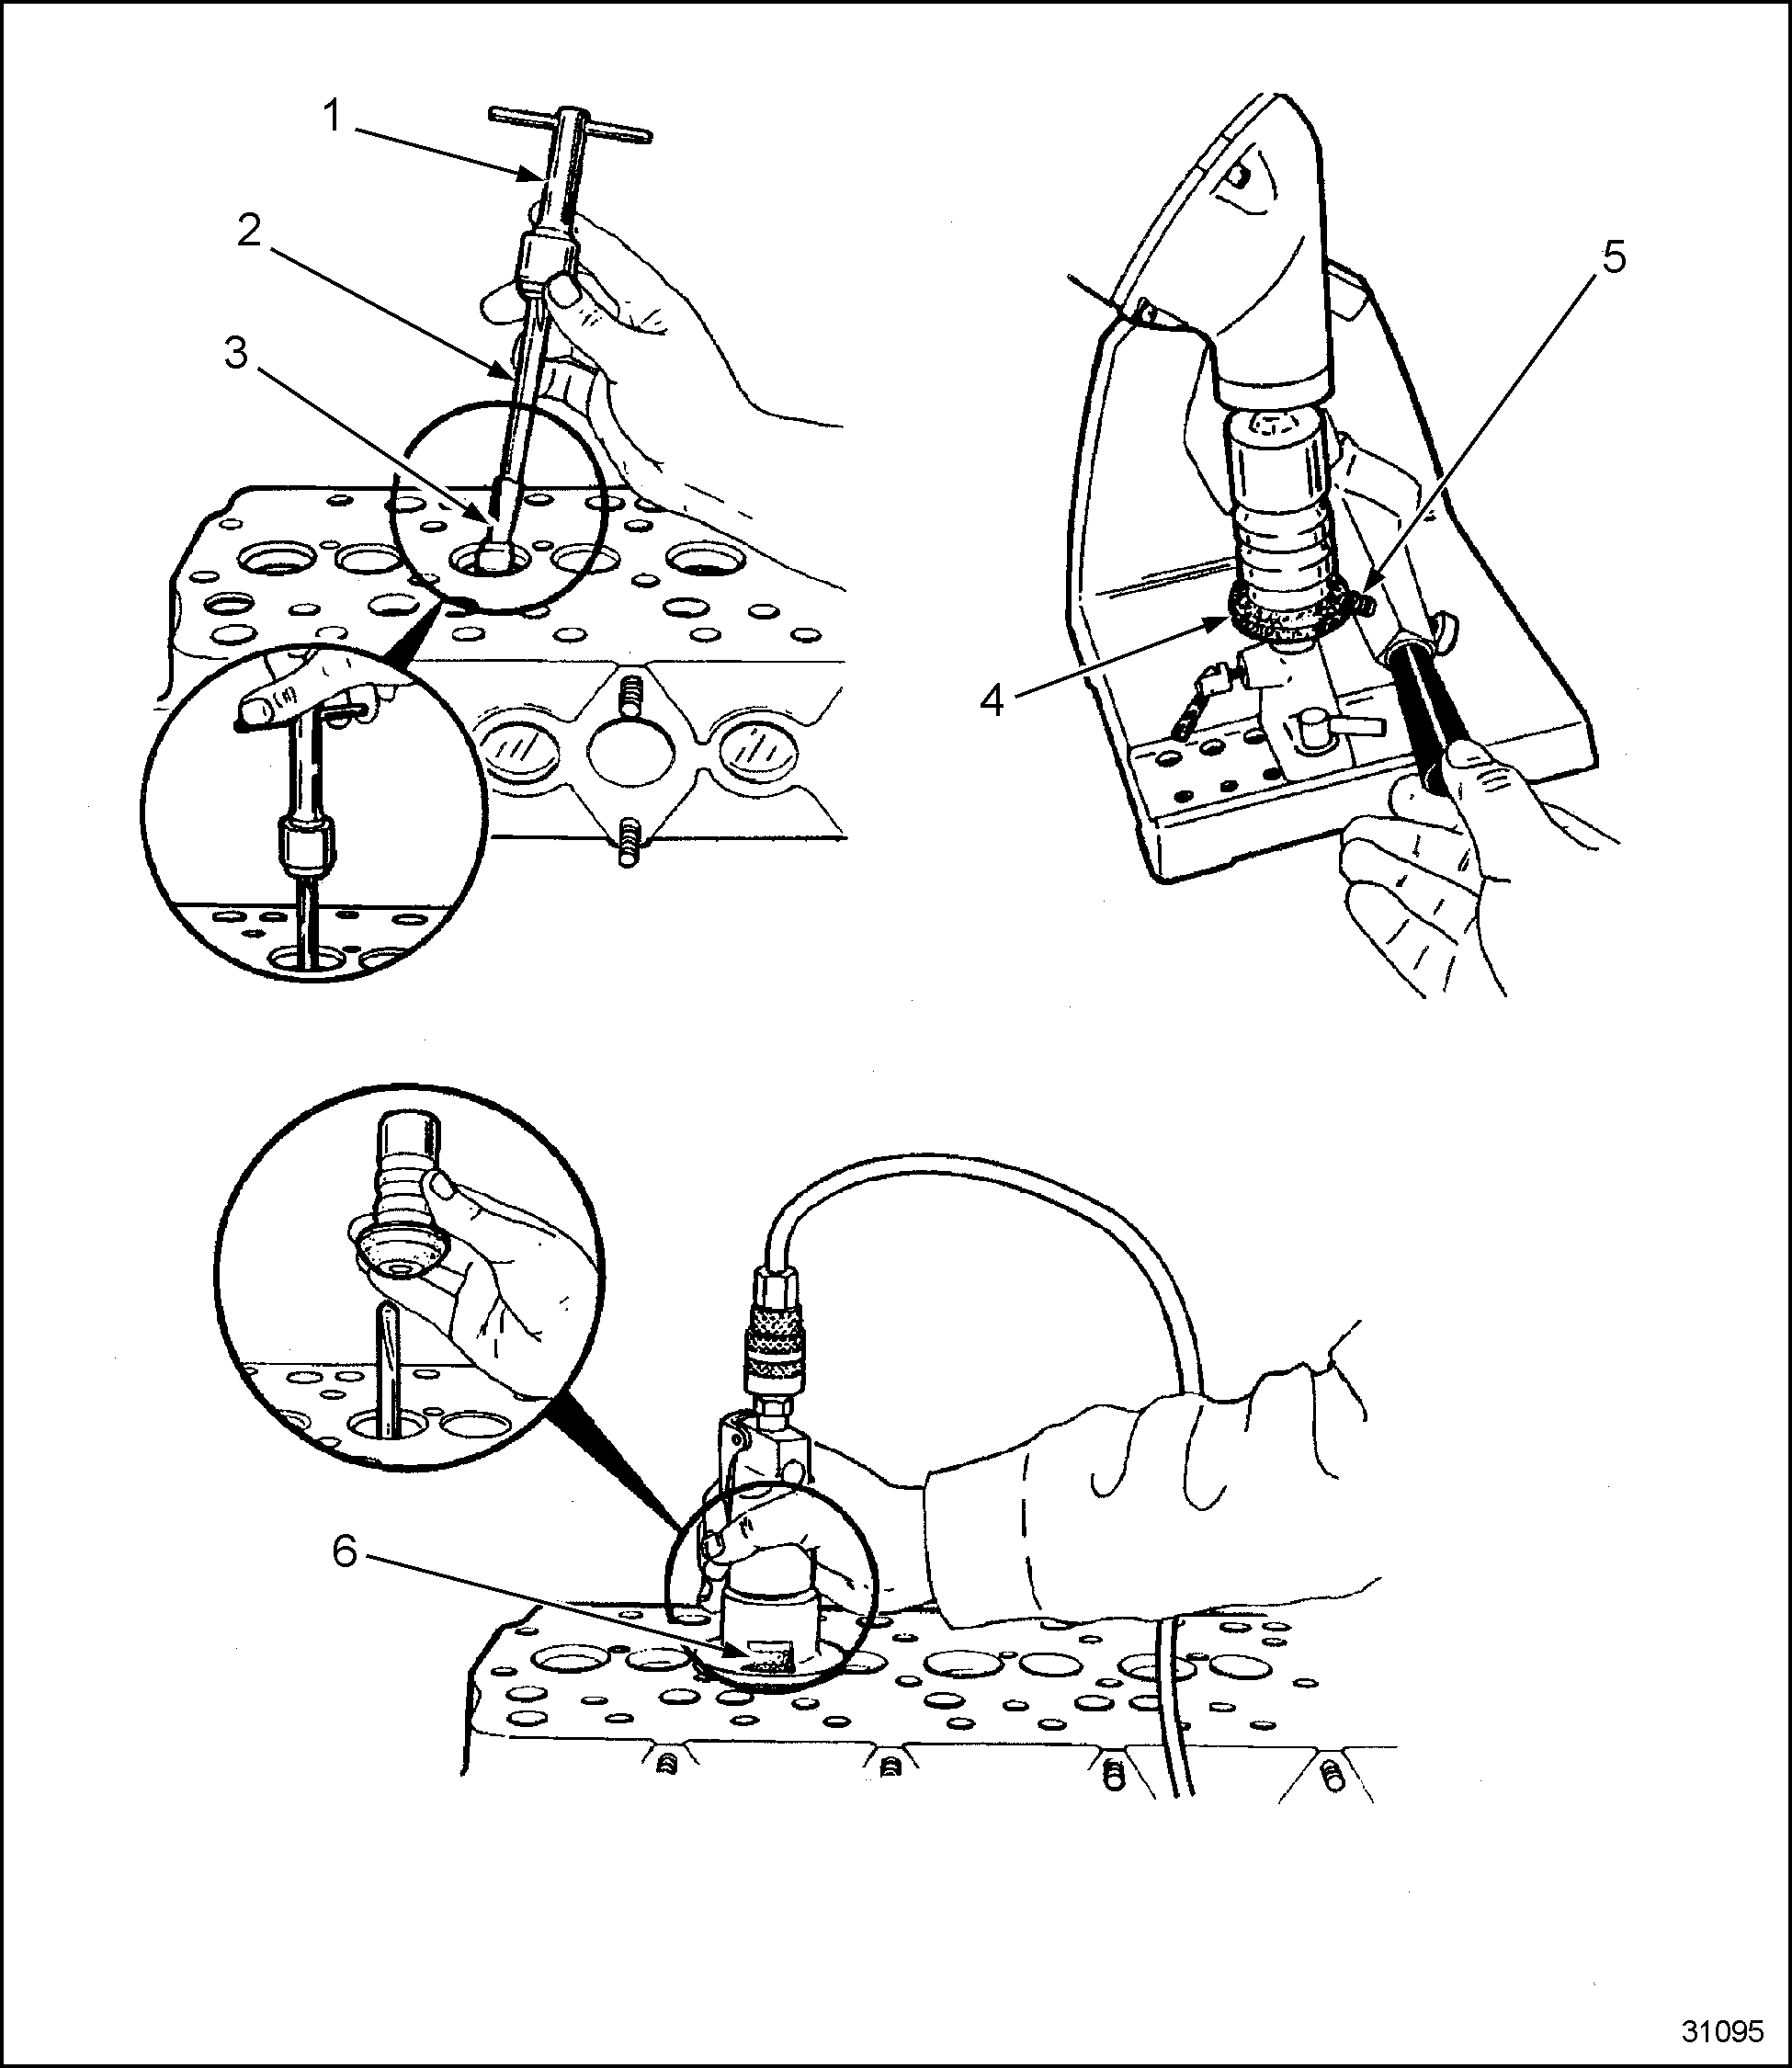
- Use a valve seat puller to remove the defective valve seat inserts as follows:
Note: Follow the instructions that apply to the tool. The following instructions are generalized.
- Cut a groove in the insert, using a stone.
- Choose the appropriate size pin collet and position the collet at the valve seat insert.
- Expand the pin collet by turning the small handle at the top of the bridge assembly. See Figure "Bridge Assembly" .
- Turn the large handle on the bridge assembly to pull the valve seat insert from the cylinder head.
- Unlock the pin collet by turning the small handle and discard the valve seat insert.

Figure 22. Bridge Assembly
- Select the appropriate size valve seat insert as listed in Table
"Valve Seat Insert Chart"
.
Note: Standard service valve seat inserts are provided in the cylinder head overhaul package. If the seat is damaged beyond the standard or 0.002 in. diameter, it will be necessary to machine the insert counterbore in the cylinder head for an oversize seat insert. Standard size inserts do not require counterbore enlargement.
- Chill the valve seat insert in a freezer for 30 minutes before installing.
- Align the insert to avoid cocking.
- Press the insert into its counterbore using J 39535 , for the intake and exhaust valve seat inserts. See Figure "Valve Seat Insertion" .
Note: Chilling the valve seat insert prevents peeling of metal from the cylinder head counterbore during installation.
Oversize Insert
Diameter of Cylinder Head Counterbore Intake
Diameter of Cylinder Head Counterbore Exhaust
Standard*
1.996-1.997 in. (50.6 mm)
1.624-1.625 in. (41.2 mm)
0.002 in (0.05 mm).*
1.823 in. (46.304 mm)
1.813 in. (46.050 mm)
0.015 in. (.381 mm)
1.836 in. (46.634 mm)
1.826 in. (46.380 mm)
Table 12. Valve Seat Insert ChartNote: * Standard and 0.002 in. oversize service insert do not require insert counterbore enlargement before installing.
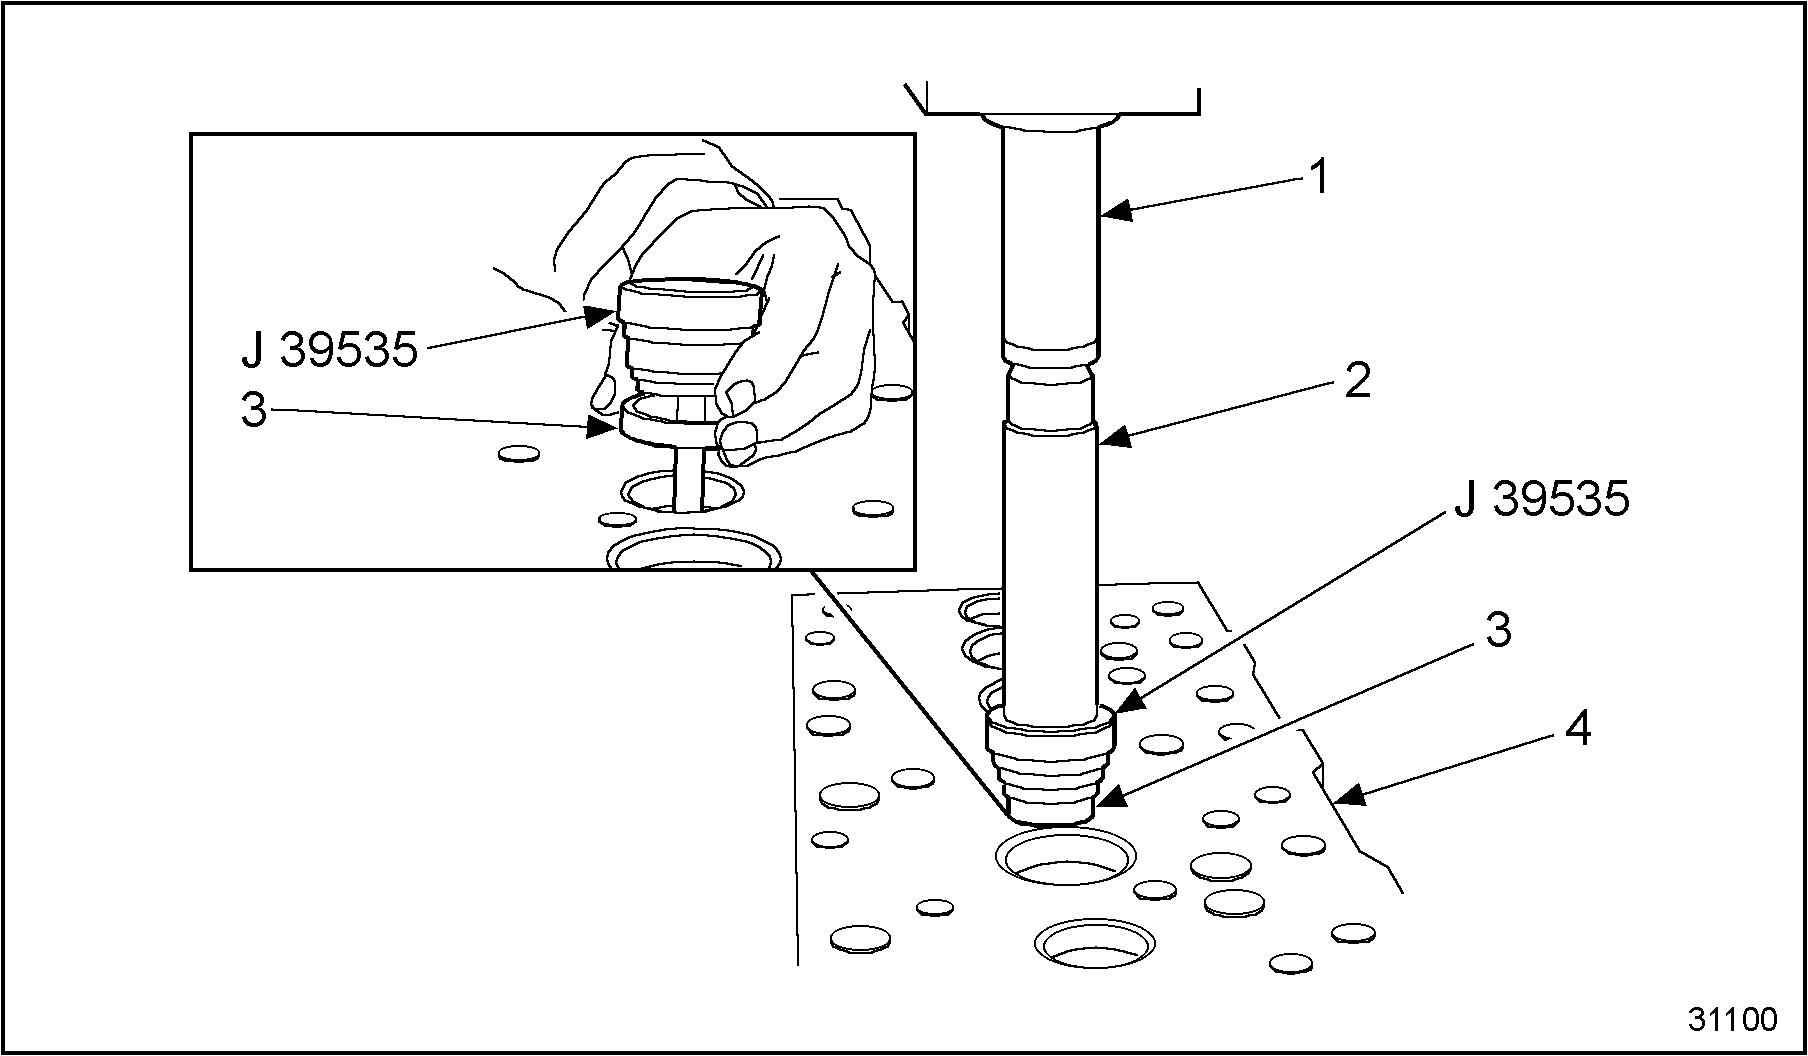
1. Press
3. Valve Seat Insert
2. Valve Guide
4. Cylinder Head
Figure 23. Valve Seat Insertion
- Grind the new valve seat(s) to the specified angles and width.
Section 1.19.6.1
Inspection of Valve Spring
Follow these steps to clean and inspect valve springs.
- Clean all valve springs and seats in a suitable solvent.
- Visually inspect valve springs for rust, pitting and cracks. Look for spring distortion.
- Spring ends must be flat and square to prevent lateral loads on the valve stem. See Figure
"Inspect Valve Springs"
.
Note: Out of square springs place a side load on the stem causing rapid guide wear.
Figure 24. Inspect Valve Springs
Section 1.19.7
Inspection of Valve Seat
Install the valve seat insert as follows:
- Measure the valve spring tension using valve spring tester J 22738-02 .
- Measure maximum spring length in use (valve closed). See Figure
"Inspect Valve Springs"
.

1. Scale
3. Load Indicator
2. Valve Spring
Figure 25. Inspect Valve Springs
- Measure minimum spring length in use (valve open).
Note: Apply the appropriate test load to each spring and determine if test length is achieved.
- Replace any valve spring that is rusted, pitted, cracked, bent or incapable of meeting tension requirements.
Section 1.19.8
Valve Rotators
Follow these steps to clean and inspect the valve rotators:
- Clean rotators in a clean solvent.
- To properly test the rotator for function, a valve spring load must be applied to the rotator.
Note: The rotator must be lubricated with clean engine oil prior to testing.
- Place the valve spring with the rotator in the spring tester J 22738-02
. Place a ball bearing between the rotator and ram of the spring tester. The ball bearing must be large enough to prevent the ram from touching any part of the rotator. See Figure
"Inspect Valve Springs"
.
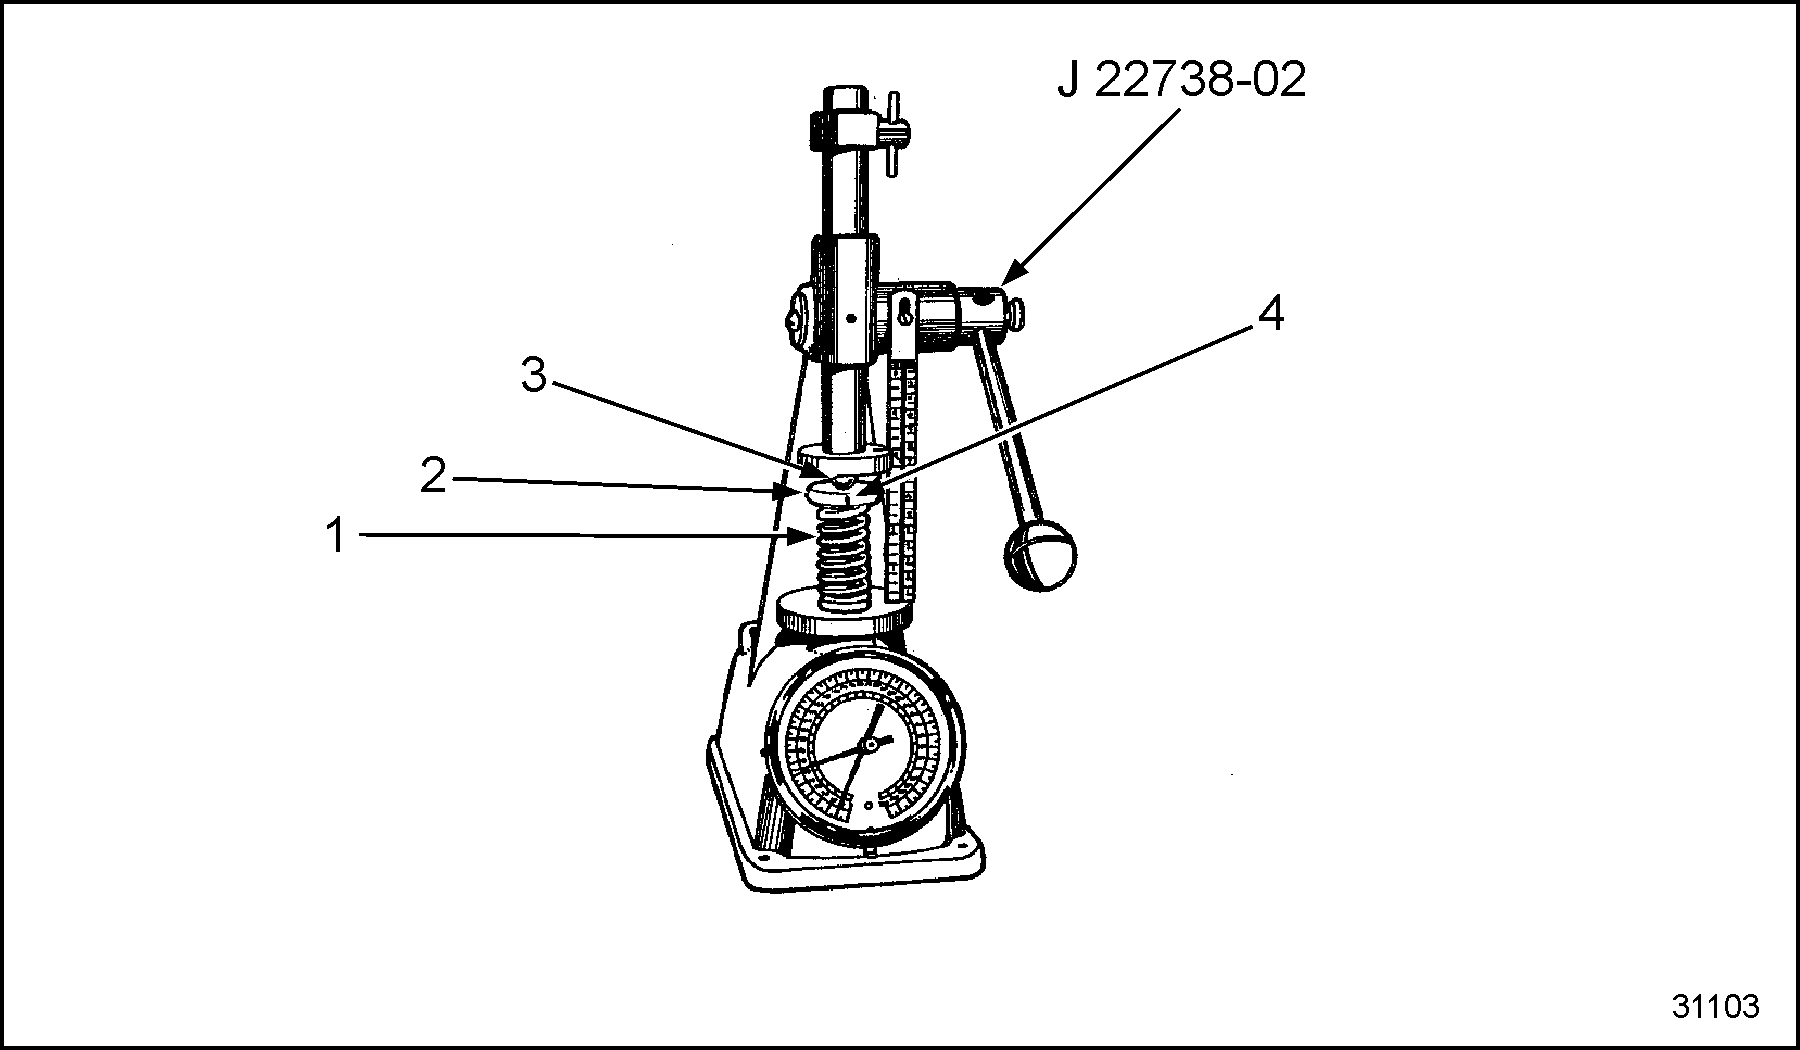
1. Valve Spring
3. Ball Bearing
2. Rotator
4. Painted Reference Mark
Figure 26. Inspect Valve Springs
- Paint a reference line on the rotator.
- Compress the valve spring rapidly with even pressure and observe the rotator as it turns. Replace any rotator that does not turn.
Section 1.19.8.1
Valve Spring Locks
Follow these steps to clean and inspect valve spring locks:
- Clean valve spring locks in a suitable solvent.
- Visually inspect inside and outside of the valve spring locks for wear.
- Replace any worn spring locks, as required.
| Series 40E Service Manual - 6SE410 |
| Generated on 10-13-2008 |