Section 3.9
Oil Pan
The oil pan used on the Series 50 engine is made of aluminum. A one-piece, non-reusable isolator seal is used between the oil pan and block. See Figure "Typical Oil Pan Assembly" .

|
1. Drain Plug |
6. Sleeve |
|
2. Oil Pan |
7. Isolator |
|
3. Elbow |
8. Bolt |
|
4. Gasket |
9. Pipe Plug |
|
5. Adaptor |
|
Figure 1. Typical Oil Pan Assembly
Rubber isolator-washer assemblies and sleeves are used for attaching the oil pan. The metal sleeve spacer is inserted through the isolator and limits the travel of the oil pan bolts to prevent over-tightening and damaging the oil pan and isolator.
Effective August 1995, isolators made of an improved vibration-absorbing material were released to reduce noise emissions. In addition, isolator bolt sleeve length was increased by 0.8 mm (0.032 in.) to accommodate the slightly longer isolators.
When installing a pipe plug, coat the threads with Loctite PT7271 sealant (or equivalent), hold the insert to keep it from turning, and torque the plug to 45-56 N·m (33-41 lb·ft).
Section 3.9.1
Repair or Replacement of Oil Pan
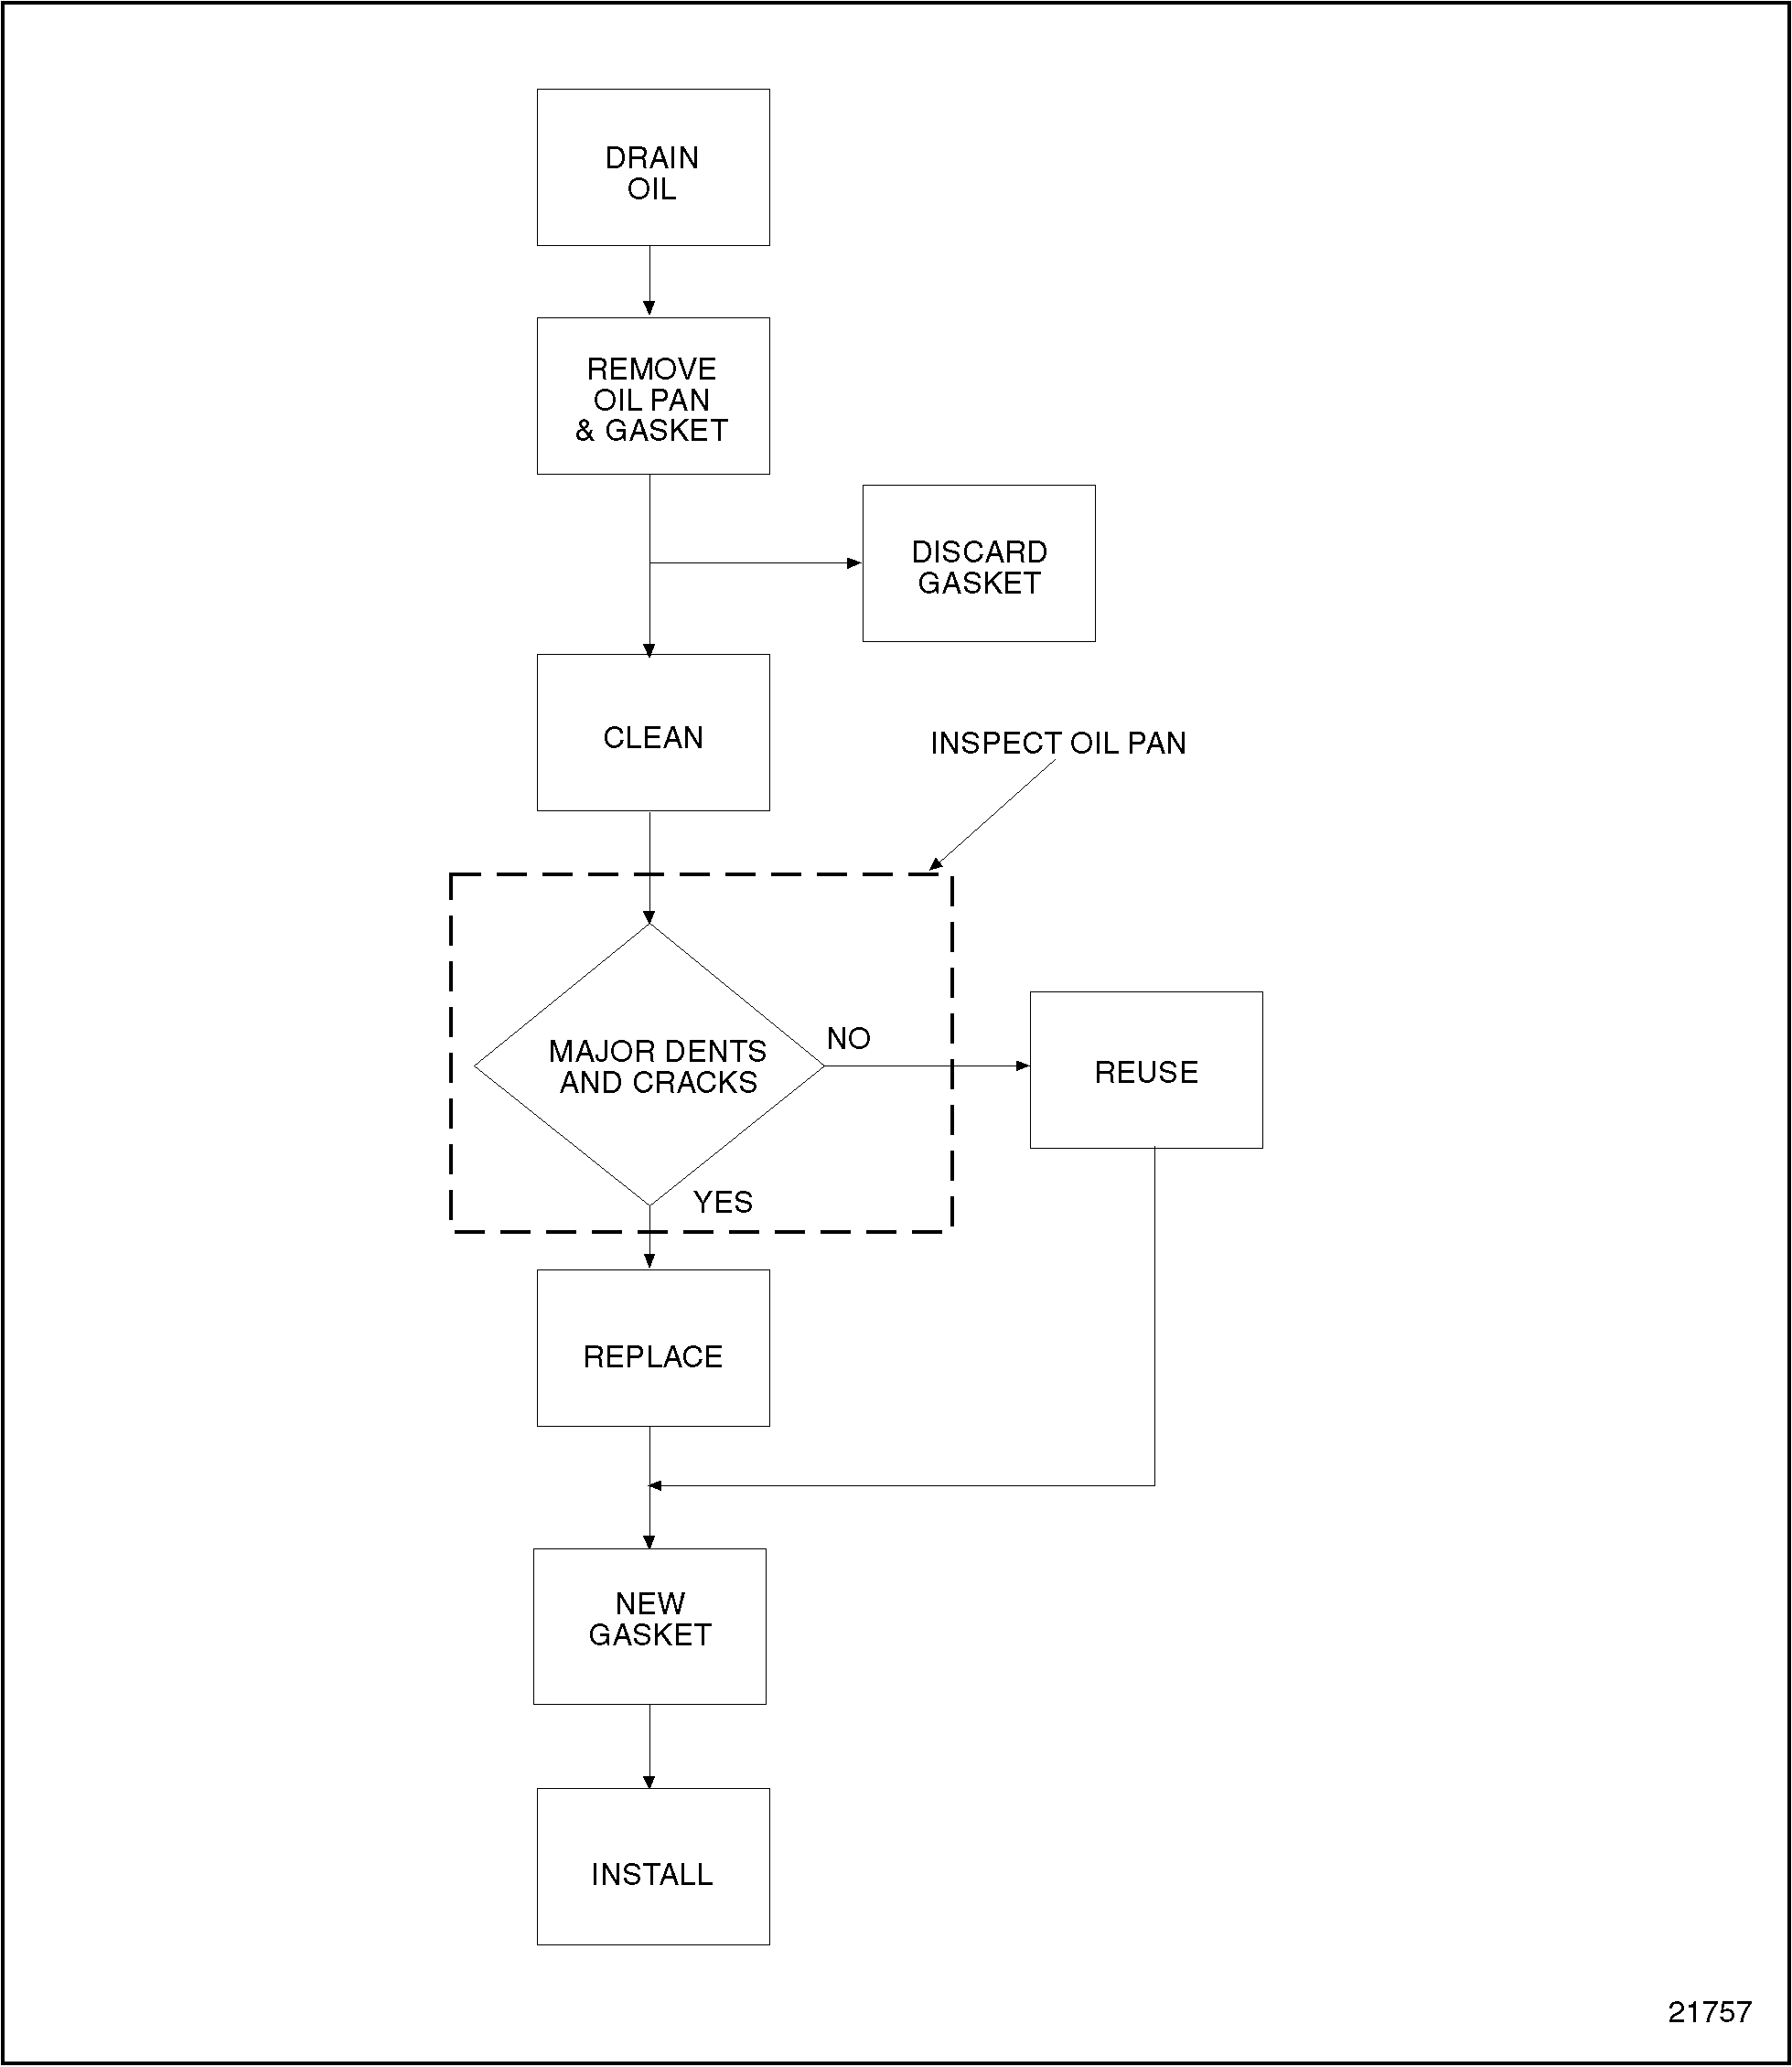
To determine if repair is possible or replacement is necessary, perform the following procedure. See Figure "Flowchart for Repair or Replacement of Oil Pan" .

Figure 2. Flowchart for Repair or Replacement of Oil Pan
Section 3.9.2
Cleaning and Removal of Oil Pan
Precleaning is not necessary.
NOTICE: |
|
Do not support the engine on the oil pan. Damage to the oil pan or engine could result. |
Note: On almost all engine applications it is possible to remove the oil pan without removing the engine.
If the engine is to be removed from the vehicle, the oil pan should be left in place until the engine is removed.
The procedure for removing the oil pan will vary with each installation. However, the following procedures will generally apply.
NOTICE: |
|
When removing a side plug, hold the flats of the insert with a 2 1/8 in. open end or large adjustable wrench to keep it from turning. If the insert is loosened, it may be necessary to remove the oil pan and retighten the nut to prevent a possible oil leak. If required, torque the nut to 186-199 N·m (137-147 lb·ft). |
Remove the oil pan as follows:
- Remove the drain plug and drain the engine oil. Refer to "13.5.1 Lubricating Oil" .
- Remove the eight oil pan bolts, washers, isolators and sleeves. Remove the center bolts on each side last.
- Remove the oil pan, taking care not to damage the oil pump inlet pipe and screen.
- Remove the oil pan isolator seal and discard.
Clean the oil pan prior to inspection as follows:
NOTICE: |
|
Do not use solvents to clean isolators. Damage to the isolator will result. |
- Clean the oil pan and attaching hardware with clean fuel oil.

EYE INJURY
To avoid injury from flying debris when using compressed air, wear adequate eye protection (face shield or safety goggles) and do not exceed 276 kPa (40 psi) air pressure.
- Dry with compressed air.
- Clean the surfaces of the cylinder block, gear case and flywheel housing where they mate with the oil pan.
Section 3.9.2.1
Inspection of Oil Pan
Inspect the oil pan inserts, oil pan, and bolt isolators as follows:
- Check the bolt isolators for dryness, cracks or tears.
- If isolator is damaged, replace with new part.
- Check oil pan for major dents, cracks and other damage.
- If oil pan is damaged, replace with new part.
Section 3.9.3
Installation of Oil Pan
Install the oil pan as follows:
- Insert the raised lip portion of the new isolator seal into the groove in the oil pan.
- Press down on the isolator seal and insert it completely around the oil pan. Be careful not to stretch or bunch the seal. For best results, install the seal at each corner, then at points half way between the corners. Continue in this manner, halving the distance and seating the seal.
- Insert a metal sleeve spacer into each isolator.
- Install the eight oil pan bolts into isolator assemblies.
- Install the oil pan assembly in position on the cylinder block.
Note: If interference occurs between the oil pan and the balance shaft assembly, it will be necessary to acquire an improved oil pan that provides the clearance necessary for the installation.
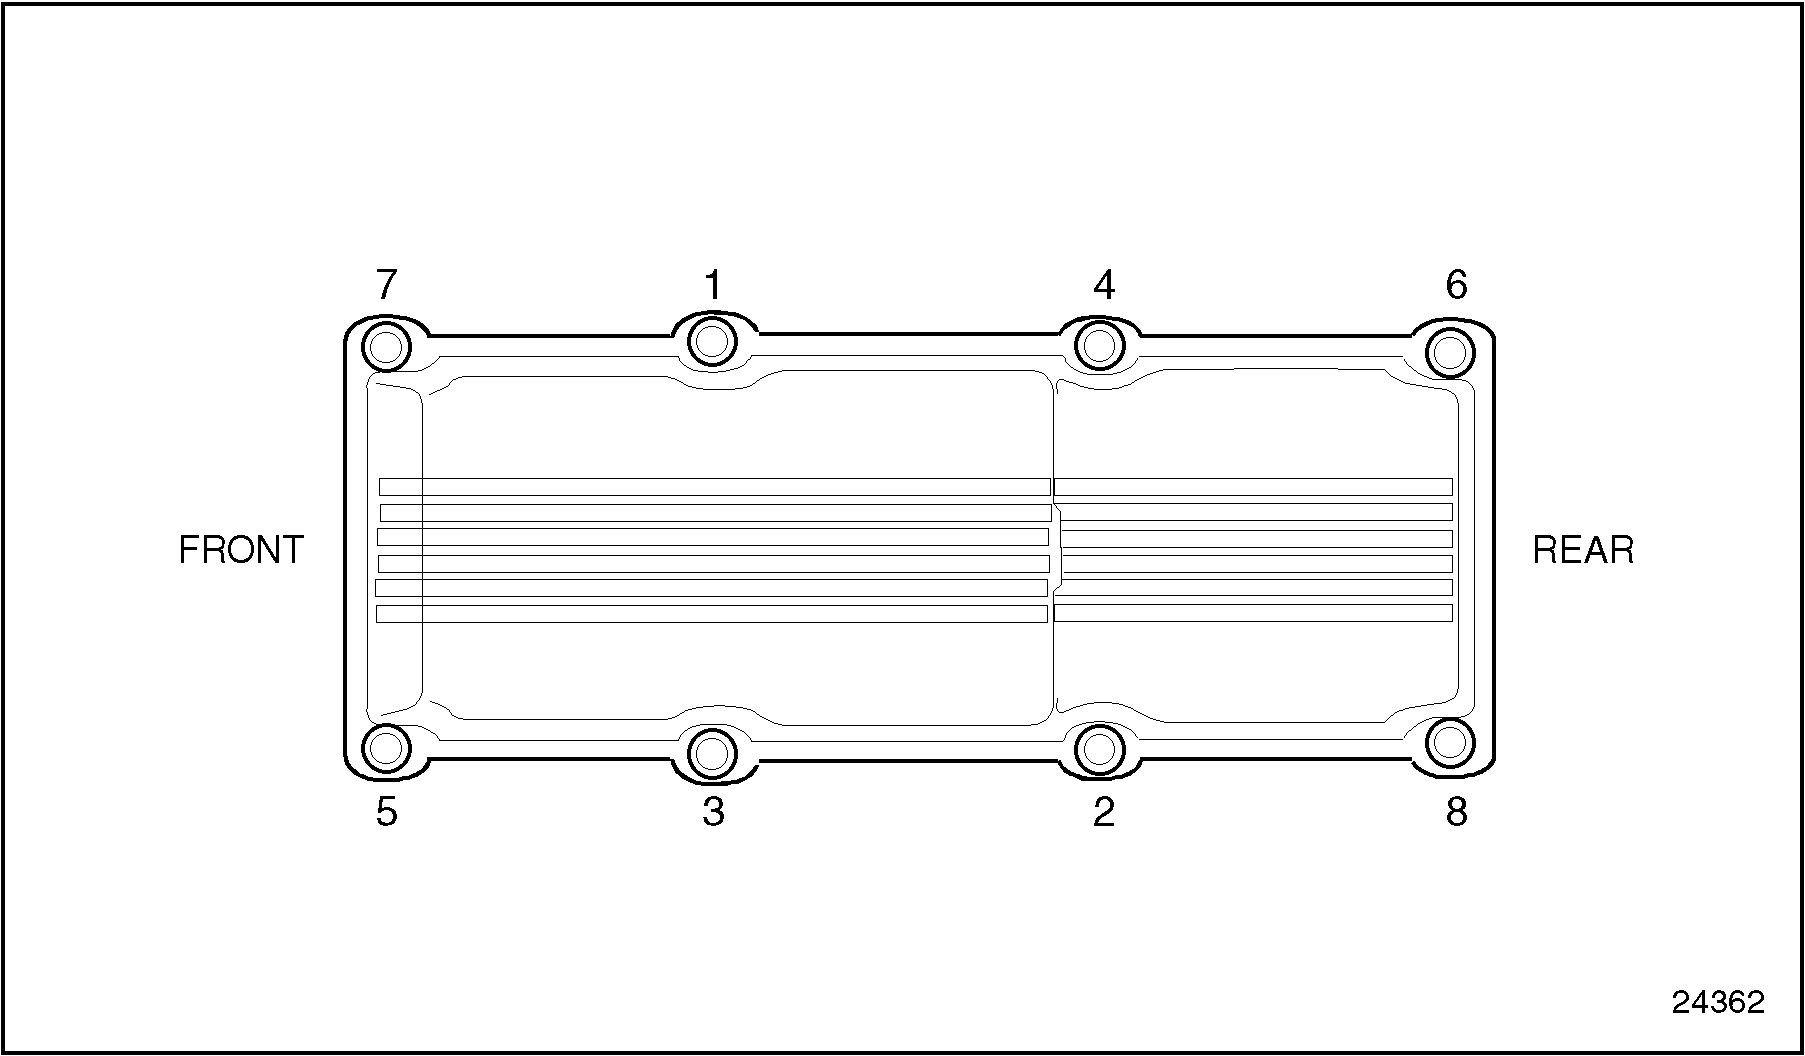
- Ensure that the isolator seal has not been disturbed. Torque the eight oil pan bolt assemblies to 24-30 N·m (18-22 lb·ft), using the proper sequence. See Figure
"Oil Pan Bolt Torque Sequence"
.

Figure 3. Oil Pan Bolt Torque Sequence
- Install and tighten the 3/4 in.-14 square, magnetic, oil drain plug to 45-56 N·m (33-41 lb·ft) torque.
- Install and tighten any other plugs that were removed from the oil pan.
Note: When installing a pipe plug, coat the threads with Loctite PT7271 sealant (or equivalent).
- Add 23 quarts (22 L) of new, clean lube oil (15W-40).
Note: The extra quart of oil (23 verses 22) is added to account for oil in the oil filter adaptor, gallery, etc.
- Refer to "11.1.2 Lubrication System" for verification of proper oil pan installation.
| Series 50 Service Manual - 6SE50 |
| Generated on 10-13-2008 |