Section 4.3
Thermostat
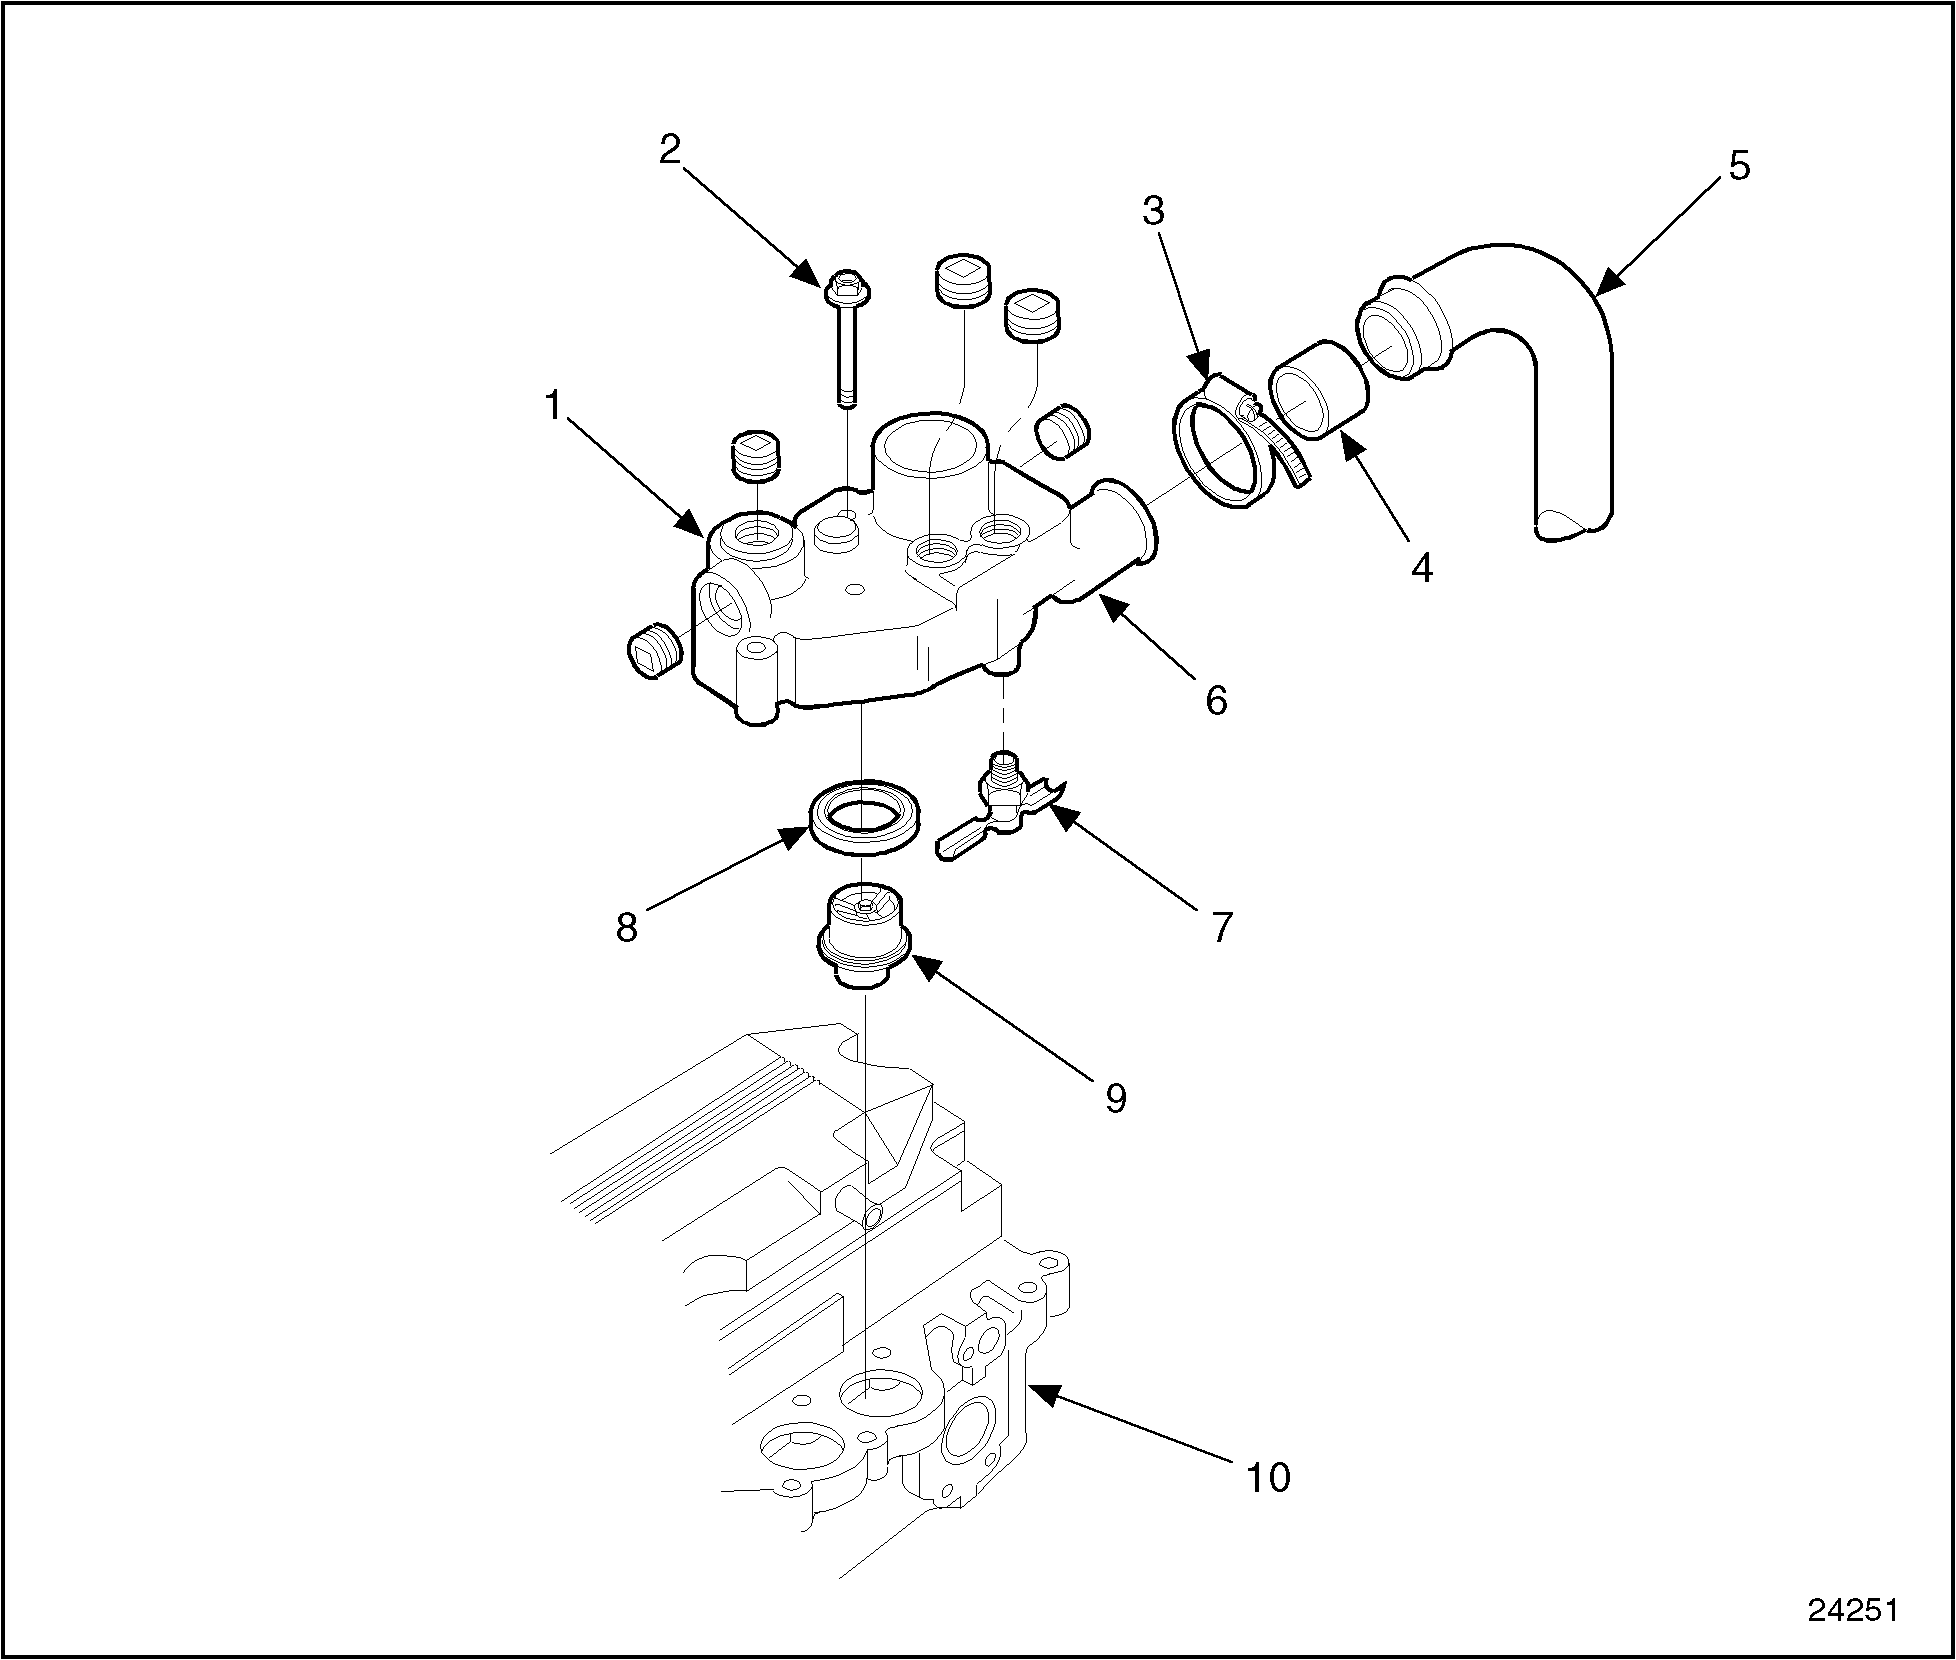
The temperature of the engine coolant is controlled by two blocking-type thermostats located in a housing attached to the right side of the cylinder head. See Figure "Thermostat and Related Parts" .
|
1. Vent Line Connection |
6. Thermostat Housing |
|
2. Bolts, Thermostat Housing-to-Cylinder Head (4) |
7. Drain Cock |
|
3. Hose Clamps (2) |
8. Seals, Thermostat Housing (2) |
|
4. Hose, Coolant |
9. Thermostats (2) |
|
5. Bypass Tube |
10. Cylinder Head |
Figure 1. Thermostat and Related Parts
In addition to a rubber seal that is part of the thermostat, there is a lip-type seal for each thermostat that is installed in a bore in the thermostat housing. See Figure "Thermostat Seals" .

|
1. Connection Opening, Vent Line |
4. Thermostat Housing |
|
2. Seal, Thermostat (2) |
5. Seals, Thermostat Housing (2) |
|
3. Thermostat (2) |
|
Figure 2. Thermostat Seals
At coolant temperatures below approximately 86-89°C (186-193°F), the thermostat valves remain closed and block the flow of coolant from the engine to the radiator. During this period, all of the coolant in the system is recirculated through the engine and is directed back to the suction side of the water pump via a bypass tube. As the coolant temperature rises above 86-89°C (186-193°F) the thermostat valves start to open, restricting the bypass system, and allowing a portion of the coolant to circulate through the radiator. When the coolant temperature reaches approximately 97°C (207°F) the thermostat valves are fully open, the bypass system is blocked off, and the coolant is directed through the radiator. See Figure "Coolant Flow Schematic" .
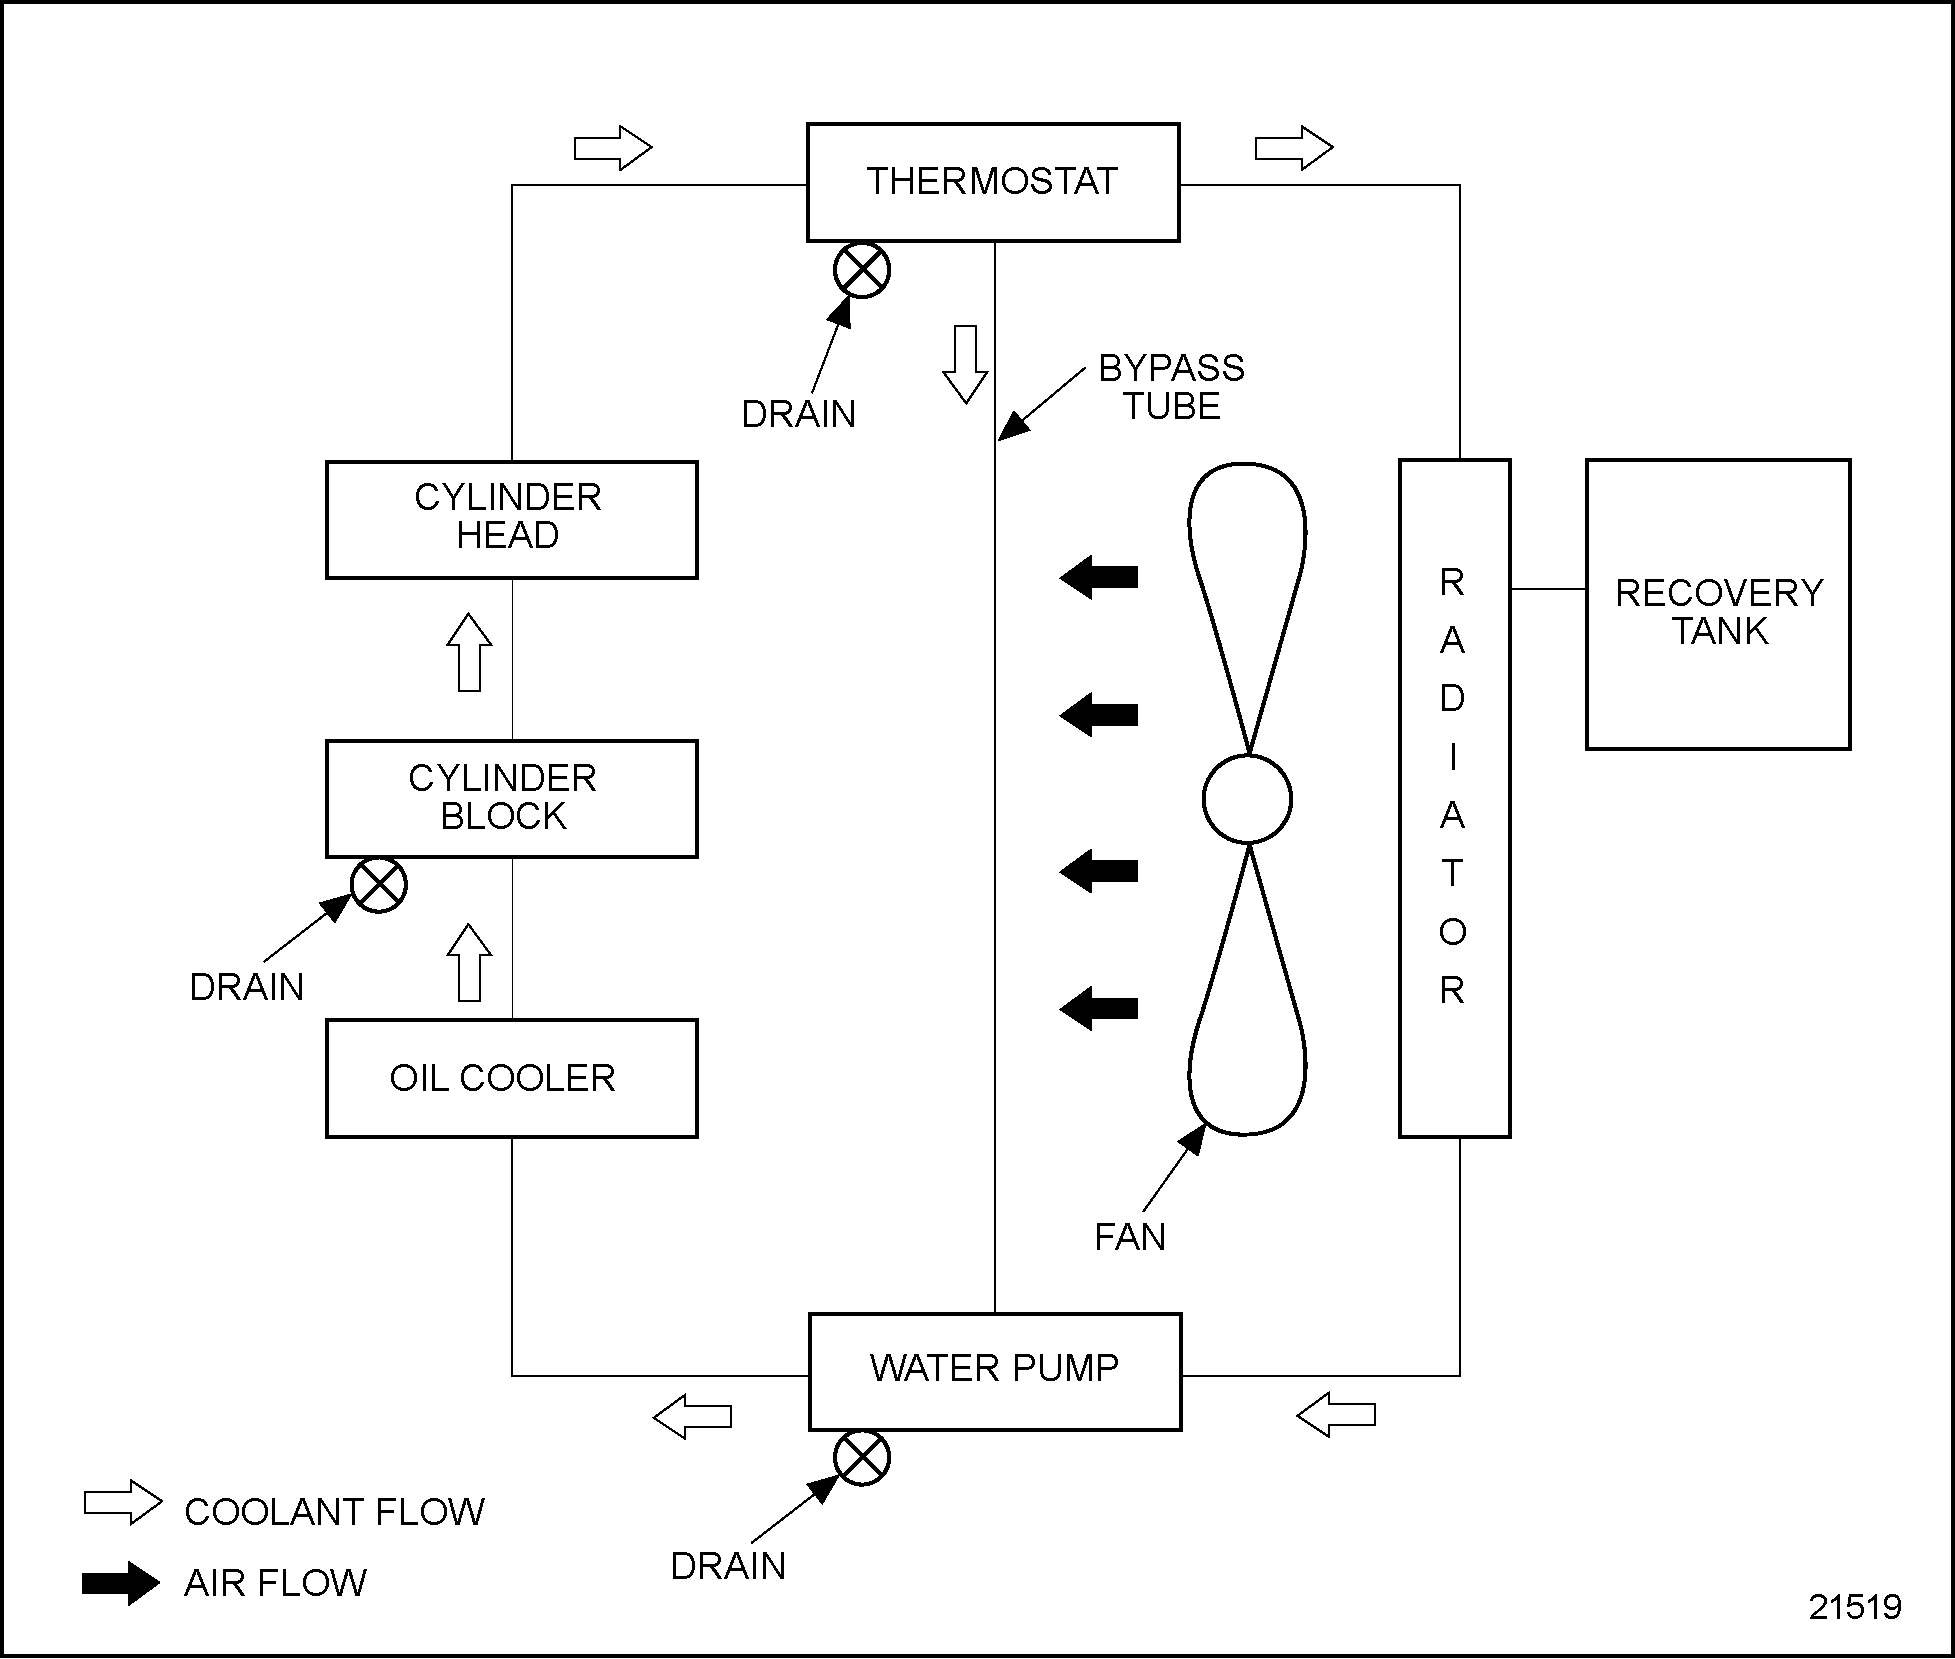
Figure 3. Coolant Flow Schematic
Properly operating thermostats are essential for efficient operation of the engine. If the engine operating temperature deviates from the normal range of 86-99°C (186-211°F) remove, inspect and replace the thermostats if necessary.
Section 4.3.1
Repair or Replacement of Thermostat
To determine if repair or replacement of the thermostat is necessary, perform the following procedure. See Figure "Flowchart for Repair or Replacement of Thermostat" .
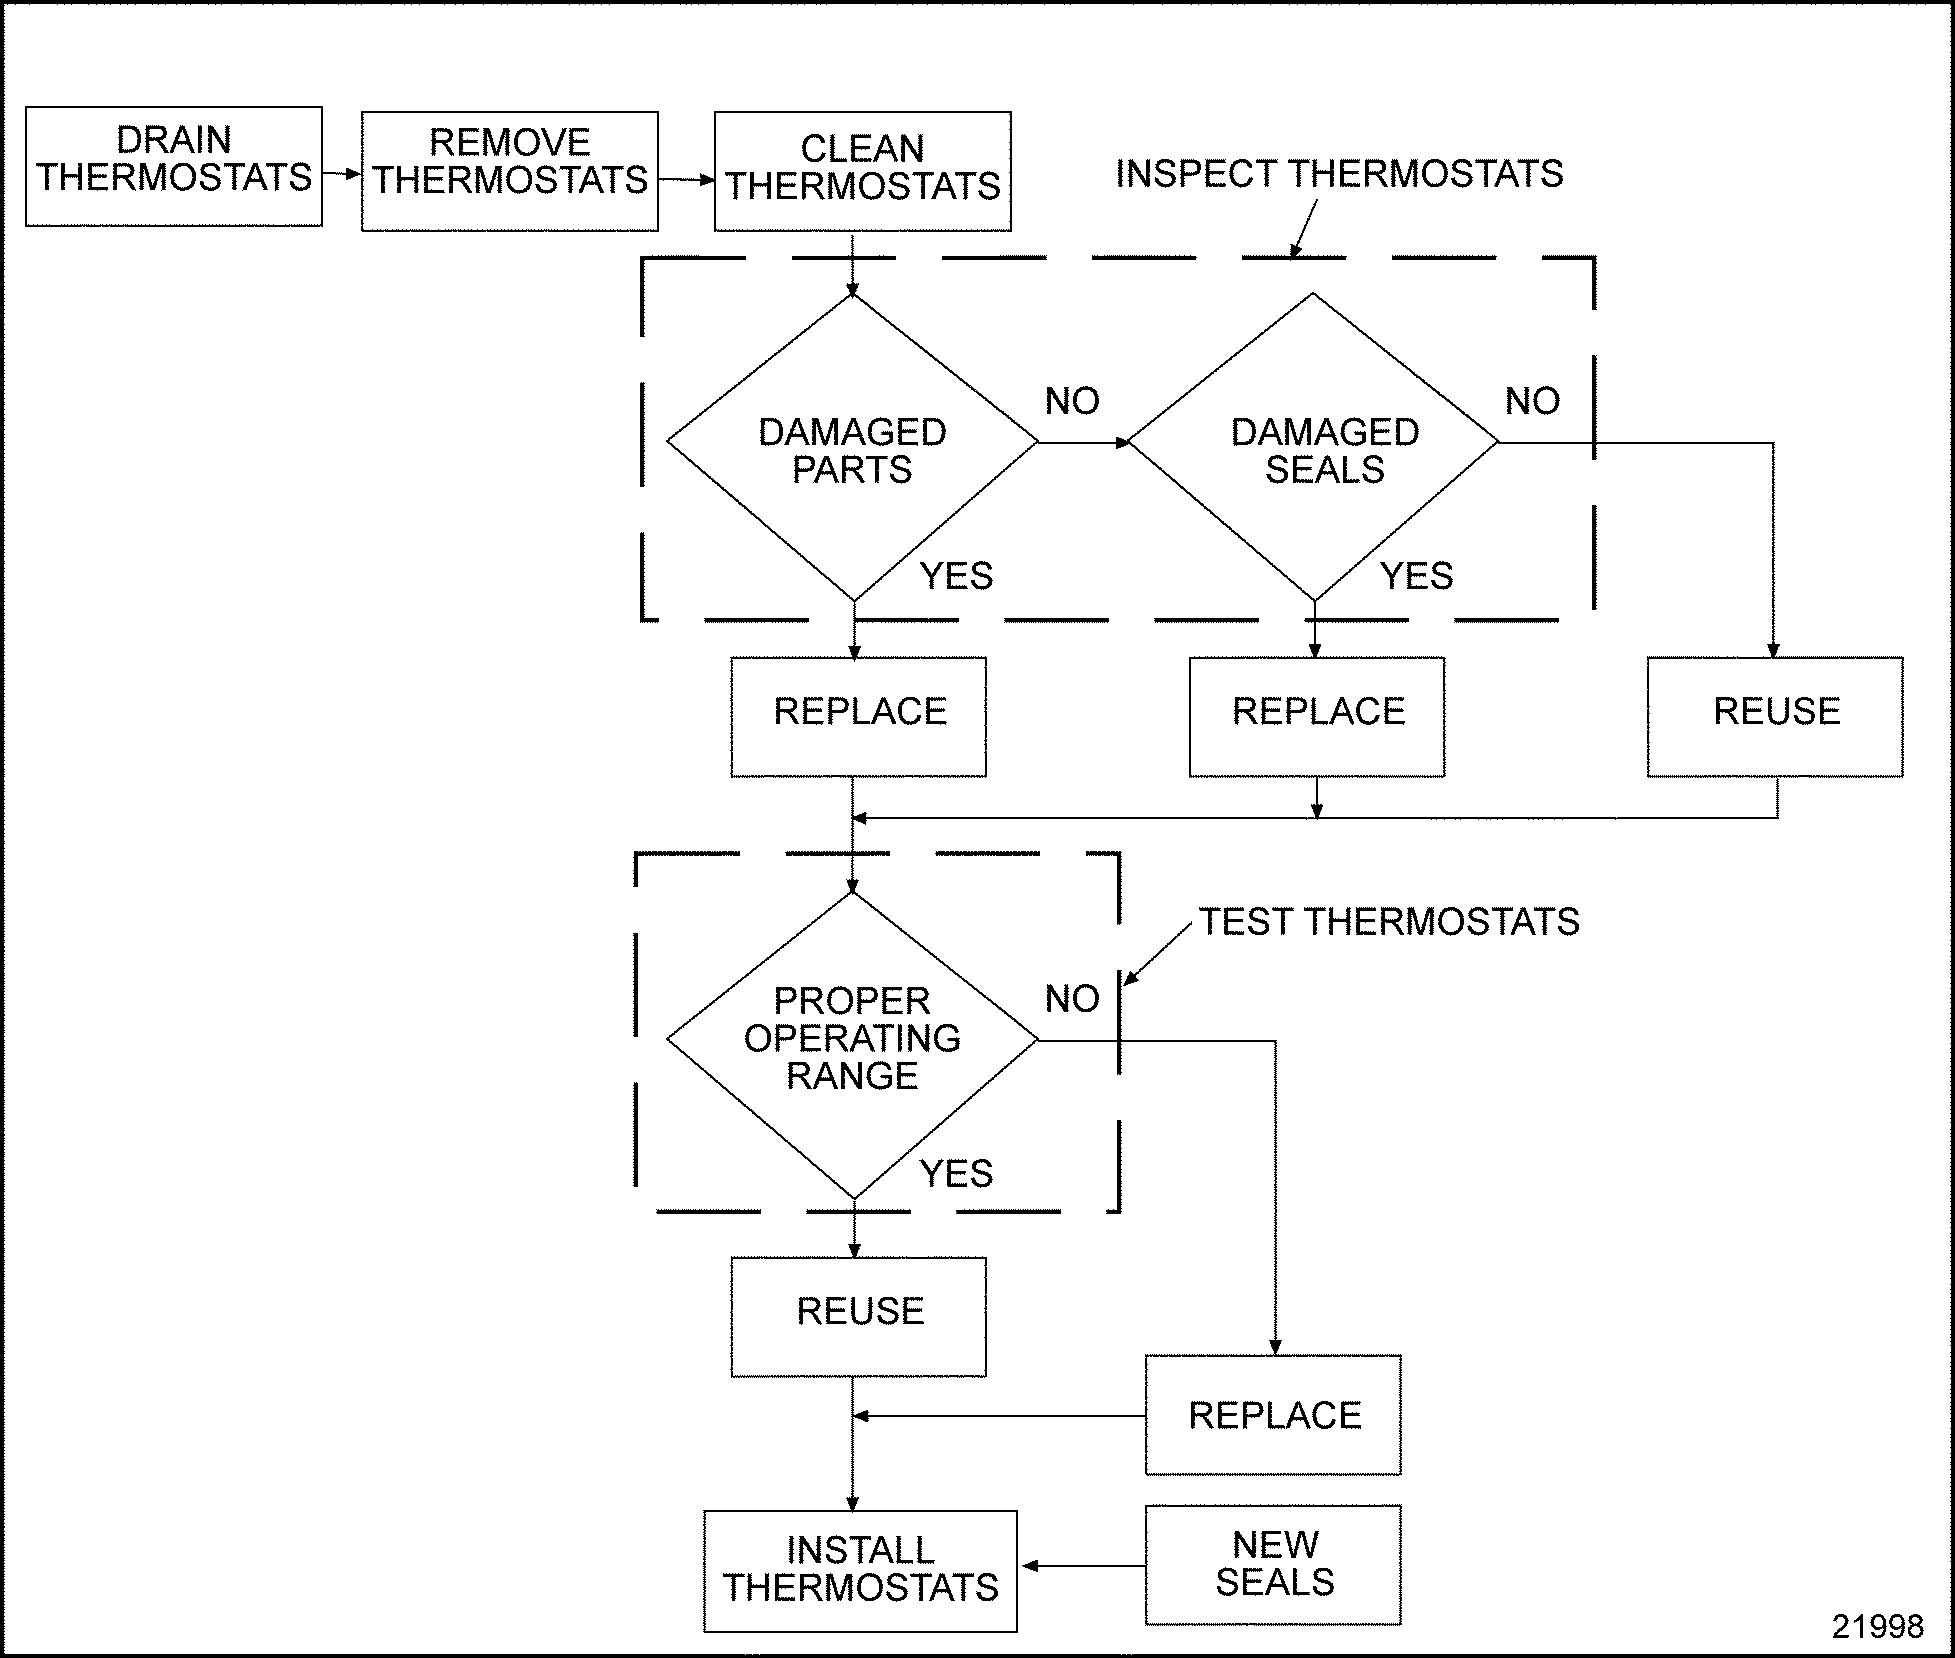
Figure 4. Flowchart for Repair or Replacement of Thermostat
Section 4.3.2
Draining and Removal of Thermostat
Drain the thermostat as follows:
|
HOT COOLANT |
|
To avoid scalding from the expulsion of hot coolant, never remove the cooling system pressure cap while the engine is at operating temperature. Wear adequate protective clothing (face shield, rubber gloves, apron, and boots). Remove the cap slowly to relieve pressure. |
- Slowly open the coolant pressure control (radiator) cap.
- Open the draincock located on the bottom of the thermostat housing.
- Drain the cooling system so that the coolant is below the thermostat level.
Remove the thermostat as follows:
- Loosen the hose clamps on the coolant hoses connected to the thermostat housing.
- Slide the hoses off the housing.
- Disconnect the vent line and any other lines which are connected to the thermostat housing.
- Remove the four thermostat housing-to-cylinder head attaching bolts.
- Remove the thermostat housing assembly from the engine.
- Remove the thermostats from the thermostat housing.
- Remove and discard the thermostat housing seals.
Section 4.3.2.1
Inspection of Thermostat
Inspect thermostat as follows:
- Clean all of the parts in clean fuel oil.

EYE INJURY
To avoid injury from flying debris when using compressed air, wear adequate eye protection (face shield or safety goggles) and do not exceed 276 kPa (40 psi) air pressure.
- Dry all parts with compressed air.
- Inspect thermostat body seal for damage, cracks or nicks.
- If any damage is noted, replace seal.
Section 4.3.3
Testing Thermostat
Check the operation of a thermostat as follows:
NOTICE: |
|
Ensure thermostat is operational. If thermostat motion becomes impaired, overheating may result. An engine which has overheated may also cause the thermostats to become inoperative. A thermostat stuck in the open position may not allow the engine to reach normal operating temperature. The incomplete combustion of fuel due to cold operation will result in build-up of carbon deposits on the pistons, rings and valves. A thermostat that does not fully open may cause engine overheating. |
- Immerse the thermostat in a metal container of water. See Figure
"Checking Thermostat Operation"
.

Figure 5. Checking Thermostat Operation
- Place a thermometer in the container using care not to allow the thermometer to touch the bottom or sides of the container.
- While slowly agitating the water to maintain an even temperature, apply heat to the container. Allow at least 10 minutes for the thermostats to react before determining if the thermostats are opening in the correct temperature range and are fully opened at 97°C (207°F).
SCALDING
To avoid injury from scalding, use lifting tools and wear heat-resistant gloves when retrieving the thermostat from boiling water.
- As the water is heated, the thermostat should begin to open (the normal opening temperature is stamped on the thermostat). 88°C (190°F) thermostats are used on the Series 50 engine with a start-to-open temperature range of 86-89°C (186-193°F). The thermostat is fully open (9.5 mm [0.375 in.]) at 97°C (207°F).
- If thermostat does not operate properly replace.
Section 4.3.4
Installation of Thermostat and Seal
Install new thermostat as follows:
- Position the new seal onto seal installer, J 8550
, and handle, J 7079-2
. See Figure
"Positioning the Seal onto Seal Installer"
.

Figure 6. Positioning the Seal onto Seal Installer
- Support the thermostat housing on a work bench so that it is level. See Figure
"Thermostat Housing Seal Insertion"
.
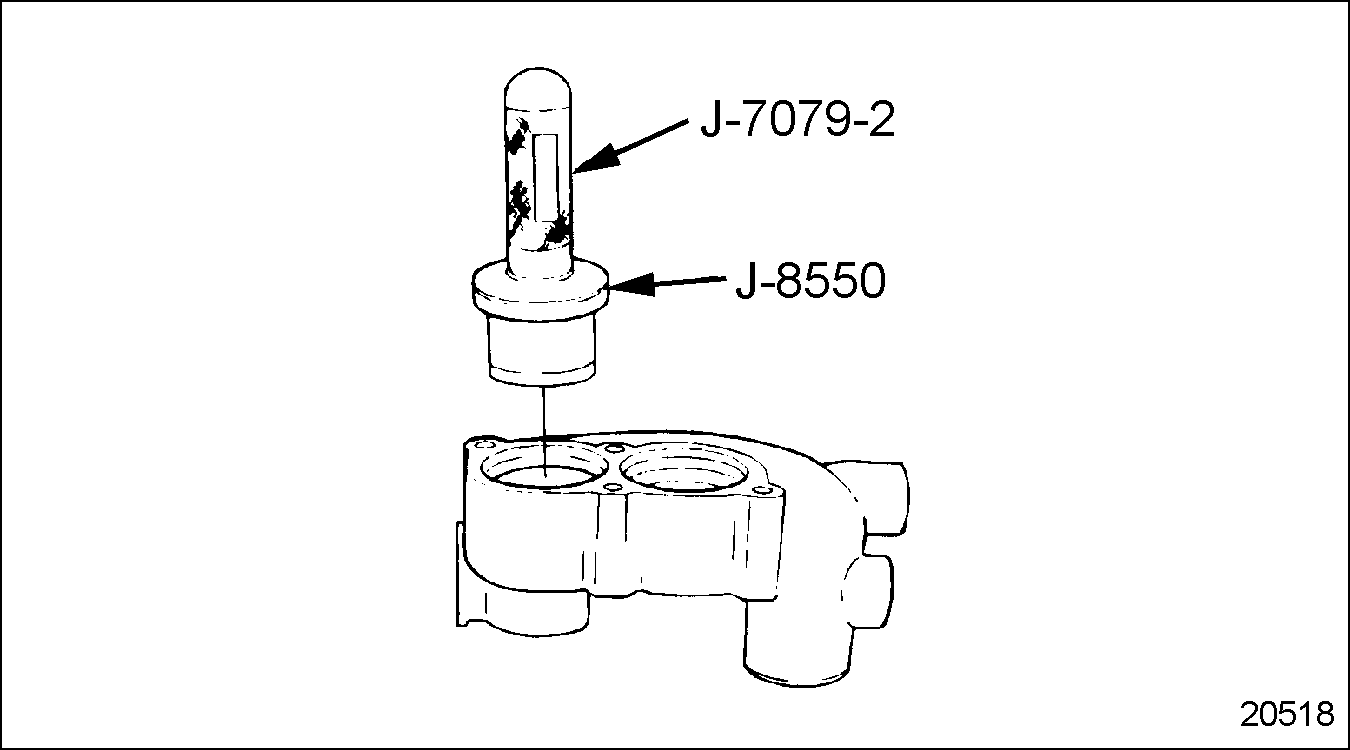
Figure 7. Thermostat Housing Seal Insertion
- Insert the seal driver with seal installed, into the thermostat housing.
- Drive the seal into the bore with a hammer, until the installation tool bottoms on the housing. See Figure
"Thermostat Housing Seal Installation"
. Rotate the tool during installation to ensure the seal is installed straight. Remove tools J 7079-2
and J 8550
.
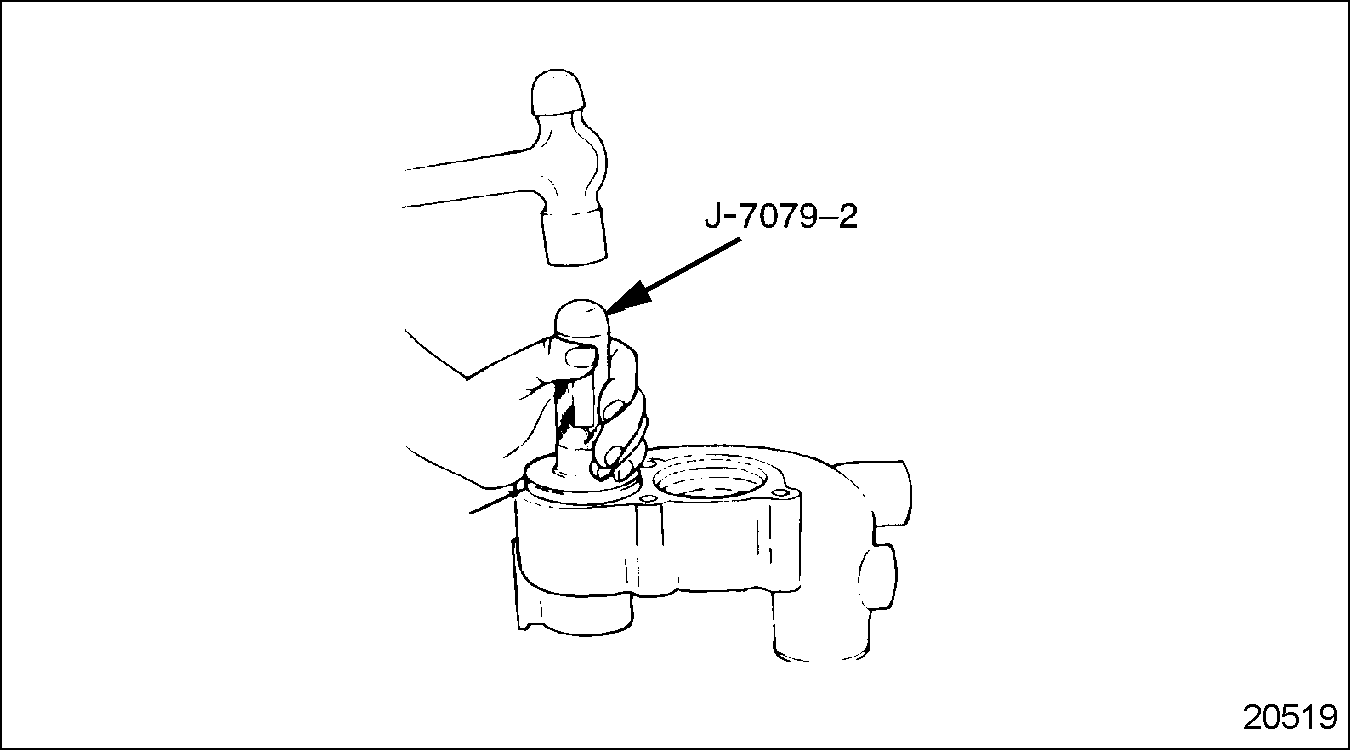
Figure 8. Thermostat Housing Seal Installation
- Repeat step 1 through step 4 for the other seal.
- Coat the lip of the seals with clean engine oil.
- Place the thermostats, spring up, into the thermostat housing.
- Press down on the thermostats to seat them. See Figure
"Seating Thermostats"
.

Figure 9. Seating Thermostats
- Be sure the machined surface of the thermostat housing, where it contacts the cylinder head, is clean and dry.
- Install the thermostat housing to the cylinder head with the four attaching bolts. Torque the bolts to 58-73 N·m (43-54 lb·ft).
- Install the coolant hoses to the thermostat housing. Tighten the hose clamps.
- Apply a coating of Loctite Pipe Sealer with Teflon, J 26558-92 part of PT-7276 , or equivalent to the threads of the draincock if it was removed from the bottom of the thermostat housing.
- Install and tighten the drain cock.
- Install any other components removed for this operation.
- Close the draincocks in the water pump housing and at the right rear of the cylinder block.
- Install the thermostat housing vent line and any other lines that were removed from the housing.
- Fill the cooling system. Refer to "13.5.4 Cooling System" .
- Refer to "11 Operation and Verification" for verification of thermostat installation. Listed in Table "Series 50 Air System, Fuel System, and Cooling System Parameters" are the normal cooling system operational parameters.
| Series 50 Service Manual - 6SE50 |
| Generated on 10-13-2008 |