Section 7.3
EGR Exhaust Manifold
The EGR exhaust manifold is a three-piece manifold. The manifold assembly is assembled apart from the cylinder heads, then the entire assembly is installed to the heads.
Section 7.3.1
EGR Exhaust Manifold Removal
Remove the EGR exhaust manifold as follows:
Note: Although not shown in the below graphic, the heat exchanger and heat exchanger bracket are still installed on the engine before the exhaust manifold is removed.
- Remove the bolt that attaches the smaller front heat shield to the main heat shield, then remove the three bolts attaching the shield to the bottom of the exhaust manifold. Now remove the heat shield. See Figure
"Removal or Installation of the Exhaust Manifold Front Heat Shield"
.

1. Upper or Main Heat Shield
2. Lower or Front Heat Shield
Figure 1. Removal or Installation of the Exhaust Manifold Front Heat Shield
Note: Upper or main heat shield must remain on the exhaust manifold assembly until the assembly is removed due to inaccessibility of some of the heat shield mounting bolts.
- Loosen and remove outside nut that is resting on outside face of stud bracket. See Figure
"Removing Stud from Exhaust Manifold and Inlet Pipe"
.

1. Stud Bracket
3. Stud
2. Stud Nut
4. Exhaust Gas Inlet Pipe (Hot Pipe)
Figure 2. Removing Stud from Exhaust Manifold and Inlet Pipe
- Loosen center nut on stud that is resting on the inside, against the intake manifold center piece. See Figure
"Removing Stud from Exhaust Manifold and Inlet Pipe"
.
Note: If the inside nut that rests against the stud bracket is NOT loosened or moved at this point, it is possible that the stud dimension adjustment will remain the same without needing further adjustment when reinstalled.
Note: Stud and stud bracket should be loose enough to allow removal of the exhaust manifold inlet pipe.
- Loosen and remove bolt from positioning clamp which holds the gas inlet pipe to the throttle valve. See Figure
"Removing or Installing Positioning Clamp to Throttle Inlet Pipe"
.

Figure 3. Removing or Installing Positioning Clamp to Throttle Inlet Pipe
- Gently pull exhaust manifold gas inlet pipe from center piece of exhaust manifold and from throttle valve (see arrows in graphic). Remove the fey rings (four per groove) on the gas inlet pipe leading to the exhaust manifold center piece. See Figure
"Exhaust Manifold Gas Inlet Pipe Removal"
.

Figure 4. Exhaust Manifold Gas Inlet Pipe Removal
- Remove the twelve bolts connecting the three-piece exhaust manifold to the block; remove the exhaust manifold assembly by first lowering the left side, then the right side out from under the heat exchanger bracket (not shown in graphic). See Figure
"Removing or Installing Three-piece Exhaust Manifold Assembly"
.

Figure 5. Removing or Installing Three-piece Exhaust Manifold Assembly
- Remove the six mounting bolts from the main or upper heat shield at this point. Remove the heat shield. See Figure
"Removing Upper Heat Shield"
.
1. Upper or Main Heat Shield
2. Lower or Front Heat Shield
Figure 6. Removing Upper Heat Shield
- Remove the stud and M8 nut and collar still attached to the center exhaust manifold piece.
- Remove the two side pieces of the exhaust manifold from the center piece. See Figure
"Three Piece Exhaust Manifold Assembly"
.
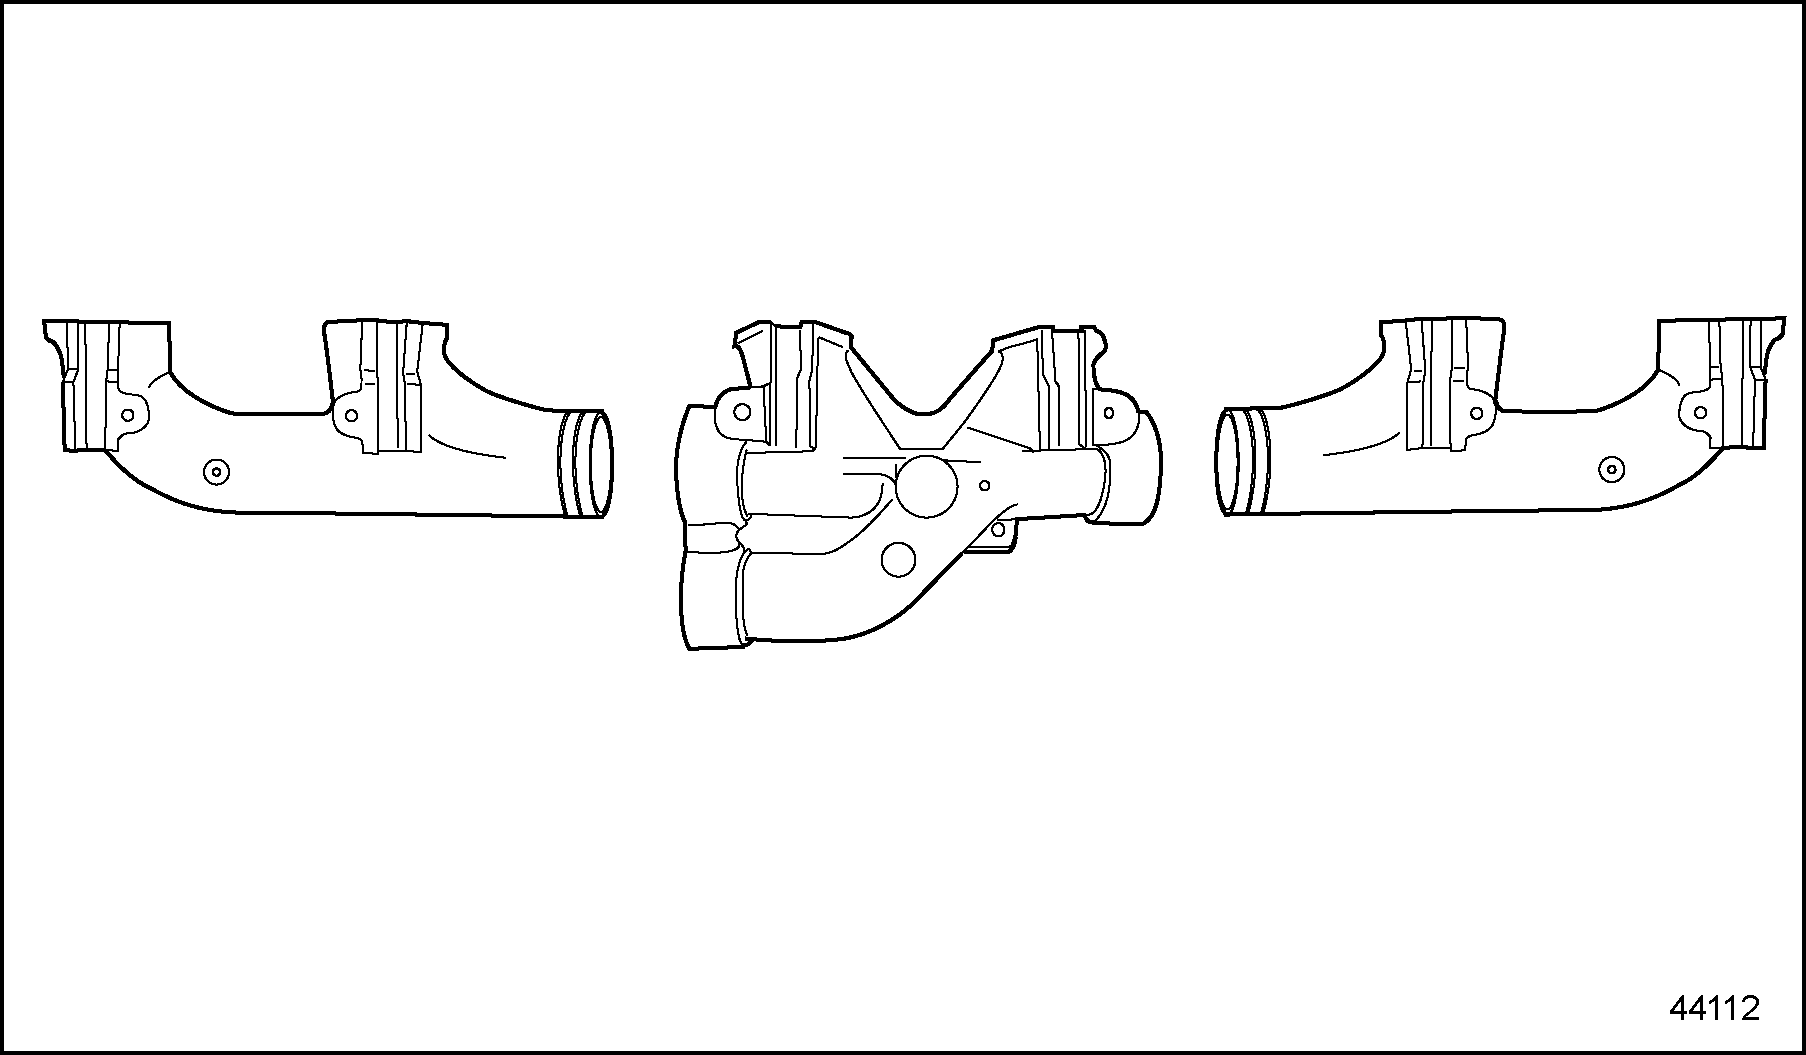
Figure 7. Three Piece Exhaust Manifold Assembly
- Remove the fey rings (2 in each groove) from the two grooves of each exhaust manifold end piece. See Figure
"Installing or Removing Rings in Exhaust Manifold Grooves"
.
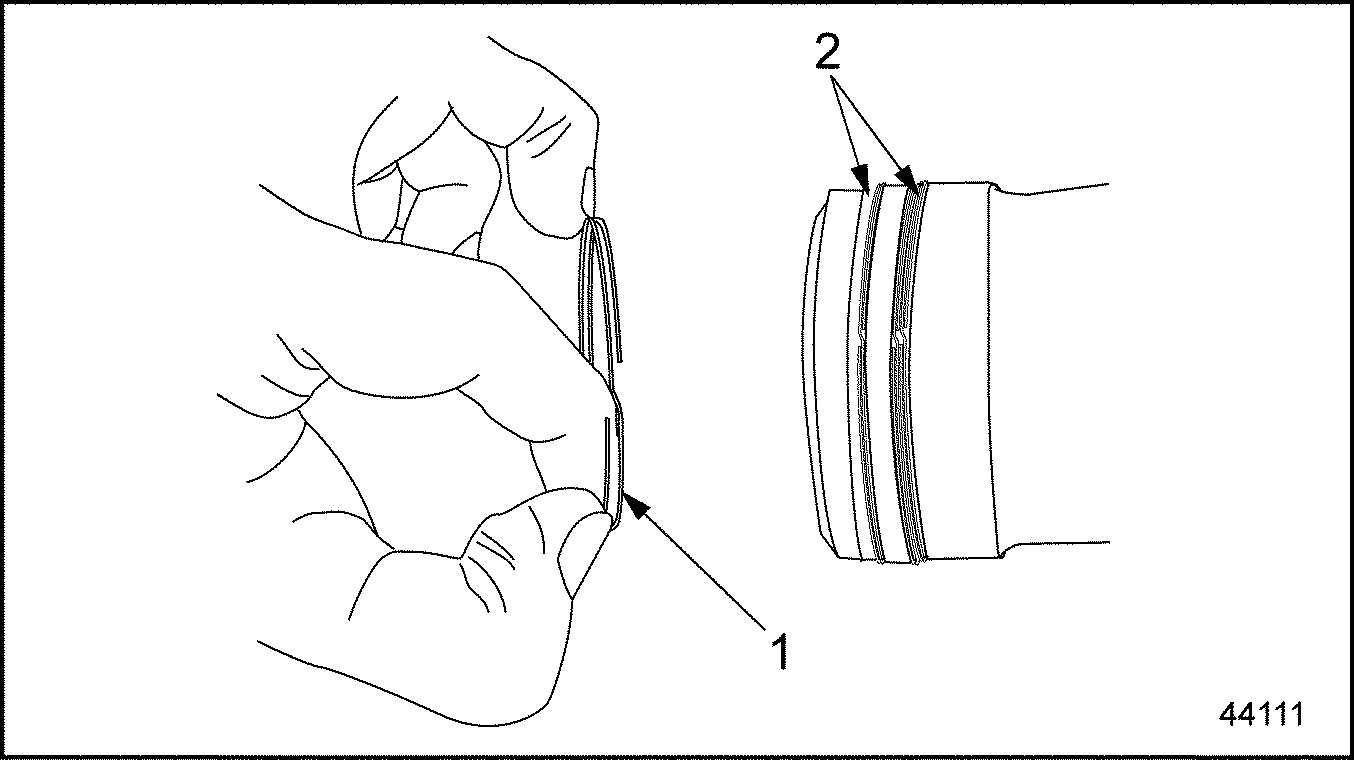
1. Fey Ring
2. Exhaust Manifold Grooves
Figure 8. Installing or Removing Rings in Exhaust Manifold Grooves
Note: EGR cooler and cooler bracket will need to be removed before removing the exhaust manifold gaskets. Refer to "7.4.1 EGR Cooler and Support Bracket Removal" .
- Remove exhaust manifold three
-piece gasket from cylinder heads. See Figure
"Removal of Exhaust Manifold Gaskets"
.
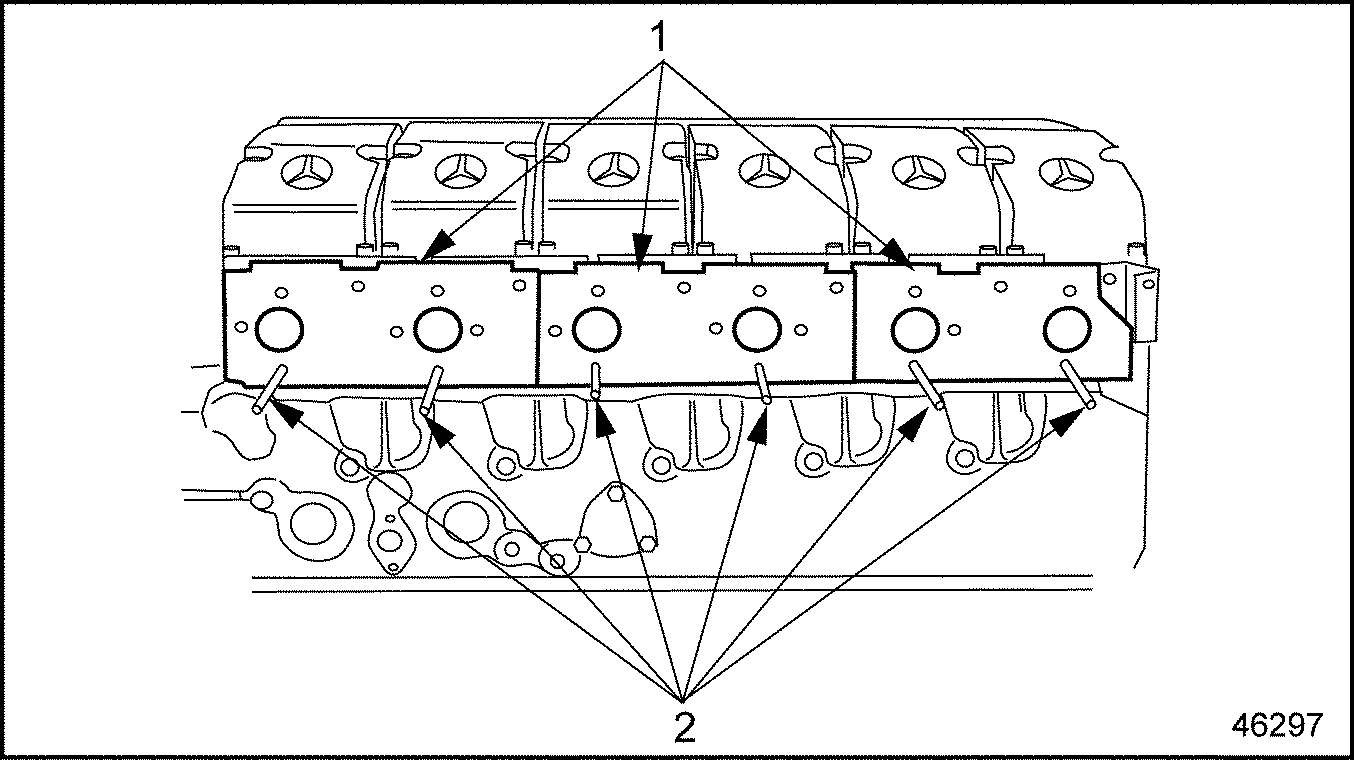
1. Three -Piece Gasket
2. Guide Studs
Figure 9. Removal of Exhaust Manifold Gaskets
Section 7.3.2
EGR Exhaust Manifold Installation
Install the EGR exhaust manifold as follows:
Note: The three-piece exhaust manifold and its related parts are first put together as an assembly; it is then mounted to the cylinder heads as one unit.
- Install the exhaust manifold guide studs to the cylinder head and mount the three
exhaust manifold gaskets. See Figure
"Installation of Exhaust Manifold Gaskets"
.
NOTICE:
The front, cylinders 1 and 2, exhaust manifold gasket has a diagonal cut along the end. Cylinders 3 – 6 use the same type of gasket. Ensure the exhaust manifold gaskets are installed in the correct location.
Note: At this point, the EGR cooler and mounting bracket should be installed on the block, but the remaining exhaust manifold installation graphics will not show these two parts installed.
Note: The exhaust manifold gasket studs are to be removed after installing the EGR cooler support bracket.
1. Three-Piece Gasket
2. Guide Studs
Figure 10. Installation of Exhaust Manifold Gaskets
- Install stud with M8 nut with collar onto exhaust manifold center piece. Do not tighten nut at this point.
Note: Stud must be installed on exhaust manifold center piece before fitting the two end pieces of manifold into center piece.
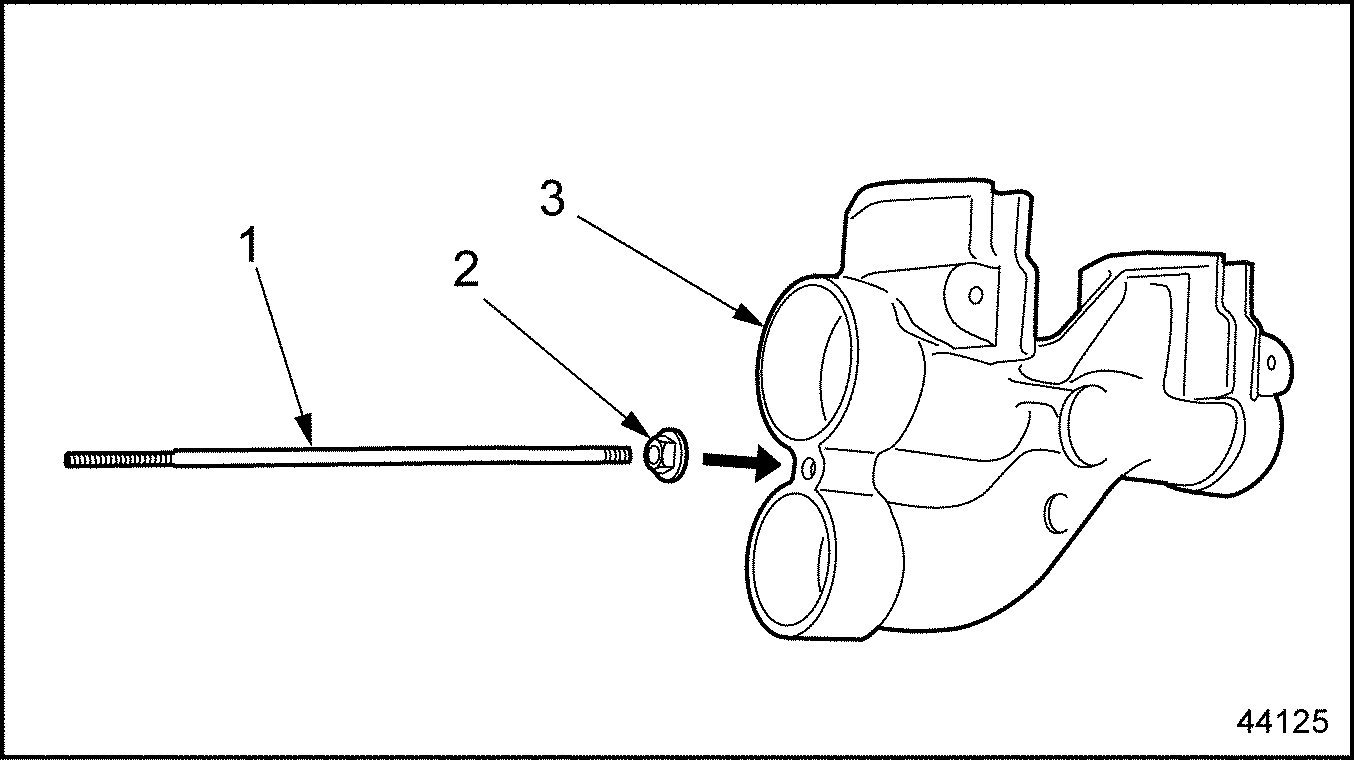
1. Stud
3. Exhaust Manifold Center Piece
2. M8 Nut with Collar
Figure 11. Installing Stud in Exhaust Manifold Center Piece
- Install the fey rings (2 in each groove) in the two grooves of each exhaust manifold end piece. See Figure
"Installing or Removing Rings in Exhaust Manifold Grooves"
.
1. Fey Rings (2 per groove)
2. Exhaust Manifold Grooves
Figure 12. Installing or Removing Rings in Exhaust Manifold Grooves
- Fit fey-ring ends of exhaust manifold pieces into center part of exhaust manifold. Do not use lubricant. See Figure "Three Piece Exhaust Manifold Assembly" .
- Bolt upper heat shield to exhaust manifold using the six mounting bolts (M8 x 12mm). Finger-tighten all of the bolts, but torque the first bolt nearest the front part of the manifold to 25 N·m (18 lb·ft).
Note: Upper heat shield bolt that is closest to front of engine is torqued before assembly is attached to engine due to impossible access after attachment to engine.
- Bolt the lower heat shield to the upper heat shield with one captured bolt and washer (M8 x 12mm). Torque to 25 N·m (18 lb·ft).
- Install the entire exhaust manifold assembly onto the cylinder heads by lifting the right side (or front) into place first, followed by the left (or rear). Install all exhaust manifold bolts, and then torque all 12 mounting bolts to 50 N·m (38 lb·ft), using a crisscross sequence.
- Torque remaining three mounting bolts (captured bolt and washer type) of the lower heat shield to the exhaust manifold. Torque to 25 N·m (18 lb·ft).
- Torque remaining five mounting bolts (captured bolt and washer type) of the upper heat shield to the exhaust manifold. Torque to 25 N·m (18 lb·ft).
- Install the fey rings (4 per groove) on the gas inlet pipe leading to exhaust manifold center piece. Do not use lubricant.
- Gently push gas inlet pipe into center exhaust manifold piece. Do not use lubricant.
- Push gas inlet pipe of heat exchanger into throttle valve. Tighten screw at bottom of positioning clamp on throttle valve assembly. Clamp must be tightened to 10 N·m (7 lb·ft) after stud adjustment. Refer to step 14 .
- Screw the nut onto stud installed in exhaust manifold. Fit stud in the bracket that is attached to the gas inlet pipe. Attach a nut to the outer edge of bracket also.
- Adjust 219 mm (8.62 in.) dimension on stud by doing the following:
- Apply 25 N·m (18 lb·ft) tightening torque to the nut on exhaust manifold. Position stud to avoid any friction between the exhaust manifold and the gas inlet pipe. See Step One in Figure
"Stud Adjustment"
.
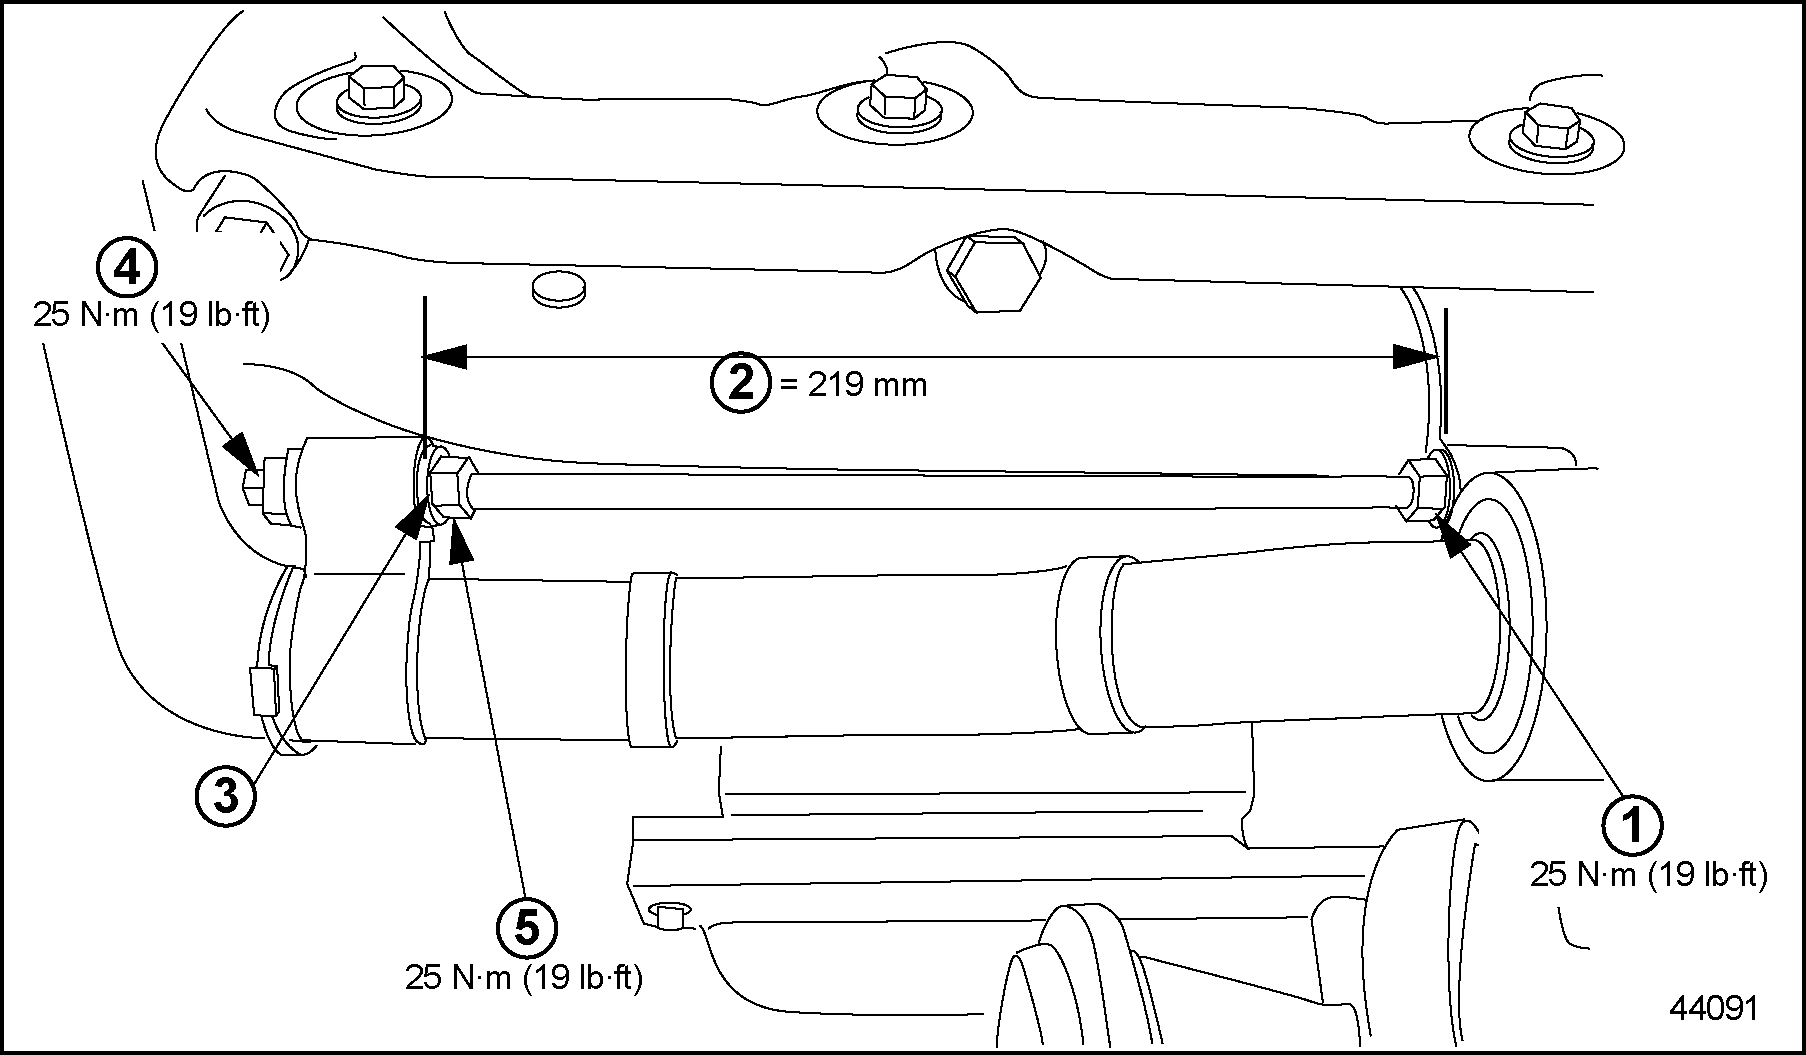
Figure 13. Stud Adjustment
- Adjust dimension to 219 mm (8.62 in.). This measurement is from the machined face of manifold to the resting face on the pipe. See Step Two in Figure "Stud Adjustment" .
- Bring nut against the resting face on pipe (internal). See Step Three in Figure "Stud Adjustment" .
- Apply 25 N·m (18 lb·ft) tightening torque to nut on resting face on pipe (external). See Step Four in Figure "Stud Adjustment" .
- Apply 25 N·m (18 lb·ft) tightening torque to nut on resting face on pipe (internal). See Step Five in Figure "Stud Adjustment" .
- Apply 25 N·m (18 lb·ft) tightening torque to the nut on exhaust manifold. Position stud to avoid any friction between the exhaust manifold and the gas inlet pipe. See Step One in Figure
"Stud Adjustment"
.
| MBE 4000 Service Manual - 6SE412 |
| Generated on 10-13-2008 |