Section 7.4
EGR Cooler and Cooler Support Bracket
The EGR system is equipped with a single-pass cooler. Exhaust gasses coming from the first three cylinders are directed through the EGR shut off valve, through the cooler and reed valves, past the EGR control valve and the mixer, then back to the cylinder.
Section 7.4.1
EGR Cooler and Support Bracket Removal
Remove the EGR cooler and its support bracket as follows:
Note: The exhaust manifold and the gas inlet pipe have already been removed at this point. It is then possible to remove the cooler and support bracket without removing the throttle valve first.
- Disconnect the coolant vent line located on top of the EGR cooler. See Figure
"Removal of Coolant Vent Line and Coolant Outlet Pipe"
.
1. Coolant Outlet Pipe Bolts
4. EGR Coolant Outlet Pipe
2. Coolant Vent Line
5. Coolant Outlet Pipe Bracket
3. Membrane
Figure 1. Removal of Coolant Vent Line and Coolant Outlet Pipe
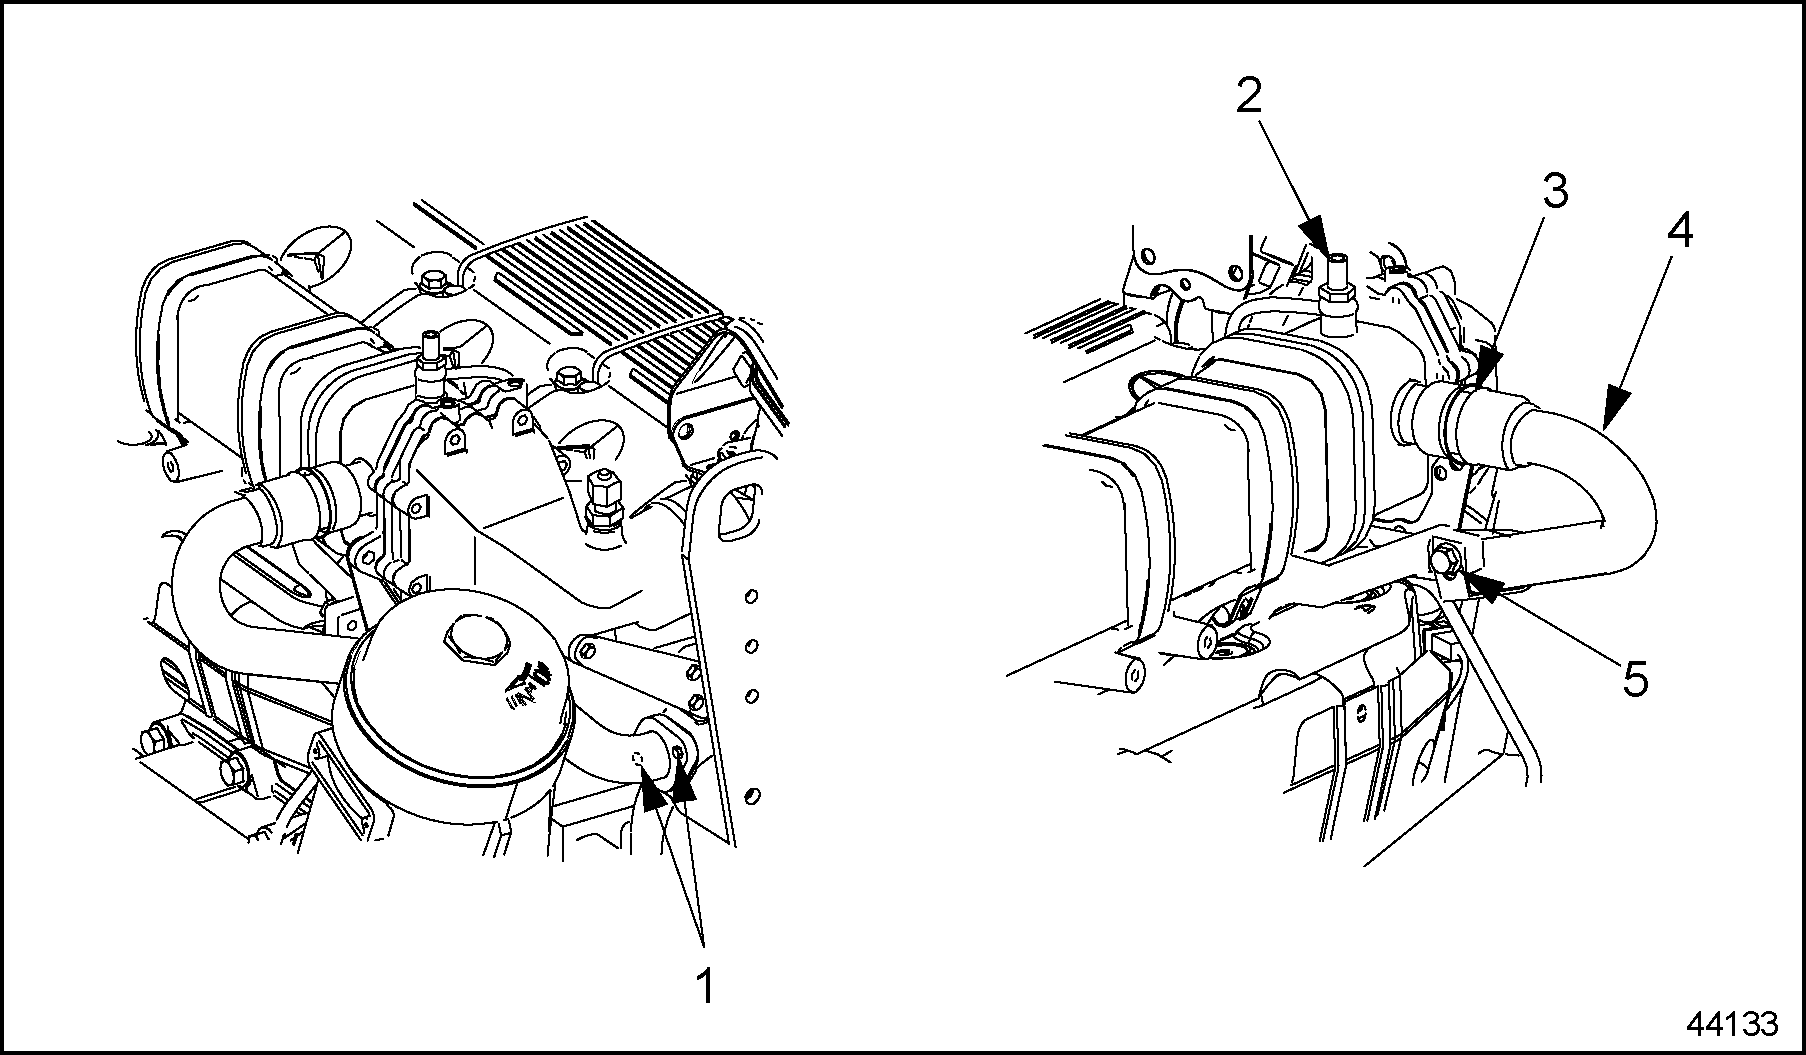
- Remove the bolt attaching the coolant outlet pipe bracket to the pipe. Remove the bracket.
- Remove the two bolts attaching the coolant outlet pipe flange to the coolant pump. Discard the gasket.
- Pull the coolant outlet pipe away from the cooler, leaving the connecting membrane in the EGR cooler boss.
- Remove the EGR temperature sensor from the reed valve housing and disconnect the sensor wiring harness where it is attached with cable ties to the reed valve housing mounting bracket. See Figure
"Removing EGR Air Temperature Sensor"
.

1. EGR Air Temperature Sensor
2. Reed Valve Housing Bracket
Figure 2. Removing EGR Air Temperature Sensor
- Remove the three bolts from the front bracket that holds and stabilizes the reed valve housing to the thermostat housing. See Figure "Removing EGR Air Temperature Sensor" .
- Remove the two front sheet metal support-to-cooler support bolts (See number 1 in graphic). See Figure
"Removing Front Sheet Metal Support"
.

1. Front Sheet Metal Support-to-Cooler Support Bolts
3. EGR Cooler-to-Sheet Metal Support Bolts
2. Front Sheet Metal Support
Figure 3. Removing Front Sheet Metal Support
Note: Do not remove the eight mounting bolts attaching the reed valve housing to the cooler at this time. Also, do not remove the two EGR cooler-to-sheet metal support bolts at this time. They will all be removed once the EGR cooler as an assembly is taken off of the engine.
- Remove the two bolts mounting the lower coolant inlet pipe to the block and remove the bracket bolt, just below the membrane, which attaches the lower coolant inlet pipe to the block. Remove gasket. See Figure
"Removing Coolant Inlet Pipe"
.

1. Lower Coolant Inlet Pipe
4. Shut off Valve Housing Bolt (2 qty.)
2. Membrane
5. Air Supply Line
3. Air Line Mounting Bolts
Figure 4. Removing Coolant Inlet Pipe
- Pull down on the lower coolant inlet pipe to loosen it from the upper pipe. Remove the membrane also.
Note: Have a container nearby to drain any unused coolant from the inlet pipes.
- Remove the two shut off valve housing bolts that hold the valve housing to the EGR cooler support. See Figure "Removing Coolant Inlet Pipe" .
- Remove the air line mounting bolts. Loosen and remove the air supply line from the EGR shut off valve. See Figure "Removing Coolant Inlet Pipe" .
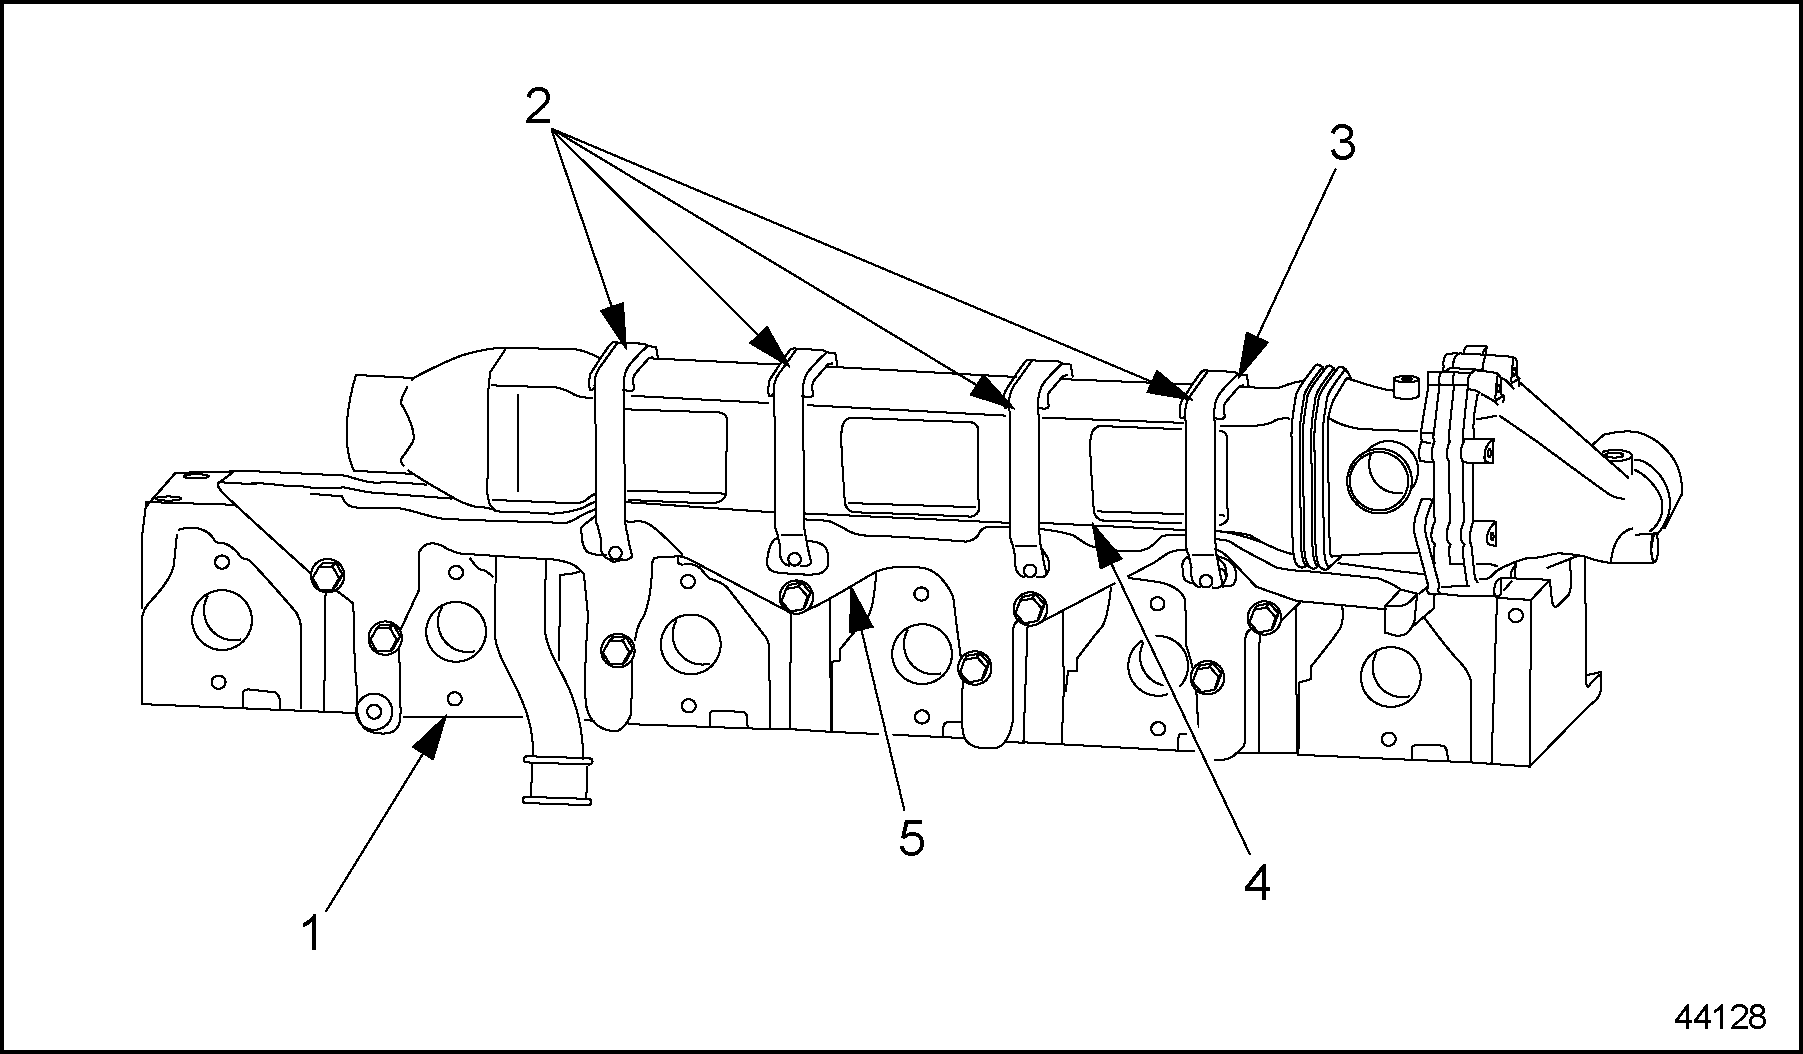
- Loosen and remove the four bolts from the four clamps that are holding the EGR cooler to the cooler support bracket. Remove the four clamping pieces for clamps also. See Figure
"Removing Clamps on the Cooler"
.

1. EGR Cooler
3. Clamps (4 Qty.)
2. Clamping Pieces (4)
4. Clamp Bolts
Figure 5. Removing Clamps on the Cooler
Note: The oil filter and oil filter cover should be removed for good clearance when removing and installing the EGR cooler assembly.
- With the cooler completely loosened at this point, pull the cooler housing flange away from the EGR control valve. As the cooler is lifted, slide the cooler inlet pipe up through the opening in the cooler support bracket. See Figure
"Removing EGR Cooler"
.
1. Cylinder Heads
4. EGR Cooler
2. EGR CoolerTightening Clamps
5. EGR Cooler Support
3. Tightening Tool for Clamps
Figure 6. Removing EGR Cooler
Note: Before removing the eight bolts from the EGR cooler support, insert the four guide studs into the exhaust manifold gasket holes to support the gaskets once the cooler support is removed.
- Remove the eight mounting bolts from the EGR cooler support and remove the support from cylinder heads. See Figure
"Removing the EGR Cooler Support"
.

1. M10 x 65 mm Bolts
2. M10 x 45 mm Bolts
Figure 7. Removing the EGR Cooler Support
- Remove the eight mounting bolts from the EGR cooler flange, which houses the reed valves. See Figure
"Removing the EGR Cooler Flange"
.

1. EGR Cooler-to- Sheet Metal Support Bolts
2. EGR Cooler Flange Bolts
Figure 8. Removing the EGR Cooler Flange
- Remove the two EGR cooler-to-sheet metal support bolts. See Figure "Removing the EGR Cooler Flange" .
- Remove the reed valves from housing. See Figure
"Removing the EGR Cooler Flange and Components"
.

1. EGR Cooler Housing
4. EGR Reed Valve Flange
2. EGR Cooler Gasket
5. Reed Valves
3. EGR Cooler Intermediate Flange
Figure 9. Removing the EGR Cooler Flange and Components
- Remove the intermediate flange and gasket from cooler flange assembly. See Figure "Removing the EGR Cooler Flange and Components" .
Section 7.4.2
EGR Cooler and Support Bracket Installation
Install the EGR cooler and the EGR cooler support bracket as follows:
Note: Exhaust manifold gaskets will have to be installed before EGR cooler support or cooler can be installed. Refer to "7.3.2 EGR Exhaust Manifold Installation" .
- Install coolant outlet pipe. Install the two M8 x 25 mm bolts through the coolant pipe flange, metal gasket and into the coolant pump. Leave loose until the cooler assembly is installed, then torque bolts to 35 N·m (26 lb·ft). See Figure
"Installation of Coolant Outlet Pipe"
.
1. Coolant Outlet Pipe Bolts
4. EGR Coolant Outlet Pipe
2. Coolant Vent Line
5. Coolant Outlet Pipe Bracket
3. Membrane
Figure 10. Installation of Coolant Outlet Pipe
Note: Coolant outlet pipe must be installed to coolant pump before the EGR cooler support and cooler are installed.
- Install the cooler support to the cylinder heads using the eight mounting bolts. Torque all bolts to 25 N·m (19 lb·ft). See Figure
"Installing EGR Cooler Support"
.
1. M10 x 65 mm Bolts
2. M10 x 45 mm Bolts
Figure 11. Installing EGR Cooler Support
Note: If at this point the exhaust manifold gasket studs are still in place, they will need to be removed.
Note: Assemble and attach the EGR reed valve housing to the cooler before mounting the cooler to the cooler support.
- Insert the reed valves into the EGR reed valve housing flange.
- Assemble the EGR reed valve housing flange, cooler intermediate flange, gasket and front sheet metal support together. Attach all to the cooler housing using the eight mounting bolts. Torque the bolts to 10 N·m (8 lb·ft). See Figure
"Installing the EGR Cooler Flange"
.
1. EGR Cooler-to- Sheet Metal Support Bolts
2. EGR Cooler Flange Bolts
Figure 12. Installing the EGR Cooler Flange
- Attach the EGR cooler to the front sheet metal support with two bolts. Torque to 25 N·m (19 lb·ft). See Figure "Installing the EGR Cooler Flange" .
- Using industrial petroleum grease, insert a membrane into the side of the EGR control valve that is closest to the EGR cooler. See Figure
"Installing Symmetric Membrane into EGR Valve"
.
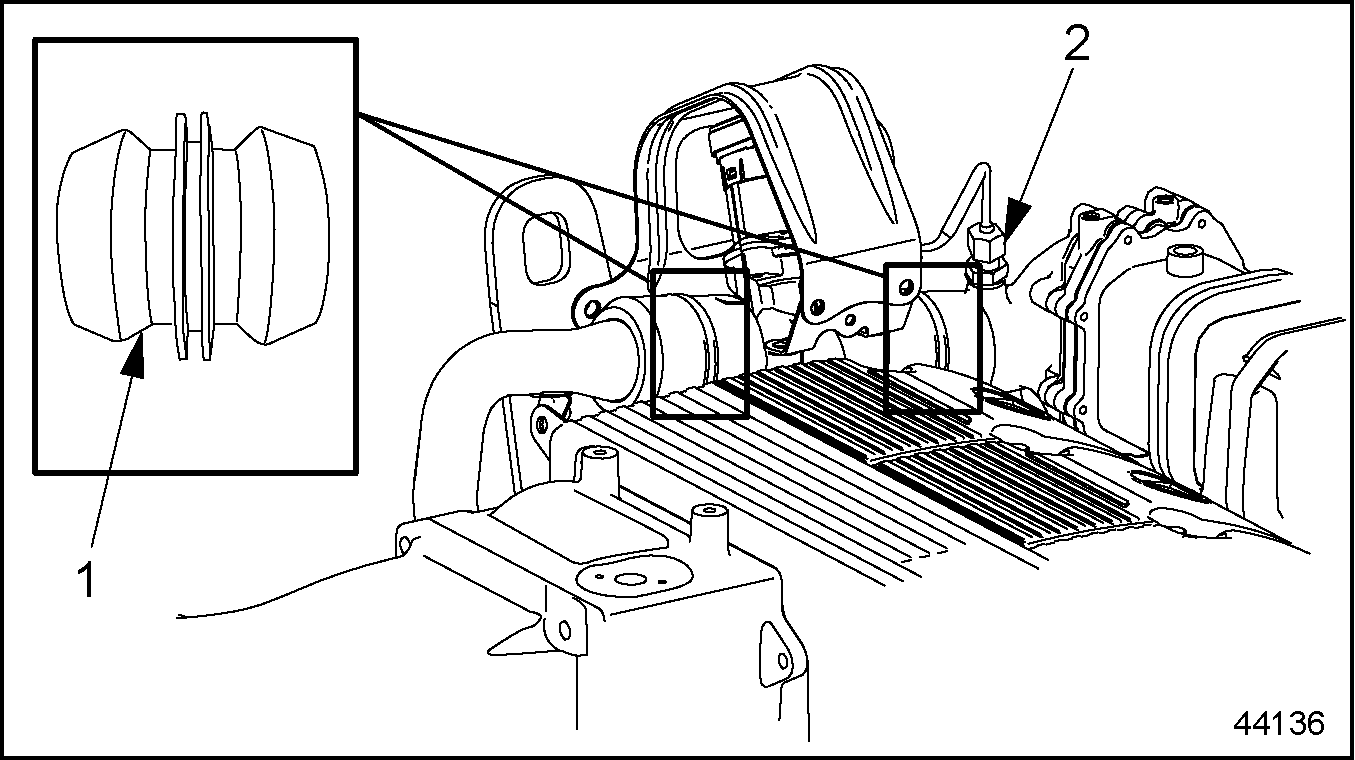
1. SymmetricMmembrane
2. EGR Temperature Sensor
Figure 13. Installing Symmetric Membrane into EGR Valve
- Lift entire EGR cooler with attached cooler flange and sit this on top of cooler support, taking care to insert the upper half of the coolant inlet pipe down through the appropriate hole in the cooler support. At the same time, push the cooler flange into the membrane. See Figure
"Installing Symmetric Membrane into EGR Valve"
.
Note: The oil filter and oil filter cover should be removed for good clearance when removing and installing the EGR cooler assembly.
- Insert the connecting membrane in the EGR cooler boss using industrial petroleum grease and push the EGR coolant outlet pipe onto the cooler. See Figure
"Installation of Coolant Vent Line and Coolant Outlet Pipe"
.
1. Coolant Outlet Pipe Bolts
4. EGR Coolant Outlet Pipe
2. Coolant Vent Line
5. Coolant Outlet Pipe Bracket
3. Membrane
Figure 14. Installation of Coolant Vent Line and Coolant Outlet Pipe
- Attach front sheet metal support-to-cooler support using two M8 x 12 mm bolts. Torque to 25 N·m (18 lb·ft).
- Install the bolt to the coolant outlet pipe bracket. Torque to 35 N·m (26 lb·ft). See Figure "Installation of Coolant Vent Line and Coolant Outlet Pipe" .
- Install coolant vent line. Torque to 25 N·m (18 lb·ft).
- Install the reed valve-housing bracket to the thermostat housing with the three mounting bolts. Torque to 25 N·m (18 lb·ft). See Figure "Installing the EGR Air Temperature Sensor and Housing Bracket" .
- Install the EGR air temperature sensor into reed valve housing flange. Torque to 25 N·m (18 lb·ft). Using plastic ties, attach remainder of sensor to reed valve-housing bracket. See Figure
"Installing the EGR Air Temperature Sensor and Housing Bracket"
.
NOTICE:
There is a possibility of installing the air temperature sensor wrong-sided. Take care to install it properly.
1. EGR Air Temperature Sensor
2. Reed Valve Housing Bracket
Figure 15. Installing the EGR Air Temperature Sensor and Housing Bracket
- Install the four clamping pieces and four clamps that hold the EGR cooler to the cooler support bracket. Torque to 10 N·m (7 lb·ft). See Figure
"Installing Clamps on the Cooler"
.
1. EGR Cooler
3. Clamps (4 Qty.)
2. Clamping Pieces (4)
4. Clamp Bolts
Figure 16. Installing Clamps on the Cooler
- Fit lower coolant inlet pipe into the symmetric membrane. Install the two bolts in the metal gasket and engine block. Also install bolt in pipe support bracket. Torque both bolts to 35 N·m (26 lb·ft). See Figure
"Installing Coolant Inlet Pipe"
.
1. Lower Coolant Inlet Pipe
4. Shut off Valve Housing Bolt (2 qty.)
2. Membrane
5. Air Supply Line
3. Air Line Mounting Bolts
Figure 17. Installing Coolant Inlet Pipe
- Install EGR shutoff valve and secure using two bolts. Torque to 35 N·m (26 lb·ft).
- Install and attach air supply line using two mounting bolts.
Section 7.4.2.1
EGR Cooler Inspection
In the event there is a suspected EGR cooler leak, inspect the engine for the following symptoms:
- Excessive coolant consumption identified by the Amber Warning Lamp (AWL) for low coolant level.
- Black traces of a liquid on the rear right side of engine block, near the shutoff-valve.
- Black soot on the inside surface of the heat shield and the mounting bracket for the EGR shutoff-valve.
- Leaking water or coolant traces around the EGR valve, outlet pipe, or shutoff-valve. See Figure
"Leaking Water or Coolant Traces near Shutoff-Valve"
.

Figure 18. Leaking Water or Coolant Traces near Shutoff-Valve
Note: Water condensation can generate water/coolant traces around EGR components. Water condensation does not imply that there is a component failure. In the case of a leaking EGR cooler, the water/coolant traces in the EGR components are always associated with coolant consumption. Check the Amber Warning Lamp (AWL) for low coolant level.
See Figure "Flowchart for Checking Coolant System for Pressure Leaks" for the flowhart of checking the coolant system for leaks. This flowchart must be applied to engines with excessive loss of coolant or for a low coolant level warning on the AWL.

Figure 19. Flowchart for Checking Coolant System for Pressure Leaks
Note: New coolant pipes have been added to the coolant system (EGR cooler supply and return lines). Make sure that they also are inspected for leaks during the coolant system pressure test.
Section 7.4.2.2
EGR Cooler Leak Test
Perform the following steps to conduct a cooler leak test:
- Short-circuit or plug the coolant ports on the EGR cooler. See Figure
"EGR Cooler Ports Closed"
for details.
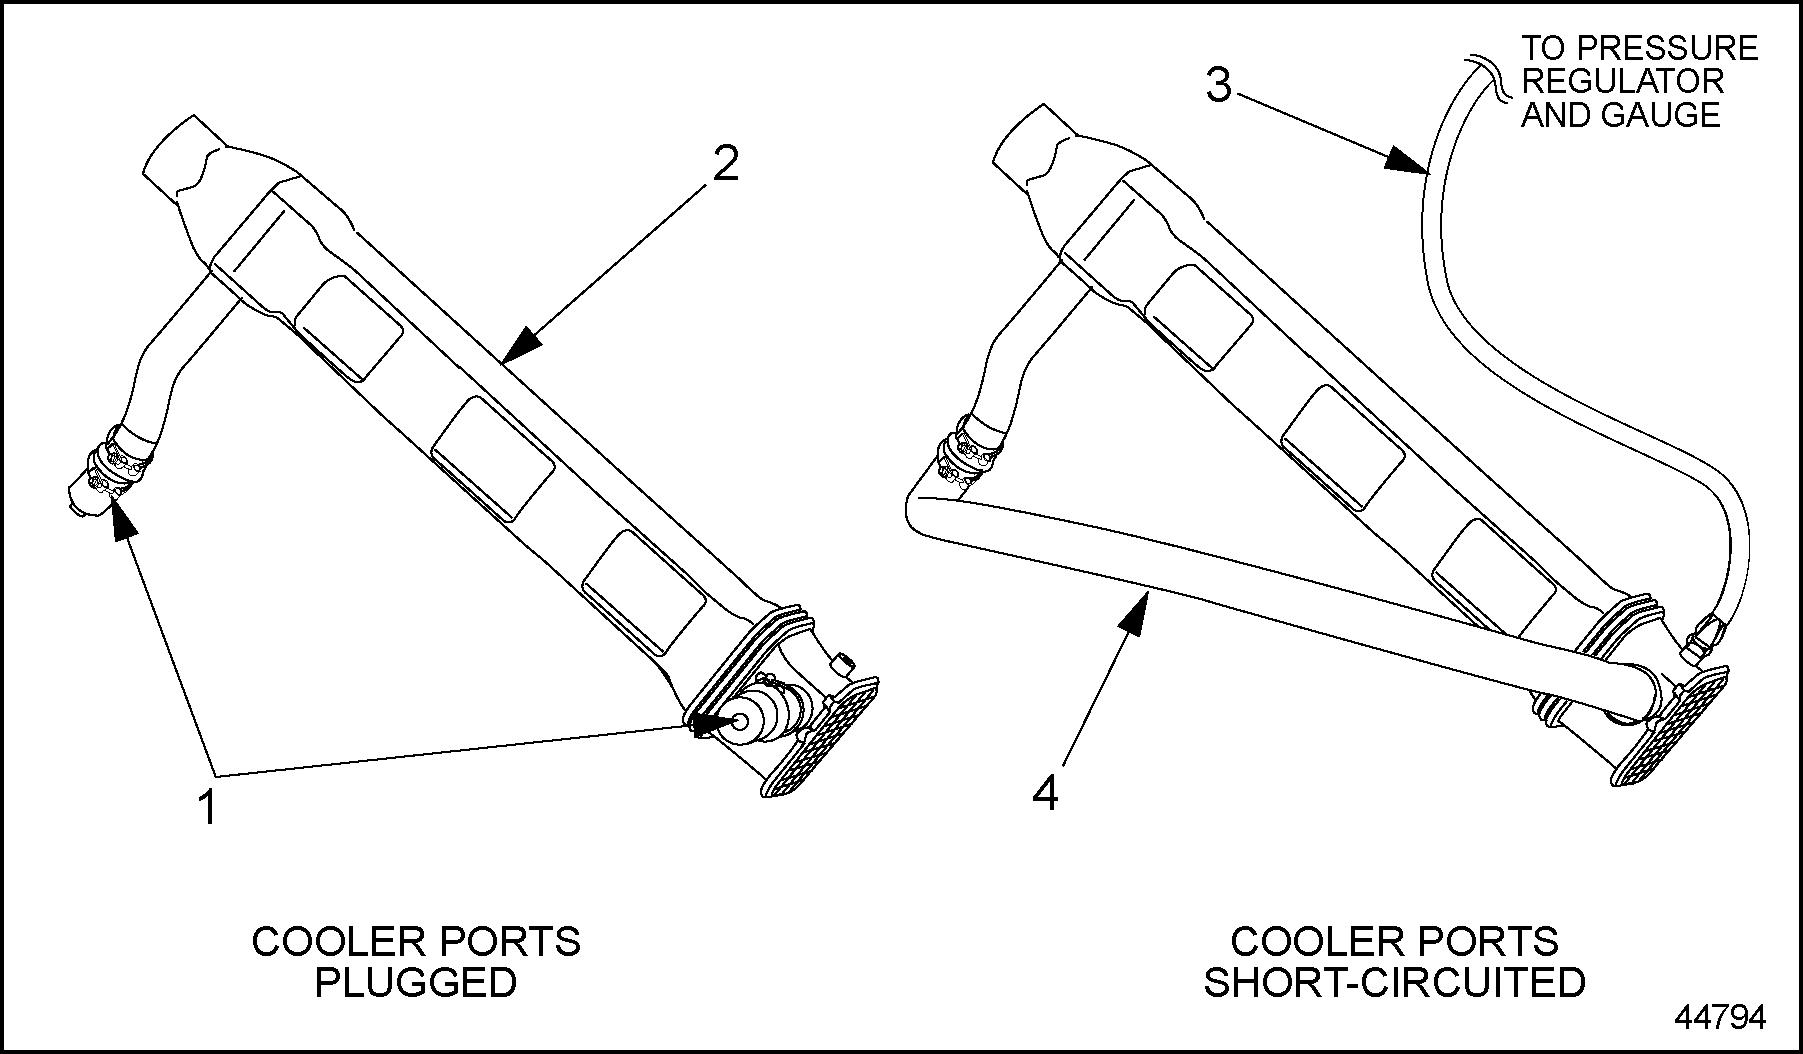
1. EGR Cooler Ports
3. Vent Line
2. EGR Cooler
4. Circuit Hose
Figure 20. EGR Cooler Ports Closed
- Connect an air supply with a pressure regulator and pressure gauge to the EGR cooler vent line.

EYE INJURY
To avoid injury from flying debris when using compressed air, wear adequate eye protection (face shield or safety goggles) and do not exceed 276 kPa (40 psi) air pressure.
- Pressurize the EGR cooler to 90 kPa (13 psi). When adjusting the pressure, do not exceed 103 kPa (15 psi).
BURNS
To avoid injury from burning, use lifting tools and heat-resistant gloves when handling heated components.
- Submerge the EGR cooler completely in a hot water tank. Tip one end of the cooler up so that air bubbles will quickly escape.
- Leave the EGR cooler submerged for five minutes.
- In the event of a failed EGR cooler, a steady stream of small air bubbles will come out of the highest end of the EGR cooler.
- Replace the EGR cooler.
| MBE 4000 Service Manual - 6SE412 |
| Generated on 10-13-2008 |
Looking for plastic vent tube # 2 that gos down to head off the top of egr part#