Section 1.6
Crankshaft
The crankshaft is precision-forged with seven main bearings and eight custom-forged counter weights, and a vibration damper at the front end.
Section 1.6.1
Crankshaft Removal
Remove crankshaft as follows:
- Remove the engine.
- Remove the cylinder head. Refer to "1.2.1 Cylinder Head Removal" .
- Remove the oil pan. Refer to "3.7.1 Oil Pan Removal" .
- Remove the flywheel housing.Refer to "1.14.1 Flywheel Housing Removal" .
- Remove the pistons. Refer to "1.15.1 Piston Removal"
- Remove the oil pump. Refer to "3.3.1 Oil Pump Removal"
.

FALLING FLYWHEEL
To avoid injury from a falling flywheel when removing the last bolt, hold the flywheel against the crankshaft by hand to prevent it from slipping off the crankshaft. The flywheel is not doweled to the crankshaft.
- Remove the flywheel. Refer to "1.10.1 Flywheel Removal" .
- Remove the crankshaft gear from the crankshaft. See Figure
"Crankshaft, Main Bearings, and Main Bearing Caps"
.

1. Crankshaft
6. Main Bearing Cap for Thrust washer
2. Upper Bearing Shell
7. Main Bearing-Cap Bolt
3. Lower Bearing Shell
8. Crankshaft Gear
4. Thrust washer
9. Locating Pin
5. Main Bearing Caps
Figure 1. Crankshaft, Main Bearings, and Main Bearing Caps
- Mark the order of the main bearing caps, then remove the main bearing-cap bolts. Loosen the main bearing caps with a plastic hammer and remove them.

BODILY INJURY
To avoid injury from a falling component, ensure a proper lifting device is used. Never stand beneath a suspended load.
- Attach a suitable hoist to the crankshaft, using the existing mounting bolts for the flywheel and the vibration damper/belt pulley. Lift the crankshaft out of the crankcase.
- Mark the upper bearing shells relative to their bearing caps, then remove them from the crankcase.
- Check all parts for wear or damage. Measure the various crankshaft tolerances. Refer to "1.6.1.1 Crankshaft Measuring" .
Section 1.6.1.1
Crankshaft Measuring
Measure the crankshaft as follows:
- Remove the engine.

BODILY INJURY
To avoid injury from a falling component, ensure a proper lifting device is used. Never stand beneath a suspended load.
- Remove the crankshaft. Refer to "1.6.1 Crankshaft Removal" .
- Clean the crankshaft. Check the crankshaft flange at the front for wear.
- Check the main bearing and connecting rod journals for damage and cracks. If damage or cracks are present, replace the crankshaft. See Figure
"Crankshaft Measurements"
.
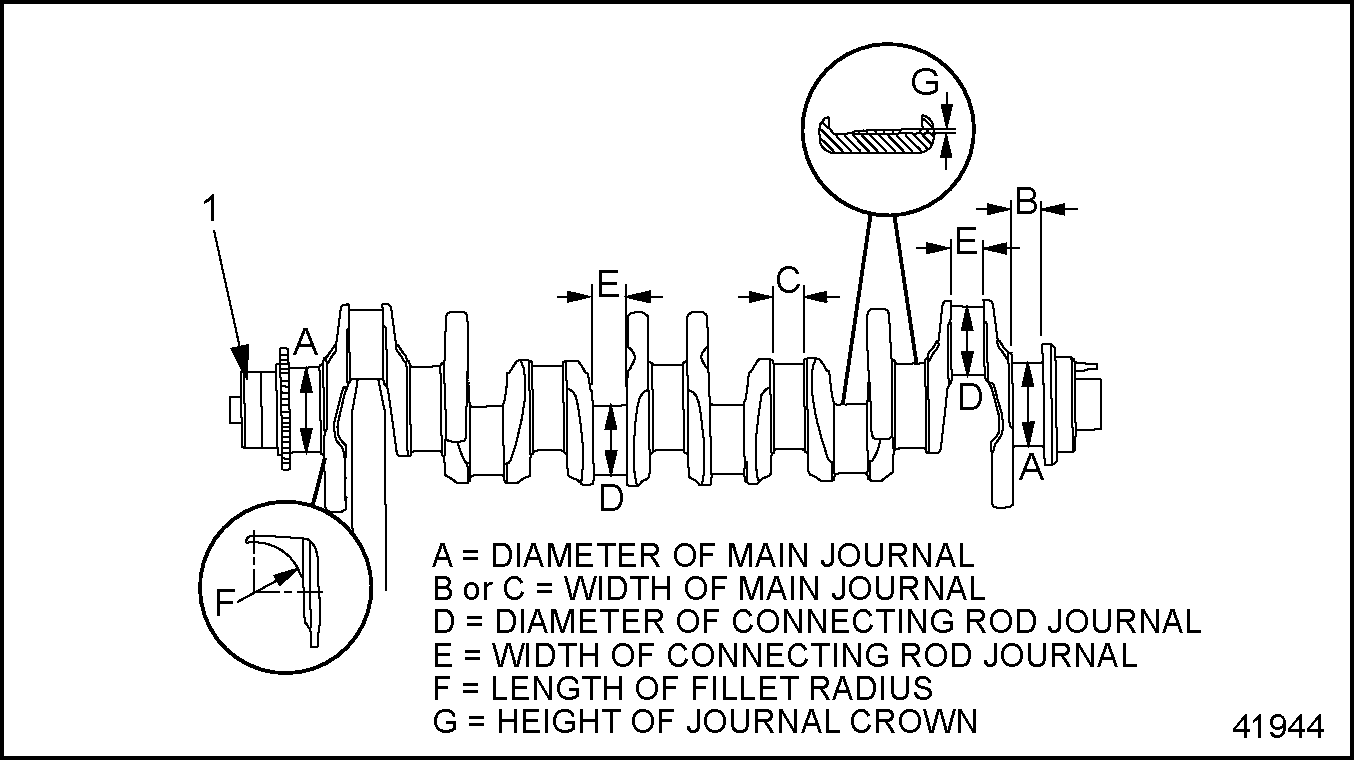
1. Crankshaft
2. Hardness Tester
Figure 2. Crankshaft Measurements
- Using a hardness tester, test the hardness of the journals. Each journal must pass the hardness test at two thirds of its circumference. If it doesn't, either replace the crankshaft, or have it re-hardened.
- Place a base underneath the bearing journal to be tested.
- Test the hardness all the way around the journal circumference. The hardness should be a minimum of 52 HRC. The crankshaft specifications are listed in Table
"Crankshaft Specifications"
.
Description
Specification
Main and Connecting-Rod Bearing Journals Permissible Difference In Out-Of-Roundness
0.005 mm
(0.0002 in.)
Permissible Taper at Main Bearing Journals and Connecting-Rod Bearing Journals
0.005 mm
(0.0002 in.)
Fillet Radii of Main Bearing and Connecting-Rod Bearing Journals
2.5 to 3.0 mm
(0.0984 to 0.1181 in.)
Radial Runout Measured at Middle Main Journal*
0.15 mm
(0.0059 in.)
Lateral Runout (End Play) Measured at Thrust washer Bearing Journal
0.16–0.38 mm
(0.006–0.015 in.)
Crown of Main Bearing Journals and Connecting-Rod Journals
0.000 to 0.004 mm
(0.000 to 0.0002 in.)
Main Bearing and Connecting Rod Journal Hardness (Rockwell hardness)
52 HRC (min.)
Permissible Imbalance of Crankshaft†
30 gcm
(0.4162 in.-ounce)
Table 6. Crankshaft Specifications
*Measure with the crankshaft mounted on the outer main bearing journals.
†With the pin for the flywheel installed, but without the flywheel, and with the crankshaft mounted on the outer bearings.
- Using a dial gauge and holder, measure the radial runout of the crankshaft. Measure at the middle main bearing journal, with the crankshaft supported on the outer main bearing journals. See Figure
"Measuring the Crankshaft Radial Runout"
. The radial runout is listed in Table
"Crankshaft Specifications"
.
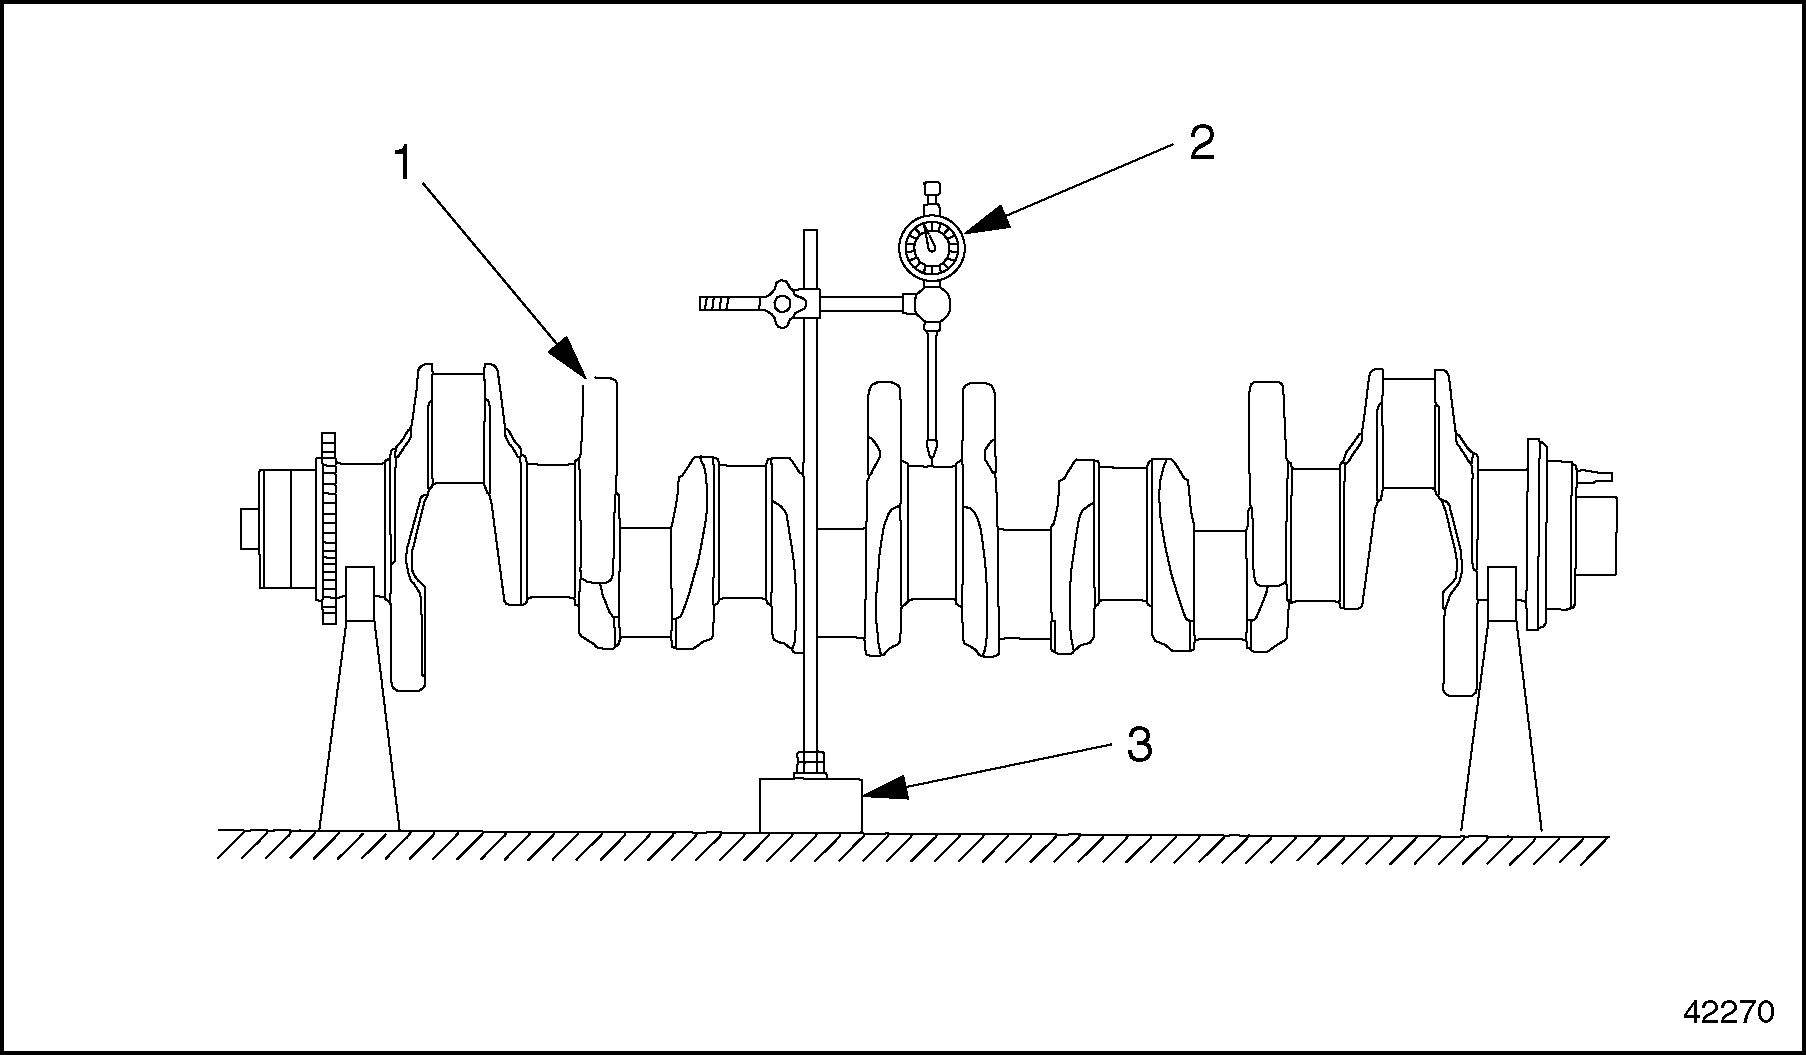
1. Crankshaft
3. Dial Gauge and Holder
2. Dial Gauge
Figure 3. Measuring the Crankshaft Radial Runout
- Measure the diameter of the main and connecting rod journals. Measure each journal at two points, offset at about 90 degrees. See Figure
"Measuring the Crankshaft Journals"
. The specifications are listed in Table
"Crankshaft Repair Specifications"
.
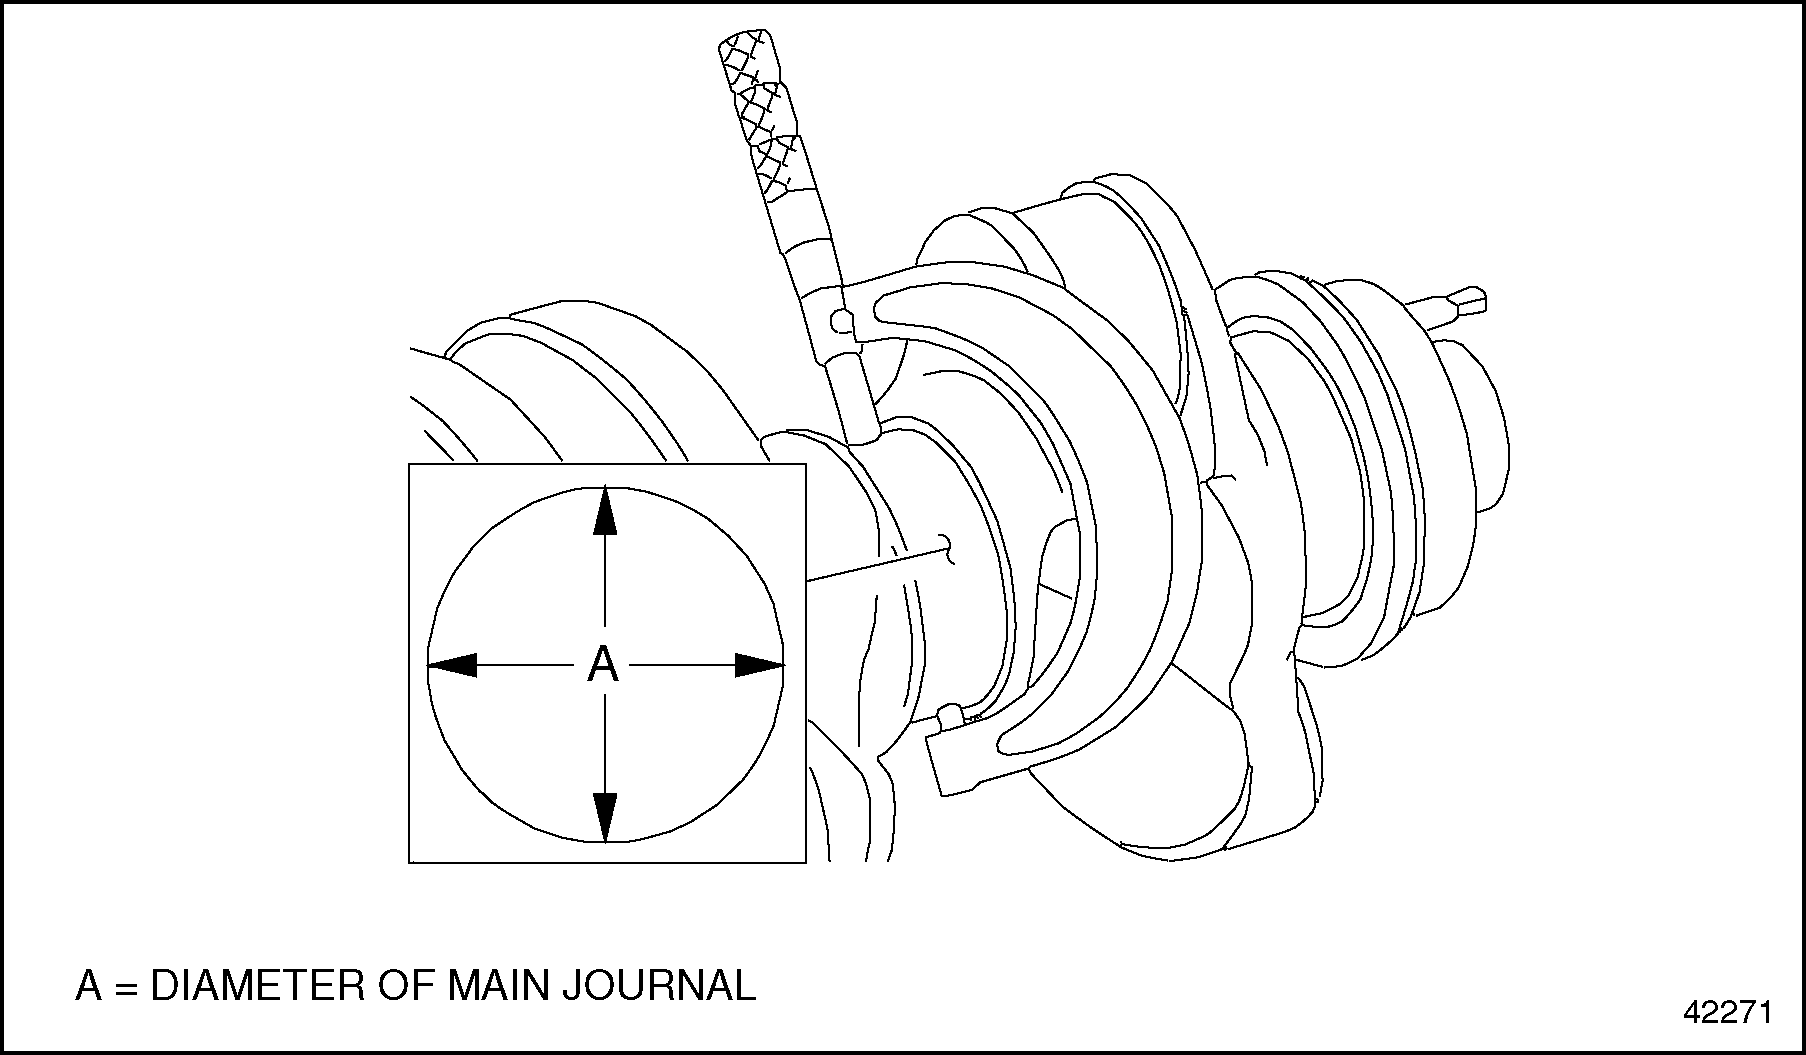
Figure 4. Measuring the Crankshaft Journals
Size
mm (in.)
Main Bearing Journal Diameter
mm (in.)
Main Bearing Journal Width
mm (in.)
Thrustwasher Bearing Journal Width
mm (in.)
Connecting-Rod Bearing Journal Diameter
mm (in.)
Connecting-Rod Bearing Journal Width
mm (in.)
All Sizes
—
31.0–31.2
(1.220–1.228)
—
—
34.0–34.2 mm
(1.339–1.346 in.)
Standard
85.990–86.010
(3.3854–3.3862)
—
31.000–31.062
(1.2205–1.2229)
69.995–70.015
(2.7557–2.7565)
—
Undersize –
0.10 (0.004)
85.890–85.910
(.3.3815–3.3823)
—
—
69.895–69.915
(2.7518–2.7526)
—
Undersize –
0.25 (0.010)
85.740–85.760
(3.3756–3.3764)
—
—
69.745–69.765
(2.7459–2.7466)
—
Undersize –
0.30 (0.012)
—
—
31.300–31.362
(1.2323–1.2347)
—
—
Undersize –
0.50 (0.020)
85.490–85.510
(3.3658–3.3665)
—
31.500–31.562
(1.2402–1.24256)
69.495–69.515
(2.7360–2.7368)
—
Undersize –
0.75 (0.030)
85.240–85.260
(3.3559–3.3567)
—
—
69.245–69.265
(2.7262–2.7270)
—
Undersize –
1.00 (0.040)
84.990–85.010
(3.3461–3.3469)
—
—
68.9950–69.015
(2.7163–2.7171)
—
Table 8. Crankshaft Repair Specifications - Measure the following dimensions on the crankshaft, see Figure
"Crankshaft Measurements"
and reference the specifications listed in Table
"Crankshaft Specifications"
and listed in Table
"Crankshaft Repair Specifications"
.
- Thrust washer bearing journal width
- Main bearing journal width
- Connecting-rod journal width
- Fillet radii of main and connecting-rod journals
- Crown of main and connecting-rod journals
- Out-of-roundness difference between the main and connecting-rod bearing journals
- Imbalance of the crankshaft
- Taper of main and connecting-rod bearing journals
Section 1.6.1.2
Positioning the Crankshaft Radially
Measure for radial position as follows:
- If not already done, remove the engine.

BODILY INJURY
To avoid injury from a falling component, ensure a proper lifting device is used. Never stand beneath a suspended load.
- If needed, remove the crankshaft from the engine, and remove the connecting rods and their bearings and the main bearing shells from the crankshaft. Refer to "1.6.1 Crankshaft Removal" .
- If needed, clean the bearing points of the crankshaft with a chamois.
- Measure the main bearing journal. Refer to "1.6.1.1 Crankshaft Measuring" .
- Assemble the main bearing shells into the crankcase and the main bearing caps. Then install the main bearing caps. Refer to "1.6.2 Crankshaft Installation" .
- Using a dial gauge and calipers, measure the inside diameter of each of the main bearings. See Figure
"Measuring the Inside Diameter of the Main Bearings"
. The main bearing specifications are listed in Table
"Main Bearing Repair Specifications"
.

1. Bearing Cap Bolts
3. Main Bearing Shell
2. Main Bearing Cap
4. Crankcase Race
Figure 5. Measuring the Inside Diameter of the Main Bearings
Size
mm (in.)
Main Bearing Inner Diameter
mm (in.)
Standard
86.066 to 86.108 (3.388 to 3.390)
Undersize – 0.1 (0.0039)
85.966 to 86.008 (3.384 to 3.386)
Undersize – 0.25 (0.0098)
85.816 to 85.858 (3.379 to 3.380)
Undersize – 0.5 (0.0197)
85.566 to 85.608 (3.369 to 3.370)
Undersize – 0.75 (0.0295)
85.316 to 85.358 (3.359 to 3.361)
Undersize – 1.0 (0.0394)
85.066 to 85.108 (3.349 to 3.351)
Table 11. Main Bearing Repair Specifications- Measure vertically from the top to the bottom of the bore (see Figure "Measuring the Inside Diameter of the Main Bearings" , A).
- Measure 30 degrees counterclockwise from the separation point of the bearing shells (see Figure "Measuring the Inside Diameter of the Main Bearings" , B).
- Measure 30 degrees clockwise from the separation point of the bearing shells (see Figure "Measuring the Inside Diameter of the Main Bearings" , C).
- If any one of the readings is not within tolerances, replace the main bearing shells as applicable.
Note: New bearing shells are supplied ready for installation. Do not machine them.
- Remove the bearing caps.

BODILY INJURY
To avoid injury from a falling component, ensure a proper lifting device is used. Never stand beneath a suspended load.
- Install the crankshaft into the cylinder block. Refer to "1.6.2 Crankshaft Installation" .
- Install the engine.
Section 1.6.2
Crankshaft Installation
Install the crankshaft as follows:
|
EYE INJURY |
|
To avoid injury from flying debris when using compressed air, wear adequate eye protection (face shield or safety goggles) and do not exceed 276 kPa (40 psi) air pressure. |
- Clean the crankshaft oil passages with a wire brush and blow compressed air through the passages. Clean the crankshaft, bearings, and bearing seats with a chamois.
- Check the main bearing and connecting rod journals for damage and cracks. If damage or cracks are present, replace the crankshaft.
- Measure the crankshaft journals. Refer to "1.6.1.1 Crankshaft Measuring" .
- Lightly coat the bearing surfaces with clean engine oil.
NOTICE:
The oil holes of the upper bearing shells must be aligned with those of the crankcase. If these holes are not aligned, the bearings will not be sufficiently lubricated, and engine damage will result.
- Install the upper bearing shells into the crankcase, in the same order they were removed.
- Make sure the locking lugs of the bearing shells fit into the slots of the crankcase bores, and that the oil holes of the bearing shells and the crankcase are aligned. See Figure
"Main Bearing Installation"
.

1. Upper Bearing Shell
3. Bearing Cap
2. Lower Bearing Shell
Figure 6. Main Bearing Installation
- Install the lower bearing shells into main bearing caps, making sure the locking lugs are fully seated in the grooves of the bearing caps. See Figure
"Main Bearing Installation"
.

BODILY INJURY
To avoid injury from a falling component, ensure a proper lifting device is used. Never stand beneath a suspended load.
- Using a suitable hoist, lower the crankshaft into the crankcase.
- Position all the bearing caps (except the thrust washer bearing cap) with their bearing shells on the crankcase journals. All the bearing caps fit into the crankcase at the side (off-centered). Make sure the numbers on the bearing caps are in ascending order, starting from the front of the engine. See Figure
"Main Bearing Cap Markings"
.
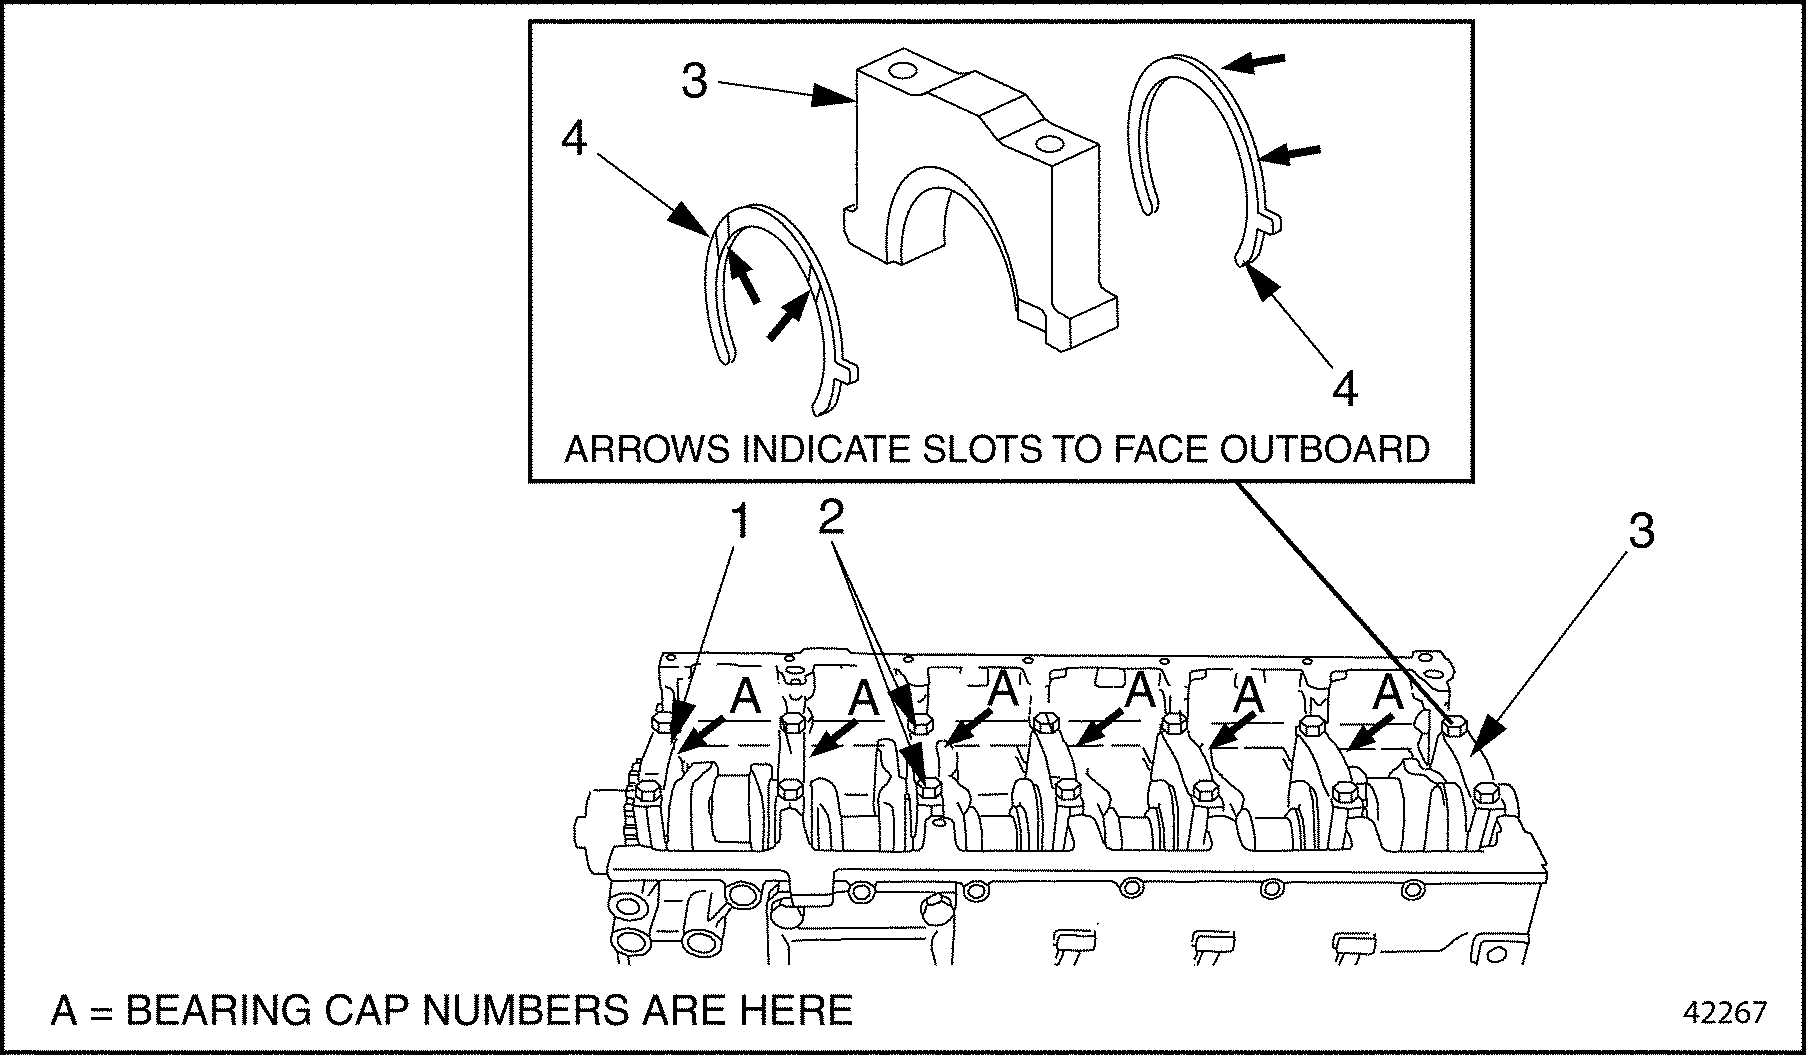
1. Bearing Caps
3. Thrust washer Bearing Cap
2. Bearing-Cap Bolts
4. Thrust washer (arrows indicate slots to face outboard)
Figure 7. Main Bearing Cap Markings
Note: The main bearing bolts have changed on some MBE 900 engines. Ensure that the correct length bolts are used when replacing.
- Measure the shaft length of the main bearing-cap bolts. Replace any bolts that exceed the maximum shaft length. See Figure
"Measuring a Main Bearing-Cap Bolt"
and see Table "Main Bearing Bolt Maximum Reuse Length"
.
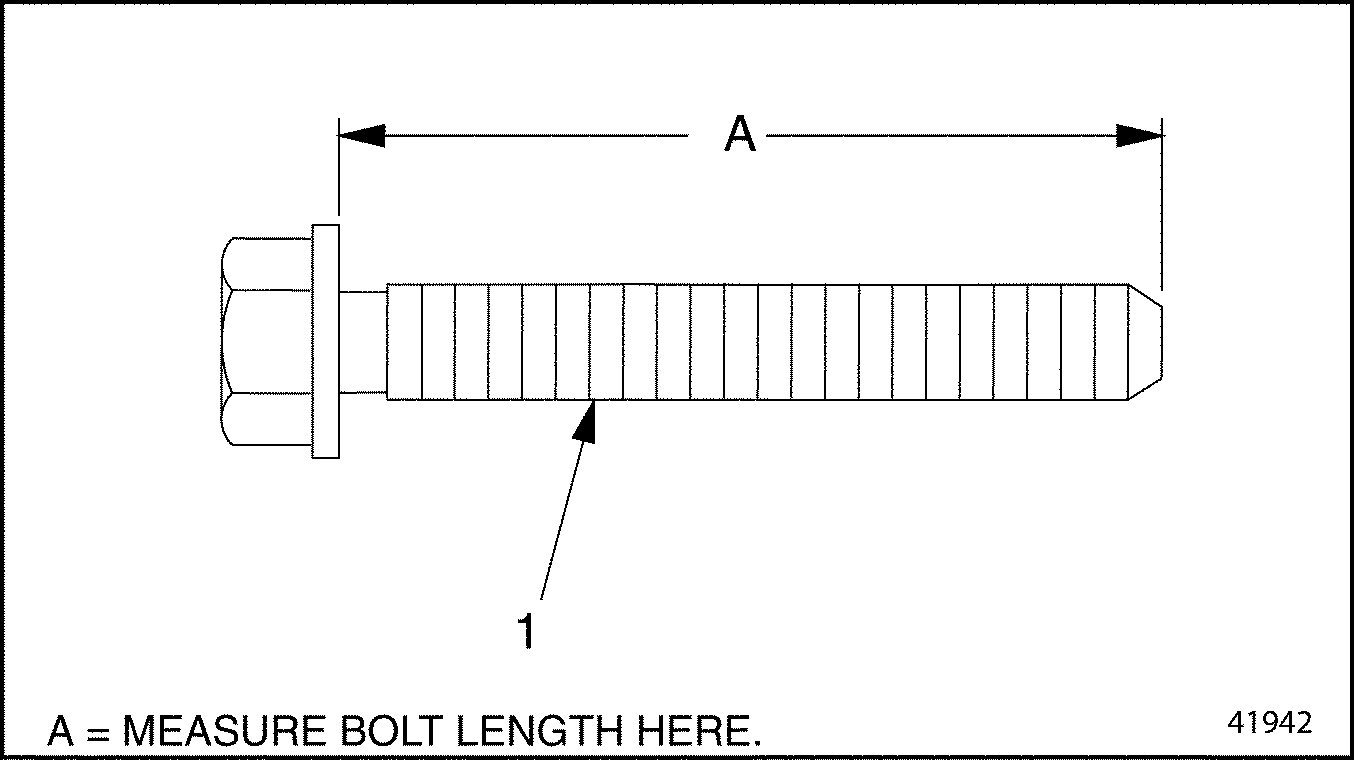
1. Main Bearing-Cap Bolt
Figure 8. Measuring a Main Bearing-Cap Bolt
Size
Bolt Shaft Length (New)
Maximum Shaft Length
M14 x 2.0
114 mm (4.48 in.)
116.0 mm (4.57 in.)
134 mm (5.28in.)
136.0 mm (5.35 in.)
Table 19. Main Bearing Bolt Maximum Reuse Length - Put a light coat of oil on the main bearing-cap bolts. Install all the M14 main bearing-cap bolts. Tighten each one in four stages. The tightening stages are listed in Table
"Tightening Stages, Main Bearing-Cap Bolts"
.
Size
Max. Shaft Length
Tightening Stage
Torque Value
M14 x 2.0
(116.0 mm (4.57 in.) or 136.0 mm (5.35 in.)
Stage 1
30 N·m (22 lb·ft)
Stage 2
80 N·m (59 lb·ft)
Stage 3
155 N·m (114 lb·ft)
Stage 4
additional 90 degrees
Table 20. Tightening Stages, Main Bearing-Cap Bolts - Install the thrust washers in the bearing cap, making sure the slots on the thrust washers are facing outboard. See Figure "Main Bearing Cap Markings" .
- Install the thrust washer bearing cap. Tighten the bolts in stages to the same torque as the other bearing-cap bolts.
- Measure the crankshaft end-play (lateral runout) at the thrust washer bearing journal. See Figure
"Checking the Crankshaft End-Play (Lateral Runout)"
.
- Set up a dial gauge and a dial gauge holder. See Figure
"Checking the Crankshaft End-Play (Lateral Runout)"
.
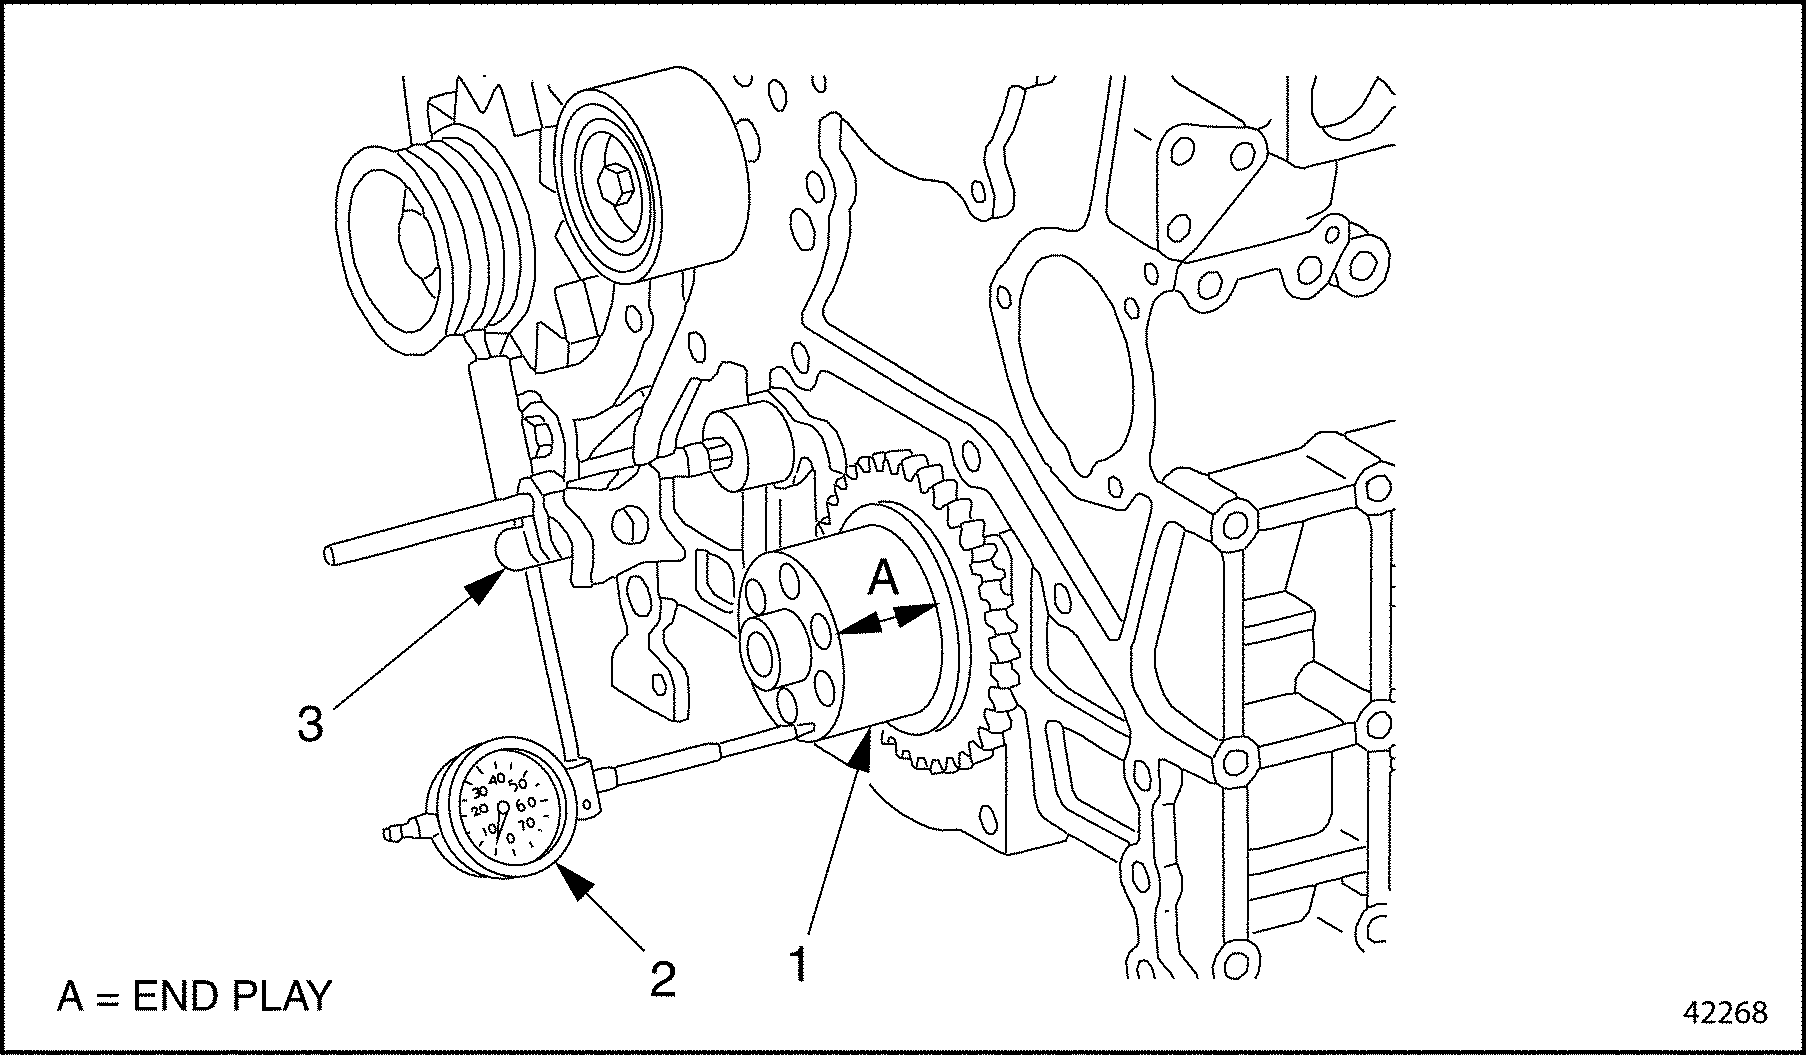
1. Crankshaft
3. Dial Gauge Holder
2. Dial Gauge
Figure 9. Checking the Crankshaft End-Play (Lateral Runout)
- Move the crankshaft all the way forward by prying on one of the bearing caps, then zero out the dial gauge. See Figure "Checking the Crankshaft End-Play (Lateral Runout)" , A.
- Move the crankshaft all the way to the rear. Note the end-play on the dial gauge. See Figure "Checking the Crankshaft End-Play (Lateral Runout)" , A.
- If the end-play is not 0.16 mm to 0.38 mm (0.006 in. to 0.015 in.), replace the thrust washers with those of the necessary thickness. Oversize thrust washers are available.
- Set up a dial gauge and a dial gauge holder. See Figure
"Checking the Crankshaft End-Play (Lateral Runout)"
.
- Attach the crankshaft gear to the crankshaft flange. Refer to "1.7.2 Crankshaft Gear Installation"
. Align the key on the crankshaft with the keyway in the gear. Make sure the mark "1" on the crankshaft gear is between the markings "1–1" on the camshaft gear. See Figure
"Aligning the Marked Gear Teeth"
.
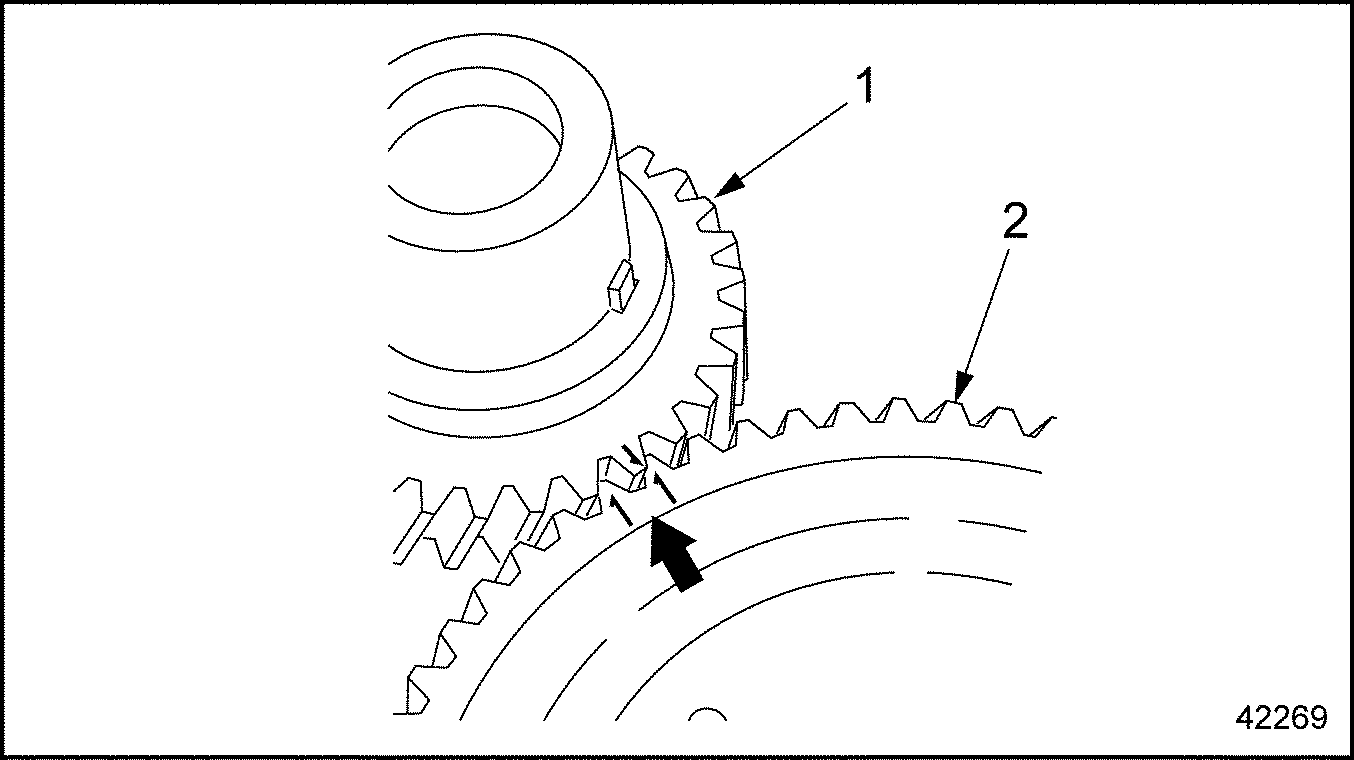
1. Crankshaft Gear
2. Camshaft Gear
Figure 10. Aligning the Marked Gear Teeth
- Install the pistons. Refer to "1.15.2 Piston Installation" .
- Install the oil pump. Refer to "3.3.2 Oil Pump Installation" .
- Install the oil pan. Refer to "3.7.2 Oil Pan Installation"
.

BODILY INJURY
To avoid injury from a falling component, ensure a proper lifting device is used. Never stand beneath a suspended load.
- Install the flywheel housing. Refer to "1.14.2 Flywheel Housing Installation" .
- Install the cylinder head. Refer to "1.2.2 Cylinder Head Installation" .
- Install the engine in the vehicle.
| MBE 900 Service Manual - 6SE414 |
| Generated on 10-13-2008 |