Section 1.15
Pistons, Piston Rings, and Connecting Rods
The pistons are made of aluminum alloy with ring carriers and a shallow combustion chamber recess. The pistons are cooled by oil spray nozzles. The following illustration shows the piston and connecting rod assembly in an exploded view. See Figure "Piston Assembly (exploded view)" .

|
1. Piston and Rings |
5. Connecting Rod Cap |
|
2. Wrist Pin |
6. Connecting Rod Stretch Bolt |
|
3. Snap Ring |
7. Bearing Halves |
|
4. Connecting Rod |
Figure 1. Piston Assembly (exploded view)
Section 1.15.1
Piston Removal
Remove the pistons as follows:
- With the engine removed from the vehicle, remove the cylinder head and oil pan. Refer to "1.2.1 Cylinder Head Removal" and refer to "3.7.1 Oil Pan Removal" .
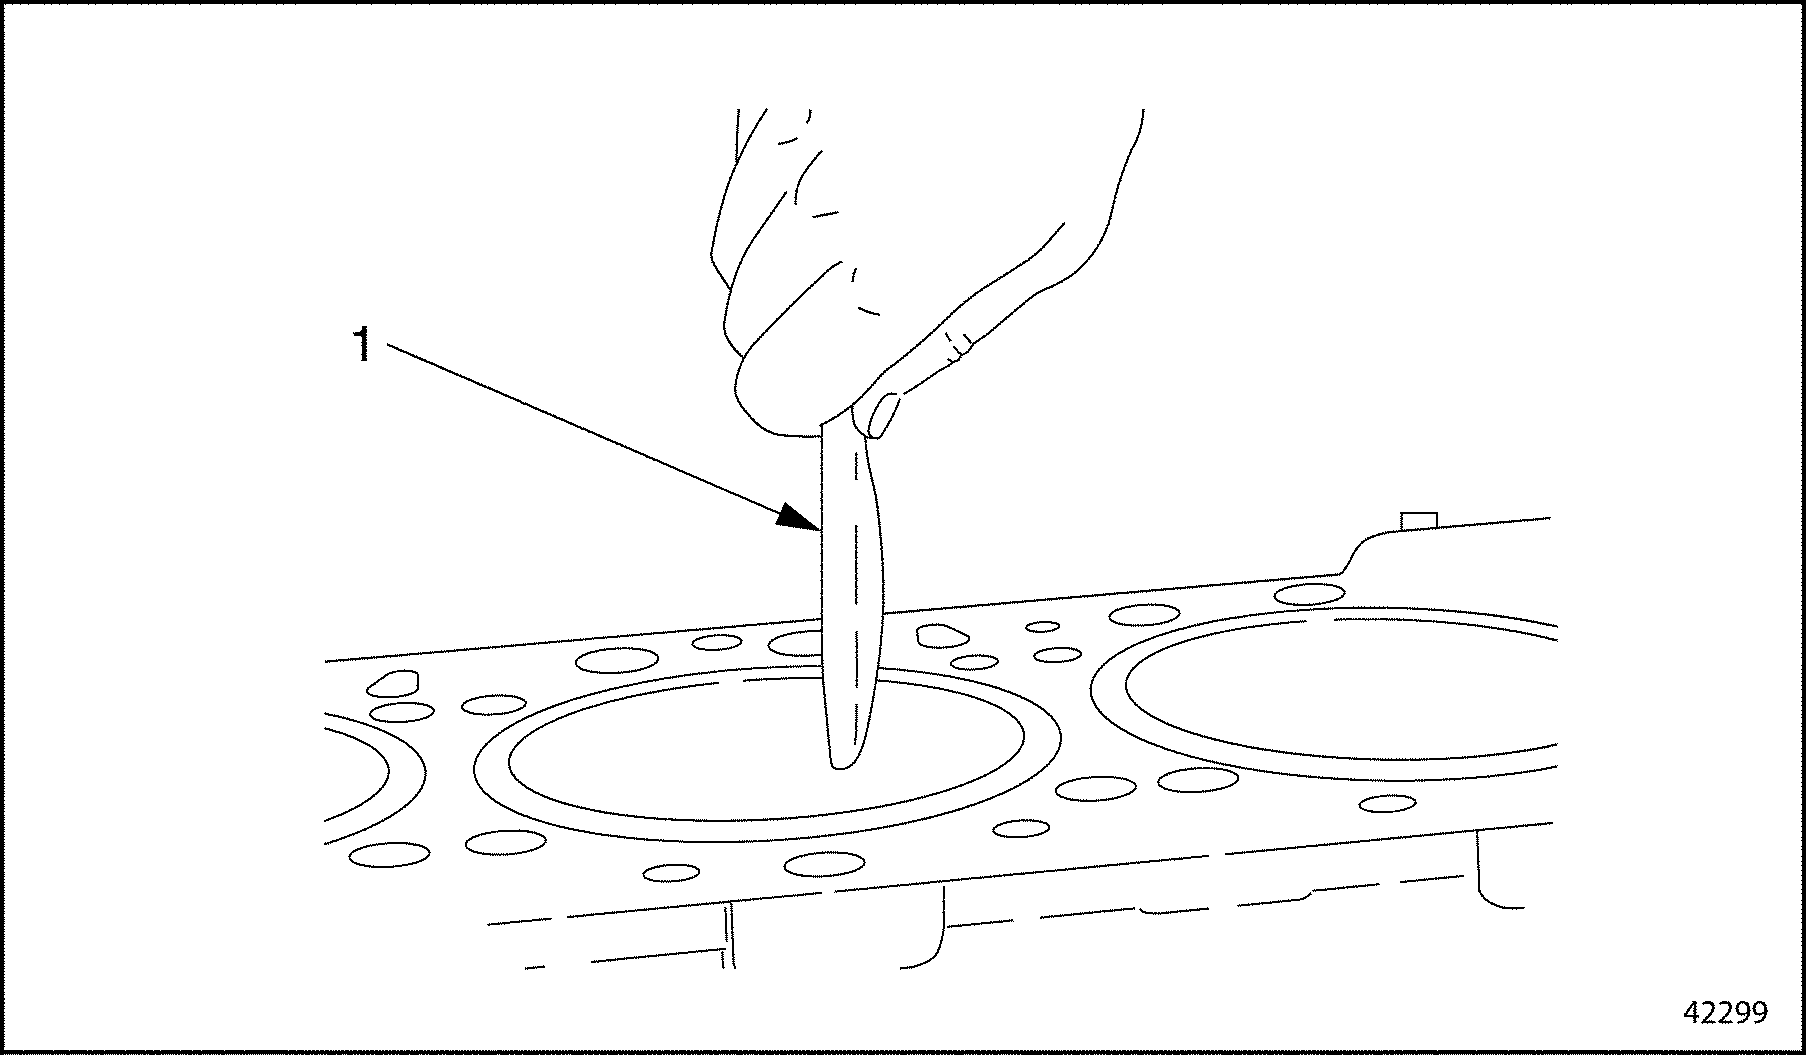
- Using a plastic scraping tool, carefully scrape off any combustion residues from the combustion area in the cylinder in order to avoid damage to the piston rings when the piston is removed. See Figure
"Cleaning the Cylinder Liner"
.

1. Plastic Scraping Tool
Figure 2. Cleaning the Cylinder Liner
Note: Be sure the connecting rods and the bearing caps are marked so that they can be matched for installation. See Figure "Checking Rod and Bearing Cap Markings" .

1. Bearing Cap
2. Connecting Rod
Figure 3. Checking Rod and Bearing Cap Markings
NOTICE:
Do not damage the oil spray nozzles. It is helpful to remove them before proceeding. Damaged oil spray nozzles could result in a loss of oil pressure and cause engine damage.
- Being careful not to damage the oil spray nozzles (see Figure
"Location of Oil Spray Nozzle"
), remove the connecting rod stretch bolts and caps.

1. Oil Spray Nozzle
Figure 4. Location of Oil Spray Nozzle
- Push the piston and connecting rod out of the cylinder, and remove it from the engine block.
NOTICE:
Be sure the vise jaws are adequately lined to prevent the rod surface from being nicked or marred in any way. Such surface damage could cause rod cracking or breaking.
- Secure the connecting rod in a vise with protective jaws.
- Remove the wrist-pin snap rings. Push the wrist pin out and remove the piston from the connecting rod. At this time you may wish to remove and replace the piston rings. If so, refer to "1.15.3 Piston Ring Removal" .
Section 1.15.1.1
Connecting Rod Inspection
The following commercially available tools are required for this procedure:
- Caliper, internal measurement, 40 to 60 mm
- Caliper, internal measurement, 100 to 120 mm
- Micrometer, 50 to 75 mm
- Caliper gauge with dial indicator
Inspect the connecting rods as follows:
- Inspect the connecting rod for blue discoloration (indicates bearing overheat damage), scoring, notches, and cracks. If any of these conditions are found, replace the connecting rod.
- Measure the inner diameter of the bushing in the small bore of the connecting rod. Use a caliper (internal measurement, 40 to 60 mm), dial indicator, and holder. See Figure
"Measuring Inner Diameters in the Connecting Rod"
.

1. Dial Indicator
5. Bearing Shell (2 parts)
2. Holder, Dial Indicator
6. Bearing Cap
3. Bushing
7. Bolts (2 qty.)
4. Connecting Rod
Figure 5. Measuring Inner Diameters in the Connecting Rod
- If the value exceeds 40.04 mm (1.5764 in.), replace the connecting rod.
Note: Checking the connecting rod for a twisted or bent condition in the next step requires machine shop equipment such as a caliper gauge with a dial indicator.
- Inspect the connecting rod for twisting and dimensional tolerance. See Figure
"Connecting Rod Measurements"
. If any value exceeds those listed in Table
"Connecting Rod Inspection Specifications"
, replace the connecting rod. Do not attempt to straighten the rod.

Figure 6. Connecting Rod Measurements
- On each side of the connecting rod, measure the distance from the bearing bore (large bore) to the inner surface of the bushing. The measurement must be 157.445 to 157.510 mm (6.1986 to 6.2012 in).
- Measure the difference in axial parallelism between the bearing bore and the inner surface of the bushing, at 50 mm (2 in.) from the connecting-rod centerline. The maximum allowed difference is 0.025 mm (0.0010 in.).
Description
Dimensions,
mm (in.)
Distance Between Connecting Rod Bearing Bore and Bushing Inner Surface
157.445–157.510 (6.1986–6.2012 )
Maximum Difference in Axial Parallelism Between Bearing Bore and Bushing Inner Surface
0.025 (0.0010)
Distance from Connecting Rod Center Line for Measuring Parallelism
50 (2)
Bushing Inner Diameter
40.03–40.04 (1.5760–1.5764)
Bearing Seat Inner Diameter with Bearing Shells Installed
Standard
70.054–70.093 (2.7580–2.7596 )
Repair Stage: Undersize 0.1 mm
69.954–69.993 (2.7541–2.7556 )
Repair Stage: Undersize 0.25 mm
69.804–69.843 (2.7482–2.7497)
Repair Stage: Undersize 0.5 mm
69.554–69.593 (2.7383–2.7399)
Repair Stage: Undersize 0.75 mm
69.304–69.343 (2.7285–2.7300)
Repair Stage: Undersize 1.0 mm
69.054–69.093 (2.7187–2.7202)
Basic Bore Diameter for Connecting Rod Bearings
75.000–75.019 (2.9528–2.9535)
Connecting-Rod Bearing Play
Radial
0.039–0.098 (0.0015–0.0039)
Axial (end play)
0.170–0.470 (0.0067–0.0185)
Permissible Out-of-Roundness of Basic Bores
Bearing Bore
0.008 (0.0003)
Bushing Bore
0.006 (0.0002)
Connecting Rod Bolt
Thread Diameter
M12 x 1.25
Shank Length When New
56.0 (2.20)
Maximum Shank Length
57.0 (2.24)
Table 8. Connecting Rod Inspection Specifications
Section 1.15.2
Piston Installation
Install the pistons as follows:
Note: If the engine block deck height has been reduced, you must install pistons with a reduced height.
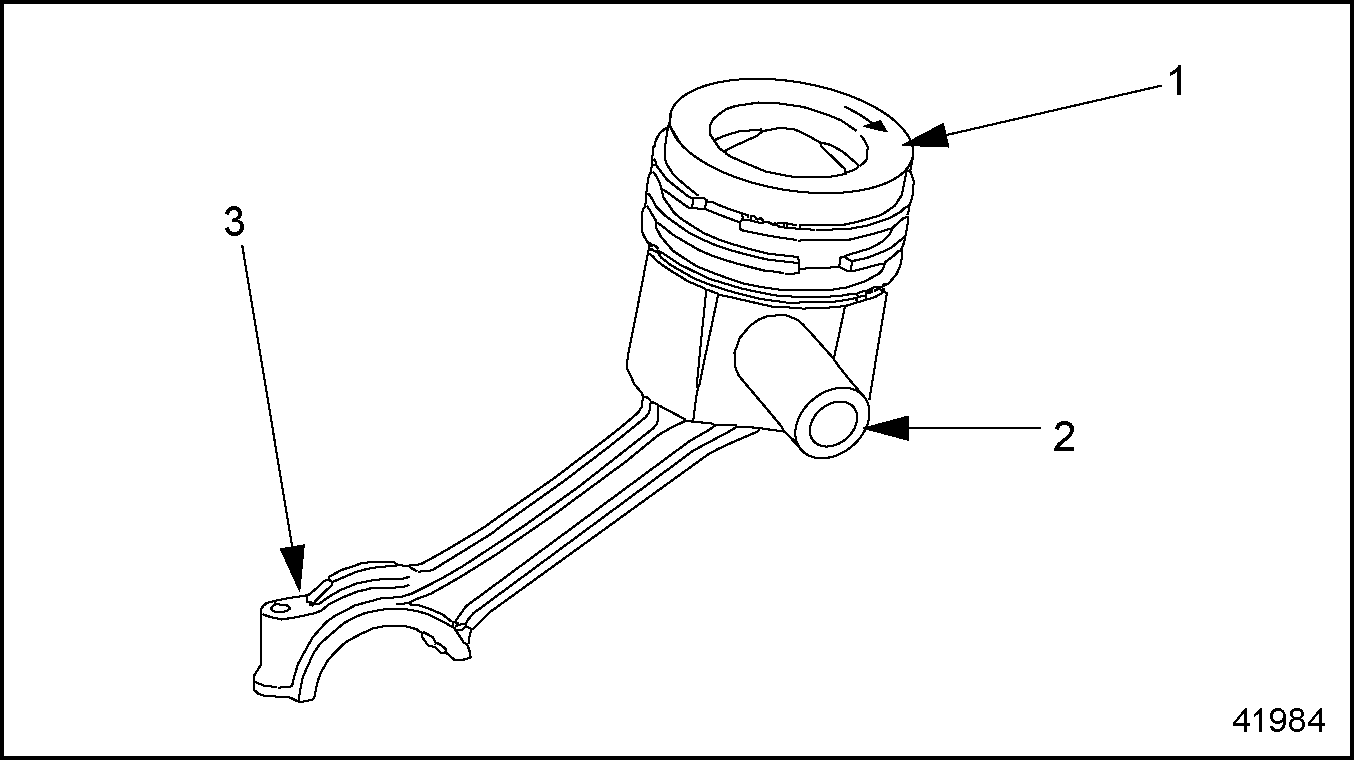
- Position the connecting rod in the piston so that the far side of the rod contact surface (with the number on it) is on the right side (exhaust side) of the engine, and the arrow on the crown of the piston points toward the front of the engine.
- Install the wrist pin and secure it with the snap rings. See Figure
"Installing the Wrist Pin"
.

1. Piston
3. Far Side of Connecting Rod
2. Wrist Pin
Figure 7. Installing the Wrist Pin
- Coat the piston lightly with clean engine oil.
- Install new piston rings. Refer to "1.15.4 Piston Ring Installation" .
- Offset the ring gaps alternately by 120 degrees. See Figure
"Ring Gaps Offset 120 Degrees"
.

1. Piston
Figure 8. Ring Gaps Offset 120 Degrees
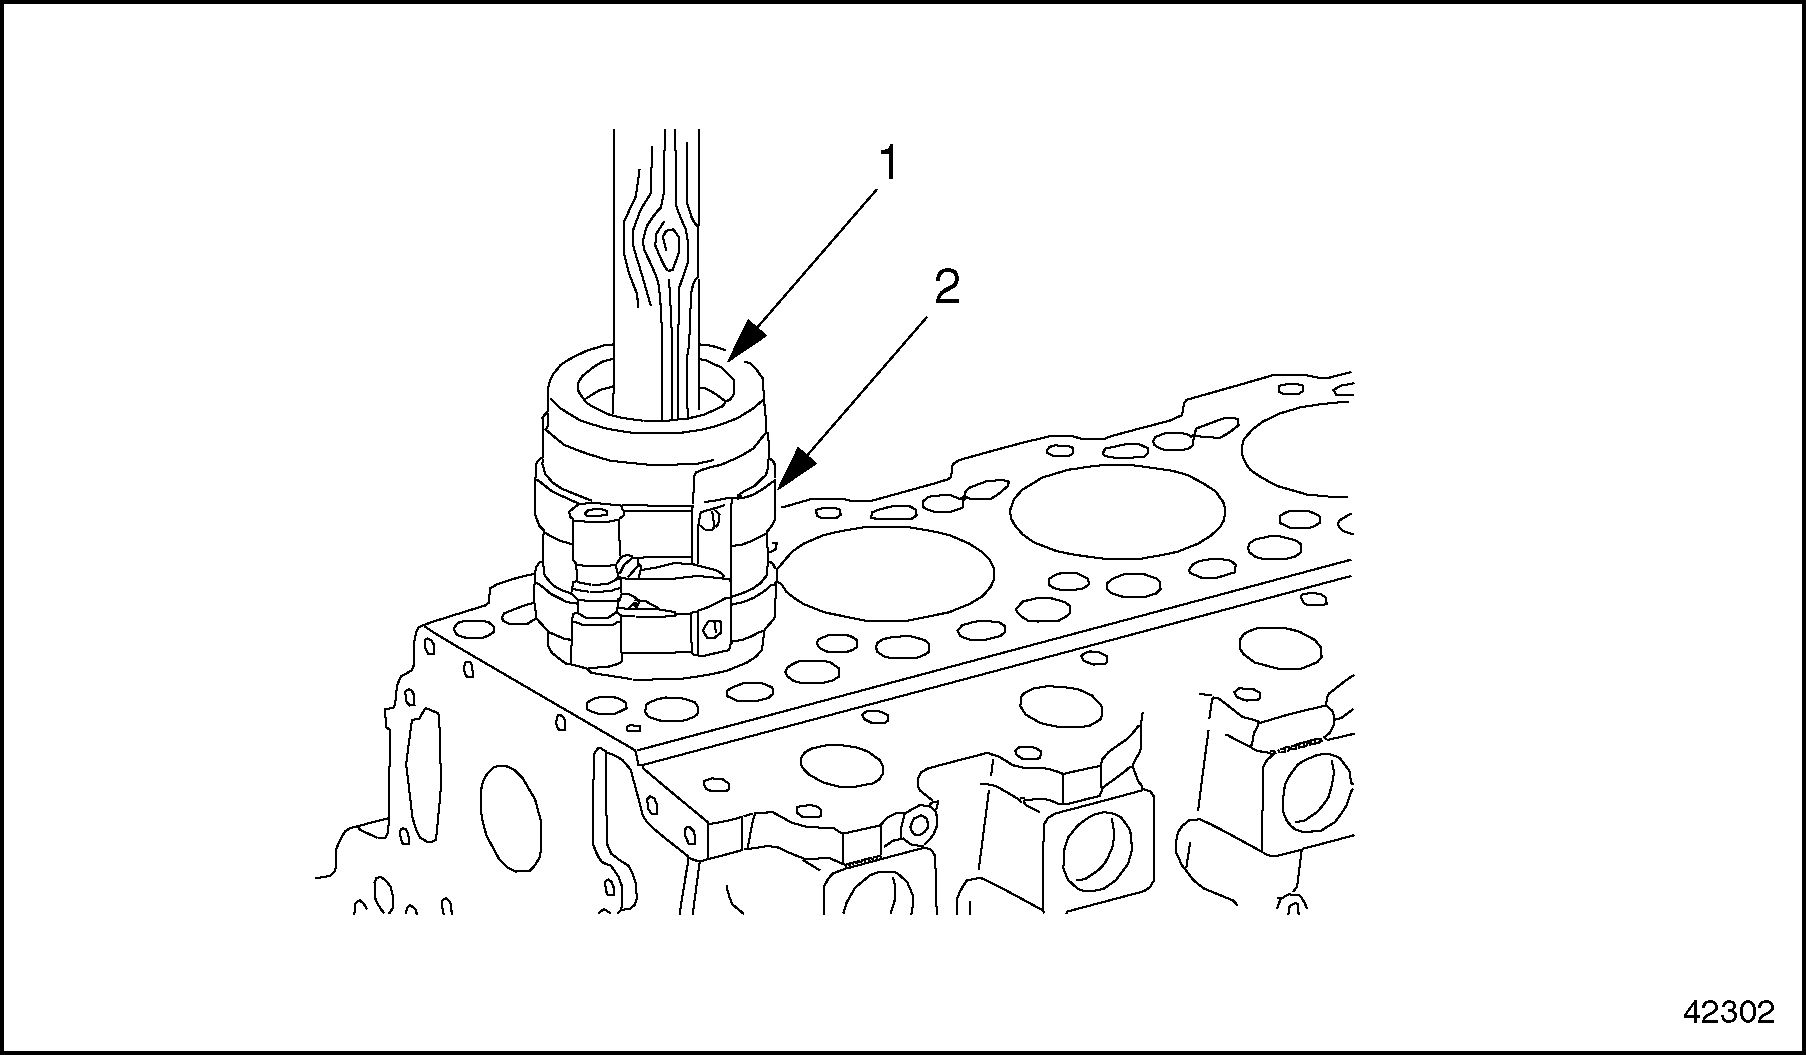
- Position a ring compressor loosely over the piston. Tighten the ring compressor on the piston so that it can just slide over the piston.
- Install the rod bearing half in the rod. Be sure that the bearing tang is fully seated in the groove of the rod. See Figure
"Installing the Rod Bearing Halves"
.

1. Connecting Rod
3. Connecting Rod Cap
2. Bearing Halves
Figure 9. Installing the Rod Bearing Halves
- Coat the bearing surface lightly with clean engine oil.
- With the piston arrow pointing toward the front of the engine, push the piston into the cylinder until the rod bearing rests on the crankshaft journal. See Figure
"Installing a Piston"
. Be careful not to scratch the crankshaft journals with the connecting rod.

1. Piston
2 Ring Compressor
Figure 10. Installing a Piston
- Install the rod cap bearing half in the cap. Be sure that the bearing tang is fully seated in the groove of the cap. See Figure "Installing the Rod Bearing Halves" .
- Coat the bearing surface lightly with clean engine oil.
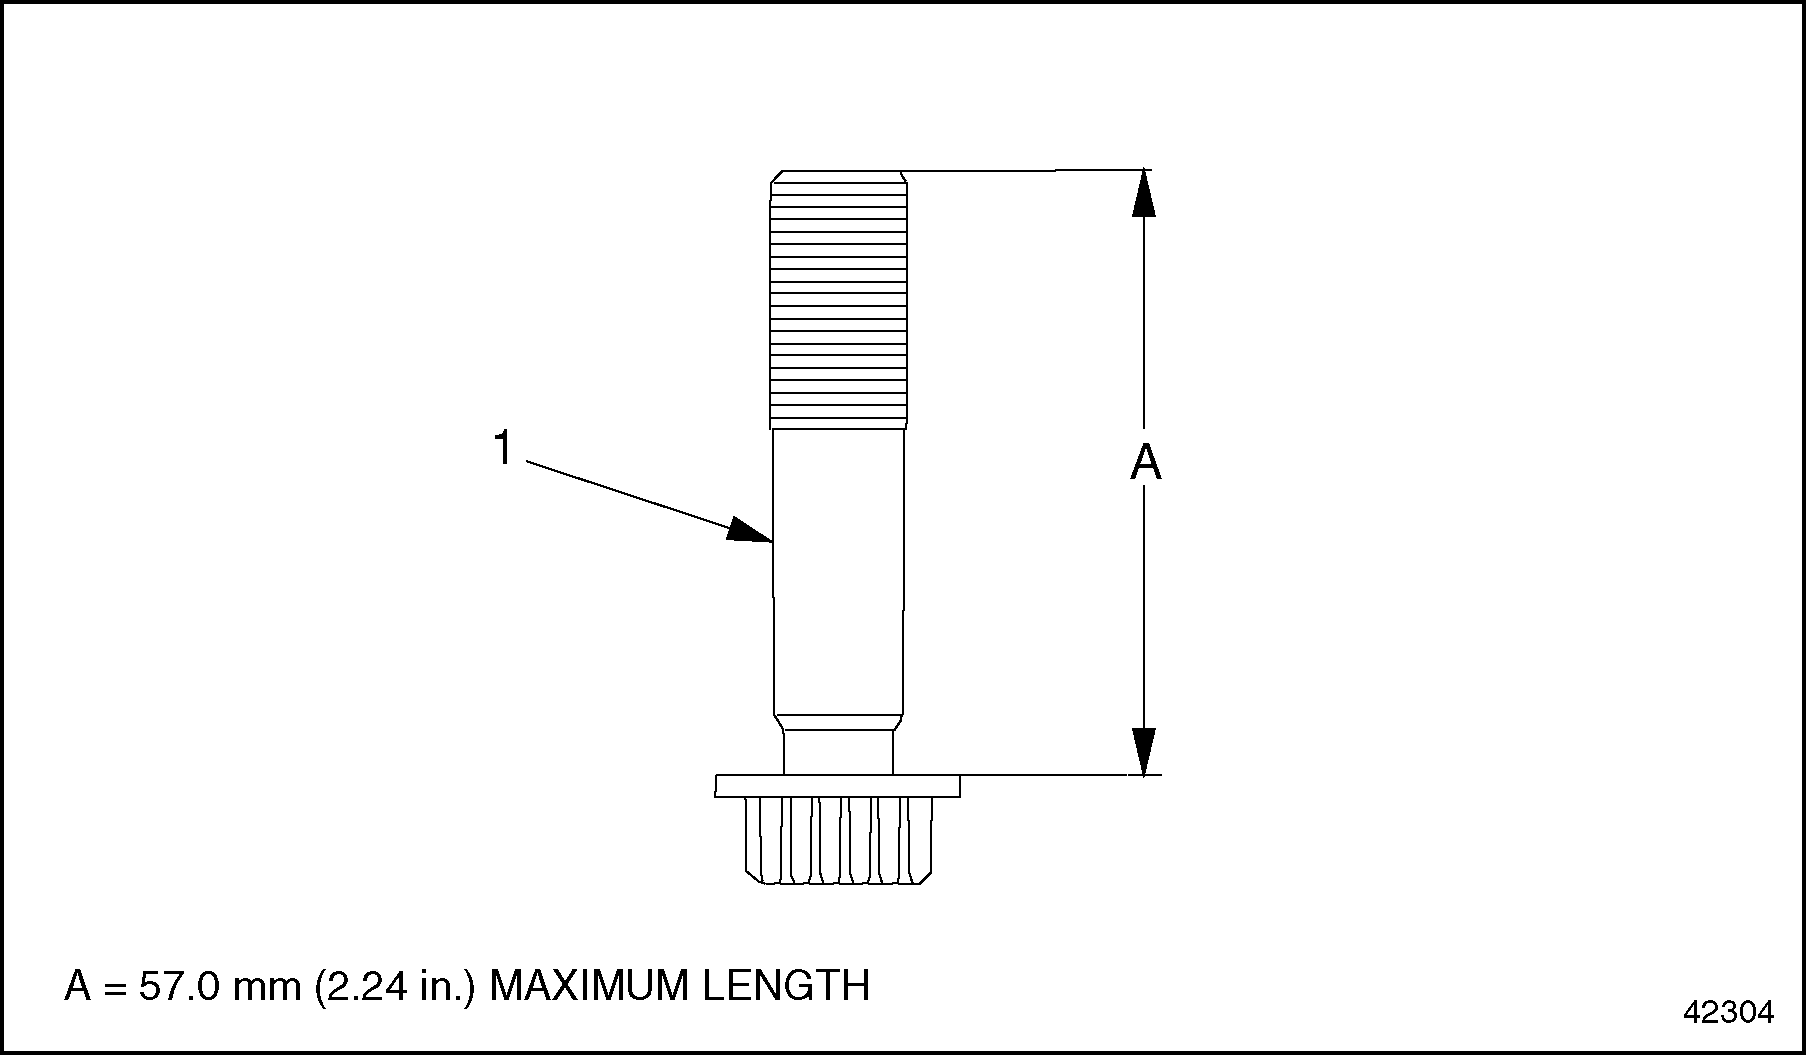
- Measure the connecting rod stretch bolts. Replace any bolts that exceed the maximum length of 57.0 mm (2.24 in.). See Figure
"Measuring a Stretch Bolt"
. Lubricate the stretch bolt threads lightly.

1. Shank
Figure 11. Measuring a Stretch Bolt
- Install the connecting rod cap on the connecting rod and hand-tighten the stretch bolts. Be sure that the marks on the cap and the rod match. See Figure
"Checking Rod and Bearing Cap Markings"
.

1. Bearing Cap
2. Connecting Rod
Figure 12. Checking Rod and Bearing Cap Markings
- Tighten the connecting rod stretch bolts alternately. Tighten each one in turn to the first stage and then go on to the next stage as listed in Table
"Tightening Stages, Connecting Rod Stretch Bolts"
.
Max. Shaft Length
Tightening Stage
Torque Value
N·m (lb·ft)
57.0 mm (2.24 in.)
Stage 1
11 (8)
Stage 2
45 (33)
Stage 3
additional 90 degrees
Table 15. Tightening Stages, Connecting Rod Stretch Bolts - Rotate the crankshaft to make sure it turns freely.
- Using a dial gauge and holder, measure the piston projection relative to the top of the crankcase at all the pistons. See Figure
"Piston Projection at Top Dead Center"
.

1. Piston
Figure 13. Piston Projection at Top Dead Center
- If the piston projection dimensions are not correct, replace the piston.
- Install the oil spray nozzles if they have been removed. Be sure they are seated and aligned correctly.
- Install the cylinder head and the oil pan. Refer to "1.2.2 Cylinder Head Installation" and refer to "3.7.2 Oil Pan Installation" .
Section 1.15.3
Piston Ring Removal
Remove piston rings as follows:
- With the piston removed from the engine block, remove the rings, using suitable ring pliers. See Figure
"Removing the Piston Rings"
.

1. Piston
2. Ring Pliers
Figure 14. Removing the Piston Rings
- Remove the rings in order, starting from the top of the piston down. See Figure
" Piston Rings"
.

1. Keystone Piston Ring (Groove I)
3. Double Chamfered Oil Control Ring with Expander Spring (Groove III)
2. Taper Face Ring with Internal Angle (Groove II)
4. Piston
Figure 15. Piston Rings
Section 1.15.3.1
Piston and Piston Ring Cleaning, Inspection, and Measuring
Clean, inspect, and measure the piston and piston rings as follows:
- Clean all the carbon from the ring grooves.
- Be sure the grooves are not damaged, and that there are no burrs or combustion residue in the grooves.
- Before installing the new rings, check the end gap for the correct end gap measurements listed in Table
"Piston Ring End-Gap Dimensions"
.
Note: Check the end gap of the upper two piston rings first. The must be removed from the third (lowest) piston ring before you can measure its end gap.
Ring Designation
Groove
Gap When New
mm (in.)
Maximum End Gap
mm (in.)
Keystone
I
0.35 to 0.55 (0.014 to 0.022)
1.0 (.039)
Taper-Faced with Internal Angle
II
0.40 to 0.60 (0.016 to 0.024 )
1.0 (.039)
Double-Chamfered Oil Control with Garter Spring
III
0.25 to 0.50 (0.010 to 0.020 )
1.0 (.039)
Table 19. Piston Ring End-Gap Dimensions - Place each ring squarely into the combustion area of a cylinder liner or cylinder, then measure the end gap, using a feeler gauge. See Figure
"Checking the Ring End-Gap"
.

Figure 16. Checking the Ring End-Gap
- Remove the spring expander from the third (lowest) ring, then measure its gap in the same way as the other two rings.
Section 1.15.4
Piston Ring Installation
Install the piston rings as follows:
- Install the spring expander into the ring. See Figure
"Installing the Expander Spring"
.

1. Expander Spring
3. Expander Spring Joint
2. Piston Ring
Figure 17. Installing the Expander Spring
- Using ring pliers, install the rings. Make sure the word "TOP" on each ring is facing toward the crown of the piston. Install the rings in the reverse order of their removal; from the bottom to the top of the piston.
- Offset the ring gaps alternately by 120 degrees. See Figure
"Piston Rings Offset 120 Degrees"
.

1. Piston
Figure 18. Piston Rings Offset 120 Degrees
| MBE 900 Service Manual - 6SE414 |
| Generated on 10-13-2008 |