Section 2.1
Fuel System
The fuel system consists of a fuel tank, fuel filter, strainer, hand primer pump, fuel filter, fuel supply pump, supply manifold and fuel injectors. All of these items are located on the left side of the engine.
The fuel system provides filtered fuel to the fuel injectors at a regulated 448 kPa (65 psi). The system also returns warm fuel to the fuel tank.
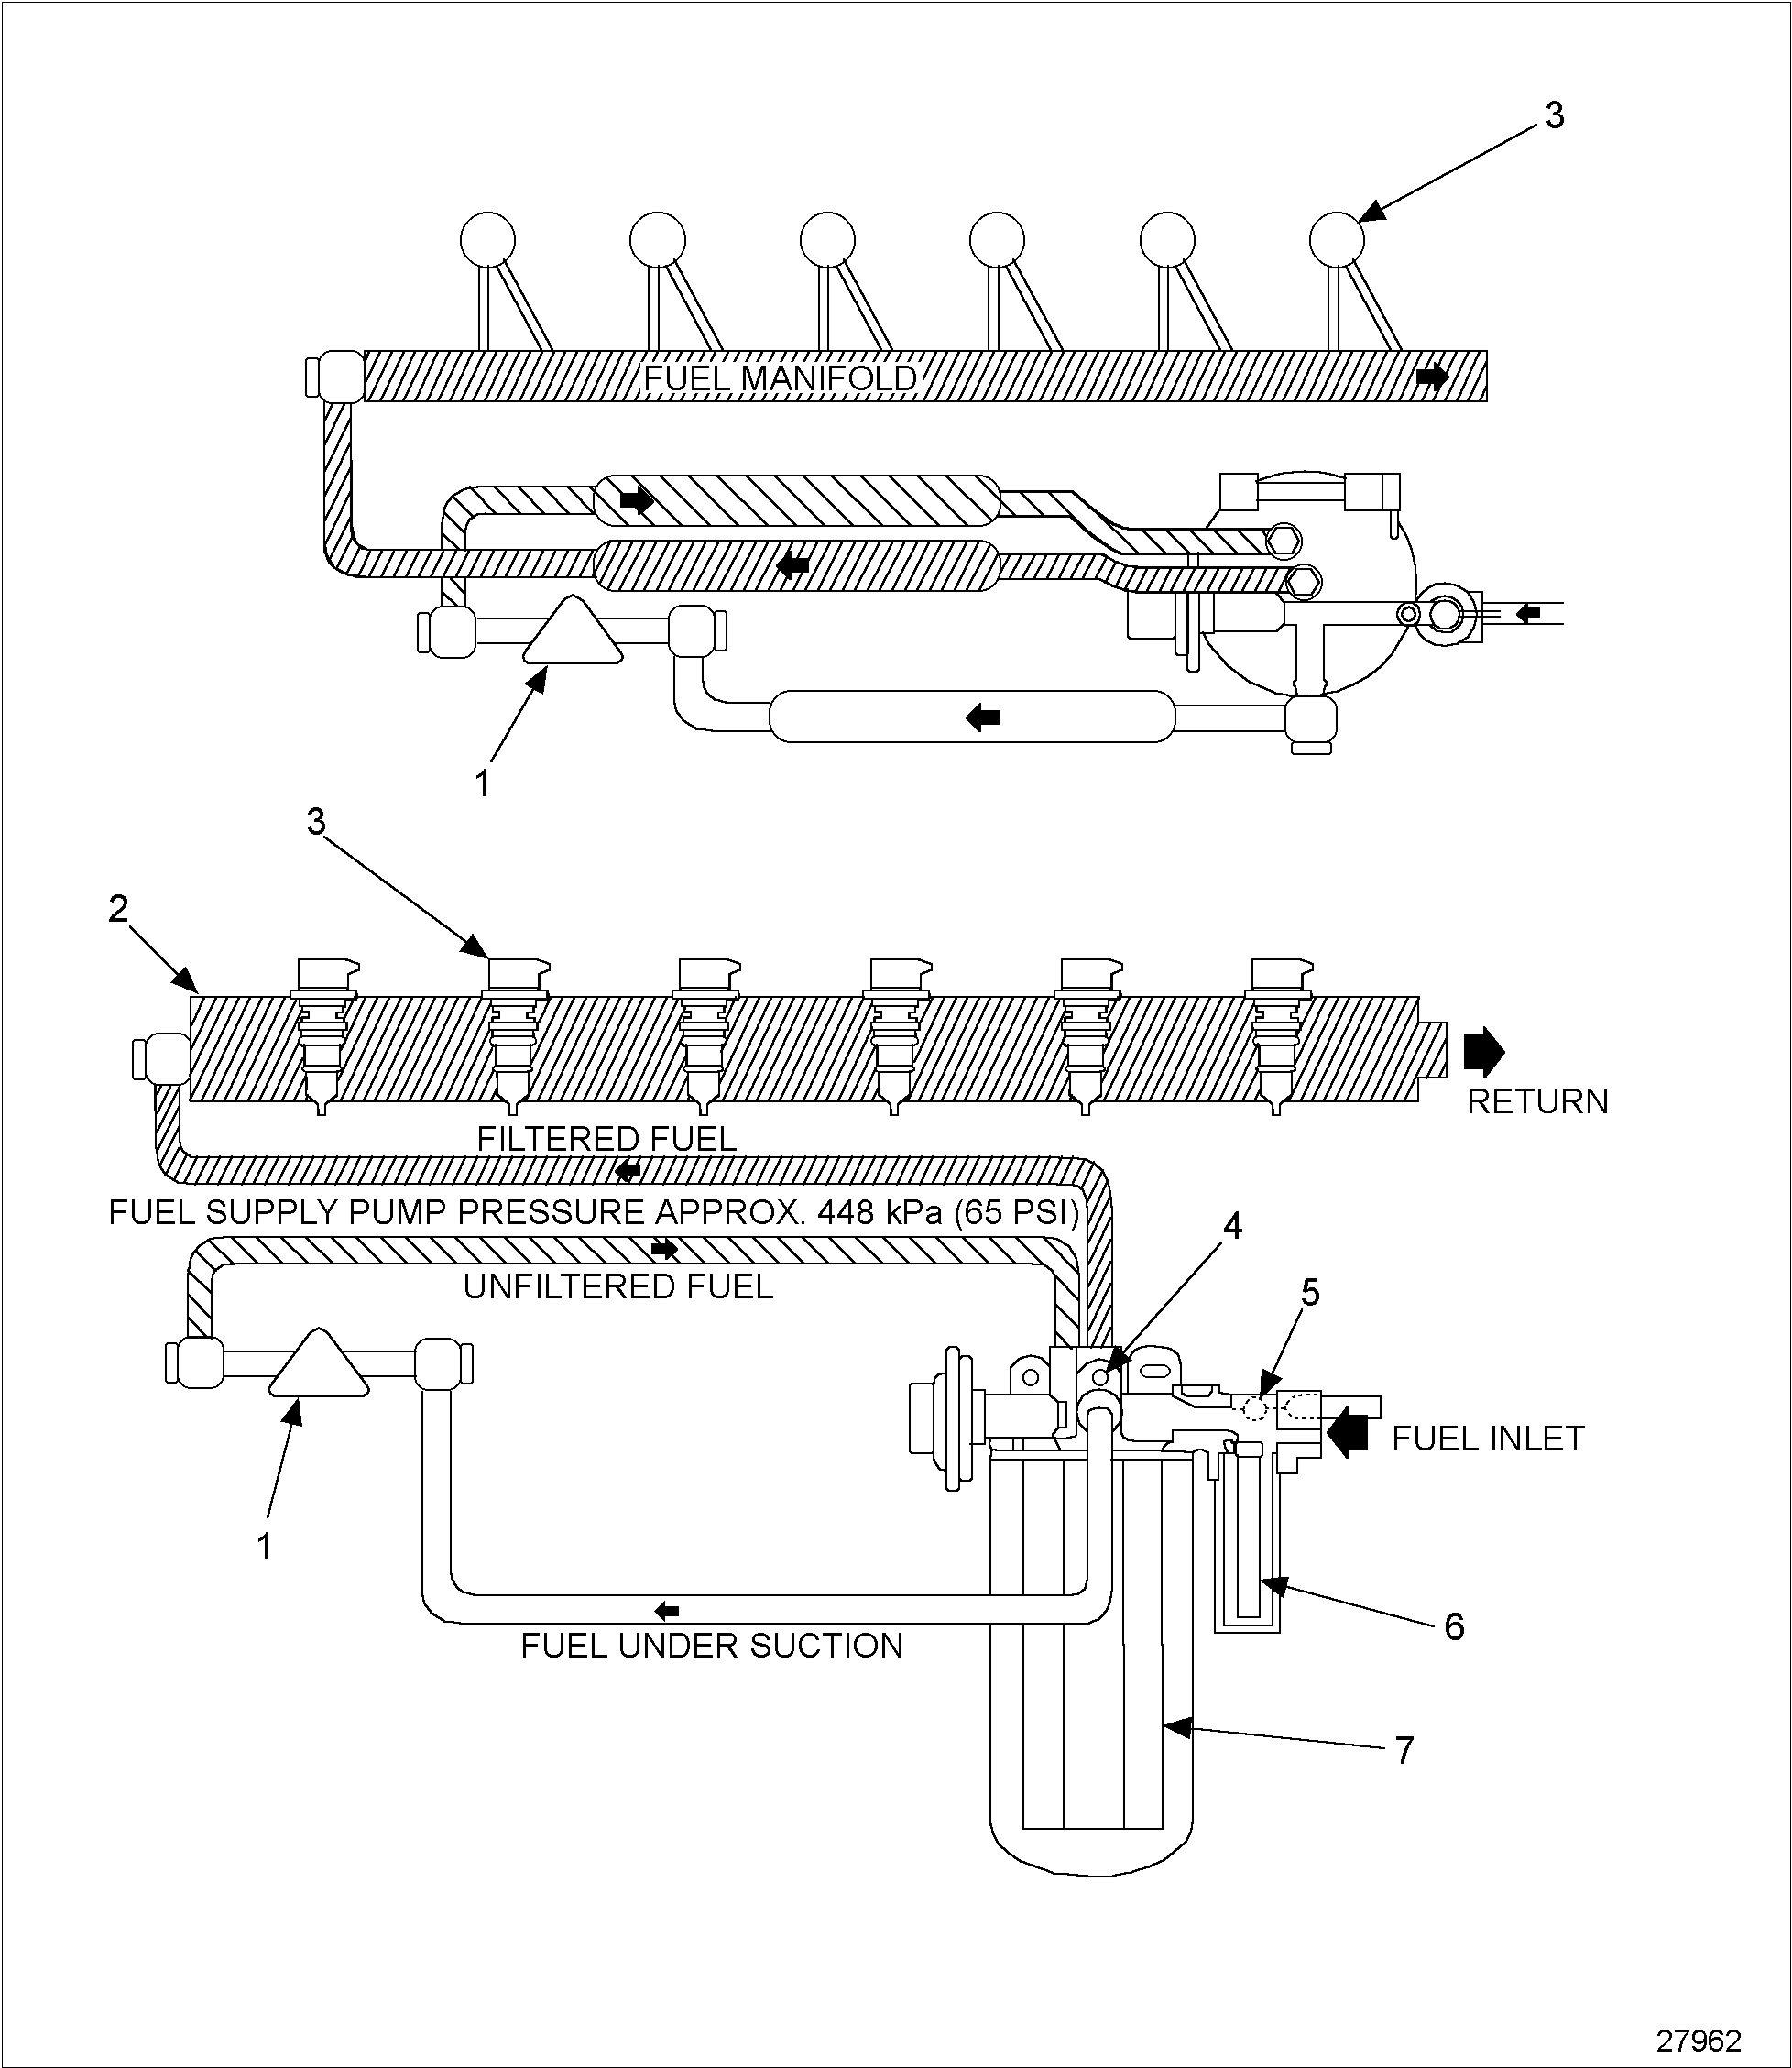
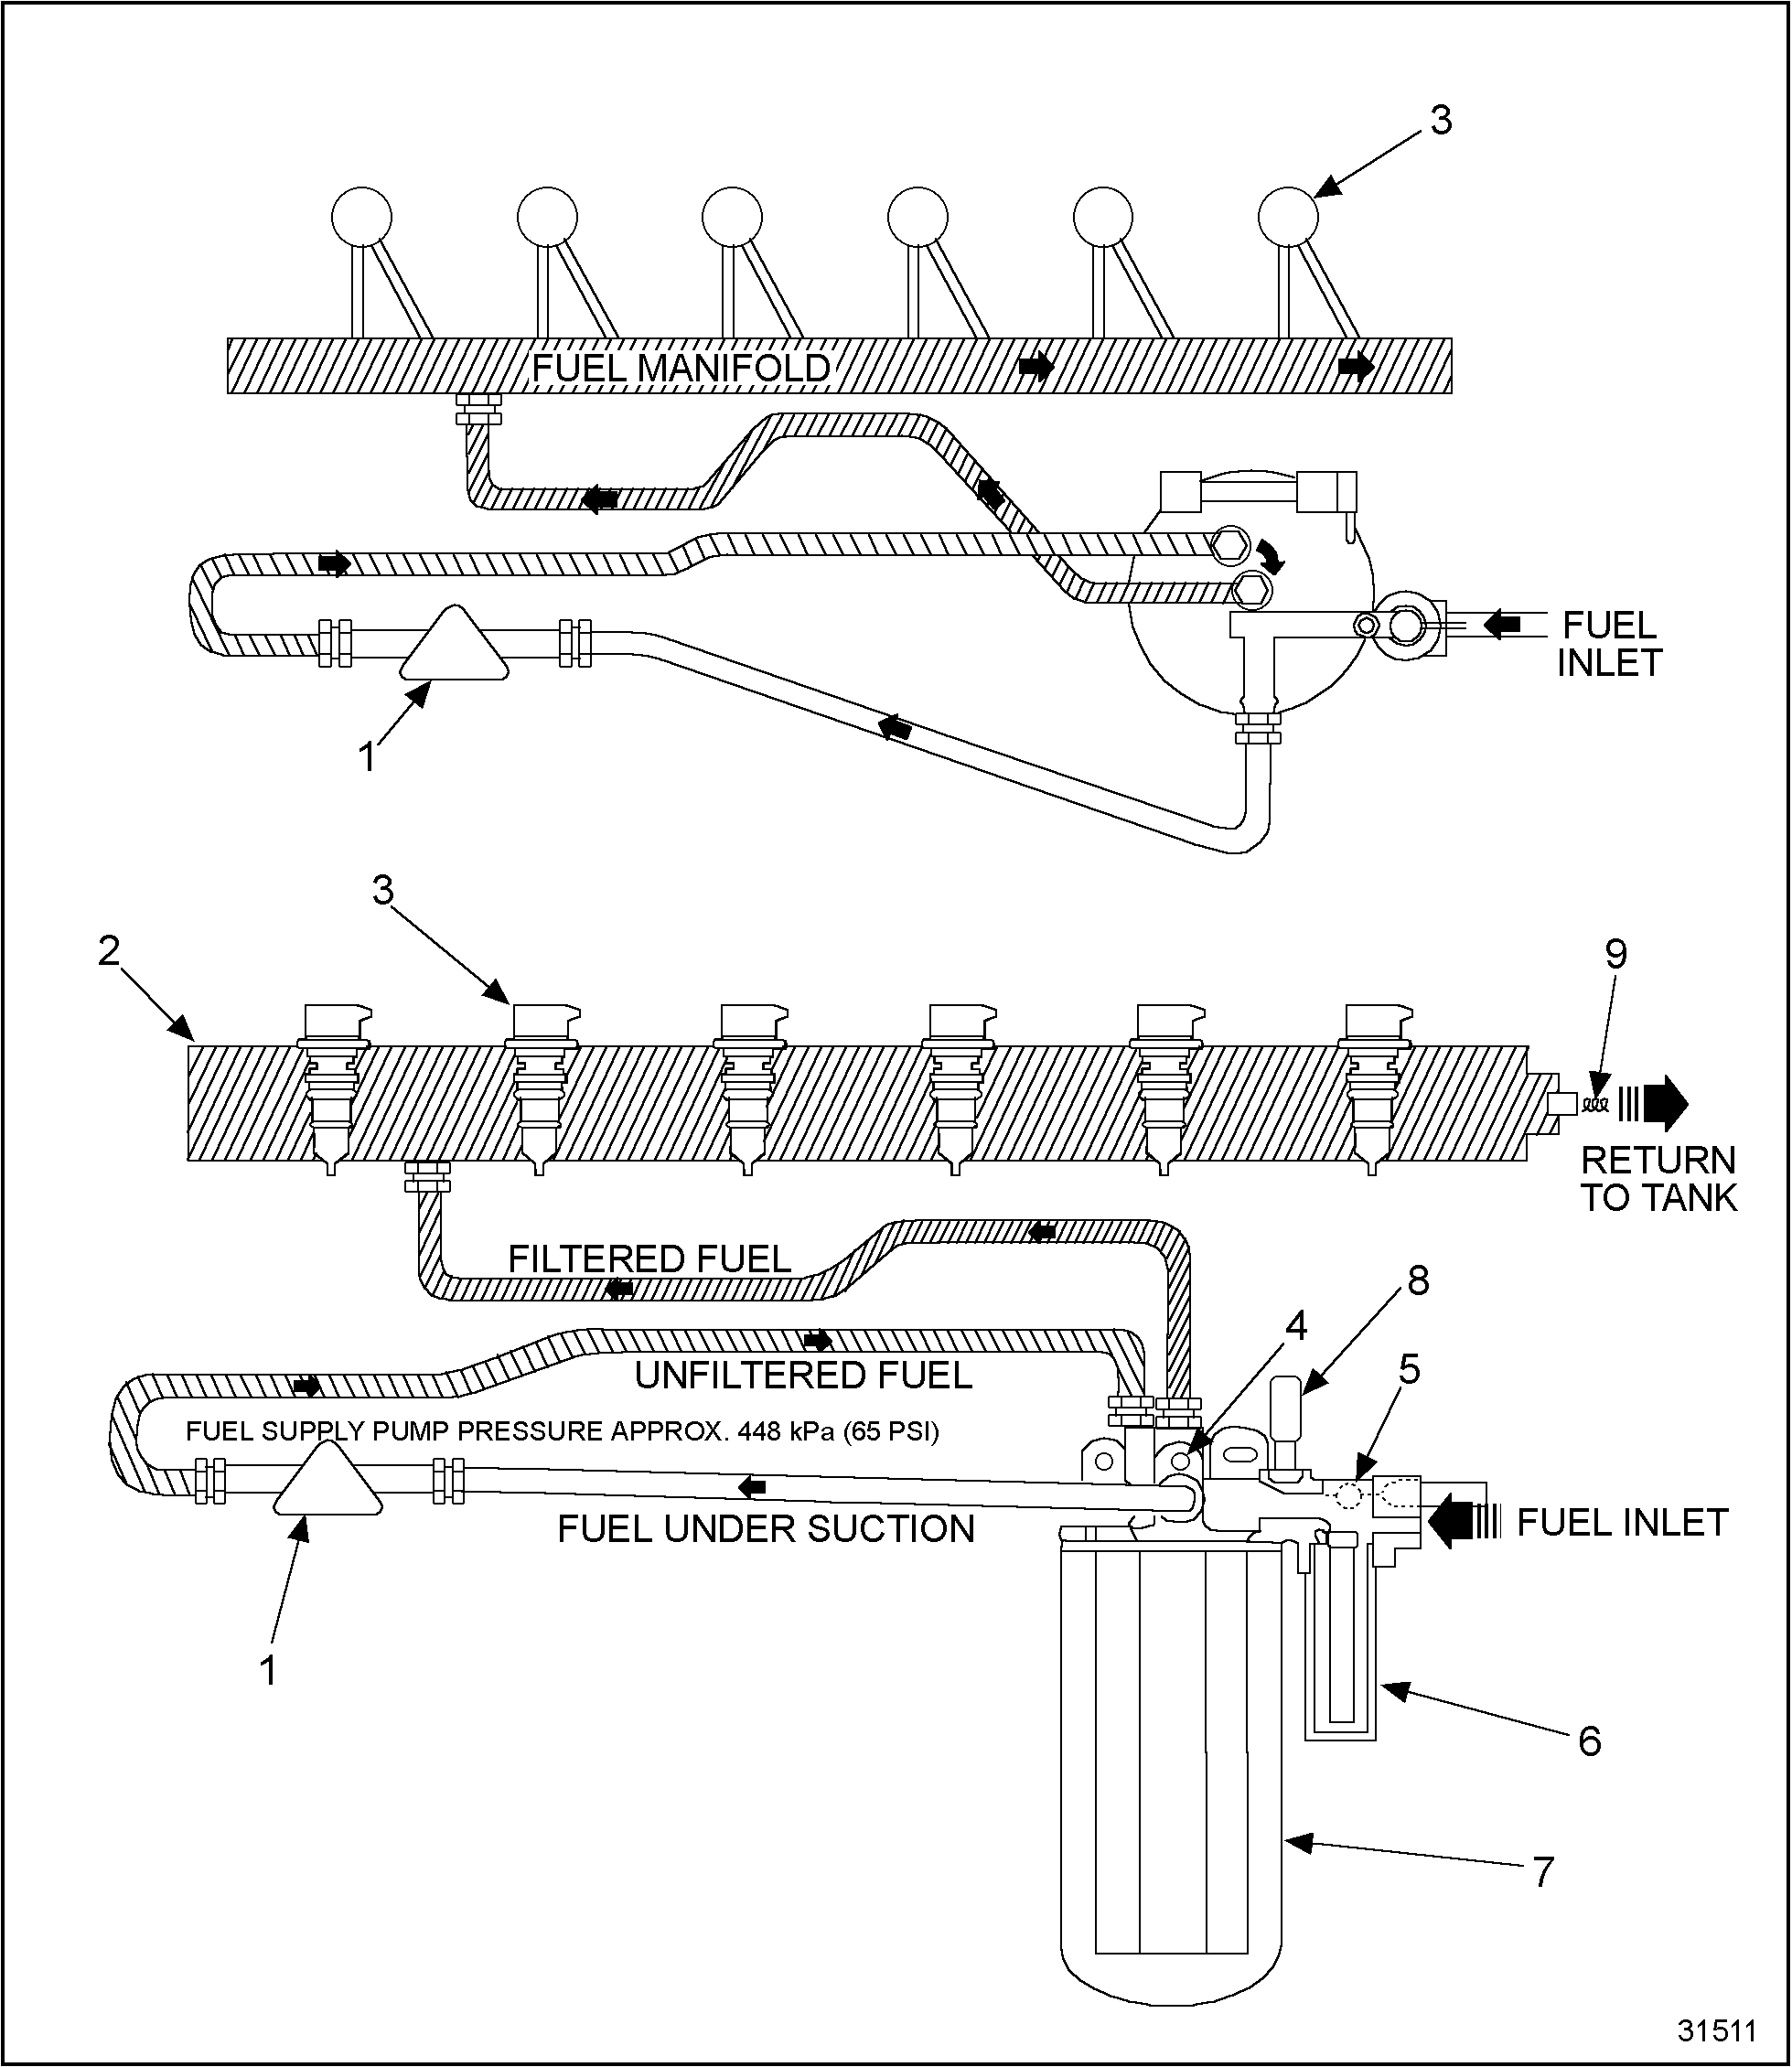
As fuel travels through the fuel system, it will be under negative pressure (vacuum), supply pump pressure and high pressure (injection pressure). See Figure "Fuel System with Horizontal Mounted Primer Pump" . See Figure "Fuel System with Vertical Mounted Primer Pump" .
|
1. Supply Pump |
5. Check Ball |
|
2. Fuel Manifold |
6. Strainer |
|
3. Injector |
7. Filter |
|
4. Bleeder Valve |
8. Hand Primer Pump |
Figure 1. Fuel System with Horizontal Mounted Primer Pump
|
1. Supply Pump |
6. Strainer |
|
2. Fuel Manifold |
7. Filter |
|
3. Injector |
8. Hand Primer Pump |
|
4. Bleeder Valve |
9. Fuel Pressure Regulator Valve |
|
5. Check Ball |
|
Figure 2. Fuel System with Vertical Mounted Primer Pump
Section 2.1.1
Negative Pressure (Vacuum)
When the priming pump is pushed down, the check ball is seated onto the fuel strainer. Releasing the priming pump unseats the check ball, draws fuel from the fuel tank to the inlet port of the fuel filter header and into the fuel strainer assembly. Fuel exits the strainer, flows through the internal passage of the fuel filter header, via a fuel line to the fuel supply pump.
Once the engine has been primed, the fuel supply pump keeps the intermediate fuel system under pressure and the fuel supply line under negative pressure for a constant supply of fuel.
Section 2.1.2
Fuel Supply Pump Pressure
The supply pump produces approximately 448 kPa (65 psi) of fuel pressure. Fuel now flows from the supply pump to the fuel filter header. Fuel then travels through an internal passage into the fuel filter. Fuel passes through the fuel filter, from the outside in, and out the fuel filter header, through a fuel line to the fuel supply manifold.
Section 2.1.3
High Pressure
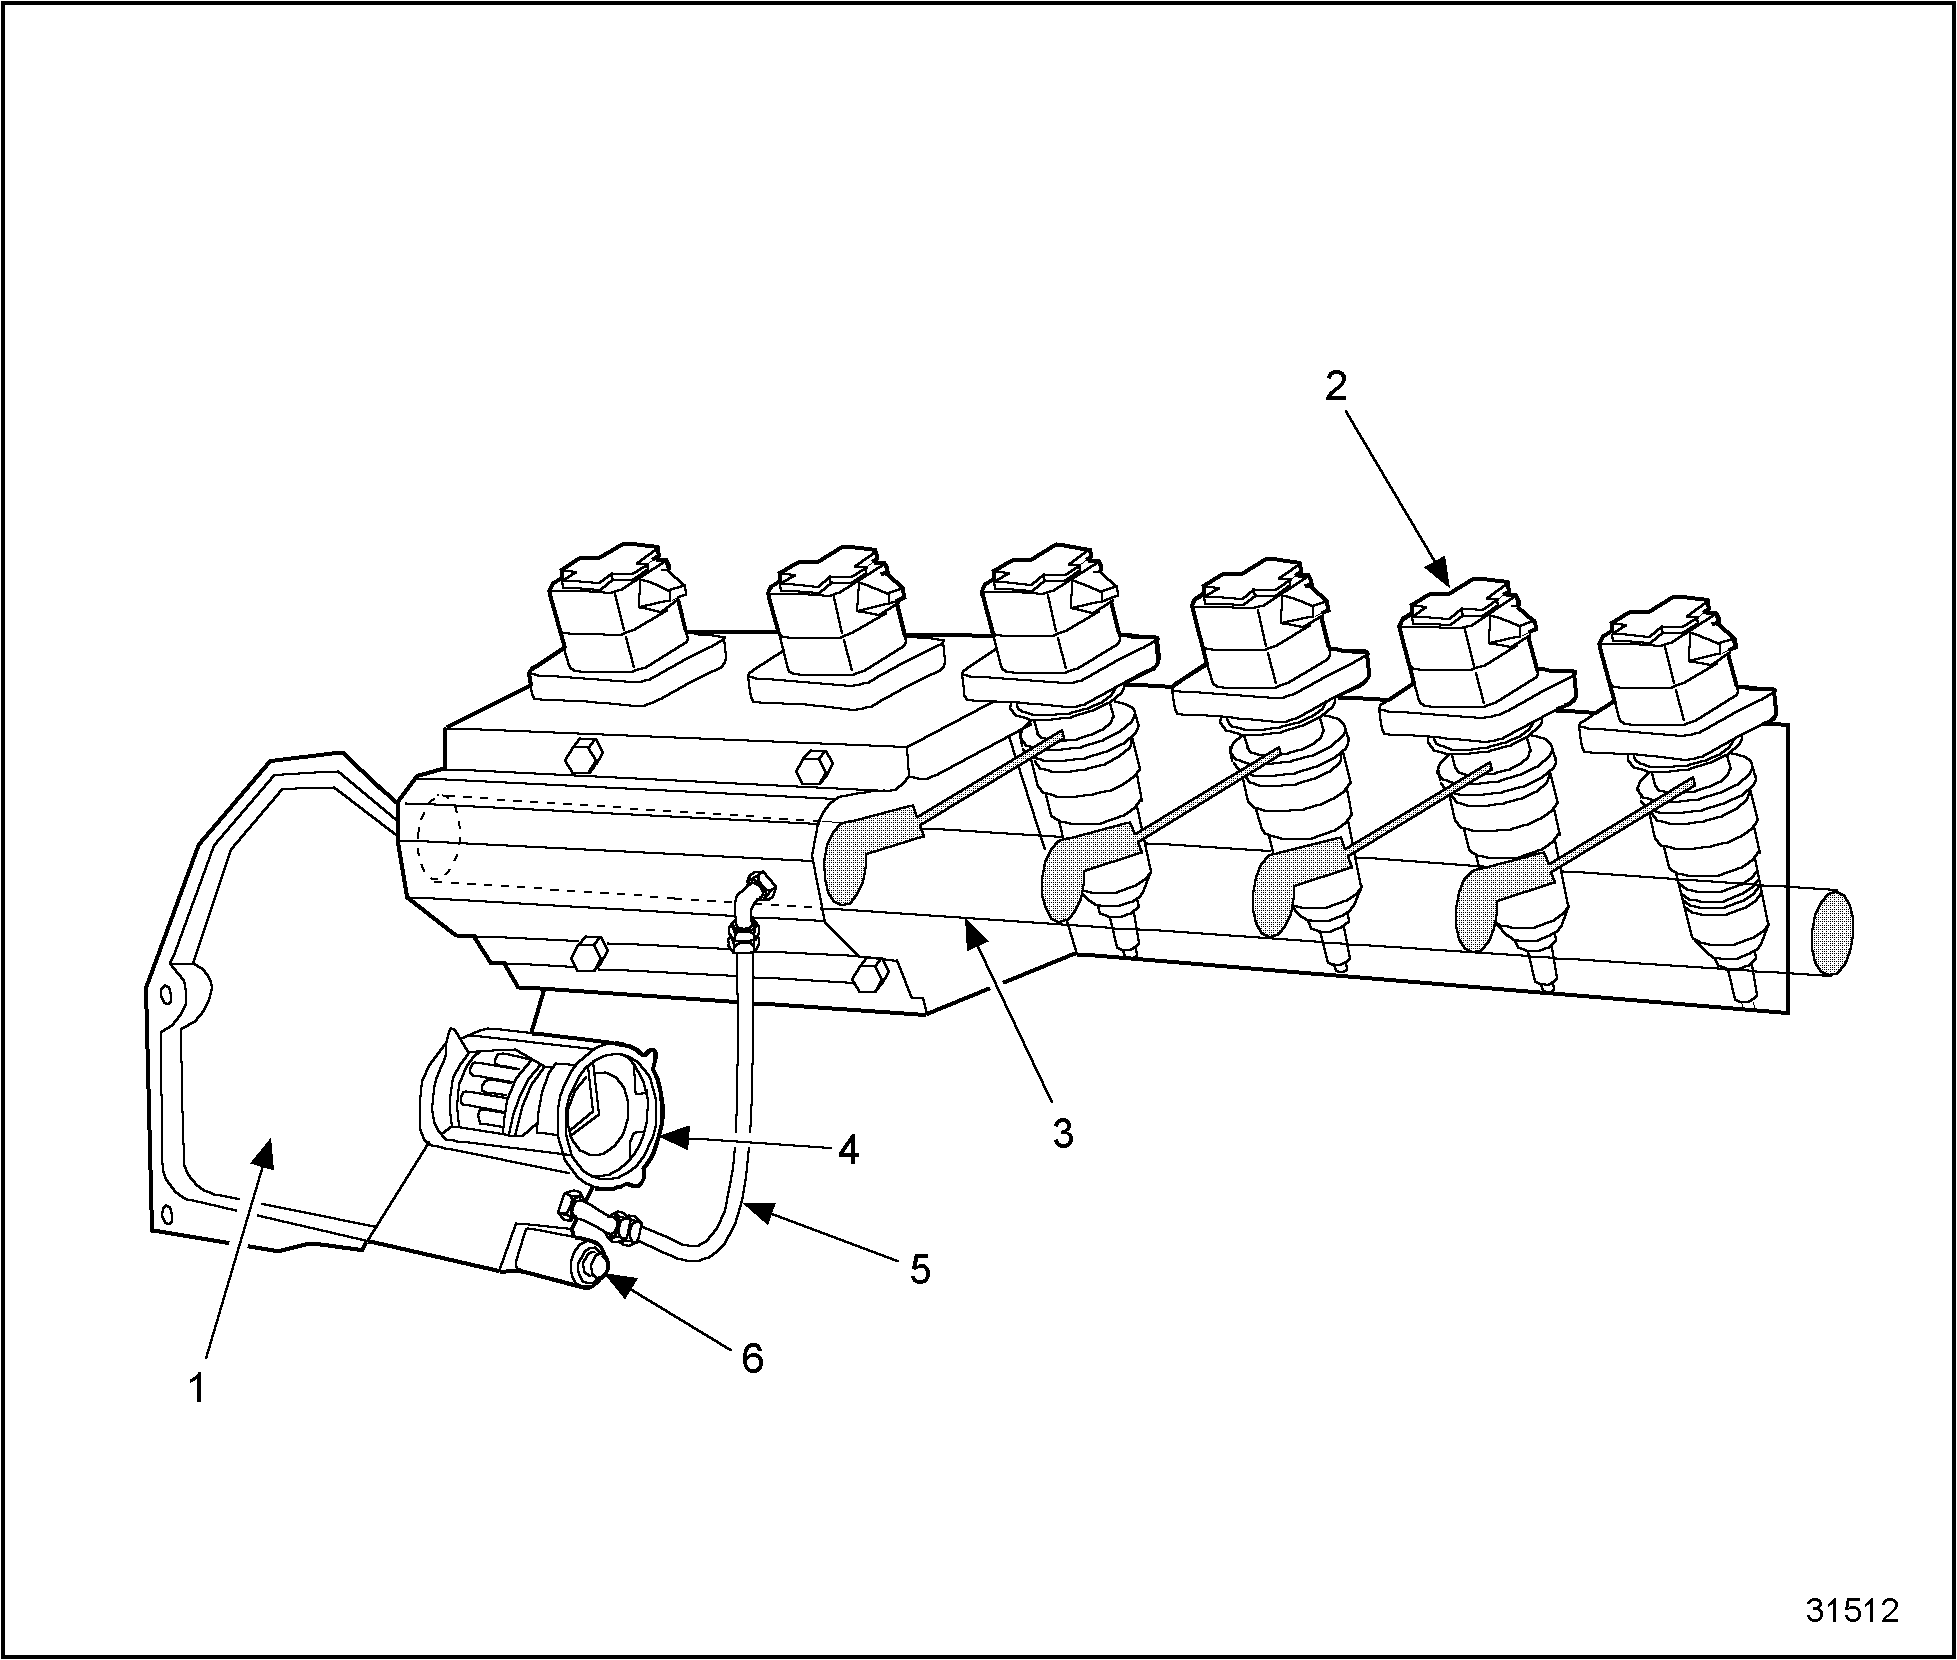
Fuel in the supply manifold is delivered to drillings in the cylinder head leading to the injector bores. The fuel is then pressurized by the injectors to approximately 124,106 kPa (18,000 psi). The excess fuel is piped from the rear of the supply manifold to the fuel tank.
Section 2.1.4
Injection Control Pressure
The system utilizes hydraulically actuated, electronically controlled injectors to deliver fuel to each cylinder. The hydraulic fluid used to actuate the injector is engine oil.
Oil is drawn from the oil pan through the pickup tube by the engine oil pump. The engine oil pump is a gerotor type pump driven by the crankshaft. Oil is fed through passages in the front cover to the oil reservoir.
The reservoir makes available a constant supply of oil to a high pressure hydraulic pump mounted to the front cover. The high pressure pump is a gear driven swash plate pump. High pressure oil is delivered by the high pressure pump to the supply manifold and into oil passages machined into the cylinder head.
The ECM controls the IPR valve. Desired pressure control is a variable function of the engine control strategy and the calibration that has been programmed into the ECM.
The ICP sensor is mounted on the supply manifold and provides the feedback signal for the closed loop control system. The ICP sensor is a ceramic disk type pressure sensor that converts pressure into a 0 to 5 volt analog signal that the ECM uses to determine ICP pressure. See Figure "HEUI Lube System, Front-Mounted Injection Control Pressure Sensor" . See Figure "HEUI Lube System, Mid-Mounted Injection Control Pressure Sensor" .

|
1. Reservoir |
5. High Pressure Manifold |
|
2. Hose |
6. High Pressure Pump |
|
3. Injection Control Pressure Sensor |
7. Injection Pressure Regulator Valve |
|
4. Injector |
|
Figure 3. HEUI Lube System, Front-Mounted Injection Control Pressure Sensor
|
1. Reservoir |
5. High Pressure Manifold |
|
2. Hose |
6. High Pressure Pump |
|
3. Injection Control Pressure Sensor |
7. Injection Pressure Regulator Valve |
|
4. Injector |
8. Hose |
Figure 4. HEUI Lube System, Mid-Mounted Injection Control Pressure Sensor
A spring/piston pop-off valve is installed internal to the high pressure pump and is set to dump oil pressure into the front cover in the event ICP pressure exceeds 27579 kPa (4000 psi). See Figure "Engine Mounted ECM System" .

|
1. ECM |
3. Injection Pressure Regulator |
|
2. Fuel Injector |
4. Injection Control Pressure Sensor |
Figure 5. Engine Mounted ECM System
Section 2.1.5
Fuel Injector
The fuel injector is a unitized fuel injector that is hydraulically actuated and electronically controlled. See Figure "Fuel Injector" .

Figure 6. Fuel Injector
Hydraulic actuation is accomplished when the injector solenoid is energized opening a poppet valve and allowing ICP pressure to flow on top of the amplifier/accumulator piston.
Fuel is supplied to the injector by passages drilled through the cylinder head that intersect with fill ports in the injector.
The area under the plunger is filled with fuel from pressure supplied by the supply pump. As the plunger moves down the increased pressure closes the fuel inlet check ball. Pressure continues to rise opening the nozzle valve; fuel is pressurized through the nozzle orifices and injected into the combustion chamber at pressures as high as 124,106 kPa (18,000 psi).
Injection is terminated when the solenoid is de-energized and ICP pressure is released.
The fuel injector consists of four (4) major components:
- Solenoid
- Poppet Valve
- Intensifier Piston and Plunger
- Nozzle Assembly
An improved single seal is released for the fuel injector middle groove position for the Series 40E engines. See Figure "Fuel Injector Middle Groove Seal" .

Figure 7. Fuel Injector Middle Groove Seal
The new middle groove single seal can be identified by its blue and black color. The displaced seal has a white coating and the cushion ring is green and black. All Detroit Diesel Series 40E engines have the new improved seal.
Note: The injector seals and rings are not serviced separately. The seal package contains all seals and rings needed to service one injector assembly.
Fuel injectors with the new seal became effective on engines with serial numbers 1054920 and above.
Section 2.1.5.1
Injector Removal
Follow these steps to remove the injectors:
- Remove all fuel injector hold down clamp mounting bolts (at the front of the fuel injector).
Note: The shoulder bolt at the rear of the fuel injector does not require removal.
- Disengage the fuel injector hold down clamp from the shoulder bolt by sliding the clamp toward the rear of the engine; then, up and over the head of the shoulder bolt.
- Remove the fuel injector from the cylinder head bore. Insert a pry bar under the hold down clamp and pry up or use Injector Remover Tool J 42946.
NOTICE
Ensure the clamp is free of the shoulder bolt when prying up on the clamp, to prevent damage to the bolt.
- Lift the fuel injector straight up and out of the injector bore of the cylinder head. O-rings should be replaced whenever the fuel injector is removed. If required, remove six shoulder bolts. See Figure
"Fuel Injector Removal"
.

Figure 8. Fuel Injector Removal
Section 2.1.5.2
Injector Installation
Follow these steps to install the injectors:
- If removed, install shoulder bolt and torque to specifications.
- Lubricate fuel injector, and insert the injector assembly in the bore of the cylinder head.
Note: Do not strike the top of the fuel injector to seat it! Use hand pressure applied to the top of the fuel injector, until the hold down clamp can be engaged under the head of the shoulder bolt.
- Seat the fuel injector into the fuel injector bore with the hold down clamp over the shoulder bolt. Use a 5/8 in. (16 mm) open end wrench on the lower edge of the hold down clamp to further insert the fuel injector into the bore of the cylinder head, until seated.See Figure
"Fuel Injector Installation"
.
1. Fuel Injector Solenoid Connector Clip
2. Fuel Injector Solenoid Connector
Figure 9. Fuel Injector Installation
- Install the fuel injector hold down clamp mounting bolt and torque to specifications.
- For fuel injectors with the plastic clip connector, install the oil deflector and wiring harness channel to the fuel injector. Tighten bolts. See Figure
"Fuel Injector Installation"
.

1. Wiring Harness Channel
Figure 10. Fuel Injector Installation
Section 2.1.5.3
Solenoid
The solenoid is a very fast acting electromagnet that, when energized, pulls the poppet valve off its seat. See Figure "Solenoid" .

|
1. Nozzle Assembly |
4. Poppet Valve |
|
2. Check Ball |
5. Solenoid |
|
3. Intensifier Piston |
6. Nozzle Valve |
Figure 11. Solenoid
Section 2.1.5.4
Poppet Valve
The poppet valve is held on its seat by a spring. In this closed position, high pressure inlet oil is blocked and the intensifier cavity is opened to drain. When the solenoid is energized, the poppet is quickly lifted off its seat. The path to drain is closed and the inlet for high pressure oil is opened.
Section 2.1.5.5
Intensifier Piston and Plunger
When the poppet valve opens the inlet port, high pressure oil enters the injector and acts on the top of the intensifier piston. Pressure builds on the intensifier, pushing it and the plunger down. The intensifier is seven times larger in surface area on the 7.6 engine, and six times larger in surface area on the 8.7 engine, than the plunger. This provides an equal multiplication of force. The downward movement of the plunger pressurizes the fuel in the plunger cavity, causing the nozzle to open.
Section 2.1.5.6
Nozzle Assembly
The nozzle assembly is of conventional design with the exception of the fill check. This check ball seats and seals during the downward stroke of the plunger to prevent leakage of the high pressure fuel. During the return stroke, it unseats allowing the plunger cavity to fill. The nozzle valve is an inwardly opening type that lifts off its seat when pressure overcomes the spring force. Fuel is then atomized at high pressure through the nozzle tip. See Figure "Nozzle Assembly" .
|
1. Nozzle Assembly |
4. Poppet Valve |
|
2. Check Ball |
5. Solenoid |
|
3. Intensifier Piston |
6. Nozzle Valve |
Figure 12. Nozzle Assembly
Section 2.1.6
Fuel Injector Seals and Rings
Each seal has been specifically designed for a given location on the fuel injector. Each part of the seal package must be in the proper location and must be free of damage as well as foreign material. Improper installation of the seals could adversely affect engine performance leading to an inoperative engine.
Note: The fuel injector assembly is not field serviceable. Do not attempt to repair. The warranty may be denied if the fuel injector core shows signs of tampering.
The fuel injector is of the highest quality and has been manufactured to exacting standards. The injector has been assembled and calibrated with computer controlled equipment designed specifically for this purpose. The injector has been pretested and demonstrated to function within precise factory specified limits.
Note: If one seal on a fuel injector needs to be replaced, the entire set must be replaced at the same time.
The replacement seals and rings are packaged with the following: See Figure "Fuel Injector Seal, Ring and Groove ID" .
- Upper Backup Ring (steel)
- Upper Cushion Ring (black)
- Upper O-ring Seal (blue)
- Middle Seal (blue and black)
- Lower O-ring Seal (orange)
- Injector Gasket (copper)
- Installation Instructions

Figure 13. Fuel Injector Seal, Ring and Groove ID
Note: Refer to this manual for information regarding the removal and installation of the following parts:
- Road draft tube; refer to "1.2 Road Draft Tube" .
- Valve covers; refer to "1.3 Valve Cover/Intake Manifold" .
- Engine harness connector (disconnect only, do not remove) at fuel injector solenoids; refer to "8.1.1 Removal of Wiring Harness" .
- Supply manifold (draining only; do not remove). Refer to .
- Fuel injectors; refer to "2.1.5 Fuel Injector" .
|
NOTICE |
|
The supply manifold oil and fuel rails must be drained prior to removing the fuel injectors. This prevents leakage into the cylinder bore when the fuel injector is removed. Fluid trapped in the cylinder can cause severe mechanical damage to the engine should a hydrostatic lock up occur when the engine is cranked with the starter. |
Note: Ensure the oil rails are fully drained before removing the fuel injectors.
Section 2.1.6.1
Fuel Injector Seals and O-rings Removal
Perform the following steps to remove the fuel injector seals and O-rings.
|
NOTICE |
|
Rings and seals should be replaced each time the fuel injector is removed. If any of the fuel injectors have damaged rings and seals, all of the fuel injectors should be removed and their rings and seals should be replaced. While removing the seals ensure the fuel injector body seal grooves are not scratched. Unless damaged, leave the original steel backup ring in the uppermost groove on the fuel injector, and do not replace it. |
- Remove the copper fuel injector gasket from the bottom of the fuel injector.
- Lift the lower O-ring seal out of its groove with a wooden or plastic tool. Cut the seal and remove it.
- Lift the middle one or two seals out of the middle groove using a wooden or plastic tool. Cut the seals and remove.
Note: An improved single middle seal has replaced the original two middle seal combination. Depending on early or later style injector, the injectors you are rebuilding may have one or two seals in the middle groove. This kit contains the new single seal for installation in the middle groove regardless of whether the injector had one or two seals originally in this groove.
- Lift the upper O-ring seal out of its groove with a wooden or plastic tool. Cut the seal and remove it.
- Lift the upper cushion ring out of its groove with a wooden or plastic tool. Cut the ring and remove it.
- This step is optional. If the steel backup ring is damaged, lift one corner of the upper backup ring from its groove; slide the rest of the backup ring from its groove and over the tip of the fuel injector.
- Ensure the fuel injector is clean and free of debris. Place the fuel injector into the holder rack where it will be protected from debris and damage.
Section 2.1.6.2
Fuel Injector O-rings and Seals Installation (Upper Groove)
Install the upper groove rings and seal (larger diameter).
- Locate the upper groove rings and seal (larger diameter).
- Lightly lubricate the rings and seal with new, clean engine oil.
Note: The backup ring acts like a spring. Care must be taken when installing this part. Do not twist the ring. Ring flatness is important.
- Gently spread to gap, and slide the steel backup ring over the body of the fuel injector, up to the large diameter, just below the upper groove.
- Insert one end of the ring into the upper groove and walk the rest of the ring into the groove. See Figure
"Upper Groove Backup Ring Installed"
.
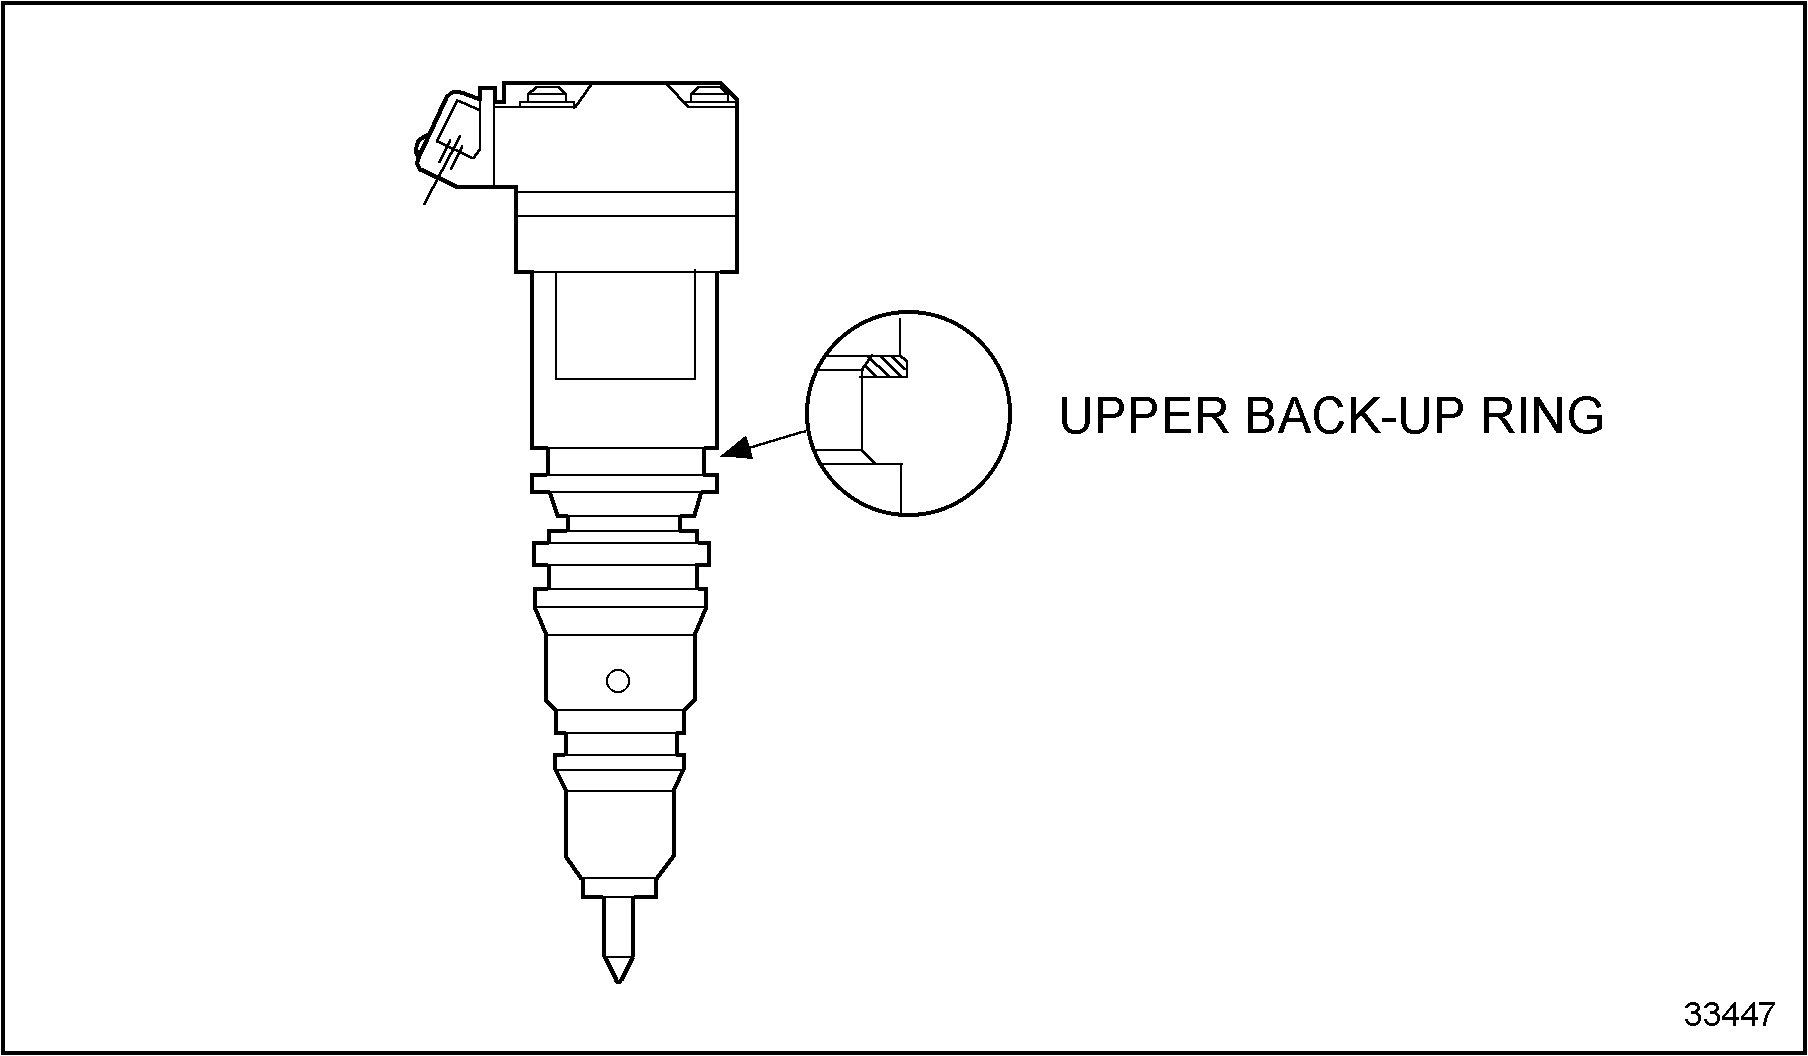
Figure 14. Upper Groove Backup Ring Installed
- Slide the cushion ring over the fuel injector and into the upper groove. Ensure the cushion ring is up against the backup ring. See Figure
"Upper Groove Backup Ring and Cushion Ring Installed"
.
Note: Ensure the cushion ring does not twist during installation.
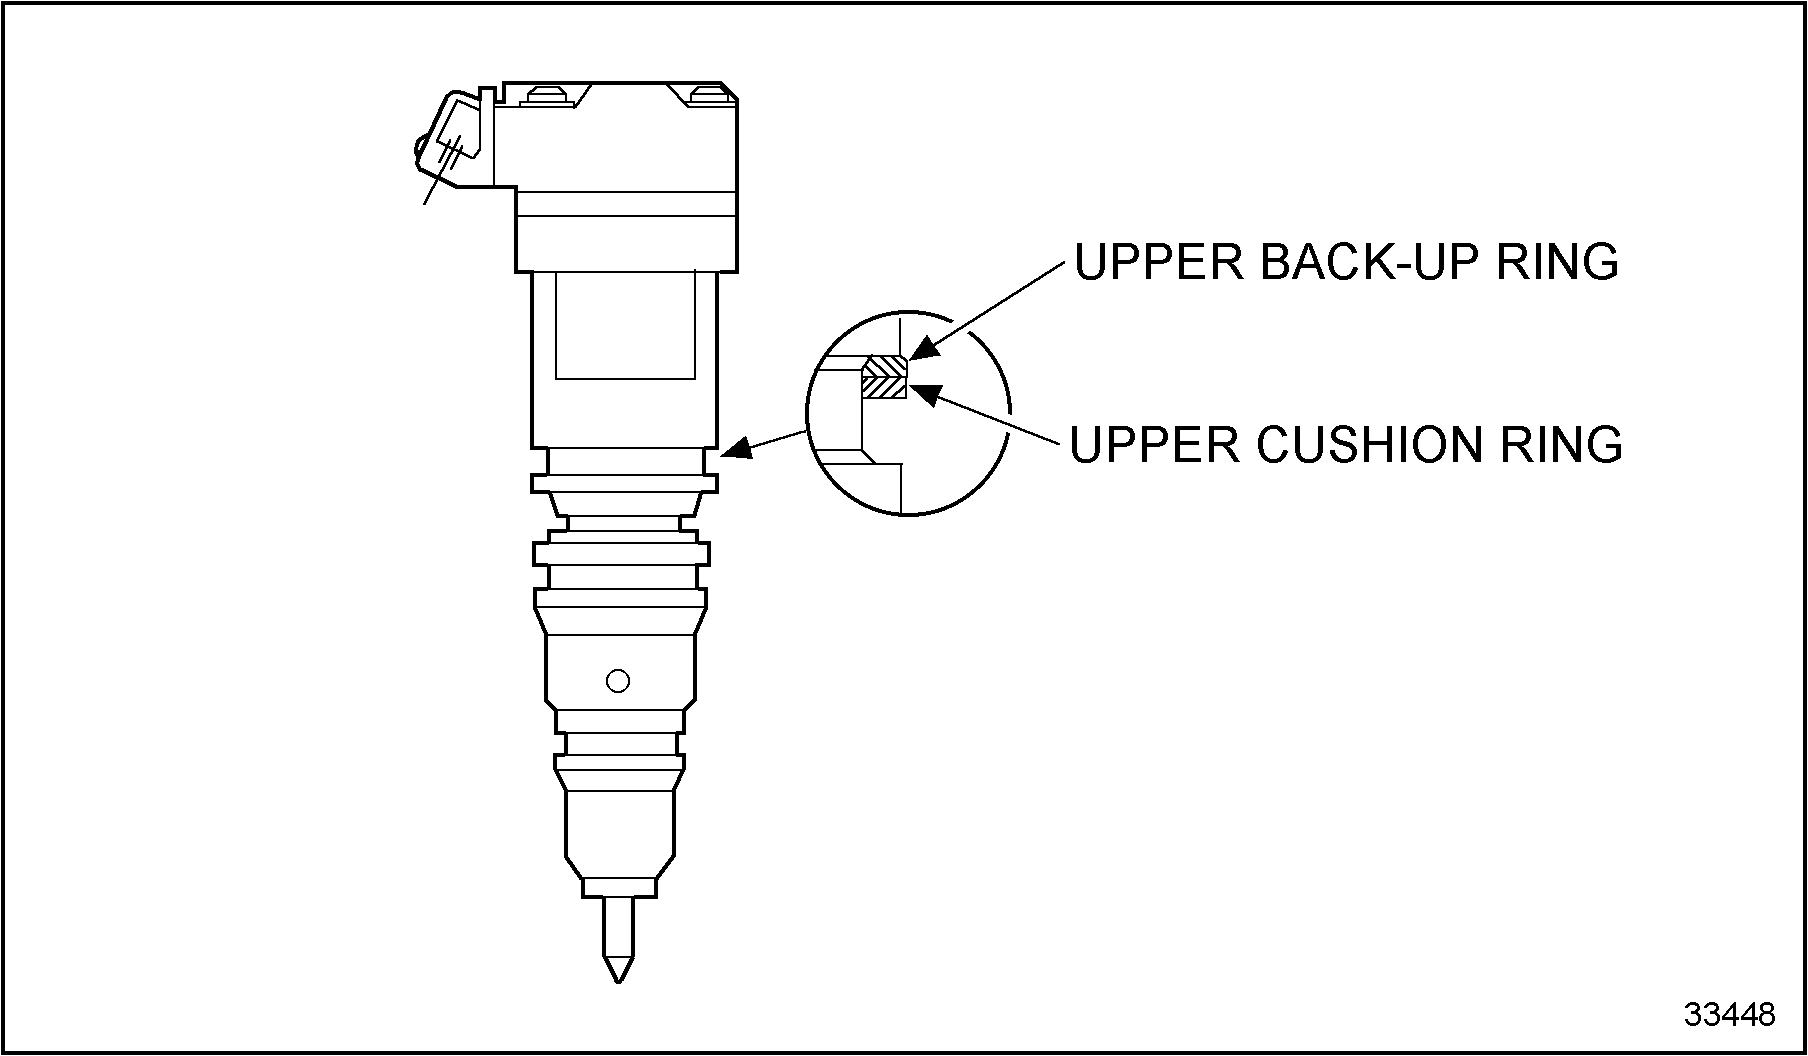
Figure 15. Upper Groove Backup Ring and Cushion Ring Installed
- Slide the fuel injector upper O-ring seal over the injector and into the upper groove. Ensure the seal is up against the cushion ring. See Figure
"Upper Groove Backup Ring, Cushion Ring and O-ring Installed"
.
Note: Ensure the O-ring does not twist during installation.
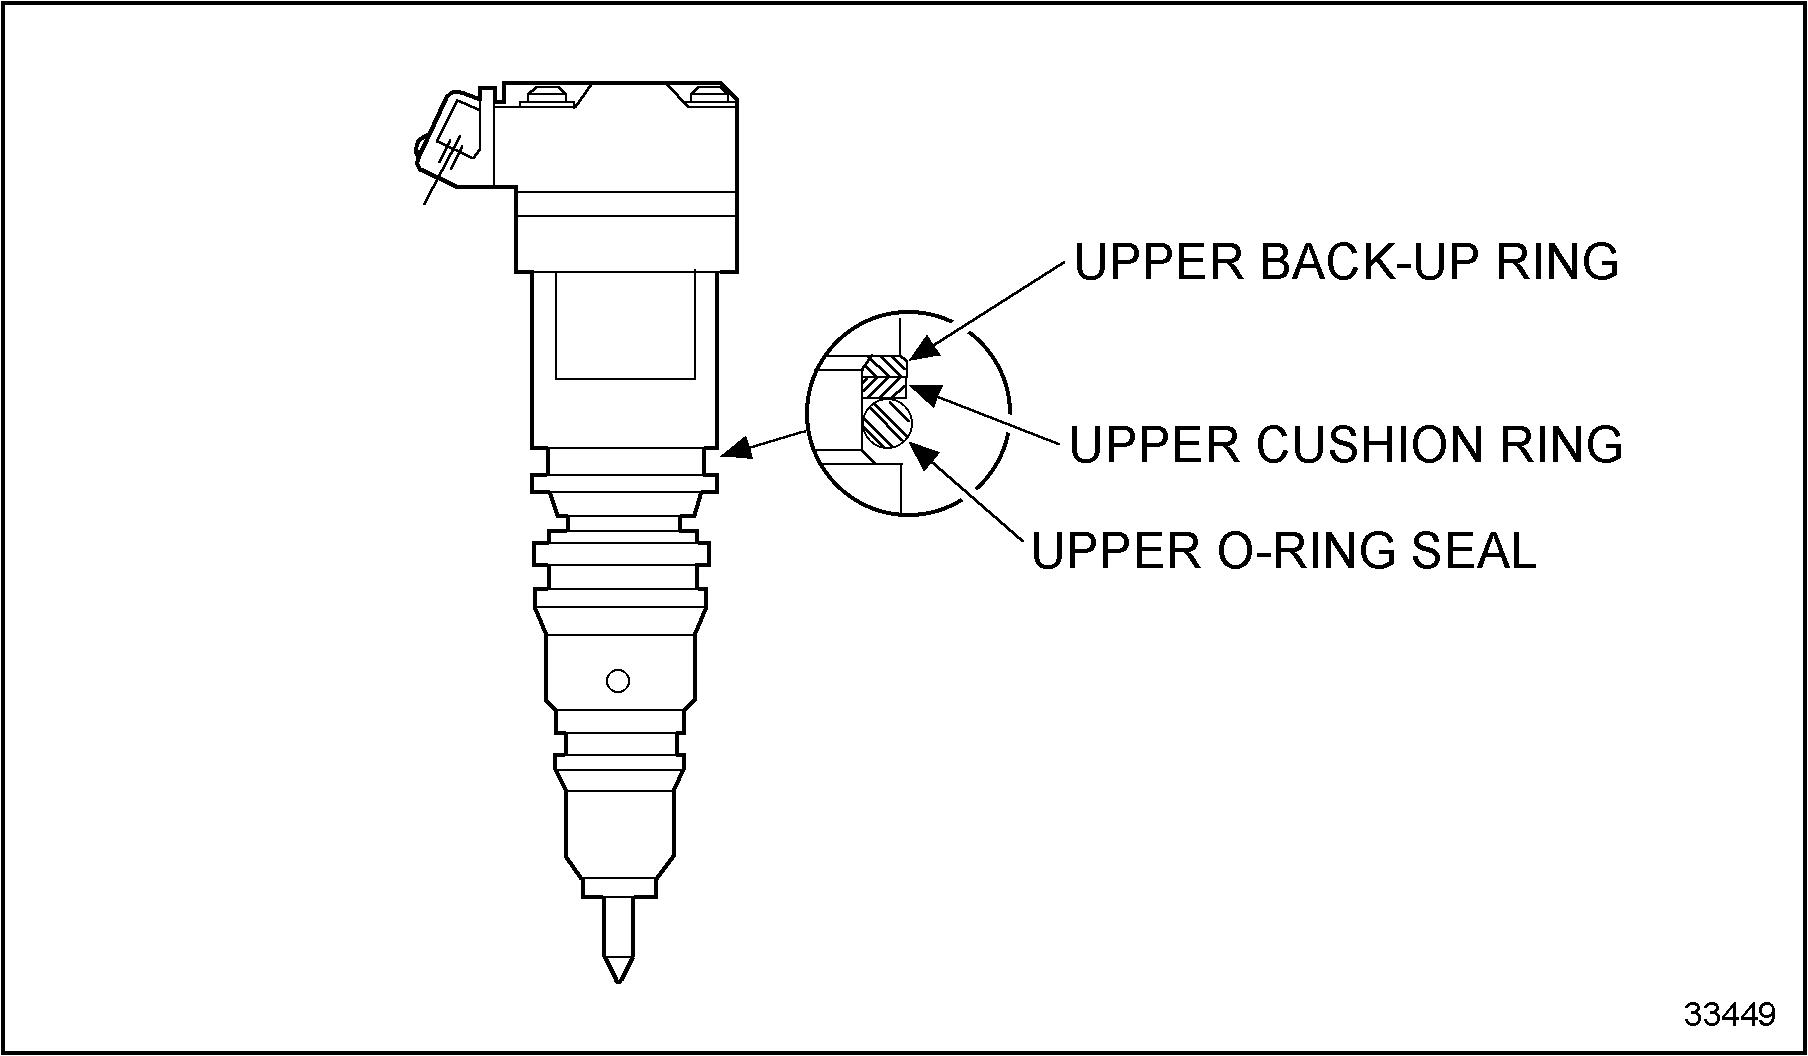
Figure 16. Upper Groove Backup Ring, Cushion Ring and O-ring Installed
Section 2.1.6.3
Fuel Injector Seal Installation (Middle Groove)
Install the single middle groove seal as follows: See Figure "Middle Groove Seal Installed" .
- Locate the middle groove seal (blue and black color).
- Lightly lubricate the seal with clean engine oil.
- Slide the middle fuel injector seal over the fuel injector and push into the middle groove. Care should be taken to minimize the amount and length of time that the seal is expanded during installation. Ensure the middle fuel injector seal is up against the groove.
Note: Ensure the seal does not twist or over-stretch during installation. Slide the seal onto the injector. Do not roll the seal. Approximately ten minutes after the seal has been installed, it should return to its normal shape. Check for proper fit.
The seal should be trapped in the middle groove to ensure it will not slide out of the groove during injector installation into the cylinder head.
Figure 17. Middle Groove Seal Installed
Section 2.1.6.4
Fuel Injector Seal Installation (Lower Groove)
Install the lower groove O-ring seal as follows:
- Locate the lower groove O-ring seal.
- Lightly lubricate the seal with clean engine oil.
Note: Ensure the lower fuel injector seal does not twist during installation.
- Slide the lower fuel injector seal over the fuel injector body and into the lower groove. Ensure the lower fuel injector seal is up against the groove. See Figure
"Lower Groove Seal Installed"
.

Figure 18. Lower Groove Seal Installed
- Apply a light coat of clean grease to the new copper gasket and press onto the fuel injector, using fingers. Orientation of the raised bead on the copper gasket is not important. See Figure
"Copper Gasket Installed"
.

Figure 19. Copper Gasket Installed
Note: After all the seals have been installed on the injectors, wait approximately ten minutes before installing the injectors back into the cylinder head. This will allow the seals to recover back to their correct diameter, ensuring ease of installation and proper seal function.
Section 2.1.7
Fuel Injector Operation
There are three stages the fuel injector goes through during operation. They are:
- Fill Cycle
- Injection
- End of Injection
Section 2.1.7.1
Fill Cycle
During pre-injection all internal components have returned to their spring-loaded positions. The poppet valve is blocking high pressure oil from entering the injector. The plunger and intensifier are at the top of their bore and the plunger cavity is full of fuel. Fuel pressure in the plunger cavity is the same as fuel gallery pressure, approximately 448 kPa (65 psi).
Section 2.1.7.2
Injection
When the ECM determines that the injector should be fired, the following sequence of events occurs:
- The ECM sends a Fuel Delivery Command Signal (FCDS) to the injector solenoid.
- The solenoid is fully energized almost instantly creating a strong magnetic pull on the armature.
- The magnetic pull of the solenoid overcomes spring tension holding the poppet closed.
- The poppet is quickly raised off its seat.
- The upper poppet land closes off the path to the drain.
- The lower land opens the poppet chamber to incoming high pressure oil.
- High pressure oil flows around the poppet to the top of the intensifier piston.
Pressure on the top of the intensifier forces it down along with the plunger. The downward movement of the plunger pressurizes the fuel in the plunger cavity and nozzle. When the fuel pressure reaches Valve Opening Pressure (VOP), the nozzle valve lifts off its seat and injection begins.
Injection pressures may be as high as 12,411 kPa (18,000 psi) depending on engine requirements.
Section 2.1.7.3
End of Injection - Drain Cycle
The end of the injection cycle begins when the ECM terminates the fuel delivery command signal to the injector solenoid. See Figure "Injector Drain Cycle" . The following occurs:

Figure 20. Injector Drain Cycle
- The magnetic field of the solenoid collapses and is no longer able to overcome poppet spring tension to hold the poppet off its seat.
- The poppet closes, shutting off high pressure oil from entering the injector.
- When the poppet is seated, the upper land of the poppet opens the poppet cavity to drain.
- Pressurized oil in the intensifier chamber and poppet chamber flows upward around the poppet seat, through the vent holes in the poppet sleeve and out the adaptor drain hole.
- The pressure of the fuel and spring in the plunger cavity exerts an upward force on the plunger and intensifier. As the pressure of the pressurized oil above the intensifier drops, so does the downward force on the intensifier.
- The upward force from the pressurized fuel almost instantly becomes greater than the downward force on the intensifier so the downward motion of the intensifier and plunger stops.
- When the plunger stops, fuel flow also stops.
- With the check still open, the remaining pressure on the fuel pushes a tiny amount of additional fuel out the orifice holes. This causes a large pressure drop with fuel nozzle pressure below the VOP. Spring tension on the nozzle valve now re-seats and injection stops.
Section 2.1.8
Split-Shot Injectors
New split-shot injectors and new electronics have been released for Series 40E engines. Installation began with engine serial number 1028711 for standard torque engines rated at 175, 190, 210, and 230 hp and for high torque engines rated at 195 and 210 hp.
Split-shot injectors are designed to provide a two stage injection shot. The first shot, or pilot injection, begins the initial combustion within the injector. This is followed closely by a second shot that completes the combustion process. The double shot extends combustion time for a more controlled pressure rise within the cylinder, thereby reducing combustion knock and oxides of nitrogen (NOx) emissions. The new injectors are compatible for use with JP8 jet fuel as an alternative to Number 2 diesel fuel.
The new injectors, together with all seals and O-rings required for installation, are available in the service kit listed in Table "Split-Shot Injector Service Kit" . New split-shot injectors and former injectors used on Series 40E engines are not interchangeable on a part-for-part basis due to changes to the electronic control calibration required to operate the new injectors. The new injectors must be used with the new electronics. Therefore, the former injectors will continue to be serviced for engines not having the new electronics.
|
Injector Service Kit Number |
Injector Part Number * |
Character Reference ID * |
|
1829839C91 |
1829926C1 or 1829837C1 |
BE |
Note: * The ID part number is not a service part number. The ID part number and character reference are etched on the top of the injector assembly solenoid.
| Series 40E Service Manual - 6SE410 |
| Generated on 10-13-2008 |