Section 1.21
Timing Gear Train and Front Cover
Valve train failures from broken or bent pushrods, valves, rocker arms and worn valve keepers and rotators in many instances could be caused by improper timing of the gear train. Depending on valve lash setting, if the camshaft gear is improperly timed by tooth early, the engine pistons will strike the intake valve heads. If the timing is set one tooth late, the exhaust valve may contact the pistons.
Section 1.21.1
Engine Gear Train Timing Check Without Removing Front Cover or Engine Tear Down
For testing purposes only: No. 1 intake valve setting with No. 1 piston at TDC (compression) is 0.74 mm (0.029 in.). Method One uses a Feeler Gage.
Section 1.21.1.1
Method One - Using a Feeler Gage
Follow these steps when using a feeler gage:
- Adjust the No. 1 intake valve with the No. 1 piston set at TDC (Top Dead Center) compression stroke to 0.74 mm (0.029 in.).
- Scribe a straight line or a radial line in a clockwise direction, 47 mm (1.850 in.) in length. Start from the vibration damper pulley notch when facing the engine. See Figure
"Checking Engine Gear Train Timing"
.
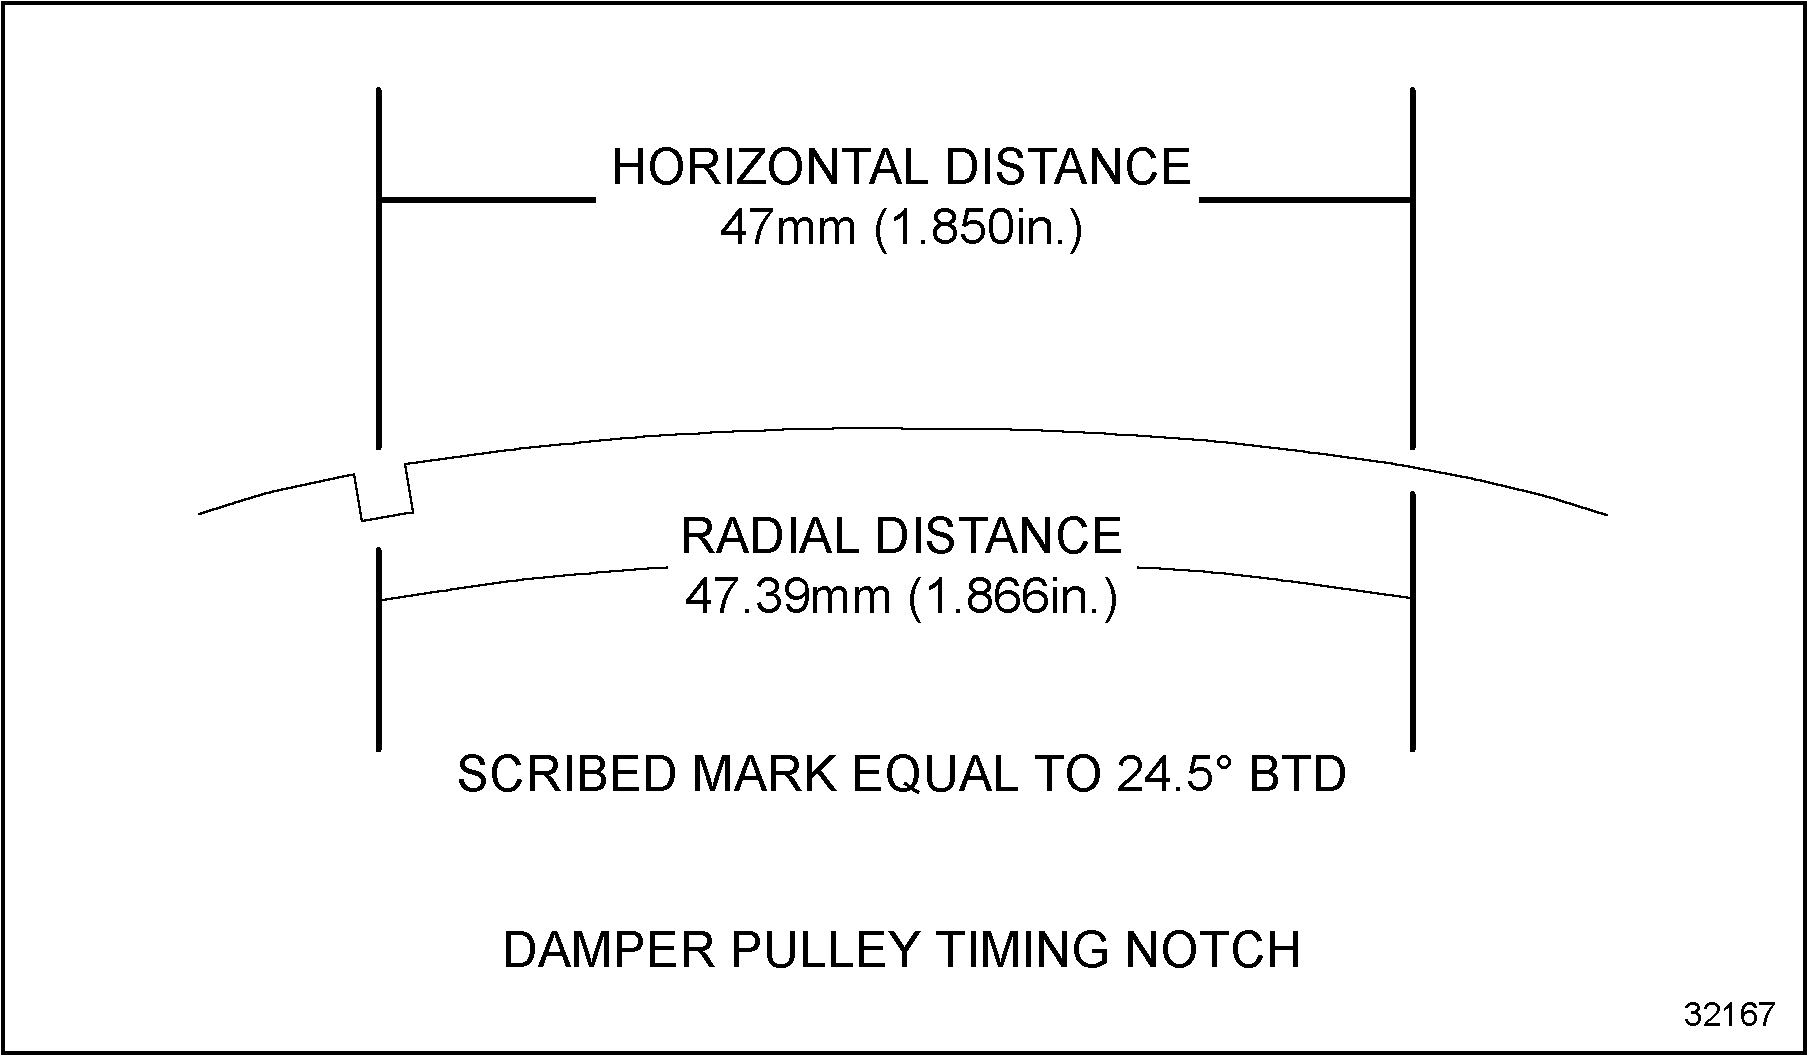
Figure 1. Checking Engine Gear Train Timing
- Turn the engine forward to approximately BDC (Bottom Dead Center).
- Place a 0.10 mm (0.004 in.) feeler gage between the valve lever and valve stem of the No. 1 intake valve and slowly rotate the engine forward until the feeler gage becomes tight. This is now the point at which the No. 1 intake valve starts to open before top dead center. The scribed mark should line up with the TDC arrow located on the front cover, or be within 0.65 mm (0.260 in.) on either side of the arrow (equals ± 3.5 degrees).
Note: One tooth out of time on the gear train equals approximately 11 degree movement, 21.431 mm (27/32 in.) radial distance, of vibration damper.
Note: If the timing on the No. 1 valve is within specifications, the other valves, barring extreme camshaft lobe wear or poor adjustment, will also be in time.
- Readjust the No. 1 intake valve to its proper lash; refer to Specifications in Section 1.A.
- If timing is incorrect, removal of the front cover of the engine is required to inspect punch mark and gear tooth position.
Section 1.21.1.2
Method Two - Using a Dial Indicator
Follow these steps when using a dial indicator:
- Adjust the No. 1 intake valve with the No. 1 piston set at TDC (Top Dead Center) compression stroke to 0.74 mm (0.029 in.).
- Position the dial indicator fixture magnetic base on the valve cover fence rail with the indicator shaft on the No. 1 intake valve rotator.
- Set dial indicator at zero.
- Rotate the engine approximately one full revolution either direction to a position of 360 degrees from the starting point.
- The dial indicator should read 3.0 to 5.59 mm (0.115 to 0.220 in.) for proper gear train timing.
- If dial indicator readings are outside the specified range, removal of the front cover of the engine is required to inspect punch mark and gear tooth position.
- Readjust the No. 1 intake valve to the proper lash; refer to Specifications in Section 1.A.
Section 1.21.2
Removal of Front Cover, Front Half
Prior to removing the front cover, the following items must be removed:
- Belt
- Front engine mounting bracket
- Vibration damper
- Oil pump assembly
- Water inlet elbow, if required
- Oil pan
- Water pump and pulley
- High pressure pump
- Coolant filter header, if required
- CMP sensor,
- Wiring harness, refer to "8.1.1 Removal of Wiring Harness"
To remove the front cover, follow this procedure.
Note: Drain the oil from the engine before removing the front cover.
- Remove the serpentine belt and the auto tensioner as follows:
- Install breaker bar into the belt tensioner and remove tension on the belt.
- Remove serpentine belt.
- Return belt tensioner back to original position and remove breaker bar.
- Loosen mounting bolt and remove the belt tensioner. See Figure "Removal of Auto Belt Tensioner " .
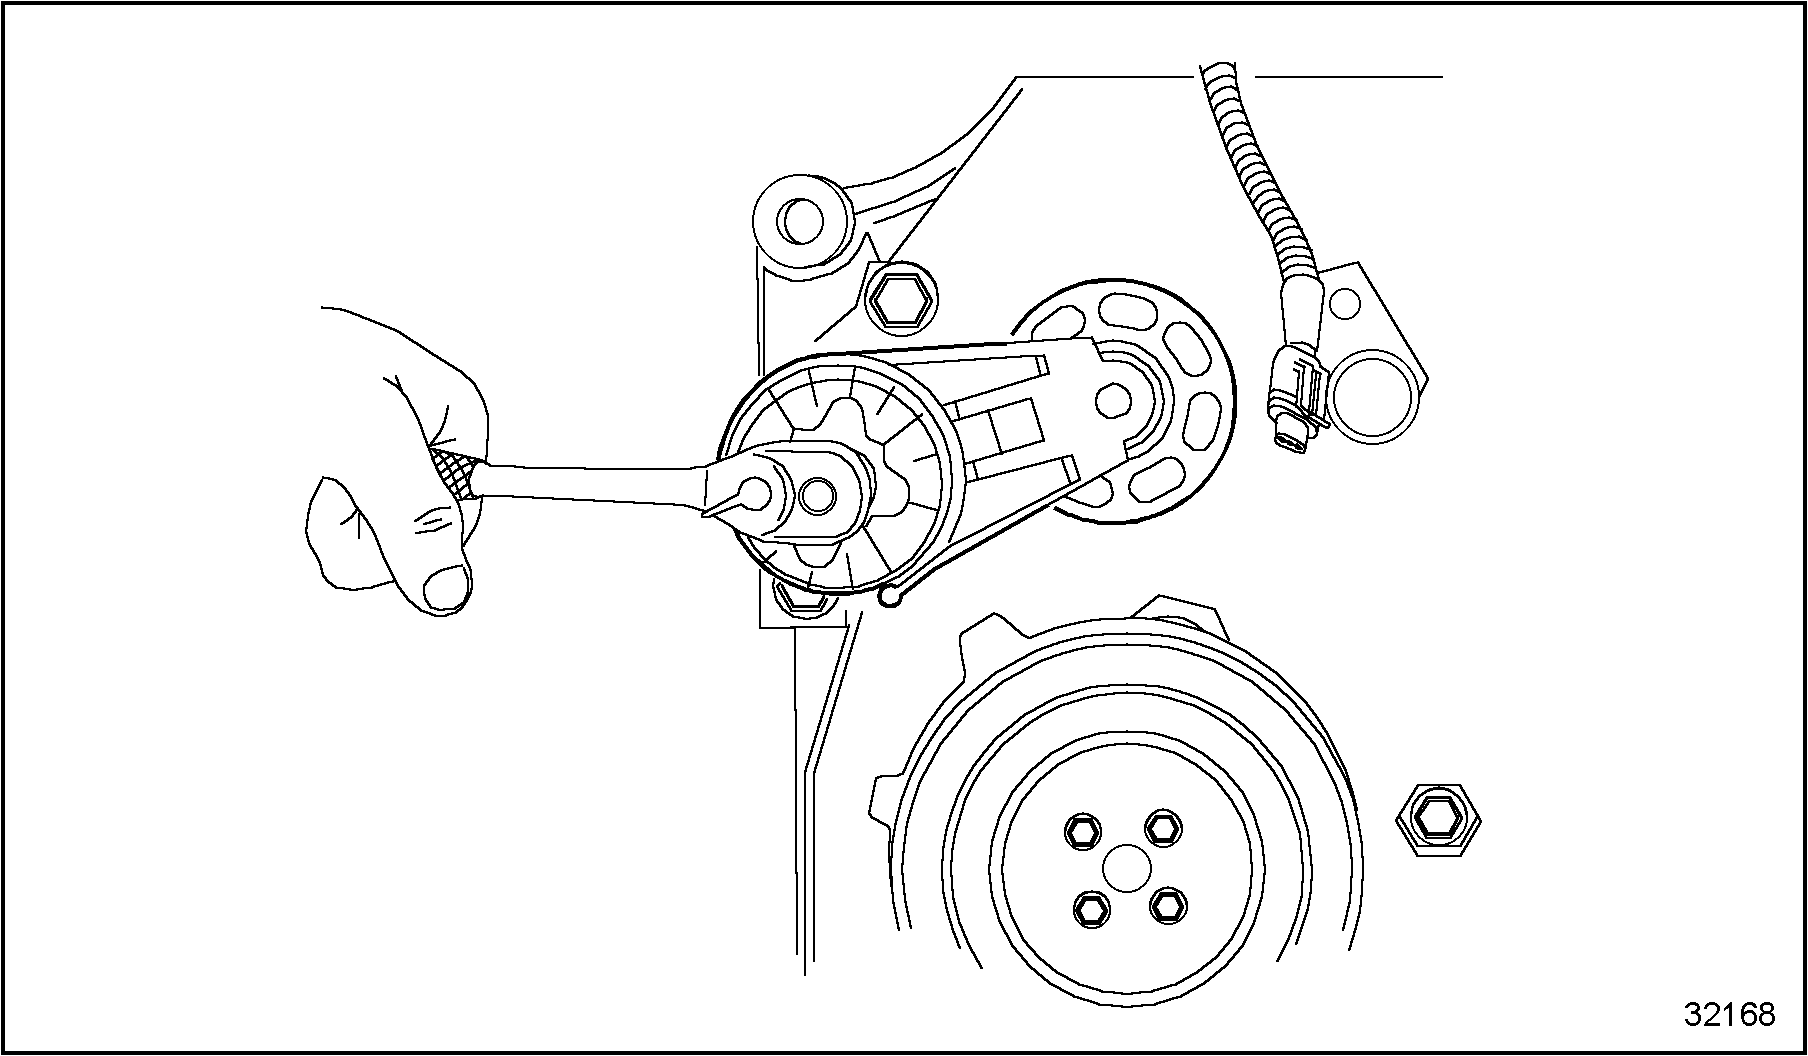
Figure 2. Removal of Auto Belt Tensioner
- Remove the alternator bracket as follows:
- Remove the alternator.
- Loosen and remove the alternator mounting bracket bolts. See Figure "Alternator Mounting Bracket" .
- Remove the bracket.
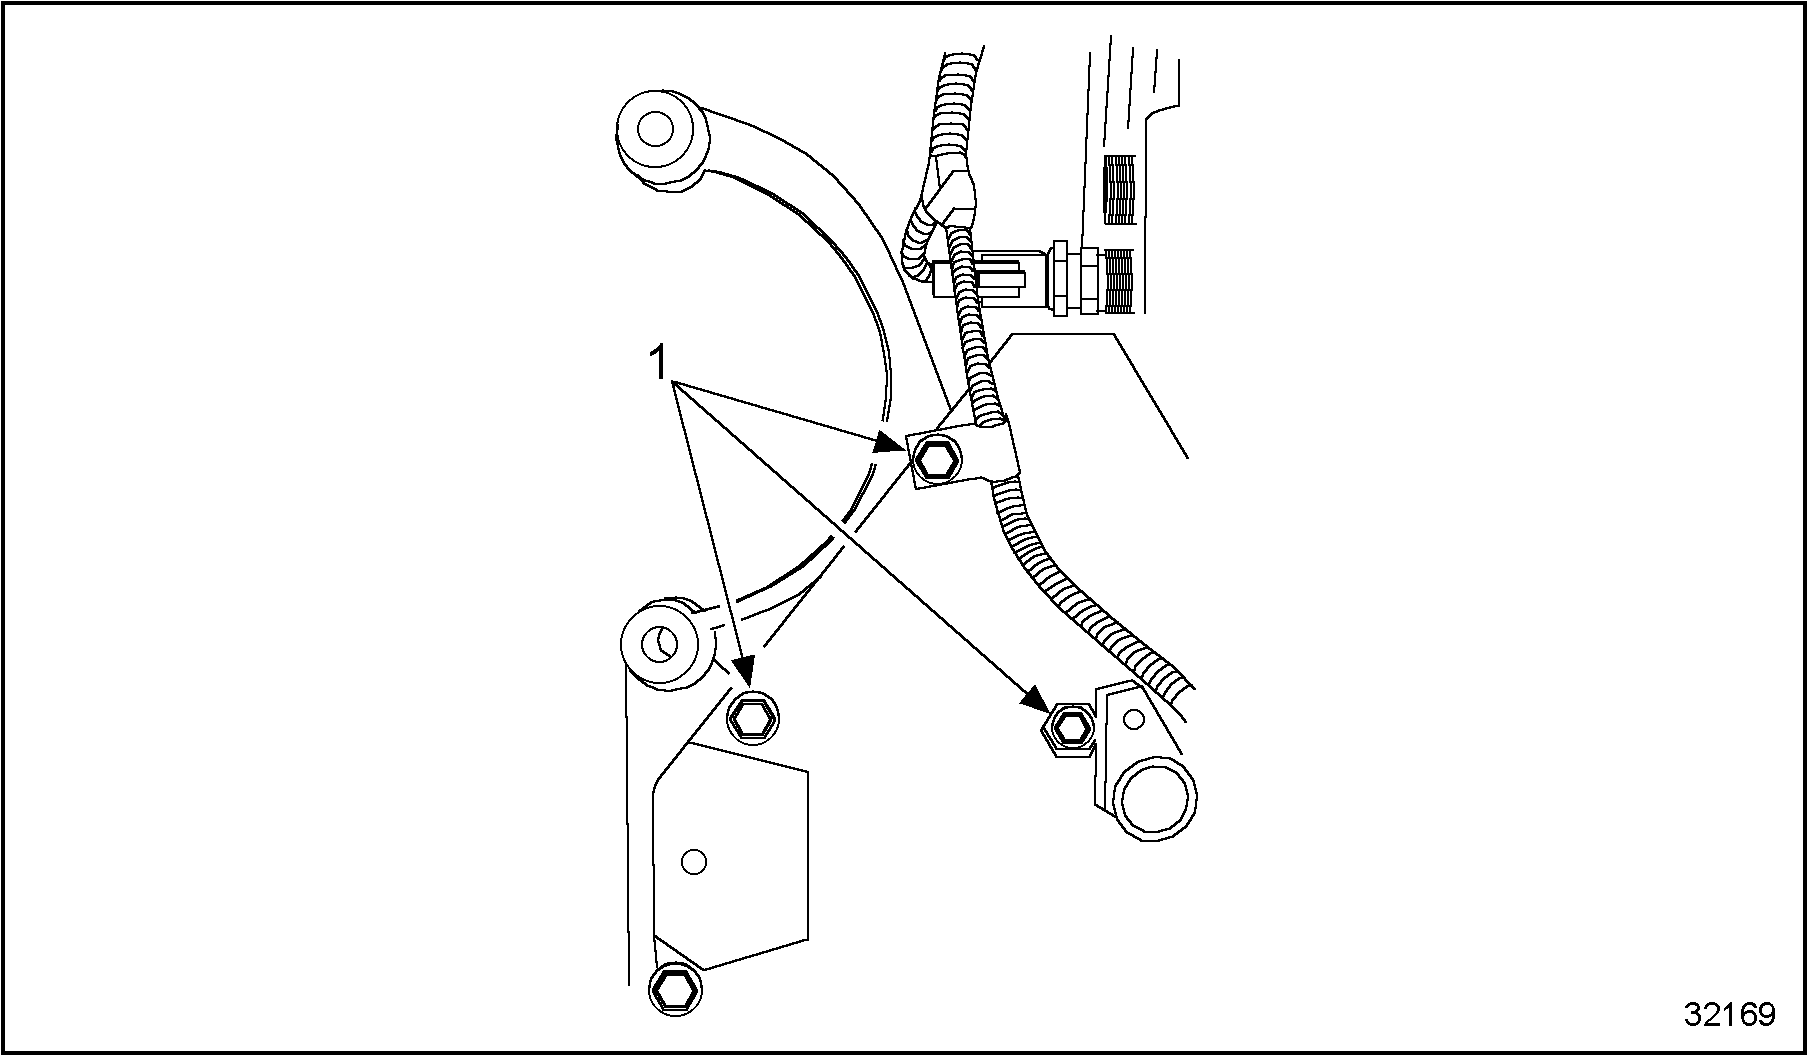
1. Alternator Mounting Bracket Bolts
Figure 3. Alternator Mounting Bracket
- Remove the fan drive hub and pulley as follows:
- Remove the bolts securing the fan pulley to the fan drive. Remove the pulley.
- Remove the fan hub drive capscrews and hub.
Note: If the engine is equipped with an air compressor, refer to "10.1.2 Installation of Air Compressor" .
- Remove the front cover as follows:
- Remove the front mounting bracket and vibration damper, refer to "1.14.1 Removal of Vibration Damper" .
- Loosen and remove all front cover mounting bolts that secure the front cover (front half) to the rear half of the cover and crankcase. See Figure "Front Cover Mounting Bolts" .
- Lift the front half of the front (cover with hardware) from the rear half of the front cover and set aside.
- Remove gaskets and O-rings from the front cover and discard. See Figure "Front Cover O-ring and Gasket Locations" .
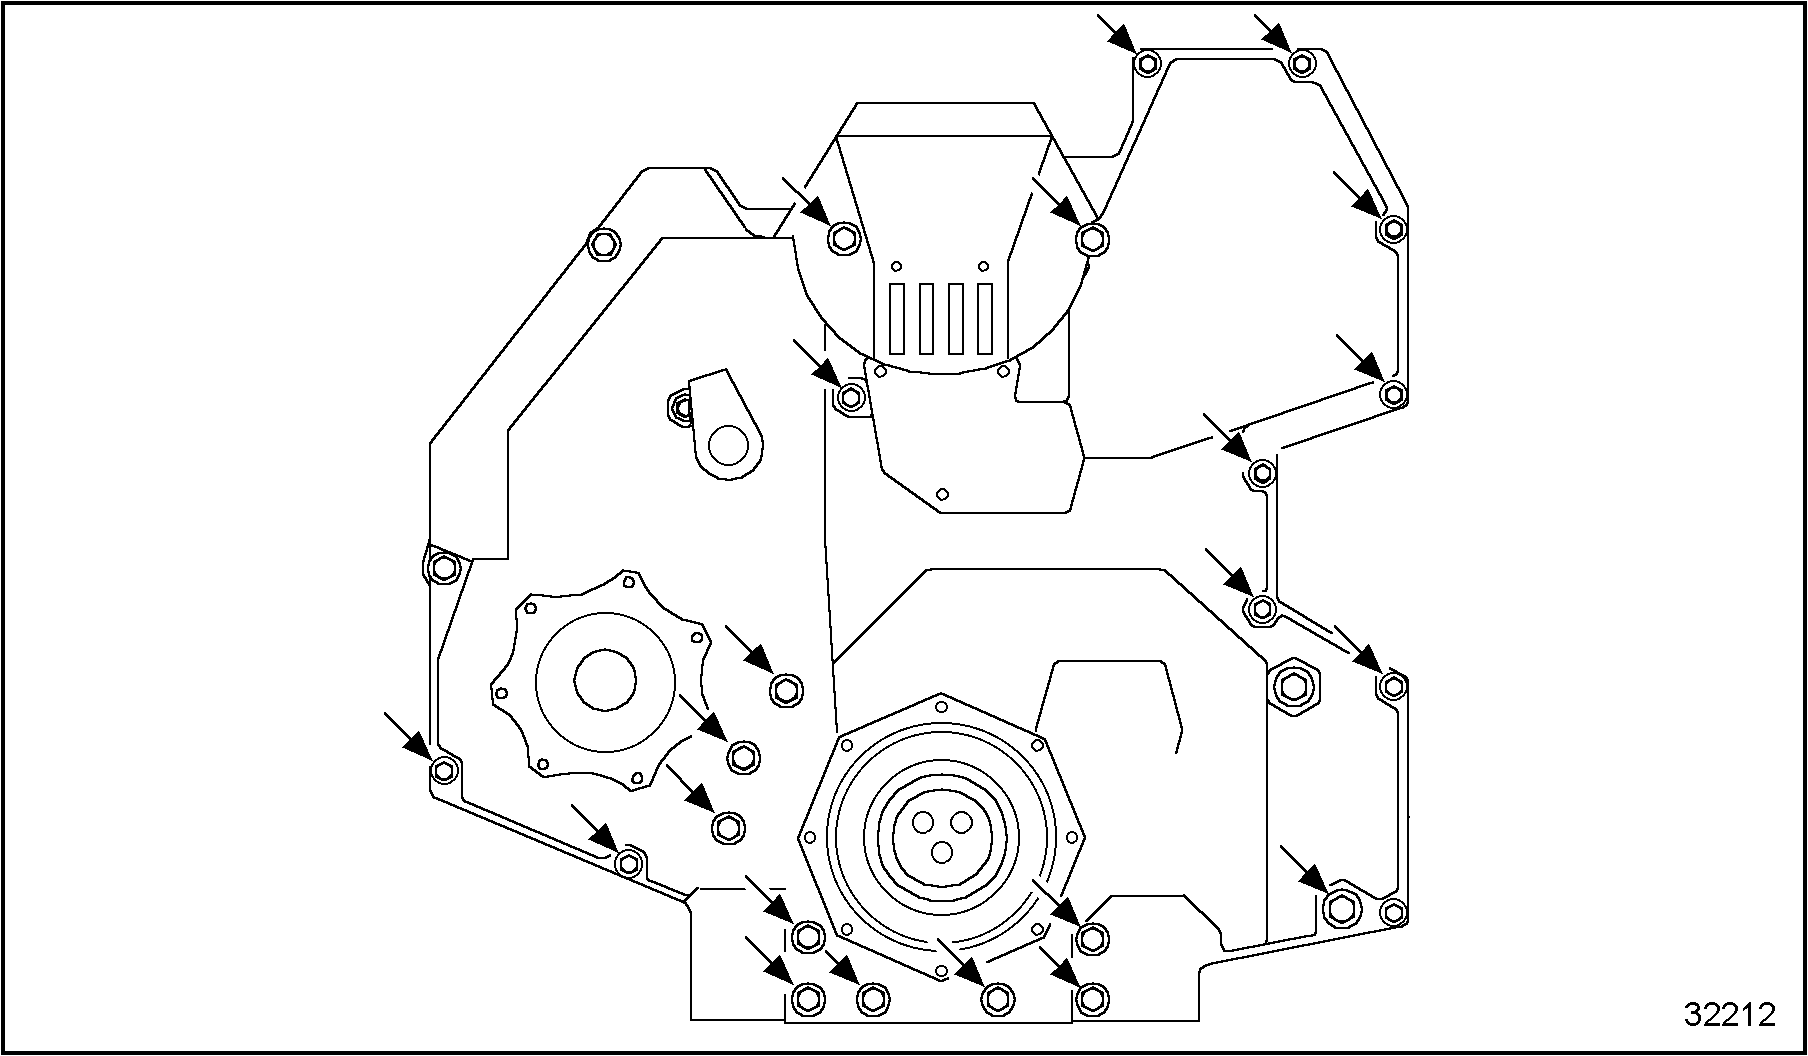
Figure 4. Front Cover Mounting Bolts
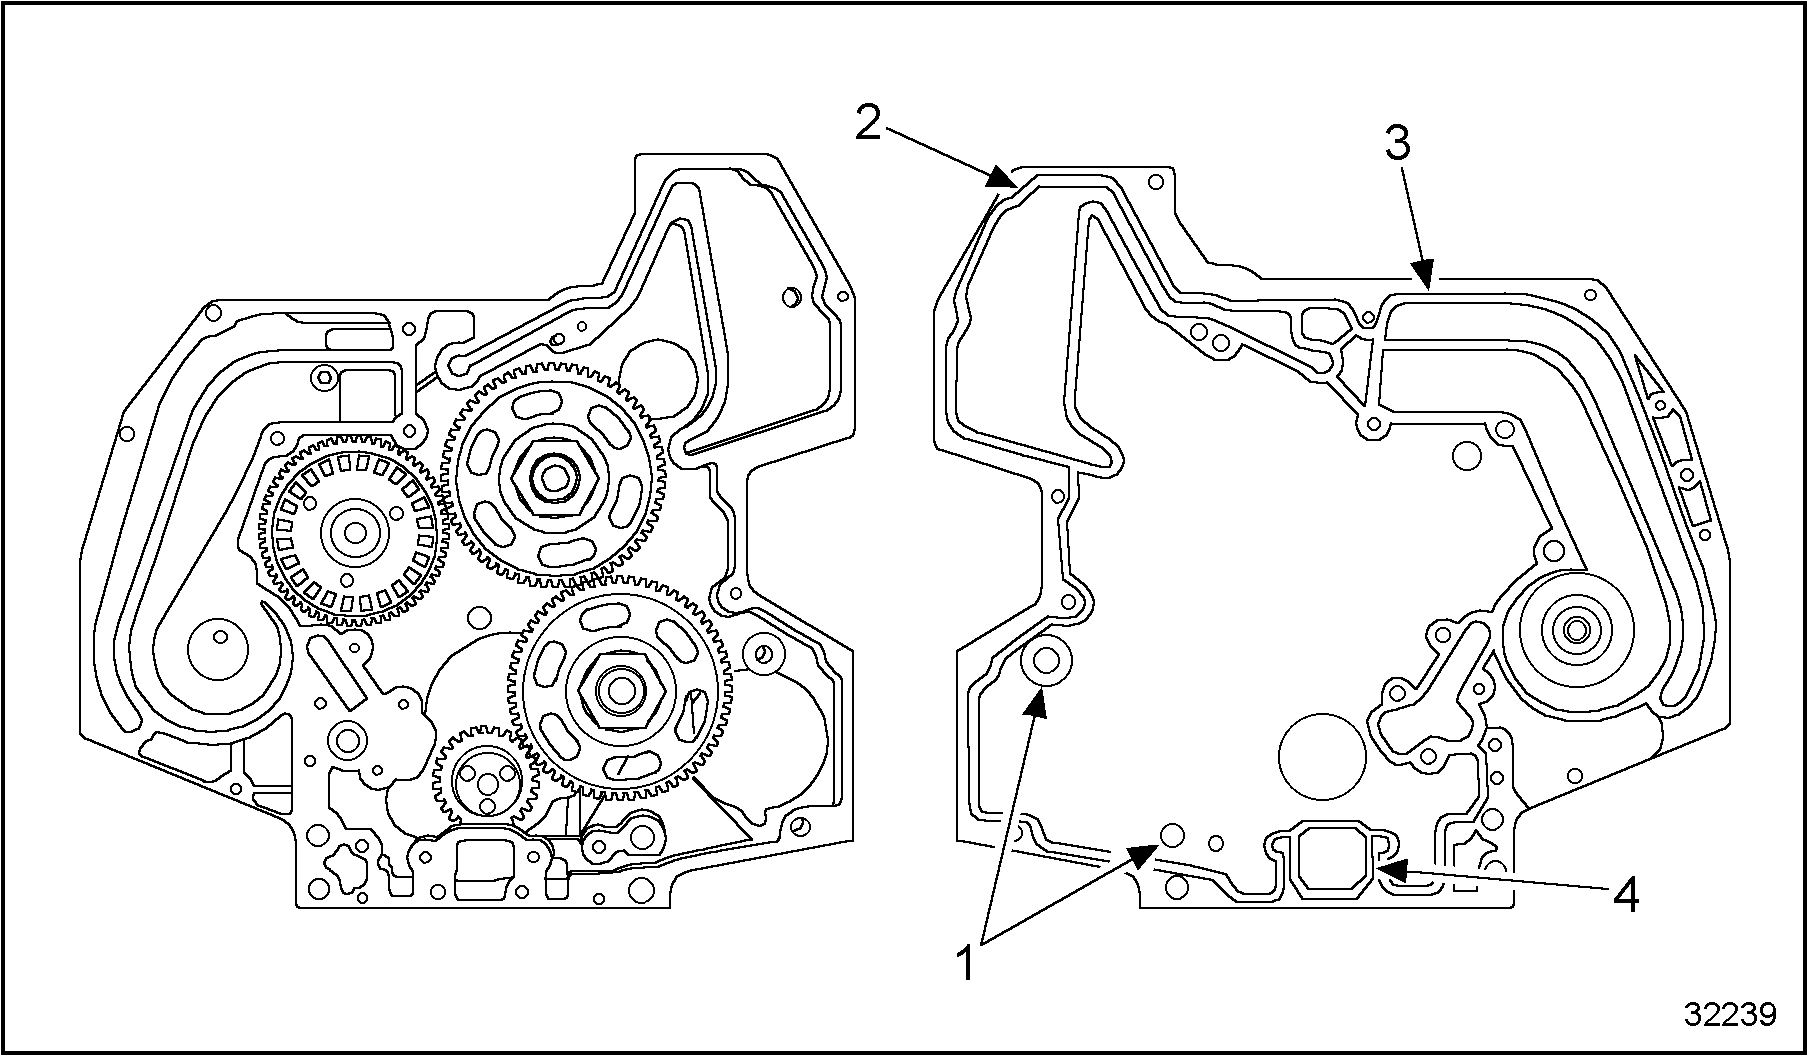
1. O-rings
3. Front Cover Oil Pressure Gasket
2. Crankcase Front Cover Reservoir Seal
4. Front Cover Oil Suction Gasket
Figure 5. Front Cover O-ring and Gasket Locations
Note: The oil pressure relief valve (stamped with "FC") should be tagged upon removal. Do not mix the oil pressure relief valve with the oil pressure regulator valve (found in the side of the crankcase).
- Remove the oil pressure relief valve from the front cover (rear half) and mark to identify its location. See Figure
"Oil Pressure Relief Valve"
.
Note: The valve may be removed by depressing the plunger and trapping a length of copper wire when released. The valve may then be removed by pulling the copper wire.
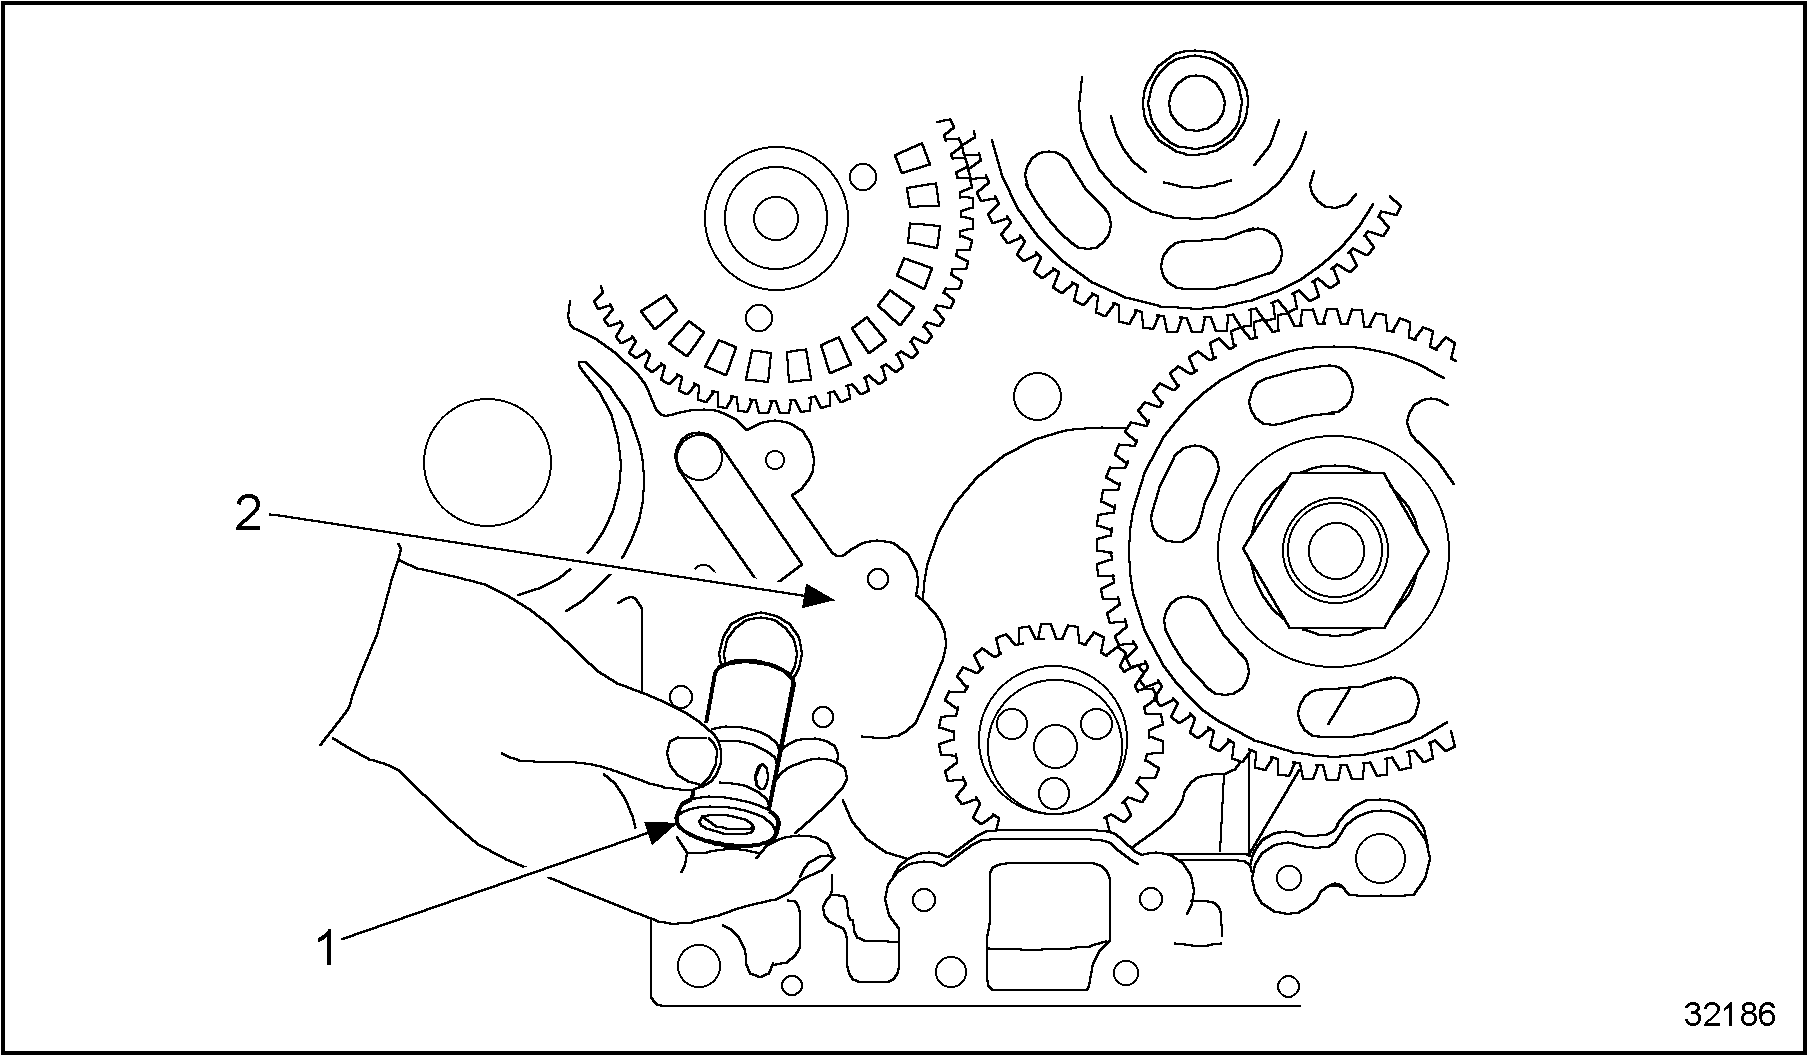
1. Oil Pressure Relief Valve
2. Front Cover Rear Half
Figure 6. Oil Pressure Relief Valve
Section 1.21.2.1
Cleaning Front Half of Front Cover
Follow these steps to clean the front half of the front cover:
- Remove all gasket material and RTV from the front half of the front cover using a scraper or wire brush.
- Clean all bolt threads prior to reassembly.
Section 1.21.2.2
Inspection
Inspection is particularly necessary if oil and coolant contamination has been found, and no other cause is discovered for the contamination.
- Visually inspect the front cover for cracks or porosity.
- Replace any front cover that fails visual inspection.
Section 1.21.3
Gear Train Removal
Follow these steps to remove the gear train.
- Rotate the engine so timing marks on the lower and upper idler gears, crankshaft and camshaft gear are aligned. See Figure
"Gear Alignment"
.

1. Crankshaft
6. Upper Idler Gear
2. Rear Half Front Cover
7. Upper/Lower Idler Gear Timing Marks
3. Camshaft Gear with Timing Disk Plate
8. Air Compressor Gear Location
4. Cam Gear/Upper Idler Timing Marks
9. Lower Idler Gear
5. High Pressure Pump Gear Location
10. Lower Idler Gear/Crank Timing Marks
Figure 7. Gear Alignment
Note: Once assembled at the alignment of marks position, the engine will require 37 crankshaft revolutions for the alignment position to be attained again.
Section 1.21.3.1
Inspection
Follow these steps to inspect the gears:
- Check the upper idler gear lash as follows: See Figure
"Gear Lash Check"
.
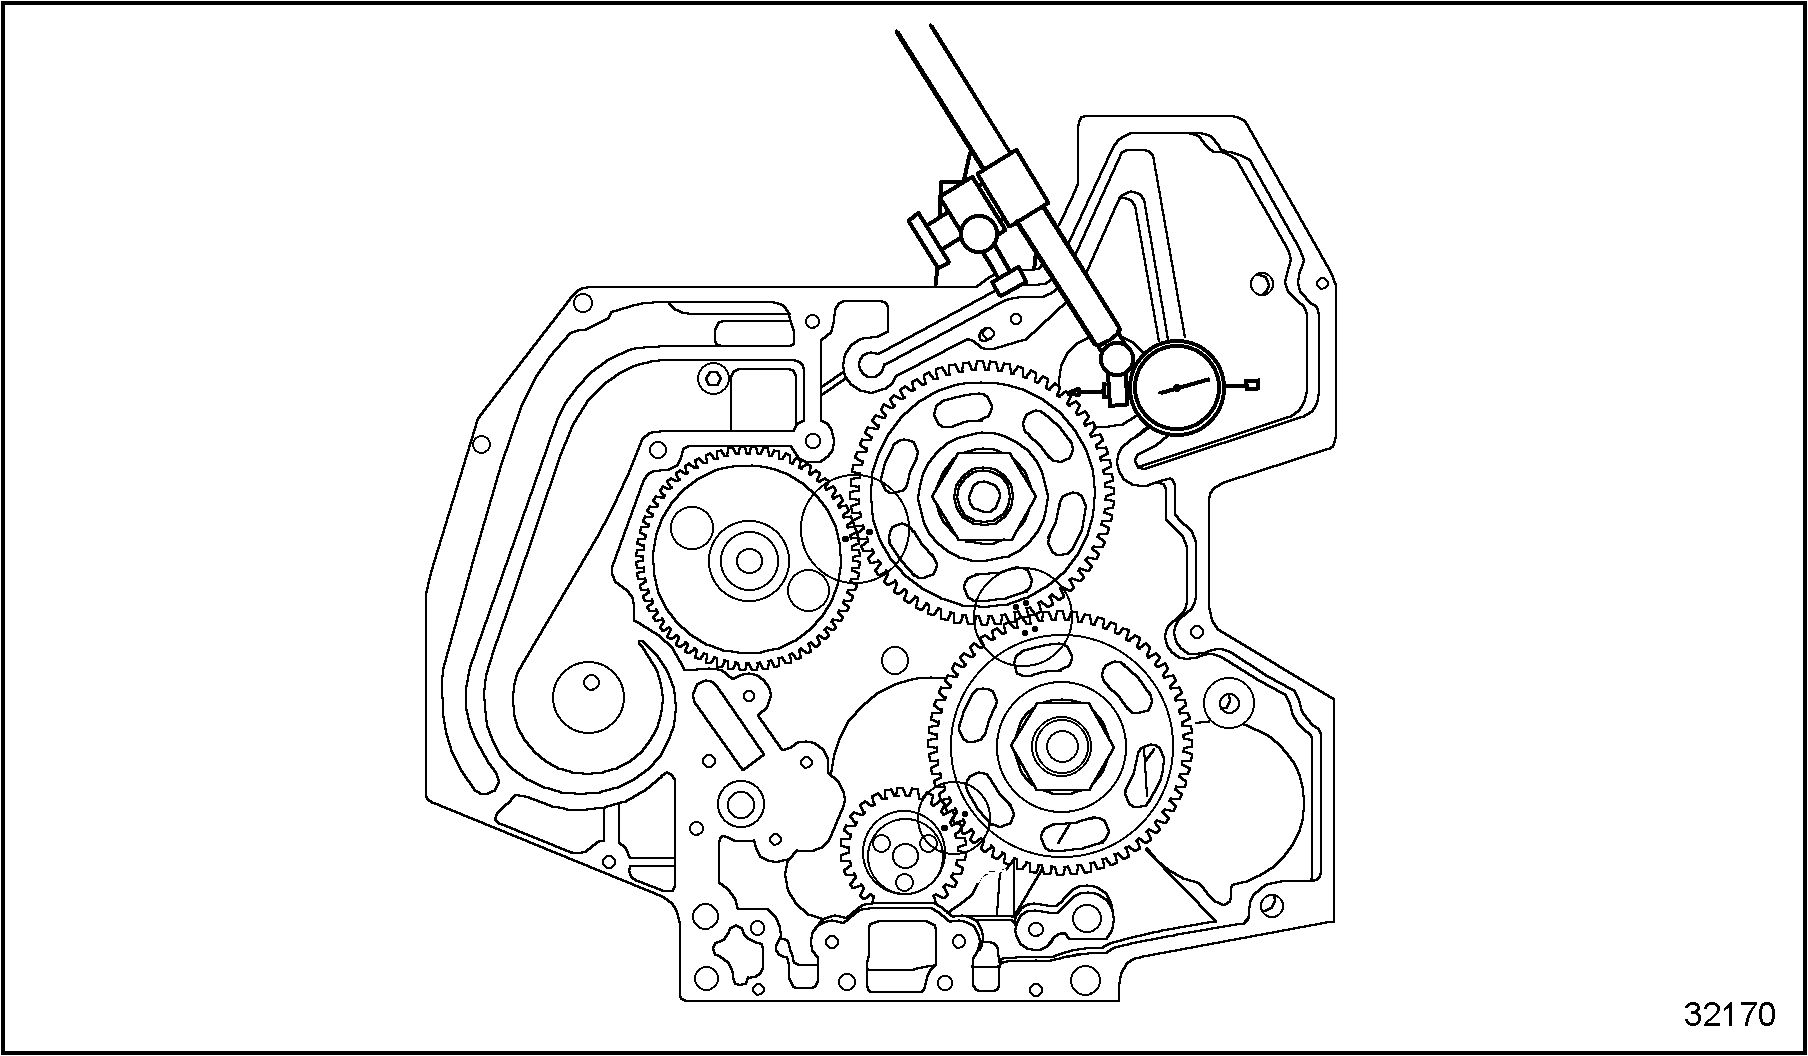
Figure 8. Gear Lash Check
- Mount the magnetic base dial indicator on top of the crankcase.
- Position the dial indicator on the gear tooth and "zero" the indicator.
- Place a screwdriver between the crankshaft and the lower idler gear.
- Move the upper idler gear back and forth.
- Record the reading on the dial indicator. If the end play exceeds specified limits, replace the upper idler gear. Refer to Specifications in Section 1.A.
- Using the dial indicator, check the upper idler gear end play.
- Check the lower idler gear lash as follows: See Figure
"Lower Idler Gear Lash Check"
.
1. Dial Indicator
2. Gear Teeth
Figure 9. Lower Idler Gear Lash Check
- Mount a magnetic base dial indicator onto the front cover.
- Position a dial indicator on the gear tooth and "zero" the indicator.
- Move lower idler gear back and forth.
- Record reading on the dial indicator. If end play exceeds specified limits, replace the lower idler gear. Refer to Specifications in Section 1.A.
- Using the dial indicator, check the lower idler gear end play.
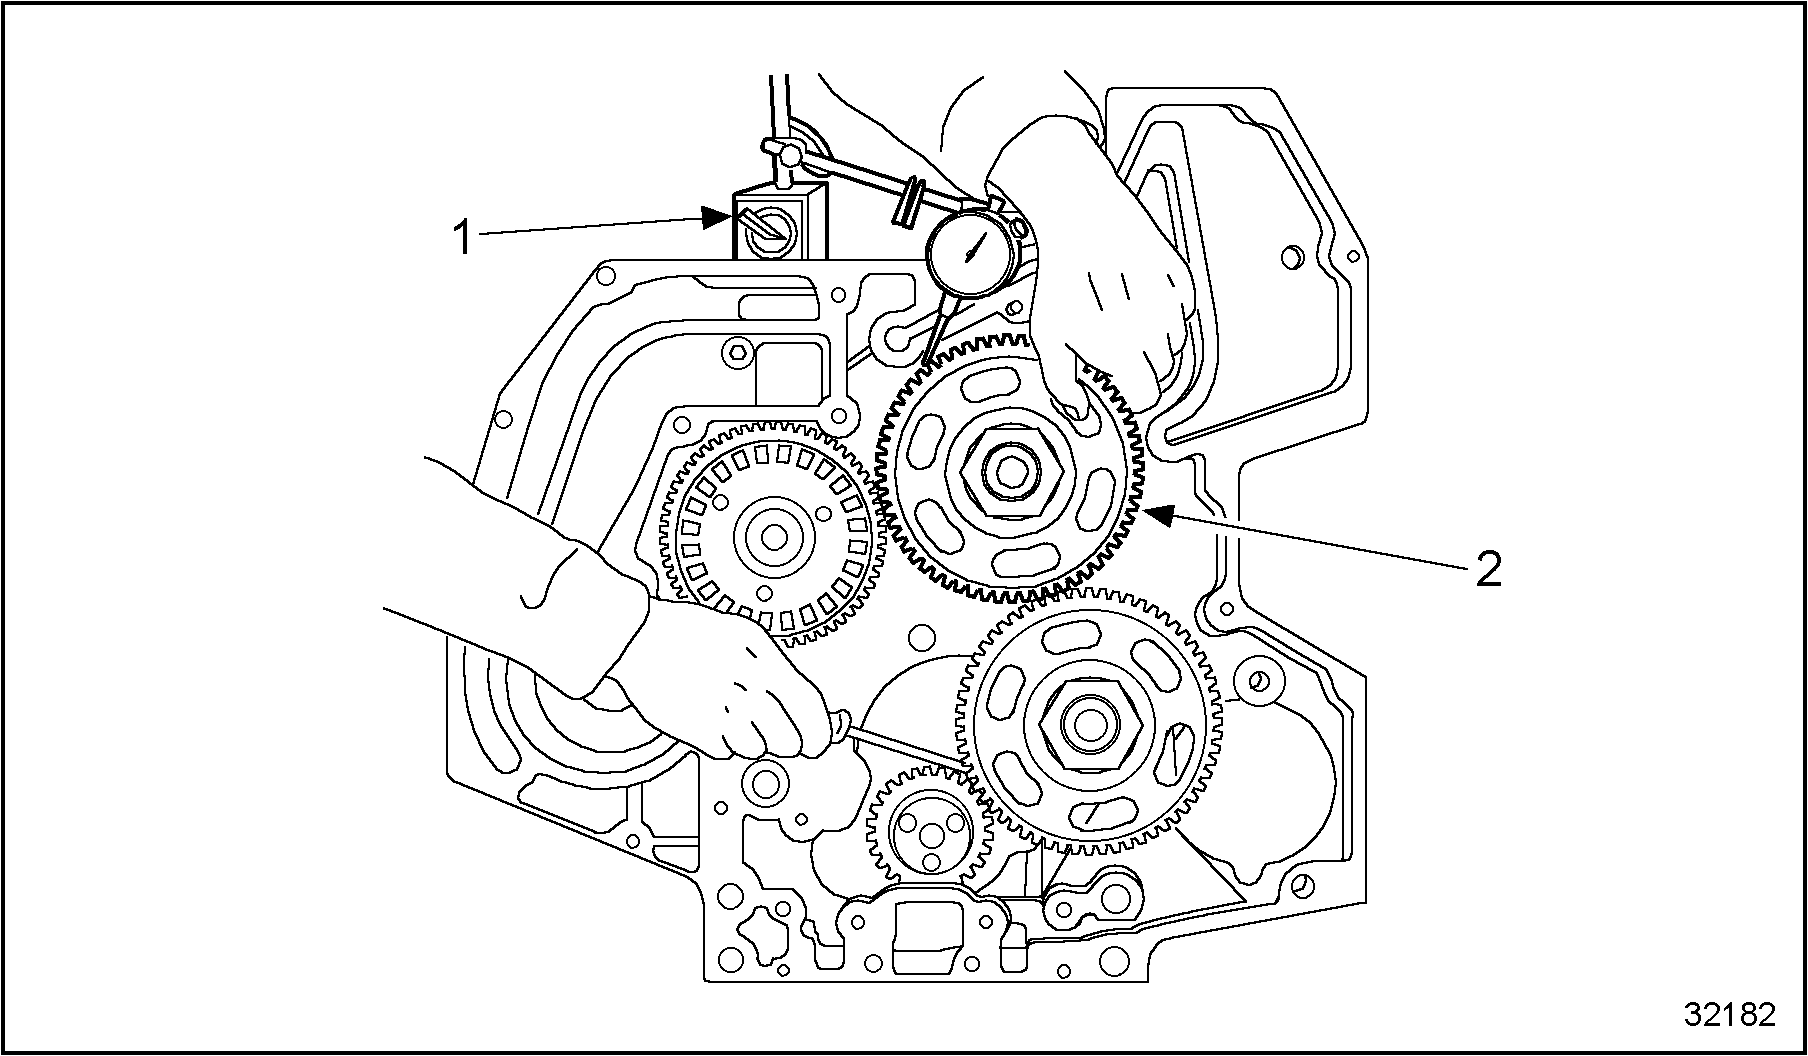
- Check the camshaft gear end play as follows: See Figure
"Camshaft End Play Check"
.
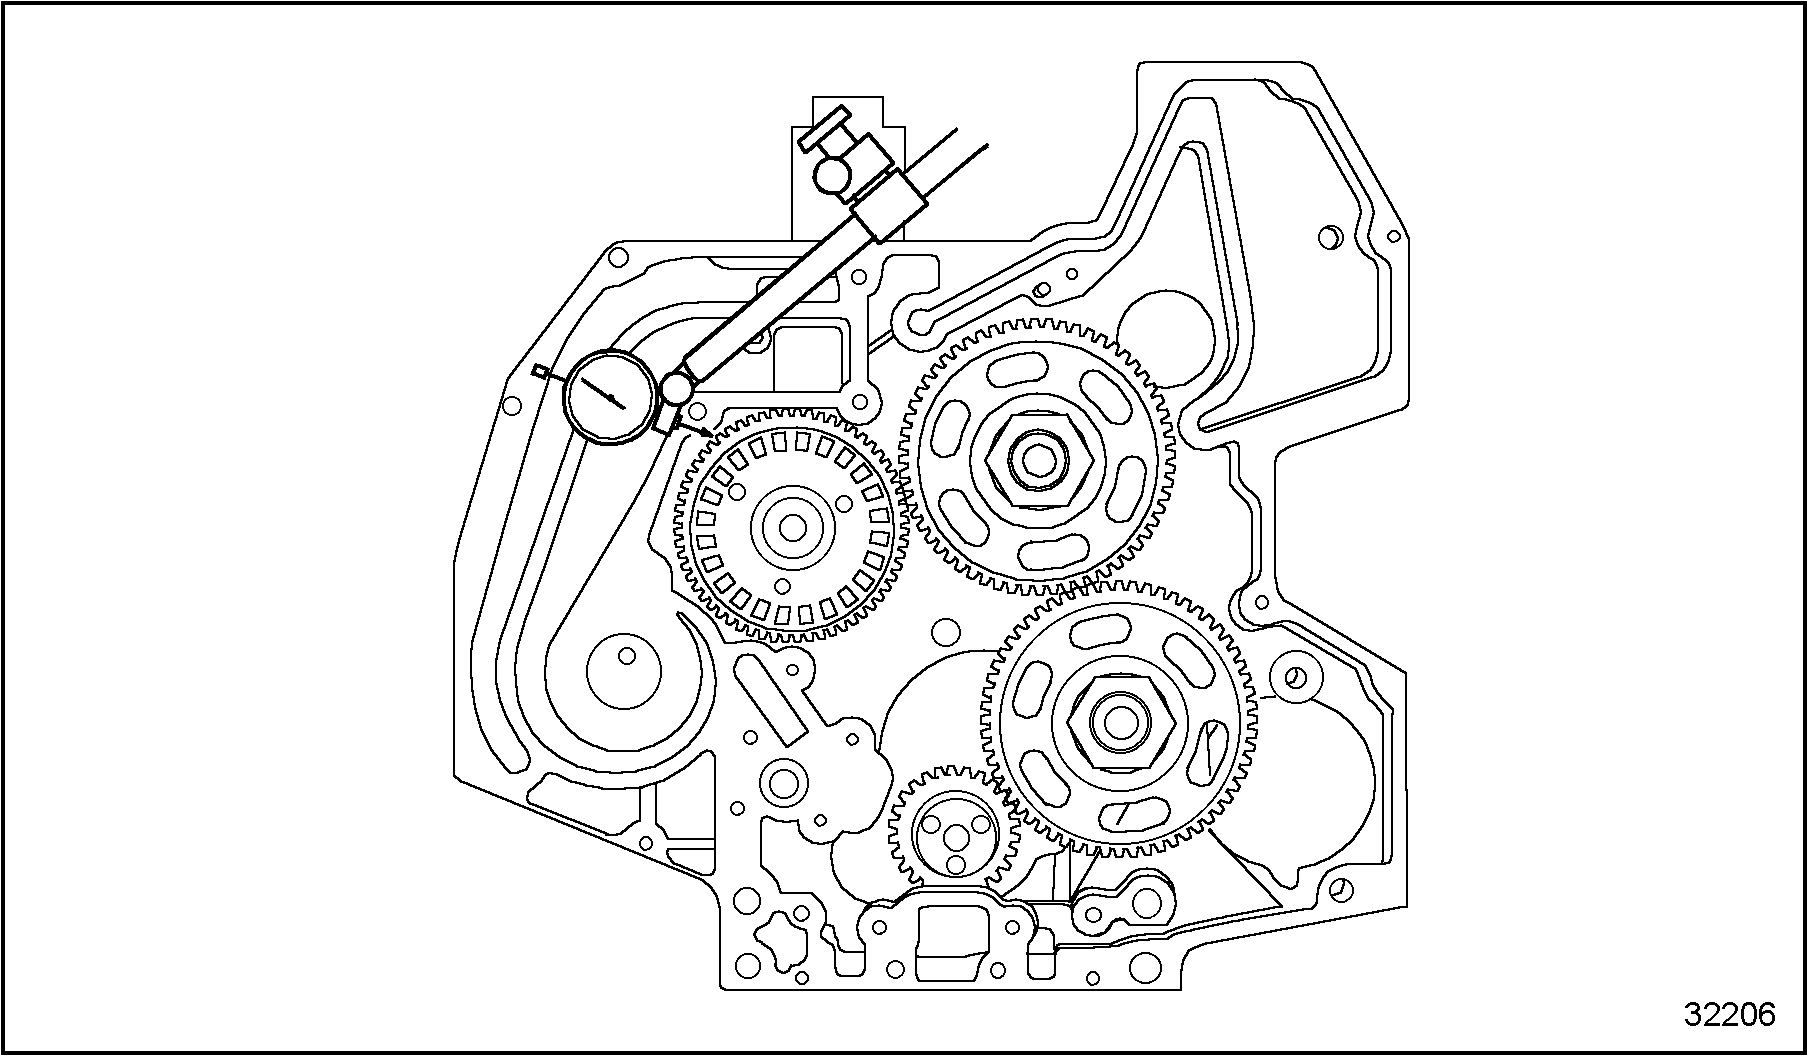
Figure 10. Camshaft End Play Check
- Mount a magnetic base dial indicator to the top of the crankcase.
- Position the dial indicator onto the camshaft tooth and "zero" the dial indicator.
- Place a screwdriver between the lower and upper idler gears.
- Move the camshaft gear back and forth.
- Record the reading on the dial indicator. If the end play exceeds specified limits, replace the camshaft gear. Refer to Specifications in Section 1.A.
Section 1.21.4
Removal of Idler Gear Assemblies
Remove the idler gear as follows: See Figure "Lower Idler Gear Removal" .
- Loosen and remove the idler gear retaining bolt using gear socket J 41167
.
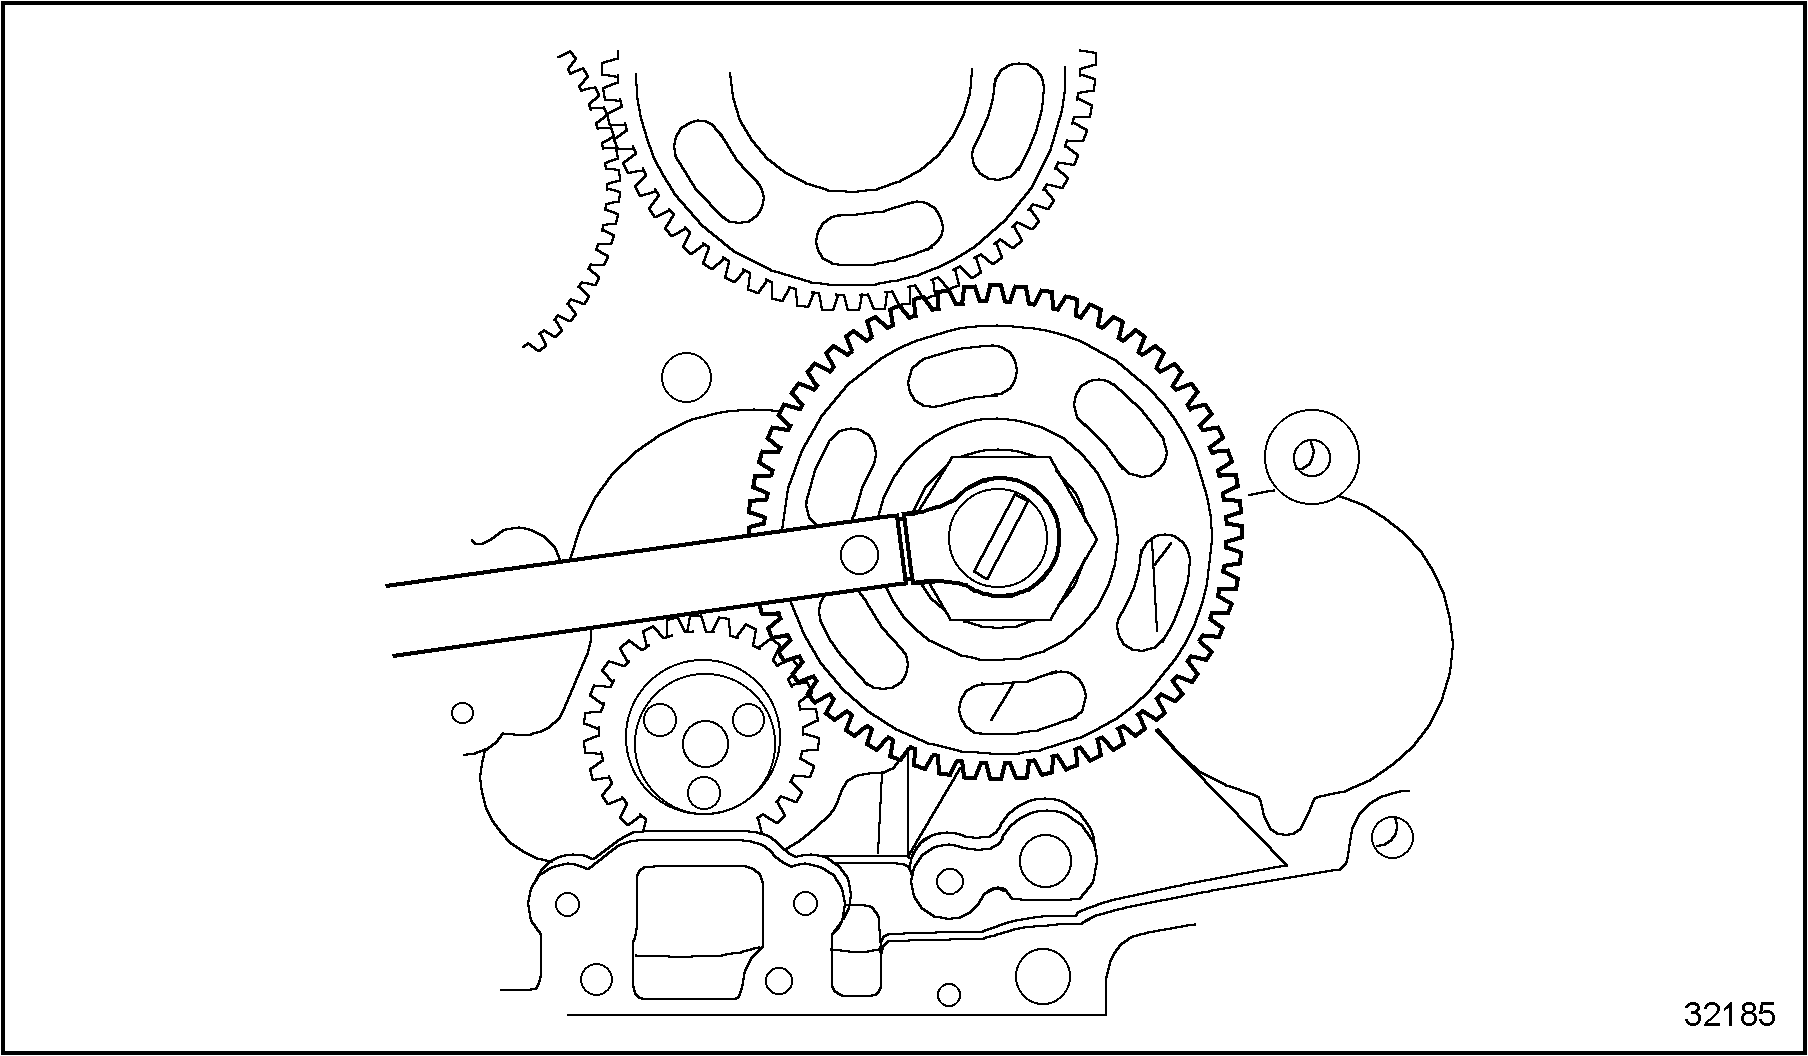
Figure 11. Lower Idler Gear Removal
- Remove the idler gear assembly from the front cover.
Note: A new upper idler gear bolt must be used with each installation of the upper idler gear. There is a preapplied sealant on the new mounting bolt.
Note: Each idler gear (upper and lower) are supported on tapered roller bearings and shafts. The bearing retaining nut should not be removed as it is required for torquing the nut. If the bearing is worn or loose, replace the complete gear assembly.
- Remove the upper idler gear retaining bolt and discard. Remove the upper idler gear. For camshaft gear removal, refer to "1.6.1 Removal of Camshaft" . For crankshaft and main bearing removal, refer to "1.7.3 Removal of Crankshaft and Main Bearings" . For flywheel housing removal, refer to "1.10.1 Crankcase Integrity Check" .
Section 1.21.5
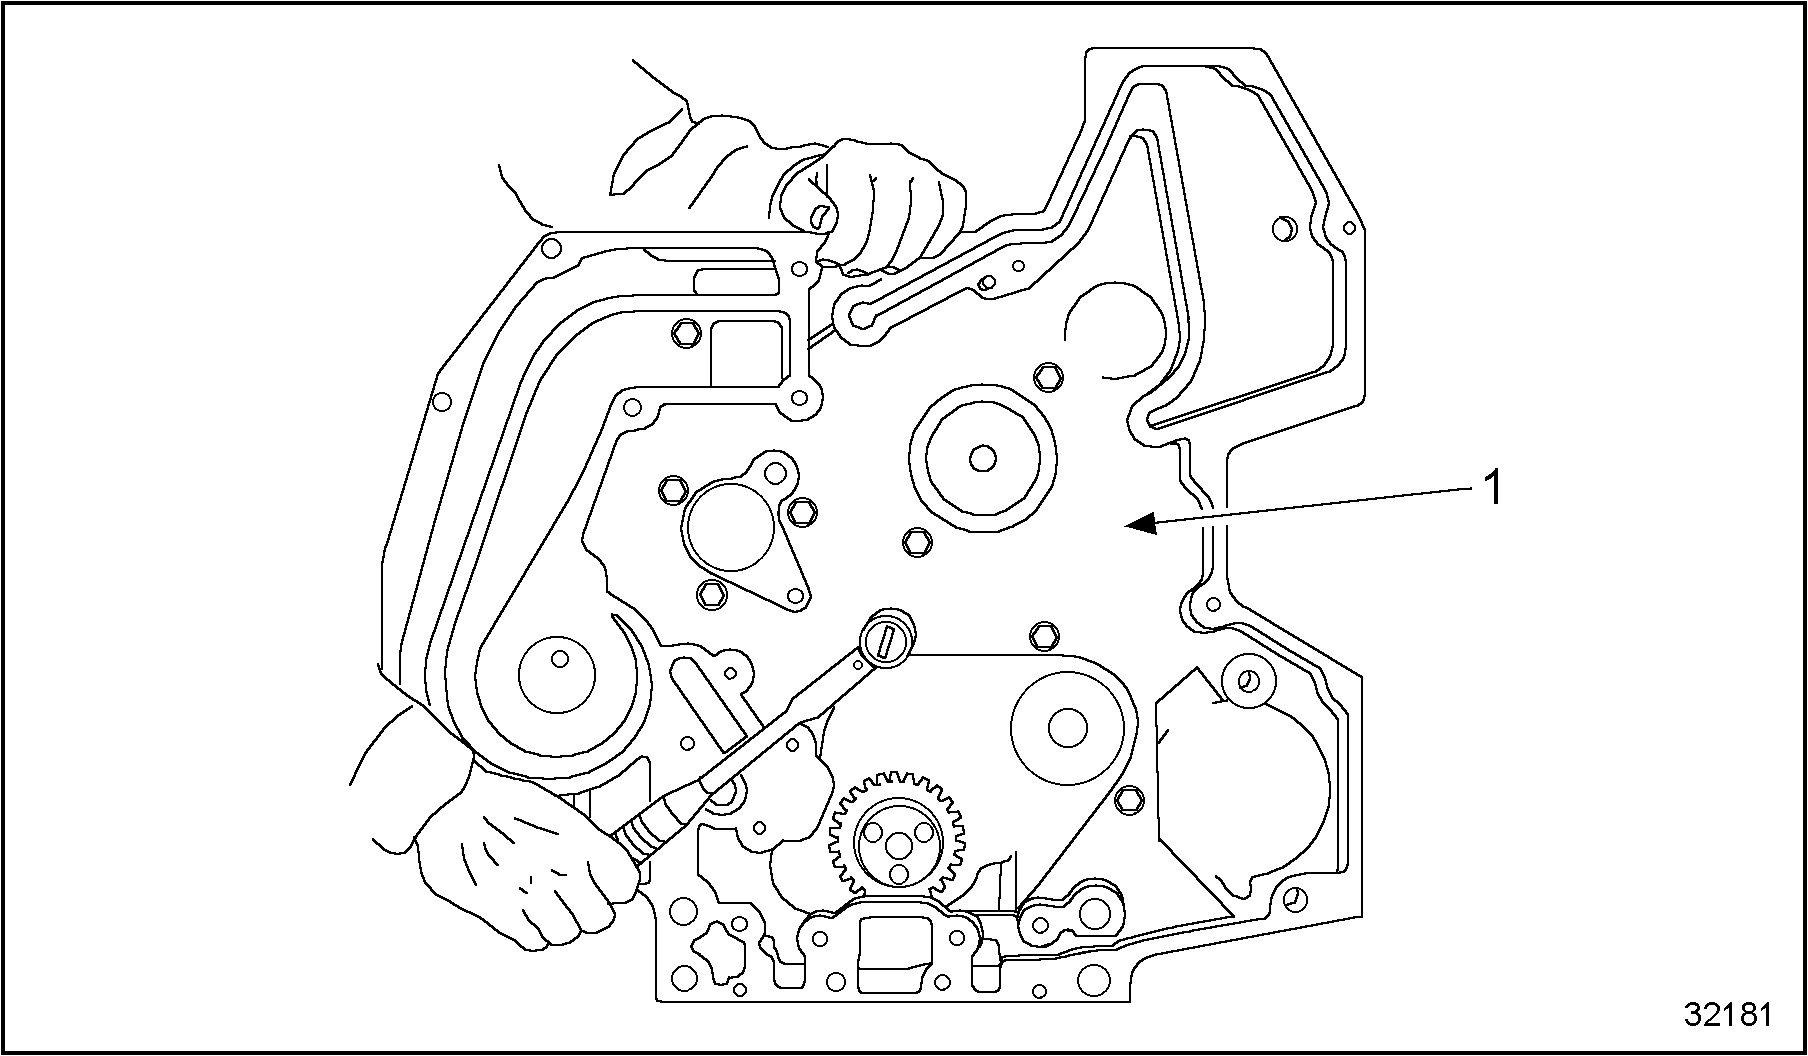
Front Cover, Rear Half, Removal
Use the following procedure to remove the front cover, rear half, with the gears removed.
- Remove the nine retaining bolts that secure the front cover to the crankcase. See Figure
"Front Cover, Rear Half, Mounting Bolts"
.
1. O-rings
3. Front Cover Oil Pressure Gasket
2. Crankcase Front Cover Reservoir Seal
4. Front Cover Oil Suction Gasket
Figure 12. Front Cover, Rear Half, Mounting Bolts
- Lift the front cover, with dowels, off the crankcase.
- Discard the O-ring and clean any sealing material from the front cover or crankcase.
Section 1.21.5.1
Cleaning Front Cover
Follow these steps to clean the front cover.
- Remove the sealing material from the front cover, rear half, using a scraper or wire brush.
- Clean all bolt threads prior to assembly.
Section 1.21.5.2
Inspection
Visually inspect the front cover for cracks or porosity.
Note: If oil or coolant contamination was found and no other cause is discovered, this inspection is very important.
Section 1.21.5.3
Cleaning Idler Gear Assemblies
Follow these steps to clean the idler gear assemblies.
- Clean all components in a suitable solvent and dry with filtered compressed air.

To avoid injury from flying debris when using compressed air, wear adequate eye protection (face shield or safety goggles) and do not exceed 40 psi (276 kPa) air pressure.
- Visually inspect the bearings for looseness. Replace the gear and bearing assembly as required.
- Visually inspect the gear teeth for chips or nicks. Replace the assembly, if required.
Note: The bearing and gear are serviced as an assembly.
Section 1.21.6
Front Cover Installation
Install a new crankshaft gear and oil spline gear if required. Install the crankshaft. For installation procedure, refer to "1.8.2 Installation" .
- Follow these steps to install the front cover.
- Install new front cover O-rings and gaskets into the grooves in the cover. See Figure "Front Cover, Rear Half, Gasket Location" .
- Mount the rear half of the front cover to the crankcase, using nine bolts. See Figure "Front Cover, Rear Half, Installation" . Torque the bolts. Refer to Specifications in Section 1.A.
1. Front Cover
Figure 13. Front Cover, Rear Half, Gasket Location
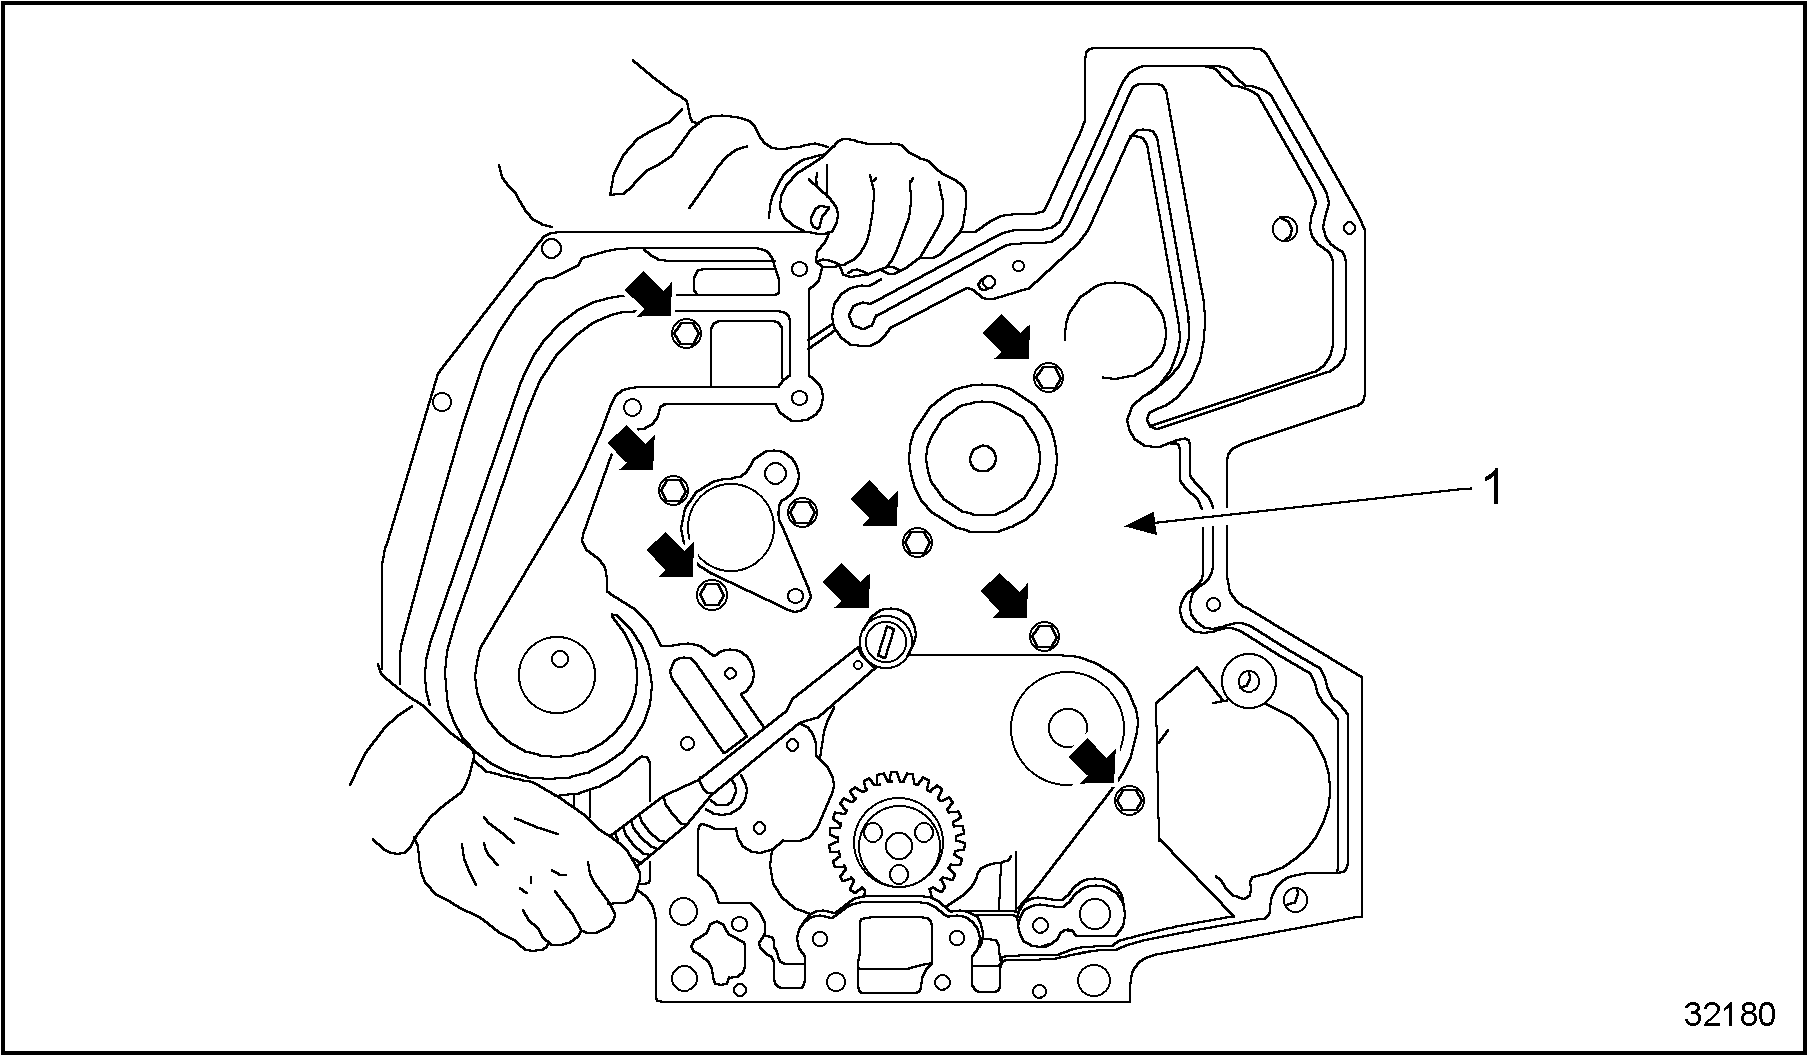
1. Front Cover
Figure 14. Front Cover, Rear Half, Installation
Section 1.21.7
Idler Gear Assembly
When an engine has been disassembled and the camshaft, crankshaft or idler gear removed, the gears must be assembled with the timing marks properly aligned. See Figure "Front Cover, Rear Half, Installation" .

|
1. Crankshaft Gear |
4. Fuel Pump Gear |
|
2. Camshaft Gear |
5. Lower Idler Gear |
|
3. Upper Idler Gear |
|
Figure 15. Front Cover, Rear Half, Installation
Note: The single punch marks on the crankshaft and lower idler gear, camshaft, and upper idler gear, must align. The two punch marks on both the idler gears must align.
Note: Once assembled at the alignment of marks position, the engine will require 37 crankshaft revolutions for the alignment position to be attained again.
- Install the lower idler gear as follows. See Figure
"Lower Idler Gear Installation"
.
Figure 16. Lower Idler Gear Installation
- Install the gear with the timing marks facing out.
- Align the crankshaft and lower idler gear timing marks.
- Torque the retaining bolt. Refer to Specifications in Section 1.A.
Note: After installation, measure the crankshaft to idler gear backlash again to confirm proper reassembly.
- Install the upper idler gear as follows. See Figure
"Valve Cover / Intake Manifold Cover and Gasket"
.
1. Crankshaft Gear
4. Fuel Pump Gear
2. Camshaft Gear
5. Lower Idler Gear
3. Upper Idler Gear
Figure 17. Upper Idler Gear Installation
- Install the gear with the timing marks facing out.
- Align the camshaft, upper idler and lower idler gear timing marks.
- Torque the retaining bolt. Refer to Specifications in Section 1.A.
- Install the high pressure pump into the rear cover. Use a new gasket. Secure to the rear cover with mounting bolts.
Note: After installation, measure the high pressure pump to upper idler gear backlash again to confirm proper reassembly.
- Install the oil pressure relief valve into the crankcase. See Figure
"High Pressure Relief Valve"
.
1. Oil Pressure Relief Valve
2. Front Cover Rear Half
Figure 18. High Pressure Relief Valve
Section 1.21.8
Front Cover, Front Half, Installation
Install the front cover, front half using the following steps.
- Apply assembly grease to the three O-rings and install into the front cover. See Figure
"Front Cover Installation"
.
Figure 19. Front Cover Installation
- Install a new gasket (3 segments) into the front half of the front cover. Two of the gasket segments are molded pieces and the third is a bulk piece. Once the gasket segments are in place, apply RTV to the joints.
- Install the front cover on the locating dowel pins and install the mounting hardware.
- Torque the retaining bolt. Refer to Specifications in Section 1.A.
Section 1.21.9
Serpentine Belt
Install auto tensioner to front cover; refer to "10.1.5 Installation of Auto Belt Tensioner" .
- Locate recess on the front cover and mount the tensioner with the locating pin at recess.
- Install bolt and secure to the front cover. Ensure the bolt is 80 mm (3-1/8 in.) and torque. See Figure
"Auto Belt Tensioner"
.
Note: Ensure the bolt is 80 mm (3-1/8 in.) in length and torque to specifications. Refer to Specifications in Section 1.A.
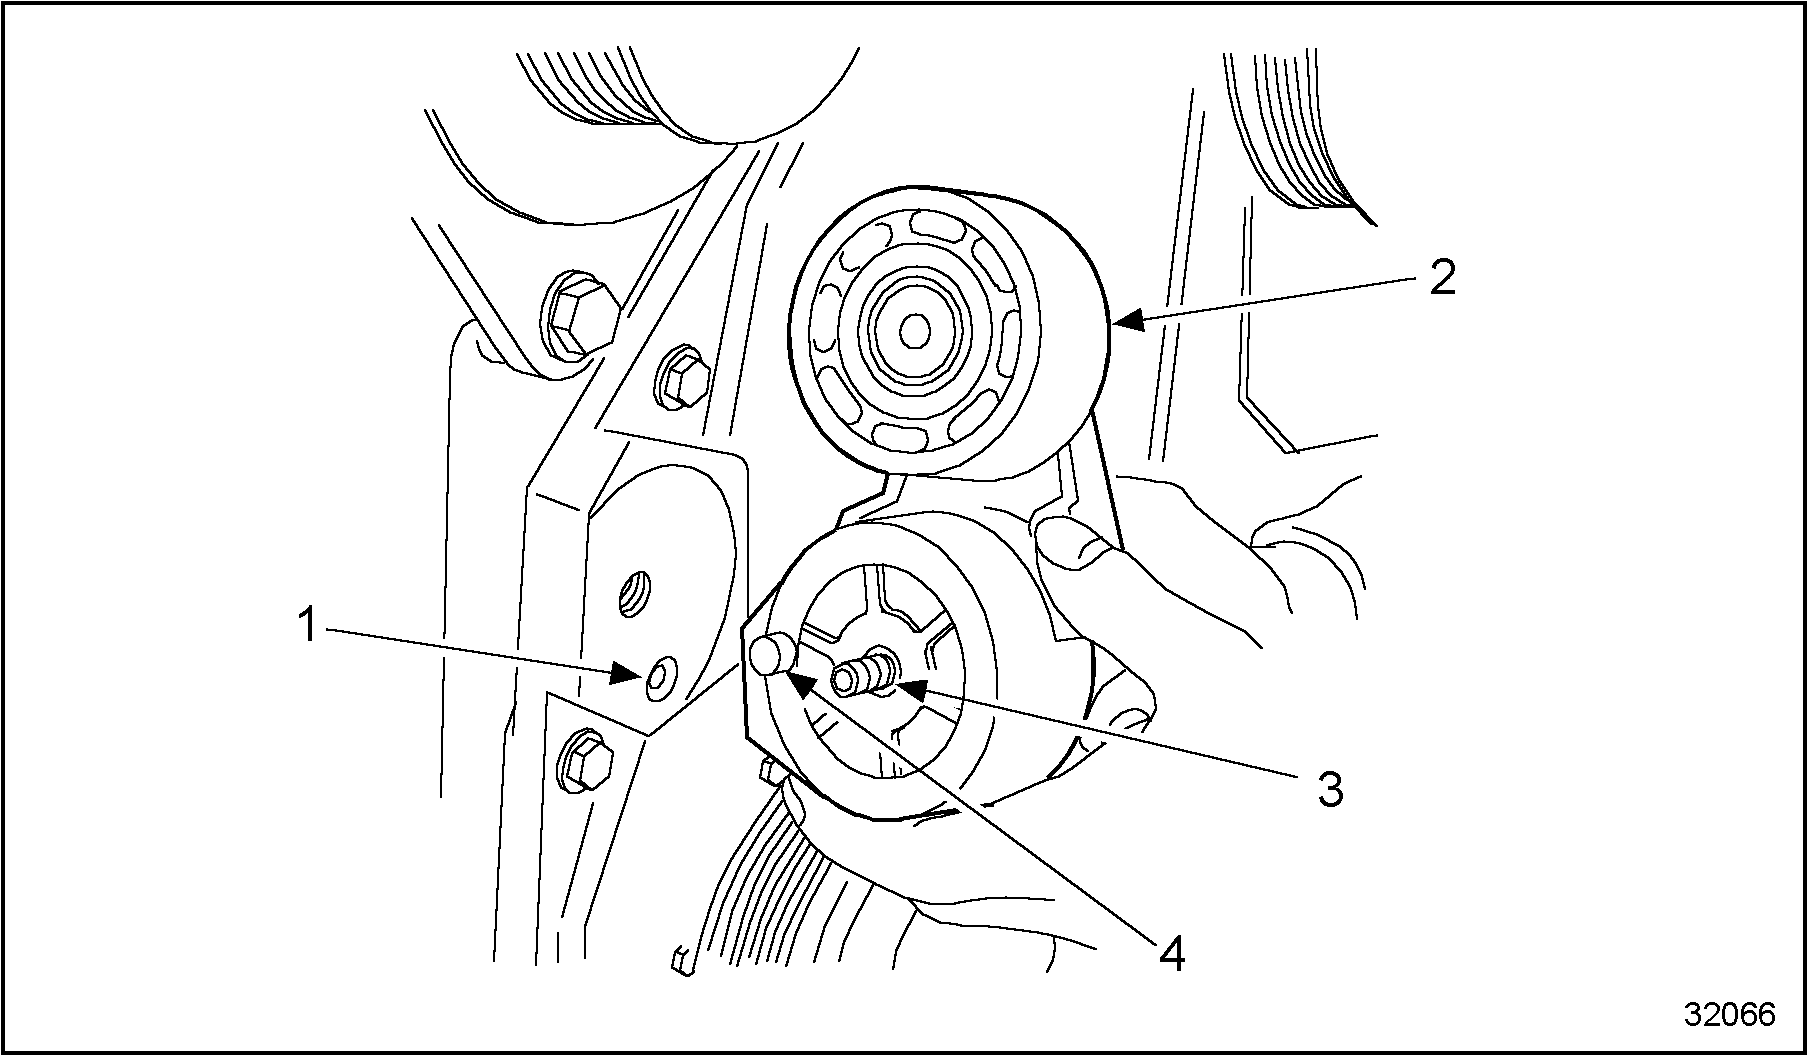
1. Recess
3. Bolt
2. Tensioner
4. Locating Pin
Figure 20. Auto Belt Tensioner
- Apply leverage to auto tensioner and feed the serpentine belt over all pulleys. See Figure "Auto Belt Tensioner" .
Section 1.21.10
Installation of Other Components
Reinstall the following components. Refer to the appropriate section for installation procedures.
- Oil pan, refer to "3.4 Oil Pan"
- Coolant filter header, if required refer to "4.6.2 Installation of Coolant Filter"
- High pressure pump, refer to "2.3.2 Fuel Pump Installation"
- Water inlet elbow, if required, refer to "4.4.2 Installation of Water Inlet Elbow"
- Oil pump assembly, refer to "3.2.2 Lubricating Oil Pump Assembly"
- Water pump and pulley, refer to "4.2.2 Installation of Water Pump"
- Front engine mounting bracket and vibration damper; refer to "1.14.2 Installation of Vibration Damper"
- CMP sensor, refer to "2.1.7 Fuel Injector Operation"
- Wiring harness, refer to "8.1.1 Removal of Wiring Harness"
- Belt, refer to "1.21.2 Removal of Front Cover, Front Half"
| Series 40E Service Manual - 6SE410 |
| Generated on 10-13-2008 |