Section 5.26
PID 110, FMI 0, Flash Code 44, Coolant Temperature High
Coolant temperature is high due to a faulty Coolant Temperature Sensor or a short.
Section 5.26.1
Troubleshooting PID 110, FMI 0, FLASH CODE 44
Troubleshoot as follows:
NOTICE: |
|
To avoid damage to the harness and connectors when disconnecting harness connectors, ensure the pulling force is applied to the connectors and not to the wires extending from the connectors. |
- Check wire 133 (yellow, coolant temperature) cavity P-3 in the Engine Sensor Harness (ESH) 30–pin connector for a short to +12V/+24V (see Figure
"Engine Sensor Harness 30–pin Connector"
). Also check pin B (coolant temperature) in the Coolant Temperature Sensor connector. If there is a short, repair or replace the wire(s), pins, and sockets.
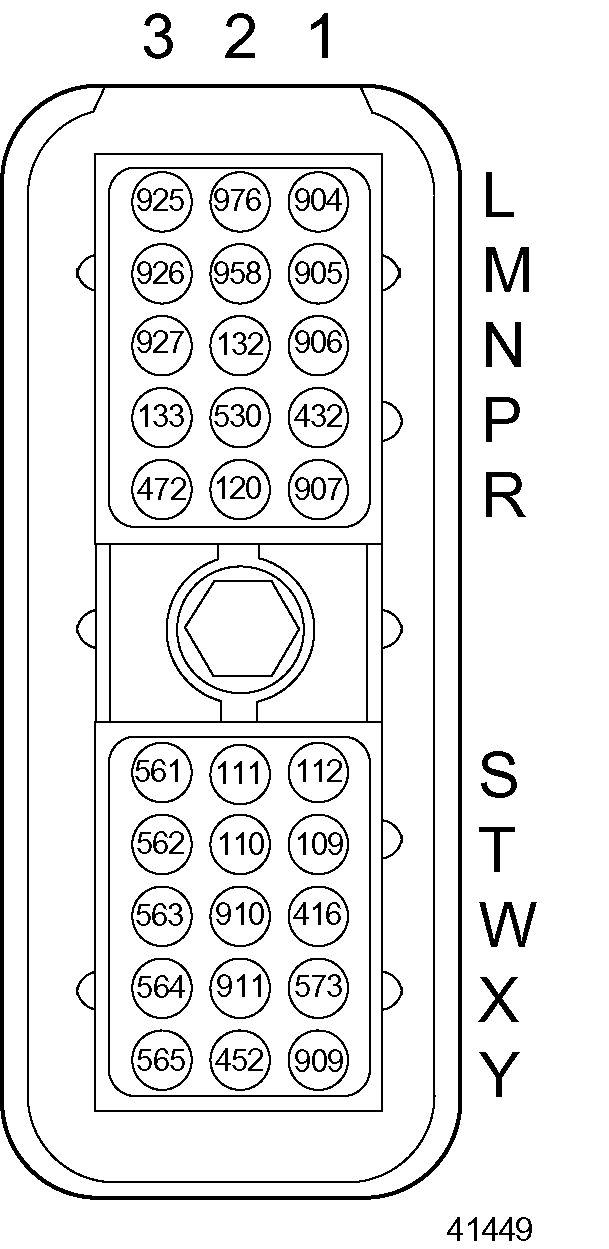
Figure 1. Engine Sensor Harness 30–pin Connector
- If the code is still active, go to step .
- If the code is not active, refer to "5.26.3 Verification" .
- Check wire 133 (yellow, coolant temperature) cavity P-3 for a short to wire 416 (gray, sensor supply voltage, 5VDC) cavity W-1 in the ESH 30–pin connector (see Figure
"Engine Sensor Harness 30–pin Connector"
). Also check pin B (coolant temperature) in the Coolant Temperature Sensor connector. If there is a short, repair or replace the wire(s), pins, and sockets.
- If the code is still active, go to step .
- If the code is not active, refer to "5.26.3 Verification" .
- Check the CTS to see if it is faulty using DDEC Sensor Tester J 37164 (see Figure
"DDEC Sensor Tester J 37164"
).

Figure 2. DDEC Sensor Tester J 37164
- Disconnect the sensor. The CTS is mounted on the right rear corner of the cylinder head, behind the turbocharger (see Figure
"Coolant Temperature Sensor Location"
).

1. Coolant Temperature Sensor
Figure 3. Coolant Temperature Sensor Location
- Remove the CTS by disengaging the locking tang on the two wire connector.
- Grasp the body of the connector and gently pull it from the socket.
- Use the appropriate wrench on the hex portion of the sensor and unscrew it from the cylinder head.
- Clip the power leads to the 12 V power source.
- Connect the sensor to the tester at the correct connector.
- Plug in a volt OHM meter. The tester will power up the sensor.
- If the sensor is faulty, replace the sensor, refer to "5.26.2 Replacing the Coolant Temperature Sensor" .
- If the sensor is not faulty, refer to "5.26.3 Verification" .
Section 5.26.2
Replacing the Coolant Temperature Sensor
The CTS is non-serviceable, and is replaced as a unit. No adjustment is required.
Replace the Coolant Temperature Sensor as follows:
- Apply Loctite pipe sealant with Teflon, PT-7260, or equivalent on all but first two threads of the replacement CTS.
- Install CTS on the cylinder head. Torque to 102-127 N·m (75-94 lb·ft).
- Carefully install the two-wire connector onto the sensor and engage the locking tang.
- If the code is still active, call Detroit Diesel Technical Service.
- If the code is no longer active, refer to "5.26.3 Verification" .
Section 5.26.3
Verification
Verify troubleshooting as follows:
- Check the DDR to see if PID 110, FMI 0, Flash Code 44 is still active.
- If the code is still active, go to step 2.
- If the code is not active, troubleshooting is complete.
- If the code is still active, call Detroit Diesel Technical Service.
| Series 50G and 60G Troubleshooting Guide - 6SE482 |
| Generated on 10-13-2008 |