Section 38.3
Troubleshooting Flash Code 38
The following procedure will troubleshoot Flash Code 38.
Section 38.3.1
Multiple Code Check
Perform the following steps to check for multiple codes.
- Turn vehicle ignition switch ON.
- Plug the diagnostic data reader (DDR) into the diagnostic data link (DDL).
- Read active codes.
- If active code 94/4 and no other codes were logged, refer to "38.3.2 Sensor Check" .
- If active code 94/4 and any or all of the following codes were logged, 94/3, 100/3 or 4, 101/3 or 4, 110/3 or 4, 174/3 or 4, 175/3 or 4, refer to "90.1 Description of Engine Sensor Harness" .
- If active code 94/4 and codes other than the following codes were logged, 94/3, 100/3 or 4, 101/3 or 4, 110/3 or 4, 174/3 or 4, 175/3 or 4, refer to "38.3.2 Sensor Check" .
Section 38.3.2
Sensor Check
Perform the following steps to check the sensor.
- Turn ignition switch OFF.
- Disconnect FPS/FRS connector and install a jumper wire between sockets B and C of the FPS/FRS harness connector. See Figure "Engine Harness Connector to Fuel Pressure Sensor" .
- Turn ignition ON.
- Read logged codes.
- If active codes 94/3 or 4 are not logged, start and run the engine until either these active codes display or engine temperature (COOLANT TEMP & OIL on DDR) has been greater than 60°C (140°F) for more than one minute.
- If active code 94/4 and any other codes are logged, refer to "38.3.4 Check for +5 Volts" .
- If active code 94/3 and any other codes except code 94/4 are logged, check to ensure ECM and FPS/FRS connectors are wired properly. Refer to "38.3.3 Check Fuel Pressure Sensor Connectors" .

Figure 1. Engine Harness Connector to Fuel Pressure Sensor
Section 38.3.3
Check Fuel Pressure Sensor Connectors
Perform the following steps to check the FPS/FRS connectors.
- Inspect terminals at the FPS/FRS connectors (both the sensor and harness side) for damage: bent, corroded, and unseated pins or sockets.
- If the terminals and connectors are damaged, repair them and refer to "38.3.12 Verify Repairs" .
- If the terminals and connectors are not damaged, replace the FPS/FRS and refer to "38.3.12 Verify Repairs" .
Section 38.3.4
Check for +5 Volts
Perform the following steps to check for +5 volts.
- Turn vehicle ignition OFF.
- Remove jumper wire.
- Turn ignition ON.
- Measure voltage on FPS/FRS harness connector, socket C to socket A. See Figure
"Engine Harness Connector to Fuel Pressure Sensor"
.
- If the voltage measurement is greater than 6 volts, refer to "38.3.9 Check for Short to Battery +" .
- If the voltage measurement is less than 4 volts, refer to "38.3.7 Check for Open +5 Volt Line" .
- If the voltage measurement is between 4 and 6 volts, refer to "38.3.5 Check for Signal Open" .
Figure 2. Engine Harness Connector to Fuel Pressure Sensor
Section 38.3.5
Check for Signal Open
Perform the following steps to check for signal open.
- Turn vehicle ignition OFF.
- Disconnect engine harness connector at the ECM.
- Install a jumper wire between pins A and B of the FPS/FRS harness connector.
- Measure resistance between sockets M1 and Y2 on the engine harness connector.
- If resistance measurement is less than or equal to 5 Ω refer to "38.3.10 Check for Short to Ground" .
- If the resistance measurement is greater than 5 Ω or open, the signal line (#905) or return line (#452) is open. Repair the open and refer to "38.3.12 Verify Repairs" .
Section 38.3.6
Check ECM Connectors
Perform the following steps to check the ECM connectors.
- Check terminals at the ECM harness connector (both ECM and harness side) for damage: bent, corroded, and unseated pins or sockets. Check W1, M1 and Y2 terminals at ECM.
- If terminals and connectors are damaged, repair them. Refer to "38.3.12 Verify Repairs" .
- If terminals and connectors are not damaged, install a test ECM. Refer to "38.3.12 Verify Repairs" .
Section 38.3.7
Check for Open +5 Volt Line
Perform the following steps to check for open +5 volt line.
- Turn vehicle ignition OFF.
- Disconnect the engine harness connectors at the ECM.
- Install a jumper wire between sockets A and C of the FPS/FRS harness connector. See Figure "Engine Harness Connector to Fuel Pressure Sensor" .
- Measure resistance between sockets W1 and Y2 on the engine harness connector.
- If resistance measurement is less than or equal to 5 Ω refer to "38.3.8 Check for Short" .
- If the resistance measurement is greater than 5 Ω or open, the engine +5 volt line (#416) is open. Repair the open and refer to "38.3.12 Verify Repairs" .
Figure 3. Engine Harness Connector to Fuel Pressure Sensor
Section 38.3.8
Check for Short
Perform the following steps to check for a short.
- Remove jumper wire.
- Measure resistance between sockets A and C of the FPS/FRS harness connector.
- If the resistance measurement is greater than 100 Ω or open, refer to "38.3.11 Replace Fuel Pressure Sensor / Fuel Restriction Sensor" .
- If the resistance measurement is less than or equal to 100 Ω, the return line (#452) is shorted to the engine +5 volt line (#416). Repair the short and refer to "38.3.12 Verify Repairs" .
Section 38.3.9
Check for Short to Battery +
Perform the following steps to check for a short to battery.
- Remove both fuses to the ECM.
- Disconnect the vehicle harness and 5-way power connectors at the ECM. See Figure "ECM Vehicle Harness Connector" .
- Measure resistance between socket W1 on the engine harness connector and socket B3 of the vehicle harness connector, and between W1 and the 5-way power harness sockets A and C.
- If the resistance measurement is greater than 1,000 Ω or open, refer to "38.3.11 Replace Fuel Pressure Sensor / Fuel Restriction Sensor" .
- If the resistance measurement is less than or equal to 1,000 Ω, a short exists between sockets where less than 1,000 Ω was measured. Repair short and reinsert fuses. Refer to "38.3.12 Verify Repairs" .

Figure 4. ECM Vehicle Harness Connector
Section 38.3.10
Check for Short to Ground
Perform the following steps to check for a short to ground.
- Turn ignition switch OFF.
- Remove jumper wires.
- Measure resistance between sockets M1 and Y2 on the engine harness connector. Also measure resistance between socket M1 and a good ground.
- If both resistance measurements are greater than 100 Ω or open, refer to "38.3.11 Replace Fuel Pressure Sensor / Fuel Restriction Sensor" .
- If either resistance measurement is less than or equal to 100 Ω, the signal line (#905) and return line (#452) are shorted together, or the signal line (#905) is shorted to battery ground. Repair the short. Refer to "38.3.12 Verify Repairs" .
Section 38.3.11
Replace Fuel Pressure Sensor / Fuel Restriction Sensor
Perform the following steps to replace the FPS/FRS.
- Turn ignition switch OFF.
- Replace FPS/FRS. See Figure "Fuel Restriction Sensor Installation" .
- Reconnect all connectors.
- Turn ignition ON.
- Clear codes.
- Start and run the engine for one minute.
- If check engine light comes on, refer to "38.3.6 Check ECM Connectors" .
- If check engine light does not come on, refer to "38.3.12 Verify Repairs" .
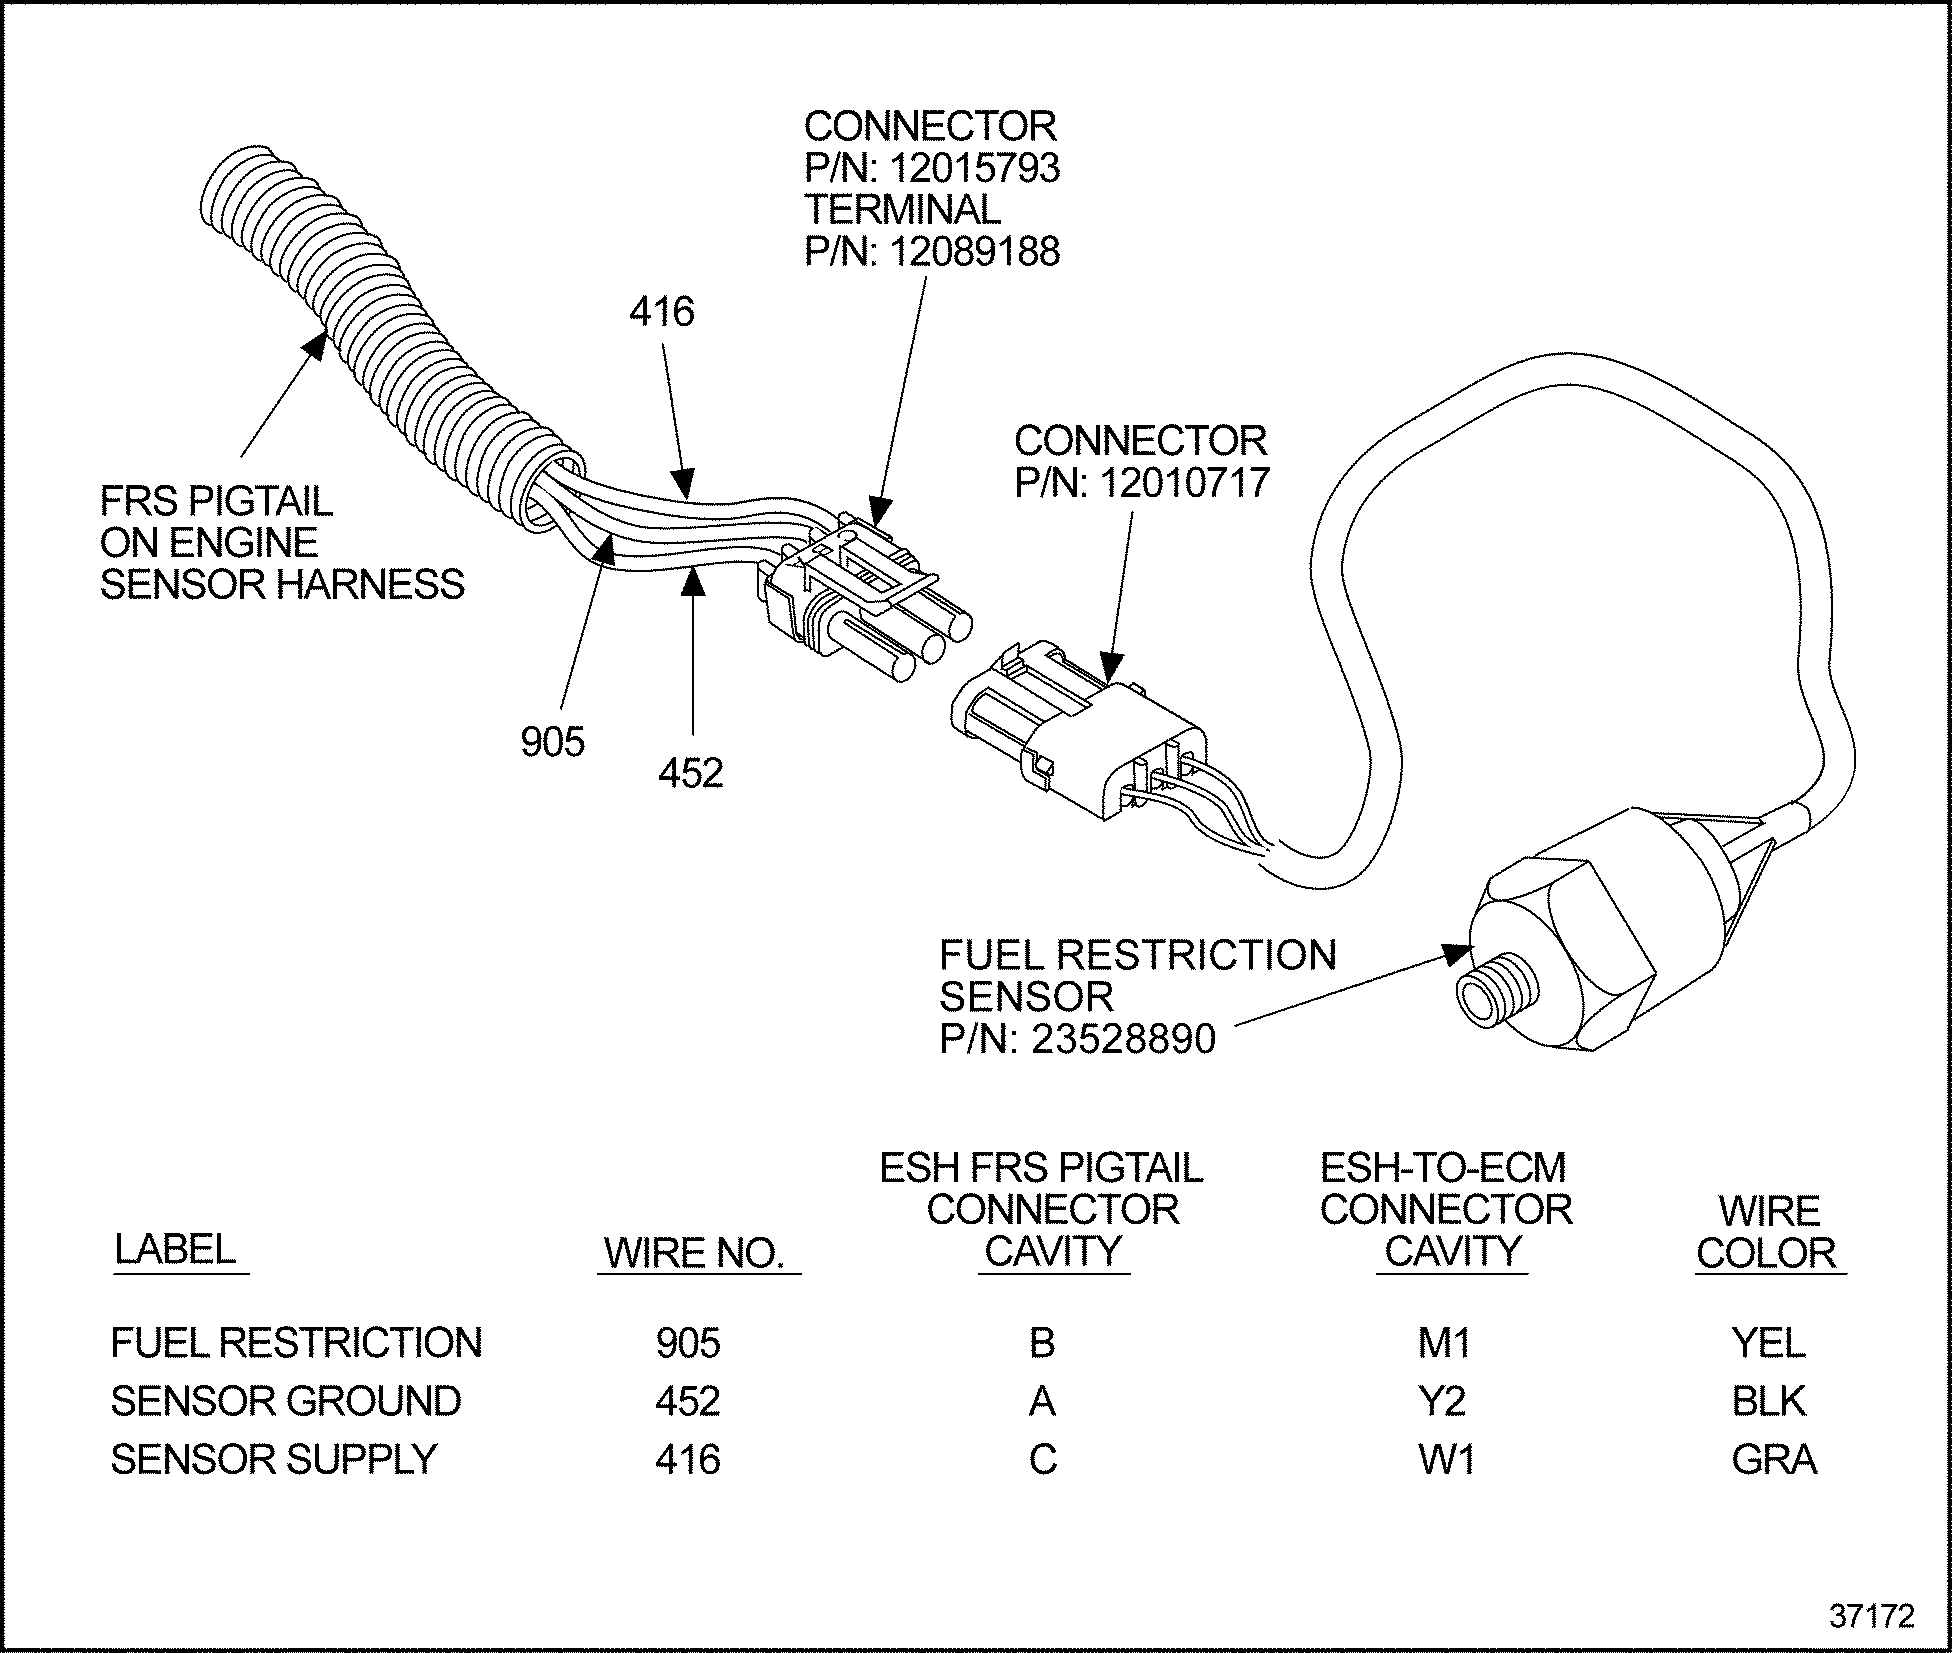
Figure 5. Fuel Restriction Sensor Installation
Section 38.3.12
Verify Repairs
Perform the following steps to verify repairs.
- Turn ignition switch OFF. Reconnect all connectors.
- Turn ignition ON. Clear codes.
- Start and run the engine for one minute. Stop engine.
- Check DDR for codes.
- If no codes are logged, troubleshooting is complete.
- If code 94/4 is not logged, and other codes are logged, refer to "9.1 First Step for Diagnosing a Fault Within the DDEC System" .
- If code 94/4 is logged, and other codes are logged, all system diagnostics are complete. Please review this section from the first step to find the error. Refer to "38.3.1 Multiple Code Check" .
| DDEC III/IV Single ECM Troubleshooting Guide - 6SE497 |
| Generated on 10-13-2008 |