Section 56.2
Troubleshooting Flash Code 54, PID 84/FMI 12
This diagnostic condition is typically an open sensor signal circuit. In a system without VSS Anti-tampering, the code is logged when the rpm >1500 and PW >15° and vehicle speed < 3 mph. With or without VSS Anti-tampering, mph will be limited if the code is logged.
Note: Code will not be logged for the first five hours of ECM/ECU life (total engine hours).
The following procedure will troubleshoot Flash Code 54.
Section 56.2.1
Check Vehicle Speed Sensor Circuit
Begin troubleshooting by taking the vehicle for a test drive with an assistant.
- View the diagnostic tool; select Vehicle Speed.
- If mph reads 0 (zero), or stays steady with the vehicle in motion, go to step 2 .
- If speed appears correct, refer to "56.2.6 Vehicle Speed Mechanical Checks" .
- Identify the speed sensor type - type one or type two.
- The type one sensor is a magnetic pickup and may be located in one of the following locations: transmission tail shaft, wheel rim, mechanical speedometer cable. If you have a type one sensor, verify with diagnostic tool signal type - magnetic. Go to step 3 .
- The type two sensor communicates with square wave input and output signals and requires the ECM/ECU to be configured correctly. If you have a type two sensor, verify with diagnostic tool signal type - switched.Refer to "56.2.7 Check for Short to Ground" .
- With ignition off, disconnect the Vehicle Interface Harness (VIH) connector.
- Measure resistance of VSS circuit across VIH connector pins, V-17 and V-18. See Figure
"VIH-to-ECM/ECU Connector"
.
- If the resistance measurement is less than 50 Ω, refer to "56.2.2 Check for Short and VSS Connectors" .
- If the resistance measurement is greater than 3,000 Ω or open, refer to "56.2.3 Check for Open" .
- If the resistance measurement is between 50 and 3,000 Ω, refer to "56.2.4 Check for Short to Ground" .
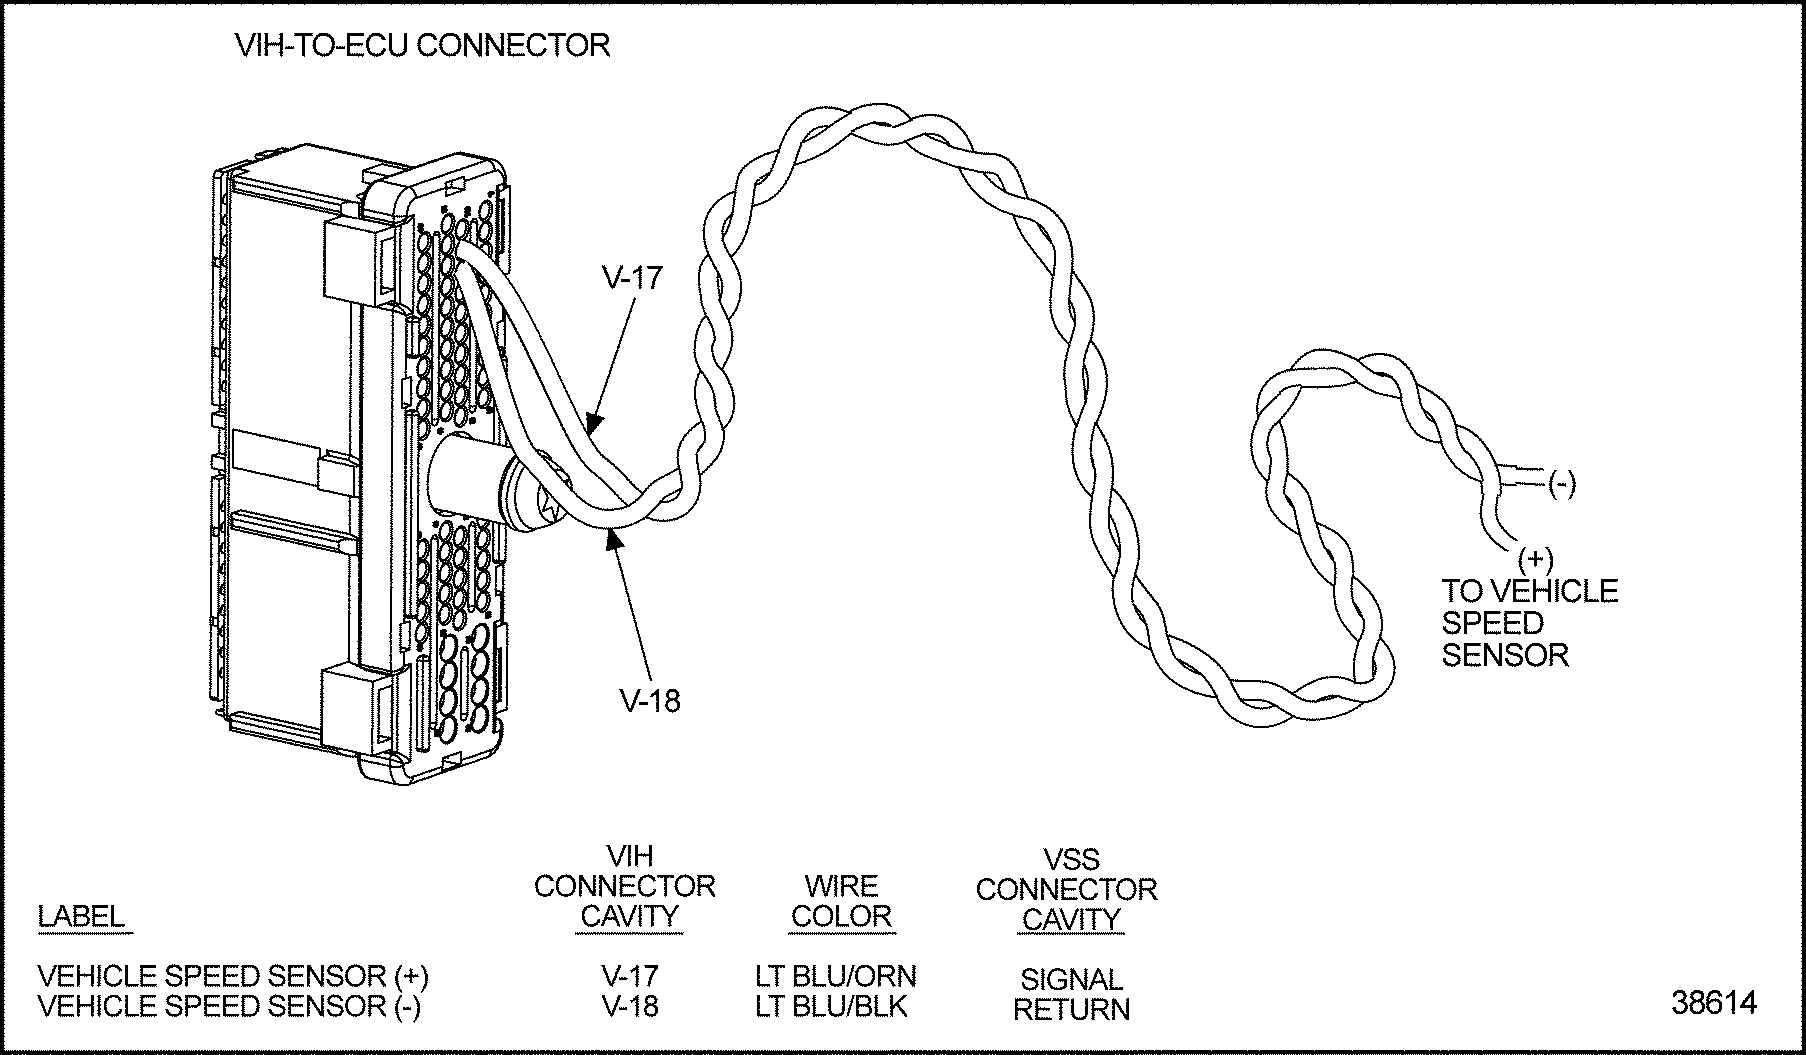
Figure 1. VIH-to-ECM/ECU Connector
Section 56.2.2
Check for Short and VSS Connectors
Perform the following steps to check for short.
- Disconnect VSS connector.
- Measure resistance between VIH connector terminals V-17 and V-18. See Figure
"VIH-to-ECM/ECU Connector"
.
- If the resistance measurement is less than or equal to 1,000 Ω, the signal wire V-17 or return wire V-18, are shorted together. Repair the short; refer to "56.2.7.1 Verify Repairs" .
- If the resistance measurement is greater than 1,000 Ω or open, go to step 3 .
- Measure resistance of VSS across Vehicle Speed Sensor connector pins. See Figure
"VIH-to-ECM/ECU Connector"
.
- If the resistance measurement is less than 50 Ω, go to step 4 .
- If the resistance measurement is greater than 3,000 Ω or open, go to step 4 .
- If the resistance measurement is between 50 and 3,000 Ω, check the terminals at the ECM/ECU VIH connector for bent, corroded, and unseated pins or sockets, on both the ECM/ECU and harness sides. If there is no damage, refer to "56.2.6 Vehicle Speed Mechanical Checks" . If there is damage, repair and refer to "56.2.7.1 Verify Repairs" .
- Check terminals at the VSS connectors (both sensor side and harness side) for bent, corroded, and unseated pins or sockets.
- If the terminals and connectors are not damaged, replace the VSS. Refer to "56.2.7.1 Verify Repairs" .
- If the terminals and connectors are damaged, repair them. Refer to "56.2.7.1 Verify Repairs" .
Section 56.2.3
Check for Open
Perform the following steps to check for open.
- Disconnect the ECM/ECU VIH connector and VSS connector.
- Install a jumper wire between sockets 1 and 2 of the VSS harness connector.
- Measure resistance between sockets V-17 and V-18 on the ECM/ECU VIH connector. See Figure
"VIH-to-ECM/ECU Connector"
.
- If the resistance measurement is less than or equal to 5 Ω, go to step 4 .
- If the resistance measurement is greater than 5 Ω or open, the VSS signal line V-17 or return line V-18 is open. Repair open and refer to "56.2.7.1 Verify Repairs" .
- Measure resistance of VSS across Vehicle Speed Sensor connector pins. See Figure
"VIH-to-ECM/ECU Connector"
.
- If the resistance measurement is less than 50 Ω, go to step 4 .
- If the resistance measurement is greater than 3,000 Ω or open, go to step 5 .
- If the resistance measurement is between 50 and 3,000 Ω, check the terminals at the ECM/ECU VIH connector for bent, corroded, and unseated pins or sockets, on both the ECM/ECU and harness sides. If there is no damage, refer to "56.2.6 Vehicle Speed Mechanical Checks" . If there is damage, repair and refer to "56.2.7.1 Verify Repairs" .
- Check terminals at the VSS connectors (both sensor side and harness side) for bent, corroded, and unseated pins or sockets.
- If the terminals and connectors are not damaged, replace the VSS. Refer to "56.2.7.1 Verify Repairs" .
- If the terminals and connectors are damaged, repair them. Refer to "56.2.7.1 Verify Repairs" .
Section 56.2.4
Check for Short to Ground
Perform the following steps to check for short to ground.
- Turn ignition OFF.
- Remove jumper wire.
- Measure resistance between sockets V-17 and V-18 and a good ground. See Figure
"VIH-to-ECM/ECU Connector"
.
- If the resistance measurement is greater than 1,000 Ω or open, refer to "56.2.5 Check for Short to Power" .
- If the resistance measurement is less than or equal to 1,000 Ω, the signal wire V-17 or return wire V-18, is shorted to ground, or wired to an unauthorized device. Repair the short; refer to "56.2.7.1 Verify Repairs" .
Section 56.2.5
Check for Short to Power
Perform the following steps to check for short to power.
- Turn ignition ON.
- Measure voltage at the ECM/ECU VIH connector between socket V-17 and a good ground. Also measure voltage between socket V-18 and a good ground. See Figure
"VIH-to-ECM/ECU Connector"
.
Figure 2. VIH-to-ECM/ECU Connector
- If both voltage measurements are less than 0.2 volts, go to step 3 .
- If either voltage measurement is greater than or equal to 0.2 volts, the VSS signal V-17 or VSS return line V-18 is shorted to the battery or some other source of voltage. Repair the short; refer to "56.2.7.1 Verify Repairs" .
- Check the terminals at the ECM/ECU VIH connector for bent, corroded, and unseated pins or sockets, on both the ECM/ECU and harness sides. See Figure
"VIH-to-ECM/ECU Connector"
.
- If the terminals and connectors are not damaged, refer to "56.2.6 Vehicle Speed Mechanical Checks" .
- If the terminals and connectors are damaged, repair them. Refer to "56.2.7.1 Verify Repairs" .
Section 56.2.6
Vehicle Speed Mechanical Checks
Perform the following vehicle speed mechanical checks.
- Check for plugged fuel filters.
- Check if any metal or debris is lodged between the VSS and the pulse wheel.
- Check if the sensor is loose.
- Ensure the VSS pulse wheel is in fixed position relative to magnetic pickup.
- Check for proper air gap between magnetic pickup and pulse wheel.
- If all mechanical checks are okay, contact the Detroit Diesel Customer Support Center (313–592–58900) for review if anti-tamper = yes.
- If all mechanical checks are not okay, repair the mechanical failure. Refer to "56.2.7.1 Verify Repairs" .
Section 56.2.7
Check for Short to Ground
Perform the following steps to check for short to ground.
- Turn ignition OFF and disconnect the ECM/ECU VIH connector.
- Measure resistance between sockets V-17 and a good ground. See Figure
"VIH-to-ECM/ECU Connector"
.
- If the resistance measurement is greater than 10,000 Ω or open, contact the component supplier for instructions. The wiring is okay, but the device may be defective. Refer to "56.2.7.1 Verify Repairs" .
- If the resistance measurement is less than or equal to 100 Ω, the VSS signal lineV-17 is shorted to ground, Repair the short; refer to "56.2.7.1 Verify Repairs" .
Section 56.2.7.1
Verify Repairs
Perform the following steps to verify repairs.
- Turn the ignition OFF.
- Reconnect all the connectors.
- Turn the ignition ON.
- Clear diagnostic tool codes.
- Perform a road test with an assistant. Ensure the vehicle is loaded.
- Stop the engine.
- Check diagnostic tool for codes.
- If no codes are logged, no further troubleshooting is required.
- If code 84/12 is not logged, and other codes are logged, refer to "18.3 First Step for Diagnosing a Fault Within the DDEC System" .
- If code 84/12 is logged, and any other codes are logged, troubleshoot the error (refer to "56.2.1 Check Vehicle Speed Sensor Circuit" and go to step 2 ) and perform tasks.
| Series 60 DDEC V Troubleshooting Guide - 6SE570 |
| Generated on 10-13-2008 |